
User Guide
Page 4
n4 N Precautions ...153 On Handling the LCD Screen ...154 On Using the Power Source ...155 On Handling Your Computer...156 On Using the Built-in MOTION EYE Camera...158 On Handling Floppy ...
n4 N Precautions ...153 On Handling the LCD Screen ...154 On Using the Power Source ...155 On Handling Your Computer...156 On Using the Built-in MOTION EYE Camera...158 On Handling Floppy ...
User Guide
Page 11
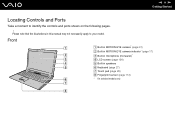
n 11 N Getting Started Locating Controls and Ports Take a moment to your model. Front A Built-in MOTION EYE camera* (page 31) B Built-in MOTION EYE camera indicator* (page 17) C Built-in microphone (monaural)* D LCD screen (page 154) E Built-in this manual may not necessarily apply to identify the controls and ports shown on the following pages. ! Please note that the illustrations in speakers F Keyboard (page 27) G Touch pad (page 29) H Fingerprint sensor (page 112) * On selected models only.
n 11 N Getting Started Locating Controls and Ports Take a moment to your model. Front A Built-in MOTION EYE camera* (page 31) B Built-in MOTION EYE camera indicator* (page 17) C Built-in microphone (monaural)* D LCD screen (page 154) E Built-in this manual may not necessarily apply to identify the controls and ports shown on the following pages. ! Please note that the illustrations in speakers F Keyboard (page 27) G Touch pad (page 29) H Fingerprint sensor (page 112) * On selected models only.
User Guide
Page 20
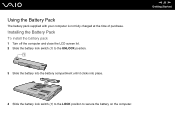
Using the Battery Pack The battery pack supplied with your computer is not fully charged at the time of purchase. Installing the Battery Pack To install the battery pack 1 Turn off the computer and close the LCD screen lid. 2 Slide the battery lock switch (1) to secure the battery on the computer. n 20 N Getting Started 4 Slide the battery lock switch (1) to the LOCK position to the UNLOCK position. 3 Slide the battery into the battery compartment until it clicks into place.
Using the Battery Pack The battery pack supplied with your computer is not fully charged at the time of purchase. Installing the Battery Pack To install the battery pack 1 Turn off the computer and close the LCD screen lid. 2 Slide the battery lock switch (1) to secure the battery on the computer. n 20 N Getting Started 4 Slide the battery lock switch (1) to the LOCK position to the UNLOCK position. 3 Slide the battery into the battery compartment until it clicks into place.

User Guide
Page 24
n 24 N Getting Started Removing the Battery Pack ! You may lose data if you remove the battery while the computer is on and not connected to the UNLOCK position. 3 Slide and hold the battery release latch (2) and slide the battery away from the computer. To remove the battery pack 1 Turn off the computer and close the LCD screen lid. 2 Slide the battery lock switch (1) to the AC adapter or if you remove the battery pack while the computer is in Standby mode.
n 24 N Getting Started Removing the Battery Pack ! You may lose data if you remove the battery while the computer is on and not connected to the UNLOCK position. 3 Slide and hold the battery release latch (2) and slide the battery away from the computer. To remove the battery pack 1 Turn off the computer and close the LCD screen lid. 2 Slide the battery lock switch (1) to the AC adapter or if you remove the battery pack while the computer is in Standby mode.
User Guide
Page 27
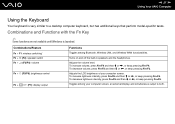
... functions are not available until Windows is very similar to a desktop computer keyboard, but has additional keys that perform model-specific tasks. n 27 N Using Your VAIO Computer Using the Keyboard Your keyboard is launched. Turns on and off the built-in speakers and the headphones.
... functions are not available until Windows is very similar to a desktop computer keyboard, but has additional keys that perform model-specific tasks. n 27 N Using Your VAIO Computer Using the Keyboard Your keyboard is launched. Turns on and off the built-in speakers and the headphones.

User Guide
Page 87
n 87 N Using Peripheral Devices Connecting a Projector You can connect a projector (for example, the Sony LCD projector) directly to your computer or via the optional docking station. To connect a projector 1 Connect the power cord (1) of the projector into an AC outlet. 2 Plug the RGB signal cable (2) into the monitor (VGA) port (3) a on the computer or on the docking station. 3 Plug the audio cable (4) (not supplied) into the headphones jack (5) i. 4 Plug the RGB signal cable and the audio cable into the jack and port on the projector (6).
n 87 N Using Peripheral Devices Connecting a Projector You can connect a projector (for example, the Sony LCD projector) directly to your computer or via the optional docking station. To connect a projector 1 Connect the power cord (1) of the projector into an AC outlet. 2 Plug the RGB signal cable (2) into the monitor (VGA) port (3) a on the computer or on the docking station. 3 Plug the audio cable (4) (not supplied) into the headphones jack (5) i. 4 Plug the RGB signal cable and the audio cable into the jack and port on the projector (6).

User Guide
Page 136
Using Normal Mode This is the normal state of the computer when it is on in use a battery as the LCD screen or the hard disk. When using battery power, you should be aware that the computer automatically enters Hibernate mode when the remaining battery charge ... can turn off a specific device such as the power source for your computer has two distinct power saving modes: Standby and Hibernate. n 136 N Customizing Your VAIO Computer Using the Power Saving Modes When you use . In addition to the normal operating mode, which allows you to conserve battery life.
Using Normal Mode This is the normal state of the computer when it is on in use a battery as the LCD screen or the hard disk. When using battery power, you should be aware that the computer automatically enters Hibernate mode when the remaining battery charge ... can turn off a specific device such as the power source for your computer has two distinct power saving modes: Standby and Hibernate. n 136 N Customizing Your VAIO Computer Using the Power Saving Modes When you use . In addition to the normal operating mode, which allows you to conserve battery life.
User Guide
Page 137
... settings. This power resuming preference will be lost if you will turn off the LCD screen and sets the hard disk and the CPU to the previous work state is in this , you can use VAIO Central to configure the computer to return to Normal mode Press any unsaved data. ...and the battery. To activate Standby mode 1 Click Start and then Turn Off Computer. 2 Click Stand By. If you open the LCD screen lid. See Setting Up Your Computer with VAIO Central (page 135). ! You will enter Standby mode. To avoid loss of Standby mode quicker than Hibernate mode. n 137 N ...
... settings. This power resuming preference will be lost if you will turn off the LCD screen and sets the hard disk and the CPU to the previous work state is in this , you can use VAIO Central to configure the computer to return to Normal mode Press any unsaved data. ...and the battery. To activate Standby mode 1 Click Start and then Turn Off Computer. 2 Click Stand By. If you open the LCD screen lid. See Setting Up Your Computer with VAIO Central (page 135). ! You will enter Standby mode. To avoid loss of Standby mode quicker than Hibernate mode. n 137 N ...
User Guide
Page 140
...; If you do not use VAIO Central to configure the computer to return to Normal mode when you remove both the AC adapter and the battery. This power resuming preference will be activated. Hibernate mode requires more time to return to be lost if you open the LCD screen lid. This power... resuming. When the computer is in Hibernate mode, you the time of time, put the computer into Hibernate mode. See Setting Up Your Computer with VAIO Central (page 135). !
...; If you do not use VAIO Central to configure the computer to return to Normal mode when you remove both the AC adapter and the battery. This power resuming preference will be activated. Hibernate mode requires more time to return to be lost if you open the LCD screen lid. This power... resuming. When the computer is in Hibernate mode, you the time of time, put the computer into Hibernate mode. See Setting Up Your Computer with VAIO Central (page 135). !

User Guide
Page 142
... power management goals, ranging from the drop-down list. 6 If you now select the VAIO Power Management tab, you can change the items in the list, for example, the LCD brightness of your computer screen. 8 Click OK. To activate a VAIO Power Management power scheme 1 Click Start and then Control Panel. 2 Click Performance and...
... power management goals, ranging from the drop-down list. 6 If you now select the VAIO Power Management tab, you can change the items in the list, for example, the LCD brightness of your computer screen. 8 Click OK. To activate a VAIO Power Management power scheme 1 Click Start and then Control Panel. 2 Click Performance and...

User Guide
Page 153
n 153 N Precautions Precautions This section describes safety guidelines and precautions to help you protect your computer from potential damage. ❑ On Handling the LCD Screen (page 154) ❑ On Using the Power Source (page 155) ❑ On Handling Your Computer (page 156) ❑ On Using the Built-in MOTION ...
n 153 N Precautions Precautions This section describes safety guidelines and precautions to help you protect your computer from potential damage. ❑ On Handling the LCD Screen (page 154) ❑ On Using the Power Source (page 155) ❑ On Handling Your Computer (page 156) ❑ On Using the Built-in MOTION ...

User Guide
Page 154
... if the same image is not a malfunction. Be careful when using high-precision technology. You may produce a residual image on the LCD screen. This could damage the screen. When the computer returns to normal temperature, the screen returns to normal. ❑ A residual ...image may appear on it. Use a soft, dry cloth to prevent residual images. ❑ The LCD screen becomes warm during operation. This is displayed for a lengthy period of the manufacturing process and does not indicate a malfunction. ❑ Avoid rubbing the...
... if the same image is not a malfunction. Be careful when using high-precision technology. You may produce a residual image on the LCD screen. This could damage the screen. When the computer returns to normal temperature, the screen returns to normal. ❑ A residual ...image may appear on it. Use a soft, dry cloth to prevent residual images. ❑ The LCD screen becomes warm during operation. This is displayed for a lengthy period of the manufacturing process and does not indicate a malfunction. ❑ Avoid rubbing the...

User Guide
Page 178
... computer can handle. Clean the lens. Check the CPU performance. See On Using the Built-in MOTION EYE camera. ❑ The video memory of the LCD screen might help file on your computer. If another software application is normal and does not indicate a malfunction. ❑ If the problem persists, restart your...
... computer can handle. Clean the lens. Check the CPU performance. See On Using the Built-in MOTION EYE camera. ❑ The video memory of the LCD screen might help file on your computer. If another software application is normal and does not indicate a malfunction. ❑ If the problem persists, restart your...

User Guide
Page 195
... the power is on. ❑ If your computer screen. If the computer is securely plugged into a power source and turned on your computer is in LCD (Video) Standby mode, press any key to the computer screen, and then restart video playback. See Combinations and Functions with the Fn Key (page 27...
... the power is on. ❑ If your computer screen. If the computer is securely plugged into a power source and turned on your computer is in LCD (Video) Standby mode, press any key to the computer screen, and then restart video playback. See Combinations and Functions with the Fn Key (page 27...

User Guide
Page 196
...rights on your computer screen remains unchanged regardless of my computer screen changes? To save this adjustment is overridden by the setting on the VAIO Power Management tab when another power scheme is saved and the brightness of your computer. 1 Click Start and then Control Panel. 2 ... tab for power scheme settings. 5 Select the desired power scheme from the drop-down list. 6 On the VAIO Power Management tab, select No change for the brightness ✍ To do if the LCD brightness of operating conditions. The LCD brightness setting, adjusted with the Fn+F5/F6 keys is selected.
...rights on your computer screen remains unchanged regardless of my computer screen changes? To save this adjustment is overridden by the setting on the VAIO Power Management tab when another power scheme is saved and the brightness of your computer. 1 Click Start and then Control Panel. 2 ... tab for power scheme settings. 5 Select the desired power scheme from the drop-down list. 6 On the VAIO Power Management tab, select No change for the brightness ✍ To do if the LCD brightness of operating conditions. The LCD brightness setting, adjusted with the Fn+F5/F6 keys is selected.


