User Guide
Page 9
...Microsoft and Sony. ❑ VAIO Sites Contains links to other VAIO documents, and system and software information for your computer. ❑ VAIO Support Access interactive help in the form of VAIO tutorials, an escalation page containing support and contact information, and various links to VAIO online ... Recovery Find information on -screen User Guide, warranty information, other Internet sites you need. Run utilities that include VAIO Media Setup and Windows Network and Sharing, and access to wireless tutorials. ❑ Security Keep your data safe and your computer running ...
...Microsoft and Sony. ❑ VAIO Sites Contains links to other VAIO documents, and system and software information for your computer. ❑ VAIO Support Access interactive help in the form of VAIO tutorials, an escalation page containing support and contact information, and various links to VAIO online ... Recovery Find information on -screen User Guide, warranty information, other Internet sites you need. Run utilities that include VAIO Media Setup and Windows Network and Sharing, and access to wireless tutorials. ❑ Security Keep your data safe and your computer running ...
User Guide
Page 11
... external display - Use indirect lighting to avoid bright spots on the display. Make sure the display screen is at a comfortable viewing distance. Choose a location where windows and lights do not create glare and reflection on the display. Proper lighting adds to find the best position. When using an external display, set...
... external display - Use indirect lighting to avoid bright spots on the display. Make sure the display screen is at a comfortable viewing distance. Choose a location where windows and lights do not create glare and reflection on the display. Proper lighting adds to find the best position. When using an external display, set...
User Guide
Page 29
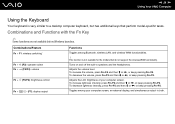
...-in speakers and the headphones. Combinations and Functions with the Fn Key ✍ Some functions are not available before Windows launches. To decrease the volume, press Fn+F3 and then m or n 29 N Using Your VAIO Computer Using the Keyboard Your keyboard is not available for the models that perform model-specific tasks.
...-in speakers and the headphones. Combinations and Functions with the Fn Key ✍ Some functions are not available before Windows launches. To decrease the volume, press Fn+F3 and then m or n 29 N Using Your VAIO Computer Using the Keyboard Your keyboard is not available for the models that perform model-specific tasks.
User Guide
Page 30
... the peripheral devices are written to the external display disables the function and restores the standard view. Provides for the lowest level of software windows may not work with a higher resolution. When your computer's screen view. ✍ The magnified view is not as clear as the standard..., as it is turned off. Combinations/Feature Fn + (F10): zoom Fn + (F12): Hibernate * On selected models only. n 30 N Using Your VAIO Computer Functions Changes the screen resolution to magnify/restore your computer's screen view is magnified, switching the view to the hard disk and the system...
... the peripheral devices are written to the external display disables the function and restores the standard view. Provides for the lowest level of software windows may not work with a higher resolution. When your computer's screen view. ✍ The magnified view is not as clear as the standard..., as it is turned off. Combinations/Feature Fn + (F10): zoom Fn + (F12): Hibernate * On selected models only. n 30 N Using Your VAIO Computer Functions Changes the screen resolution to magnify/restore your computer's screen view is magnified, switching the view to the hard disk and the system...

User Guide
Page 32
You can change these button assignments on and off and the S2 button lowers the CPU speed to help you use specific functions of the computer. To display this window, press and hold either button or launch and navigate through VAIO Central. Special-function button S1/S2 buttons Functions By default, the S1 button turns the volume on the window for changing the S button assignments. n 32 N Using Your VAIO Computer Using Special-function Buttons Your computer is equipped with special buttons to reduce the fan noise.
You can change these button assignments on and off and the S2 button lowers the CPU speed to help you use specific functions of the computer. To display this window, press and hold either button or launch and navigate through VAIO Central. Special-function button S1/S2 buttons Functions By default, the S1 button turns the volume on the window for changing the S button assignments. n 32 N Using Your VAIO Computer Using Special-function Buttons Your computer is equipped with special buttons to reduce the fan noise.

User Guide
Page 33
The viewer window may be shared by more than one software application. This is activated before using such software. Note that the camera is normal and does not ... activate or deactivate the built-in MOTION EYE camera, respectively. See the online Specifications to instant messaging software and video editing software. n 33 N Using Your VAIO Computer Using the Built-in MOTION EYE Camera Your computer may show some noises, for a video conference using the built-in MOTION EYE camera. ! Make...
The viewer window may be shared by more than one software application. This is activated before using such software. Note that the camera is normal and does not ... activate or deactivate the built-in MOTION EYE camera, respectively. See the online Specifications to instant messaging software and video editing software. n 33 N Using Your VAIO Computer Using the Built-in MOTION EYE Camera Your computer may show some noises, for a video conference using the built-in MOTION EYE camera. ! Make...
User Guide
Page 42
... contains the file(s) you want to copy and drag them to play an audio CD 1 Insert a disc into the optical disc drive. If the AutoPlay window appears, click Burn files to disc and follow the on the desktop, then click Start, All Programs, and the desired CD software to the empty...
... contains the file(s) you want to copy and drag them to play an audio CD 1 Insert a disc into the optical disc drive. If the AutoPlay window appears, click Burn files to disc and follow the on the desktop, then click Start, All Programs, and the desired CD software to the empty...
User Guide
Page 46
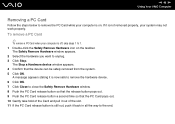
... 11 If the PC Card release button is now safe to remove the hardware device. 6 Click OK. 7 Click Close to close the Safely Remove Hardware window. 8 Push the PC Card release button so that the release button pops out. 9 Push the PC Card release button a second time so that the ...device can be safely removed from the system. 5 Click OK. The Safely Remove Hardware window appears. 2 Select the hardware you want to the end. n 46 N Using Your VAIO Computer Removing a PC Card Follow the steps below to 7. 1 Double-click the Safely Remove Hardware icon on . To ...
... 11 If the PC Card release button is now safe to remove the hardware device. 6 Click OK. 7 Click Close to close the Safely Remove Hardware window. 8 Push the PC Card release button so that the release button pops out. 9 Push the PC Card release button a second time so that the ...device can be safely removed from the system. 5 Click OK. The Safely Remove Hardware window appears. 2 Select the hardware you want to the end. n 46 N Using Your VAIO Computer Removing a PC Card Follow the steps below to 7. 1 Double-click the Safely Remove Hardware icon on . To ...
User Guide
Page 50
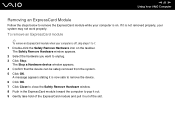
... 1 Double-click the Safely Remove Hardware icon on . The Safely Remove Hardware window appears. 2 Select the hardware you want to pop it out. 9 Gently take hold of the slot. n 50 N Using Your VAIO Computer Removing an ExpressCard Module Follow the steps below to remove the ExpressCard module while... your computer is on the taskbar. The Stop a Hardware device window appears. 4 Confirm that the device can be safely removed from the ...
... 1 Double-click the Safely Remove Hardware icon on . The Safely Remove Hardware window appears. 2 Select the hardware you want to pop it out. 9 Gently take hold of the slot. n 50 N Using Your VAIO Computer Removing an ExpressCard Module Follow the steps below to remove the ExpressCard module while... your computer is on the taskbar. The Stop a Hardware device window appears. 4 Confirm that the device can be safely removed from the ...

User Guide
Page 52
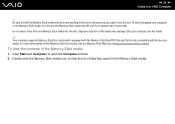
n 52 N Using Your VAIO Computer Inserting a Memory Stick Media There are two ways you need the supplied memory card adapter. The Memory Stick media is automatically detected by your ... pointing toward the Memory Stick Duo/PRO Duo media slot. 2 Carefully slide the Memory Stick media into the slot until it clicks into your Computer window as a local drive, under the appropriate letter (depending on the configuration of the computer).
n 52 N Using Your VAIO Computer Inserting a Memory Stick Media There are two ways you need the supplied memory card adapter. The Memory Stick media is automatically detected by your ... pointing toward the Memory Stick Duo/PRO Duo media slot. 2 Carefully slide the Memory Stick media into the slot until it clicks into your Computer window as a local drive, under the appropriate letter (depending on the configuration of the computer).
User Guide
Page 53
... into the slot if you insert it smoothly. To view the contents of the Memory Stick media 1 Click Start and Computer to open the Computer window. 2 Double-click the Memory Stick media icon to hold the Memory Stick media with the duo-size media. n 53 N Using Your... VAIO Computer ! Be sure to view the list of the media may damage both your computer or the Memory Stick media, do not force the Memory ...
... into the slot if you insert it smoothly. To view the contents of the Memory Stick media 1 Click Start and Computer to open the Computer window. 2 Double-click the Memory Stick media icon to hold the Memory Stick media with the duo-size media. n 53 N Using Your... VAIO Computer ! Be sure to view the list of the media may damage both your computer or the Memory Stick media, do not force the Memory ...
User Guide
Page 54
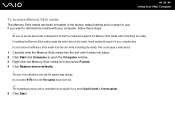
... list. ✍ The formatting process will be completed more quickly if you want to open the Computer window. 3 Right-click the Memory Stick media icon and select Format. 4 Click Restore device defaults. ! n 54 N Using Your VAIO Computer To format a Memory Stick media The Memory Stick media has been formatted in Format options...
... list. ✍ The formatting process will be completed more quickly if you want to open the Computer window. 3 Right-click the Memory Stick media icon and select Format. 4 Click Restore device defaults. ! n 54 N Using Your VAIO Computer To format a Memory Stick media The Memory Stick media has been formatted in Format options...
User Guide
Page 60
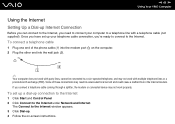
n 60 N Using Your VAIO Computer Using the Internet Setting Up a Dial-up Internet Connection Before you can connect to the Internet, you 're ready to connect to the Internet. ... not work with party lines, cannot be connected to a telephone line with multiple telephone lines or a private branch exchange (PBX). The Connect to the Internet window appears. 3 Click Dial-up your telephone cable connection, you need to connect your computer to a coin-operated telephone, and may not work with a telephone cable...
n 60 N Using Your VAIO Computer Using the Internet Setting Up a Dial-up Internet Connection Before you can connect to the Internet, you 're ready to connect to the Internet. ... not work with party lines, cannot be connected to a telephone line with multiple telephone lines or a private branch exchange (PBX). The Connect to the Internet window appears. 3 Click Dial-up your telephone cable connection, you need to connect your computer to a coin-operated telephone, and may not work with a telephone cable...
User Guide
Page 65
... the IEEE 802.11a standard, on ad-hoc networks. 1 Turn on -screen instructions. * See the online Specifications to display the Wireless Device Switch window. Select your model supports the Bluetooth functionality and/or the IEEE 802.11a/b/g standard. The Set up a connection or network... window appears. 5 Select an option to specify the ad-hoc network settings and click Next. 6 Follow the on the WIRELESS or WIRELESS LAN switch. n 65 N Using Your VAIO Computer To communicate without an access point (ad-hoc) !
... the IEEE 802.11a standard, on ad-hoc networks. 1 Turn on -screen instructions. * See the online Specifications to display the Wireless Device Switch window. Select your model supports the Bluetooth functionality and/or the IEEE 802.11a/b/g standard. The Set up a connection or network... window appears. 5 Select an option to specify the ad-hoc network settings and click Next. 6 Follow the on the WIRELESS or WIRELESS LAN switch. n 65 N Using Your VAIO Computer To communicate without an access point (ad-hoc) !

User Guide
Page 67
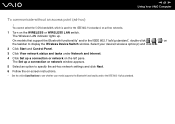
n 67 N Using Your VAIO Computer To connect to display the Wireless Device Switch window. See the manual that support the Bluetooth functionality* and/or the IEEE 802.11a/b/g standard*, double-click ( / ) on the taskbar to a wireless network 1 Make sure ...
n 67 N Using Your VAIO Computer To connect to display the Wireless Device Switch window. See the manual that support the Bluetooth functionality* and/or the IEEE 802.11a/b/g standard*, double-click ( / ) on the taskbar to a wireless network 1 Make sure ...

User Guide
Page 68
n 68 N Using Your VAIO Computer Using the Bluetooth Functionality The Bluetooth functionality is available on how to display the Wireless Device Switch window. 3 Select the Enable Bluetooth Device option. 4 Click OK. You can establish wireless communication between these devices without cables and up to see the SmartWi Connection ...
n 68 N Using Your VAIO Computer Using the Bluetooth Functionality The Bluetooth functionality is available on how to display the Wireless Device Switch window. 3 Select the Enable Bluetooth Device option. 4 Click OK. You can establish wireless communication between these devices without cables and up to see the SmartWi Connection ...
User Guide
Page 73
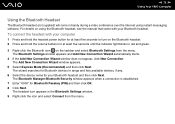
... Wizard automatically starts. 4 If the Add New Connection Wizard window does not appear, click New Connection. The Add New Connection Wizard window appears. 5 Select Express Mode (Recommended) and then click Next. The Bluetooth Manager-Bluetooth Security window appears when a connection is established. 7 Enter "0000" ... instant messaging software. The wizard searches for Bluetooth Passkey (PIN) and then click OK. 8 Click Next. n 73 N Using Your VAIO Computer Using the Bluetooth Headset The Bluetooth headset (not supplied) will come in red and green. 3 Right-click the Bluetooth icon on the...
... Wizard automatically starts. 4 If the Add New Connection Wizard window does not appear, click New Connection. The Add New Connection Wizard window appears. 5 Select Express Mode (Recommended) and then click Next. The Bluetooth Manager-Bluetooth Security window appears when a connection is established. 7 Enter "0000" ... instant messaging software. The wizard searches for Bluetooth Passkey (PIN) and then click OK. 8 Click Next. n 73 N Using Your VAIO Computer Using the Bluetooth Headset The Bluetooth headset (not supplied) will come in red and green. 3 Right-click the Bluetooth icon on the...
User Guide
Page 74
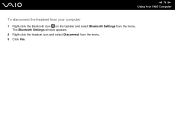
The Bluetooth Settings window appears. 2 Right-click the headset icon and select Disconnect from the menu. n 74 N Using Your VAIO Computer To disconnect the headset from your computer 1 Right-click the Bluetooth icon on the taskbar and select Bluetooth Settings from the menu. 3 Click Yes.
The Bluetooth Settings window appears. 2 Right-click the headset icon and select Disconnect from the menu. n 74 N Using Your VAIO Computer To disconnect the headset from your computer 1 Right-click the Bluetooth icon on the taskbar and select Bluetooth Settings from the menu. 3 Click Yes.
User Guide
Page 86
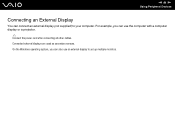
Connected external displays are used as secondary screens. n 86 N Using Peripheral Devices Connecting an External Display You can connect an external display (not supplied) to set up multiple monitors. For example, you can use an external display to your computer. On the Windows operating system, you can also use the computer with a computer display or a projector. ✍ Connect the power cord after connecting all other cables.
Connected external displays are used as secondary screens. n 86 N Using Peripheral Devices Connecting an External Display You can connect an external display (not supplied) to set up multiple monitors. For example, you can use an external display to your computer. On the Windows operating system, you can also use the computer with a computer display or a projector. ✍ Connect the power cord after connecting all other cables.
User Guide
Page 91
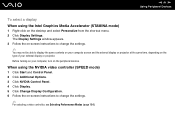
... the Intel Graphics Media Accelerator (STAMINA mode) 1 Right-click on the desktop and select Personalize from the shortcut menu. 2 Click Display Settings. The Display Settings window appears. 3 Follow the on-screen instructions to change the settings. ✍ You may not be able to change the settings. ✍ For selecting a video controller...
... the Intel Graphics Media Accelerator (STAMINA mode) 1 Right-click on the desktop and select Personalize from the shortcut menu. 2 Click Display Settings. The Display Settings window appears. 3 Follow the on-screen instructions to change the settings. ✍ You may not be able to change the settings. ✍ For selecting a video controller...


