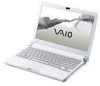

User Guide
Page 3
... Function ...70 Using Peripheral Devices...75 Using the Noise Canceling Headphones ...76 Connecting a Docking Station...82 Connecting an Optical Disc Drive ...90 Connecting External Speakers ...92 Connecting an External Display ...93 Selecting Display Modes...101 Using the Multiple Monitors Function ...102 ...Connecting a Universal Serial Bus (USB) Device...105 Connecting a Printer ...108 Connecting an i.LINK Device ...109 Customizing Your VAIO Computer ...111 Setting the Password ...112 Using Fingerprint Authentication ...124 Using the Trusted Platform Module (TPM)...132 Setting Up Your Computer...
... Function ...70 Using Peripheral Devices...75 Using the Noise Canceling Headphones ...76 Connecting a Docking Station...82 Connecting an Optical Disc Drive ...90 Connecting External Speakers ...92 Connecting an External Display ...93 Selecting Display Modes...101 Using the Multiple Monitors Function ...102 ...Connecting a Universal Serial Bus (USB) Device...105 Connecting a Printer ...108 Connecting an i.LINK Device ...109 Customizing Your VAIO Computer ...111 Setting the Password ...112 Using Fingerprint Authentication ...124 Using the Trusted Platform Module (TPM)...132 Setting Up Your Computer...

User Guide
Page 14
... up your computer with only the supplied accessories connected and set up your system. Before starting your VAIO computer. ! Be sure to get started with using your computer for example, a printer, an external hard disk drive, a scanner, and so on) at a time, following the manufacturers' instructions. ❑ Locating Controls and Ports (page 15...
... up your computer with only the supplied accessories connected and set up your system. Before starting your VAIO computer. ! Be sure to get started with using your computer for example, a printer, an external hard disk drive, a scanner, and so on) at a time, following the manufacturers' instructions. ❑ Locating Controls and Ports (page 15...
User Guide
Page 16
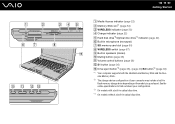
...Getting Started A Media Access indicator (page 22) B Memory Stick slot*1 (page 54) C WIRELESS indicator (page 22) D Charge indicator (page 22) E Hard disk drive*2/Optical disc drive*3 indicator (page 22) F Built-in microphone (monaural) G SD memory card slot (page 60) H WIRELESS switch (page 67) I Built-in speakers (...stereo) J Muting button (page 36) K Volume control buttons (page 36) L S1 button (page 36) M Drive eject button*3 (page 36), (page 40)/S2 button*4 (page 36) *1 Your computer supports both the standard-size Memory Stick and the Duosize Memory Stick....
...Getting Started A Media Access indicator (page 22) B Memory Stick slot*1 (page 54) C WIRELESS indicator (page 22) D Charge indicator (page 22) E Hard disk drive*2/Optical disc drive*3 indicator (page 22) F Built-in microphone (monaural) G SD memory card slot (page 60) H WIRELESS switch (page 67) I Built-in speakers (...stereo) J Muting button (page 36) K Volume control buttons (page 36) L S1 button (page 36) M Drive eject button*3 (page 36), (page 40)/S2 button*4 (page 36) *1 Your computer supports both the standard-size Memory Stick and the Duosize Memory Stick....

User Guide
Page 22
... 1 Illuminates in green when the computer is on, blinks slowly in orange while the computer is in Hibernate mode. Hard disk drive*2 /Optical disc drive*1 Illuminates while the drive is unlit. Do not place the computer into Sleep mode or turn it off when this indicator is lit.) When ...the Battery Pack (page 27) for more information. Built-in MOTION EYE camera*1 Illuminates while the built-in use. Optical disc drive*1 Illuminates while the drive is in MOTION EYE camera is reading or writing data. When the indicator is unlit, the optical disc media is lit. Caps...
... 1 Illuminates in green when the computer is on, blinks slowly in orange while the computer is in Hibernate mode. Hard disk drive*2 /Optical disc drive*1 Illuminates while the drive is unlit. Do not place the computer into Sleep mode or turn it off when this indicator is lit.) When ...the Battery Pack (page 27) for more information. Built-in MOTION EYE camera*1 Illuminates while the built-in use. Optical disc drive*1 Illuminates while the drive is in MOTION EYE camera is reading or writing data. When the indicator is unlit, the optical disc media is lit. Caps...
User Guide
Page 119
...and press the F2 key several times when the VAIO logo appears. ✍ If you have set the power-on password, enter your computer is equipped with both the built-in flash memory storage device and the built-in hard disk drive, select Hard Disk 1 Password for the flash memory storage ...device or select Hard Disk 2 Password for the hard disk drive. 4 Select Enter Master and User Passwords and press the Enter key. 5 Select Continue ...
...and press the F2 key several times when the VAIO logo appears. ✍ If you have set the power-on password, enter your computer is equipped with both the built-in flash memory storage device and the built-in hard disk drive, select Hard Disk 1 Password for the flash memory storage ...device or select Hard Disk 2 Password for the hard disk drive. 4 Select Enter Master and User Passwords and press the Enter key. 5 Select Continue ...
User Guide
Page 120
...set the power-on the computer. 2 Press the F2 key when the VAIO logo appears. n 120 N Customizing Your VAIO Computer Changing/Removing the Hard Disk Password To change the hard disk password 1 Turn on password, enter your computer is equipped with both... the built-in flash memory storage device and the built-in flash hard disk drive, select Hard Disk 1 Password for the memory storage device or select Hard Disk 2 Password for the hard disk drive...
...set the power-on the computer. 2 Press the F2 key when the VAIO logo appears. n 120 N Customizing Your VAIO Computer Changing/Removing the Hard Disk Password To change the hard disk password 1 Turn on password, enter your computer is equipped with both... the built-in flash memory storage device and the built-in flash hard disk drive, select Hard Disk 1 Password for the memory storage device or select Hard Disk 2 Password for the hard disk drive...
User Guide
Page 121
.... 3 Press the < or , key to select Security to select Exit Setup and press the Enter key. n 121 N Customizing Your VAIO Computer To remove the hard disk password 1 Turn on password, enter your computer is equipped with both the built-in flash memory storage device and the built-in... flash hard disk drive, select Hard Disk 1 Password for the memory storage device or select Hard Disk 2 Password for the hard disk drive. 4 Select Enter Master and User Passwords and press the Enter key. 5 Enter the current...
.... 3 Press the < or , key to select Security to select Exit Setup and press the Enter key. n 121 N Customizing Your VAIO Computer To remove the hard disk password 1 Turn on password, enter your computer is equipped with both the built-in flash memory storage device and the built-in... flash hard disk drive, select Hard Disk 1 Password for the memory storage device or select Hard Disk 2 Password for the hard disk drive. 4 Select Enter Master and User Passwords and press the Enter key. 5 Enter the current...

User Guide
Page 140
...press the Enter key. 10 Follow the instructions in Windows Help and Support to enable BitLocker Drive Encryption. 11 Save the recovery password to the USB flash memory device in the BIOS setup...needs to access the USB flash memory device when you boot the computer. n 140 N Customizing Your VAIO Computer To unlock the encrypted data with a recovery key stored on a USB flash memory device To ...the Enter key. 5 Press the < or , key to change the boot device order so that Internal Hard Disk is listed higher than External Device. ! The BIOS setup screen appears. Follow these steps to configure ...
...press the Enter key. 10 Follow the instructions in Windows Help and Support to enable BitLocker Drive Encryption. 11 Save the recovery password to the USB flash memory device in the BIOS setup...needs to access the USB flash memory device when you boot the computer. n 140 N Customizing Your VAIO Computer To unlock the encrypted data with a recovery key stored on a USB flash memory device To ...the Enter key. 5 Press the < or , key to change the boot device order so that Internal Hard Disk is listed higher than External Device. ! The BIOS setup screen appears. Follow these steps to configure ...

User Guide
Page 150
...memory storage device is not included in hard disk drive, then it has the VAIO HDD Protection utility preinstalled for customizing your settings for protecting your hard disk drive against shock hazards, you must first activate the VAIO HDD Protection. For more information, ... software. ! To activate VAIO HDD Protection 1 Click Start, All Programs, and VAIO Control Center. 2 Click Security and Hard Disk Drive Protection Settings. 3 Select the Activate hard disk drive protection check box. 4 Select one of the VAIO HDD Protection utility. Hard disk drive protection is disabled before Windows...
...memory storage device is not included in hard disk drive, then it has the VAIO HDD Protection utility preinstalled for customizing your settings for protecting your hard disk drive against shock hazards, you must first activate the VAIO HDD Protection. For more information, ... software. ! To activate VAIO HDD Protection 1 Click Start, All Programs, and VAIO Control Center. 2 Click Security and Hard Disk Drive Protection Settings. 3 Select the Activate hard disk drive protection check box. 4 Select one of the VAIO HDD Protection utility. Hard disk drive protection is disabled before Windows...
User Guide
Page 172
...mechanical vibration or in an unstable position. ❑ Do not move your computer while the power is damaged, the data cannot be restored. The hard disk drive has a high storage density and reads or writes data in a short time. However, it can be careful when handling your computer in a... place subject to models with the hard disk drive. Although the hard disk drive has the internal safety device to prevent losing data due to find out whether your model is equipped with a built-in temperature. ...
...mechanical vibration or in an unstable position. ❑ Do not move your computer while the power is damaged, the data cannot be restored. The hard disk drive has a high storage density and reads or writes data in a short time. However, it can be careful when handling your computer in a... place subject to models with the hard disk drive. Although the hard disk drive has the internal safety device to prevent losing data due to find out whether your model is equipped with a built-in temperature. ...
User Guide
Page 215
See Connecting an i.LINK Device (page 109) for more information. ✍ i.LINK is a trademark of Sony Corporation used only to your computer or camcorder. The procedure to cancel the Play Windows Startup sound check box. 5 Click OK. How do if ... all products with an i.LINK connection can communicate with your compatible i.LINK device for more information on your system, such as a CD-RW or hard disk drive, confirm their operating system compatibility and required operating conditions. If a message appears stating that a product contains an IEEE 1394 connection. See the manual ...
See Connecting an i.LINK Device (page 109) for more information. ✍ i.LINK is a trademark of Sony Corporation used only to your computer or camcorder. The procedure to cancel the Play Windows Startup sound check box. 5 Click OK. How do if ... all products with an i.LINK connection can communicate with your compatible i.LINK device for more information on your system, such as a CD-RW or hard disk drive, confirm their operating system compatibility and required operating conditions. If a message appears stating that a product contains an IEEE 1394 connection. See the manual ...
User Guide
Page 216
..., the i.LINK cable may vary, depending on a software application, an operating system, and a compatible i.LINK device. Unplug the cable, and plug it is a trademark of Sony used only to your computer or camcorder. Before connecting compatible i.LINK PC peripherals to designate that the i.LINK device seems to a port, such as a CD...
..., the i.LINK cable may vary, depending on a software application, an operating system, and a compatible i.LINK device. Unplug the cable, and plug it is a trademark of Sony used only to your computer or camcorder. Before connecting compatible i.LINK PC peripherals to designate that the i.LINK device seems to a port, such as a CD...

Safety Guide
Page 3
... and content management technology. All other . Updates and additions to the documentation that are trademarks or registered trademarks of Sony Corporation. Please refer to software may require an additional charge. Reverse engineering or disassembly is incorporated into selected models only...compatible i.LINK device for Canadian customers: Your new VAIO® computer includes certain software versions or upgrades, and Internet services or offers that came with your system, such as a CD-RW or hard disk drive, confirm their respective owners. Product activation procedures ...
... and content management technology. All other . Updates and additions to the documentation that are trademarks or registered trademarks of Sony Corporation. Please refer to software may require an additional charge. Reverse engineering or disassembly is incorporated into selected models only...compatible i.LINK device for Canadian customers: Your new VAIO® computer includes certain software versions or upgrades, and Internet services or offers that came with your system, such as a CD-RW or hard disk drive, confirm their respective owners. Product activation procedures ...


