
User Guide
Page 2
... Considerations ...8 Getting Started ...10 Locating Controls and Ports...11 About the Indicator Lights ...18 Connecting a Power Source ...20 Using the Battery Pack ...21 Shutting Down Your Computer Safely ...25 Using Your VAIO Computer ...26 Using the Keyboard ...27 Using the Touch Pad ...29 Using Special-function Buttons ...30 Using the Optical Disc...
... Considerations ...8 Getting Started ...10 Locating Controls and Ports...11 About the Indicator Lights ...18 Connecting a Power Source ...20 Using the Battery Pack ...21 Shutting Down Your Computer Safely ...25 Using Your VAIO Computer ...26 Using the Keyboard ...27 Using the Touch Pad ...29 Using Special-function Buttons ...30 Using the Optical Disc...
User Guide
Page 4
n4 N Precautions ...105 On Handling the LCD Screen ...106 On Using the Power Source ...107 On Handling Your Computer...108 On Handling Floppy Disks ...110 On Handling Discs ...111 On Using the Battery Pack...112 On Using Headphones...113 On Handling Memory Stick Media...113 On Handling the Hard Disk ...114 Troubleshooting ...115 Computer ...117 System Security ...127 Battery...130 Internet ...132 Networking ...134 Bluetooth Technology ...137 CDs and DVDs...141 Display ...145 Printing ...147 Microphone ...148 Mouse ...149 Speakers ...150 Touch Pad...151
n4 N Precautions ...105 On Handling the LCD Screen ...106 On Using the Power Source ...107 On Handling Your Computer...108 On Handling Floppy Disks ...110 On Handling Discs ...111 On Using the Battery Pack...112 On Using Headphones...113 On Handling Memory Stick Media...113 On Handling the Hard Disk ...114 Troubleshooting ...115 Computer ...117 System Security ...127 Battery...130 Internet ...132 Networking ...134 Bluetooth Technology ...137 CDs and DVDs...141 Display ...145 Printing ...147 Microphone ...148 Mouse ...149 Speakers ...150 Touch Pad...151
User Guide
Page 10
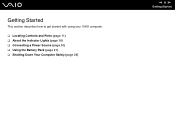
Getting Started This section describes how to get started with using your VAIO computer. ❑ Locating Controls and Ports (page 11) ❑ About the Indicator Lights (page 18) ❑ Connecting a Power Source (page 20) ❑ Using the Battery Pack (page 21) ❑ Shutting Down Your Computer Safely (page 25) n 10 N Getting Started
Getting Started This section describes how to get started with using your VAIO computer. ❑ Locating Controls and Ports (page 11) ❑ About the Indicator Lights (page 18) ❑ Connecting a Power Source (page 20) ❑ Using the Battery Pack (page 21) ❑ Shutting Down Your Computer Safely (page 25) n 10 N Getting Started

User Guide
Page 13
A AV MODE button (page 30) B Play/Pause button (page 30) C Stop button (page 30) D Previous track button (page 30) E Next track button (page 30) F Eject button (page 30) G Battery indicator (page 18) H Hard disk drive indicator (page 18) I Num lock indicator (page 18) J Caps lock indicator (page 18) K Scroll lock indicator (page 18) L Power button M Speakers N Bluetooth indicator (page 18) O WIRELESS LAN indicator (page 18) P WWAN indicator* (page 18) Q Mute indicator (page 18) * On selected models only. n 13 N Getting Started
A AV MODE button (page 30) B Play/Pause button (page 30) C Stop button (page 30) D Previous track button (page 30) E Next track button (page 30) F Eject button (page 30) G Battery indicator (page 18) H Hard disk drive indicator (page 18) I Num lock indicator (page 18) J Caps lock indicator (page 18) K Scroll lock indicator (page 18) L Power button M Speakers N Bluetooth indicator (page 18) O WIRELESS LAN indicator (page 18) P WWAN indicator* (page 18) Q Mute indicator (page 18) * On selected models only. n 13 N Getting Started

User Guide
Page 14
Back n 14 N Getting Started A Network (Ethernet) port (page 85) B Battery connector (page 21) C DC In port (page 20) D i.LINK® (IEEE1394) S400 port (page 83)
Back n 14 N Getting Started A Network (Ethernet) port (page 85) B Battery connector (page 21) C DC In port (page 20) D i.LINK® (IEEE1394) S400 port (page 83)
User Guide
Page 18
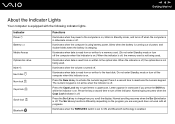
Indicator Power 1 Battery e Media Access Optical disc drive Mute % Hard disk Num lock Caps lock Scroll lock Bluetooth Functions Illuminates when the power to type letters in Hibernate ... and Bluetooth technology is charging. The Scr Lk key functions differently depending on the program you are using battery power, blinks when the battery is running out of power, and double-blinks when the battery is enabled. Illuminates when the computer is using and does not work with the following indicator lights. When...
Indicator Power 1 Battery e Media Access Optical disc drive Mute % Hard disk Num lock Caps lock Scroll lock Bluetooth Functions Illuminates when the power to type letters in Hibernate ... and Bluetooth technology is charging. The Scr Lk key functions differently depending on the program you are using battery power, blinks when the battery is running out of power, and double-blinks when the battery is enabled. Illuminates when the computer is using and does not work with the following indicator lights. When...

User Guide
Page 20
... power cord into an AC outlet (2). 3 Plug the cable attached to the AC adapter (3) into Hibernate mode. To use either an AC adapter or a rechargeable battery pack as a power source for a long period of time, put the computer into the DC In port (4) on the computer or on the AC adapter...
... power cord into an AC outlet (2). 3 Plug the cable attached to the AC adapter (3) into Hibernate mode. To use either an AC adapter or a rechargeable battery pack as a power source for a long period of time, put the computer into the DC In port (4) on the computer or on the AC adapter...

User Guide
Page 21
Using the Battery Pack The battery pack supplied with genuine Sony batteries. n 21 N Getting Started ✍ When the computer is directly connected to operate only with your computer is designed to AC power and has a battery pack installed, it clicks into the battery compartment until it uses power from the AC outlet. ! This computer is not fully charged at the time of purchase. Installing the Battery Pack To install the battery pack 1 Turn off the computer and close the LCD screen lid. 2 Slide the battery into place.
Using the Battery Pack The battery pack supplied with genuine Sony batteries. n 21 N Getting Started ✍ When the computer is directly connected to operate only with your computer is designed to AC power and has a battery pack installed, it clicks into the battery compartment until it uses power from the AC outlet. ! This computer is not fully charged at the time of purchase. Installing the Battery Pack To install the battery pack 1 Turn off the computer and close the LCD screen lid. 2 Slide the battery into place.

User Guide
Page 22
... power. The computer automatically charges the battery (the battery indicator light flashes in a double blink pattern as the battery charges). Battery indicator light status On Blinks Double blinks Off Meaning The computer is about 85% charged, the battery indicator turns off. n 22 N Getting Started Charging the Battery Pack The battery pack supplied with your computer is running...
... power. The computer automatically charges the battery (the battery indicator light flashes in a double blink pattern as the battery charges). Battery indicator light status On Blinks Double blinks Off Meaning The computer is about 85% charged, the battery indicator turns off. n 22 N Getting Started Charging the Battery Pack The battery pack supplied with your computer is running...
User Guide
Page 23
...while you should either attach the AC adapter to recharge the battery or shut down the computer and install a fully charged battery. Charging a partially discharged battery does not affect battery life. The battery indicator light is a lithium ion battery and can be recharged any unsaved data. Going back to... some software applications and some peripheral devices, the computer may not enter Hibernate mode even when battery life is impossible. To avoid loss of power, both the battery and power indicator lights start flashing. To avoid loss of data when using the computer. When...
...while you should either attach the AC adapter to recharge the battery or shut down the computer and install a fully charged battery. Charging a partially discharged battery does not affect battery life. The battery indicator light is a lithium ion battery and can be recharged any unsaved data. Going back to... some software applications and some peripheral devices, the computer may not enter Hibernate mode even when battery life is impossible. To avoid loss of power, both the battery and power indicator lights start flashing. To avoid loss of data when using the computer. When...

User Guide
Page 24
To remove the battery pack 1 Turn off the computer and close the LCD screen lid. 2 Slide and hold the release latch (1) and slide the battery away from the computer. ✍ If the battery is stuck by the side spring locks, release one lock and then the other to the AC adapter or if you remove the battery pack while the computer is in Standby mode. n 24 N Getting Started Removing the Battery Pack ! You may lose data if you remove the battery while the computer is on and not connected to remove the battery.
To remove the battery pack 1 Turn off the computer and close the LCD screen lid. 2 Slide and hold the release latch (1) and slide the battery away from the computer. ✍ If the battery is stuck by the side spring locks, release one lock and then the other to the AC adapter or if you remove the battery pack while the computer is in Standby mode. n 24 N Getting Started Removing the Battery Pack ! You may lose data if you remove the battery while the computer is on and not connected to remove the battery.
User Guide
Page 35
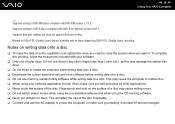
...the session when you need to close all other shape (star, heart, card, etc.), as this process, follow the instructions included with your battery is available only on an optical disc drive, you eject it. To complete this may cause the computer to malfunction. ❑ When using...50 percent charged. Supports 8cm disc reading, but does not support 8cm disc writing. Do not use circular discs. n 35 N Using Your VAIO Computer ✍ Supports writing to DVD-RW discs compliant with DVD-R for General version 2.0/2.1. Supports writing to DVD-R discs compliant with DVD-RW version...
...the session when you need to close all other shape (star, heart, card, etc.), as this process, follow the instructions included with your battery is available only on an optical disc drive, you eject it. To complete this may cause the computer to malfunction. ❑ When using...50 percent charged. Supports 8cm disc reading, but does not support 8cm disc writing. Do not use circular discs. n 35 N Using Your VAIO Computer ✍ Supports writing to DVD-RW discs compliant with DVD-R for General version 2.0/2.1. Supports writing to DVD-R discs compliant with DVD-RW version...

User Guide
Page 90
... of the power management setting you select. ! Using Normal Mode This is the normal state of power management settings to conserve battery life. n 90 N Customizing Your VAIO Computer Using the Power Saving Modes When you use . To save power while not working, you can take advantage of the computer... when it is on in use a battery as the power source for your computer has two distinct power saving modes: Standby and Hibernate...
... of the power management setting you select. ! Using Normal Mode This is the normal state of power management settings to conserve battery life. n 90 N Customizing Your VAIO Computer Using the Power Saving Modes When you use . To save power while not working, you can take advantage of the computer... when it is on in use a battery as the power source for your computer has two distinct power saving modes: Standby and Hibernate...

User Guide
Page 91
...screen and sets the hard disk and the CPU to Normal mode Press any key. ! The computer comes out of data, you can use VAIO Central to configure the computer to return to the previous work state is impossible. You can change the Standby mode settings. To activate Standby mode.... Going back to Normal mode when you remove both the AC adapter and the battery. To avoid this mode. n 91 N Customizing Your VAIO Computer Using Standby Mode Standby mode turns off automatically. See Setting Up Your Computer with VAIO Central (page 89). ! If the computer is in this , you should save ...
...screen and sets the hard disk and the CPU to Normal mode Press any key. ! The computer comes out of data, you can use VAIO Central to configure the computer to return to the previous work state is impossible. You can change the Standby mode settings. To activate Standby mode.... Going back to Normal mode when you remove both the AC adapter and the battery. To avoid this mode. n 91 N Customizing Your VAIO Computer Using Standby Mode Standby mode turns off automatically. See Setting Up Your Computer with VAIO Central (page 89). ! If the computer is in this , you should save ...

User Guide
Page 93
... then Turn Off Computer. 2 Click Hibernate. The computer returns to Normal mode Turn on the hard disk and power is turned off. n 93 N Customizing Your VAIO Computer Using Hibernate Mode In Hibernate mode, the state of the system is saved on the computer by pressing the power button. If you press... four seconds, the computer will be lost. To return to its previous state. ! To activate Hibernate mode Press the Fn+F12 keys. Even when the battery runs down, no data will switch off in this mode.
... then Turn Off Computer. 2 Click Hibernate. The computer returns to Normal mode Turn on the hard disk and power is turned off. n 93 N Customizing Your VAIO Computer Using Hibernate Mode In Hibernate mode, the state of the system is saved on the computer by pressing the power button. If you press... four seconds, the computer will be lost. To return to its previous state. ! To activate Hibernate mode Press the Fn+F12 keys. Even when the battery runs down, no data will switch off in this mode.

User Guide
Page 94
...the AC adapter for a long period of shutting down in Hibernate mode. The alarm and timer settings do not use VAIO Central to configure the computer to return to Normal mode when you cannot insert a disc. Do not move the computer ...until its power indicator turns off. n 94 N Customizing Your VAIO Computer ✍ If you the time of time, put the computer into Normal mode. This power resuming preference will not automatically...more time to return to be lost if you remove both the AC adapter and the battery.
...the AC adapter for a long period of shutting down in Hibernate mode. The alarm and timer settings do not use VAIO Central to configure the computer to return to Normal mode when you cannot insert a disc. Do not move the computer ...until its power indicator turns off. n 94 N Customizing Your VAIO Computer ✍ If you the time of time, put the computer into Normal mode. This power resuming preference will not automatically...more time to return to be lost if you remove both the AC adapter and the battery.
User Guide
Page 95
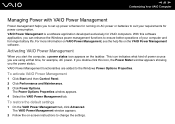
... computer, a power status icon appears on the taskbar. Activating VAIO Power Management When you to set up power schemes for running on AC power or batteries to the Windows Power Options Properties. To activate VAIO Power Management 1 Click Start and then Control Panel. 2 Click... The Power Options Properties window appears. 4 Select the VAIO Power Management tab. VAIO Power Management functionalities are using at that time, for longer battery life. The VAIO Power Management window appears. 2 Follow the on the VAIO Power Management software. If you double-click this software application...
... computer, a power status icon appears on the taskbar. Activating VAIO Power Management When you to set up power schemes for running on AC power or batteries to the Windows Power Options Properties. To activate VAIO Power Management 1 Click Start and then Control Panel. 2 Click... The Power Options Properties window appears. 4 Select the VAIO Power Management tab. VAIO Power Management functionalities are using at that time, for longer battery life. The VAIO Power Management window appears. 2 Follow the on the VAIO Power Management software. If you double-click this software application...
User Guide
Page 99
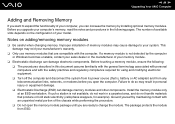
... contact with an unpainted metal portion of the chassis while performing the procedure. ❑ Do not open the computer. n 99 N Upgrading Your VAIO Computer Adding and Removing Memory If you want to expand the functionality of your computer, you can damage memory modules and other components. Improper installation... (that produce or hold static electricity (cellophane wrappers, for example). If a memory module is not available, do not handle materials that is, battery or AC adapter) and from ESD. If such a station is not detected by installing optional memory modules.
... contact with an unpainted metal portion of the chassis while performing the procedure. ❑ Do not open the computer. n 99 N Upgrading Your VAIO Computer Adding and Removing Memory If you want to expand the functionality of your computer, you can damage memory modules and other components. Improper installation... (that produce or hold static electricity (cellophane wrappers, for example). If a memory module is not available, do not handle materials that is, battery or AC adapter) and from ESD. If such a station is not detected by installing optional memory modules.
User Guide
Page 101
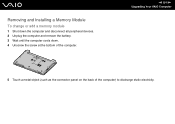
n 101 N Upgrading Your VAIO Computer 5 Touch a metal object (such as the connector panel on the back of the computer. Removing and Installing a Memory Module To change or add a memory module 1 Shut down the computer and disconnect all peripheral devices. 2 Unplug the computer and remove the battery. 3 Wait until the computer cools down. 4 Unscrew the screw at the bottom of the computer) to discharge static electricity.
n 101 N Upgrading Your VAIO Computer 5 Touch a metal object (such as the connector panel on the back of the computer. Removing and Installing a Memory Module To change or add a memory module 1 Shut down the computer and disconnect all peripheral devices. 2 Unplug the computer and remove the battery. 3 Wait until the computer cools down. 4 Unscrew the screw at the bottom of the computer) to discharge static electricity.
User Guide
Page 103
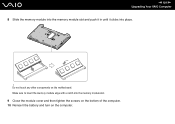
Do not touch any other components on the computer. n 103 N Upgrading Your VAIO Computer 8 Slide the memory module into the memory module slot and push it in until it clicks into the memory module slot. 9 Close the module cover and then tighten the screws on the bottom of the computer. 10 Reinsert the battery and turn on the motherboard. Make sure to insert the memory module edge with a notch into place. !
Do not touch any other components on the computer. n 103 N Upgrading Your VAIO Computer 8 Slide the memory module into the memory module slot and push it in until it clicks into the memory module slot. 9 Close the module cover and then tighten the screws on the bottom of the computer. 10 Reinsert the battery and turn on the motherboard. Make sure to insert the memory module edge with a notch into place. !


