
User Guide
Page 4
n4 N Precautions ...151 On Handling the LCD Screen ...152 On Using the Power Source ...153 On Handling Your Computer...154 On Using the Built-in MOTION EYE Camera...156 On Handling Floppy ...
n4 N Precautions ...151 On Handling the LCD Screen ...152 On Using the Power Source ...153 On Handling Your Computer...154 On Using the Built-in MOTION EYE Camera...156 On Handling Floppy ...
User Guide
Page 12
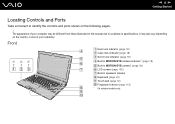
...) B Caps lock indicator (page 18) C Scroll lock indicator (page 18) D Built-in MOTION EYE camera indicator* (page 18) E Built-in MOTION EYE camera* (page 34) F LCD screen (page 152) G Built-in this manual due to identify the controls and ports shown on the country or area of your residency. n 12 N Getting...
...) B Caps lock indicator (page 18) C Scroll lock indicator (page 18) D Built-in MOTION EYE camera indicator* (page 18) E Built-in MOTION EYE camera* (page 34) F LCD screen (page 152) G Built-in this manual due to identify the controls and ports shown on the country or area of your residency. n 12 N Getting...
User Guide
Page 21
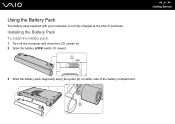
n 21 N Getting Started 3 Slide the battery pack diagonally along the guide (2) on either side of purchase. Installing the Battery Pack To install the battery pack 1 Turn off the computer and close the LCD screen lid. 2 Slide the battery LOCK switch (1) inward. Using the Battery Pack The battery pack supplied with your computer is not fully charged at the time of the battery compartment.
n 21 N Getting Started 3 Slide the battery pack diagonally along the guide (2) on either side of purchase. Installing the Battery Pack To install the battery pack 1 Turn off the computer and close the LCD screen lid. 2 Slide the battery LOCK switch (1) inward. Using the Battery Pack The battery pack supplied with your computer is not fully charged at the time of the battery compartment.

User Guide
Page 26
To remove the battery pack 1 Turn off the computer and close the LCD screen lid. 2 Slide the battery LOCK switch (1) inward and slide and hold the battery RELEASE latch (2) on and not connected to the AC adapter or if you remove the battery pack while your computer is in Sleep mode. You may lose data if you remove the battery pack while the computer is on the bottom of the computer. n 26 N Getting Started Removing the Battery Pack !
To remove the battery pack 1 Turn off the computer and close the LCD screen lid. 2 Slide the battery LOCK switch (1) inward and slide and hold the battery RELEASE latch (2) on and not connected to the AC adapter or if you remove the battery pack while your computer is in Sleep mode. You may lose data if you remove the battery pack while the computer is on the bottom of the computer. n 26 N Getting Started Removing the Battery Pack !
User Guide
Page 30
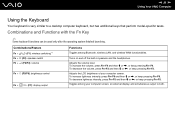
... + 2 (F3/F4): volume Fn + 8 (F5/F6): brightness control Fn + /T (F7): display output Functions Toggles among Bluetooth, wireless LAN, and wireless WAN functionalities. n 30 N Using Your VAIO Computer Using the Keyboard Your keyboard is very similar to a desktop computer keyboard, but has additional keys that perform model-specific tasks. Combinations and Functions...
... + 2 (F3/F4): volume Fn + 8 (F5/F6): brightness control Fn + /T (F7): display output Functions Toggles among Bluetooth, wireless LAN, and wireless WAN functionalities. n 30 N Using Your VAIO Computer Using the Keyboard Your keyboard is very similar to a desktop computer keyboard, but has additional keys that perform model-specific tasks. Combinations and Functions...
User Guide
Page 78
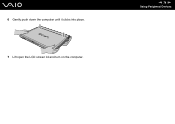
n 78 N Using Peripheral Devices 6 Gently push down the computer until it clicks into place. 7 Lift open the LCD screen lid and turn on the computer.
n 78 N Using Peripheral Devices 6 Gently push down the computer until it clicks into place. 7 Lift open the LCD screen lid and turn on the computer.
User Guide
Page 88
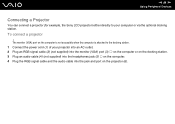
n 88 N Using Peripheral Devices Connecting a Projector You can connect a projector (for example, the Sony LCD projector) either directly to your projector into an AC outlet. 2 Plug an RGB signal cable (2) (not supplied) into the monitor (VGA) port (3) a on the computer ...
n 88 N Using Peripheral Devices Connecting a Projector You can connect a projector (for example, the Sony LCD projector) either directly to your projector into an AC outlet. 2 Plug an RGB signal cable (2) (not supplied) into the monitor (VGA) port (3) a on the computer ...
User Guide
Page 132
...Setting (page 140). Using Normal Mode This is the normal state of the computer when it is on in use a battery pack as the LCD screen or the hard disk drive. ✍ You can change the memory configuration during Normal mode. When using battery power, you should either... automatically enter Hibernate mode if the remaining battery charge becomes short, regardless of the power management setting you select. ! n 132 N Customizing Your VAIO Computer Using the Power Saving Modes When you use . In addition to the normal operating mode, which allows you to turn off specific devices, ...
...Setting (page 140). Using Normal Mode This is the normal state of the computer when it is on in use a battery pack as the LCD screen or the hard disk drive. ✍ You can change the memory configuration during Normal mode. When using battery power, you should either... automatically enter Hibernate mode if the remaining battery charge becomes short, regardless of the power management setting you select. ! n 132 N Customizing Your VAIO Computer Using the Power Saving Modes When you use . In addition to the normal operating mode, which allows you to turn off specific devices, ...

User Guide
Page 133
... you remove both the AC adapter and the battery pack. See Setting Up Your Computer with VAIO Central (page 130). ! n 133 N Customizing Your VAIO Computer Using Sleep Mode Sleep mode turns off the LCD screen and places the storage device(s) and the CPU into Hibernate mode or turn off . ...Your computer comes out of Sleep mode quicker than Hibernate mode. Going back to Normal mode when you open the LCD screen lid. If...
... you remove both the AC adapter and the battery pack. See Setting Up Your Computer with VAIO Central (page 130). ! n 133 N Customizing Your VAIO Computer Using Sleep Mode Sleep mode turns off the LCD screen and places the storage device(s) and the CPU into Hibernate mode or turn off . ...Your computer comes out of Sleep mode quicker than Hibernate mode. Going back to Normal mode when you open the LCD screen lid. If...
User Guide
Page 136
Hibernate mode requires more time to return to Normal mode from Hibernate mode than Sleep mode to Normal mode when you open the LCD screen lid. This power resuming preference will be activated. It takes more time than from Sleep mode. When your computer is in Hibernate mode, you... AC adapter and the battery pack. You can use your computer for a long period of shutting down or resuming. See Setting Up Your Computer with VAIO Central (page 130). ! Do not move your computer before its power indicator light turns off. Hibernate mode uses less power than Sleep mode. This power...
Hibernate mode requires more time to return to Normal mode from Hibernate mode than Sleep mode to Normal mode when you open the LCD screen lid. This power resuming preference will be activated. It takes more time than from Sleep mode. When your computer is in Hibernate mode, you... AC adapter and the battery pack. You can use your computer for a long period of shutting down or resuming. See Setting Up Your Computer with VAIO Central (page 130). ! Do not move your computer before its power indicator light turns off. Hibernate mode uses less power than Sleep mode. This power...
User Guide
Page 151
n 151 N Precautions Precautions This section describes safety guidelines and precautions to help you protect your VAIO computer from potential damage. ❑ On Handling the LCD Screen (page 152) ❑ On Using the Power Source (page 153) ❑ On Handling Your Computer (page 154) ❑ On Using the Built-in MOTION ...
n 151 N Precautions Precautions This section describes safety guidelines and precautions to help you protect your VAIO computer from potential damage. ❑ On Handling the LCD Screen (page 152) ❑ On Using the Power Source (page 153) ❑ On Handling Your Computer (page 154) ❑ On Using the Built-in MOTION ...
User Guide
Page 152
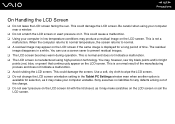
... (red, blue, or green) that continuously appear on the LCD screen or soil the LCD screen. n 152 N Precautions On Handling the LCD Screen ❑ Do not leave the LCD screen facing the sun. This is not a malfunction. Sony assumes no liabilities for selection, as it may produce a residual... image on the LCD screen lid with the lid closed, as it . This is normal and does...
... (red, blue, or green) that continuously appear on the LCD screen or soil the LCD screen. n 152 N Precautions On Handling the LCD Screen ❑ Do not leave the LCD screen facing the sun. This is not a malfunction. Sony assumes no liabilities for selection, as it may produce a residual... image on the LCD screen lid with the lid closed, as it . This is normal and does...
User Guide
Page 155
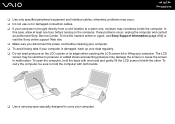
.... ❑ Use a carrying case specially designed to carry your computer. If any problems occur, unplug the computer and contact an authorized Sony Service Center. The LCD screen may damage the screen or cause the screen to a warm one hour before cleaning your computer. ❑ To avoid losing data ... To find the nearest center or agent, see Sony Support Information (page 210) or visit the Sony online support Web site. ❑ Make sure you disconnect the power cord before turning on the LCD screen or its edges when opening the LCD screen lid or lifting your computer is damaged, ...
.... ❑ Use a carrying case specially designed to carry your computer. If any problems occur, unplug the computer and contact an authorized Sony Service Center. The LCD screen may damage the screen or cause the screen to a warm one hour before cleaning your computer. ❑ To avoid losing data ... To find the nearest center or agent, see Sony Support Information (page 210) or visit the Sony online support Web site. ❑ Make sure you disconnect the power cord before turning on the LCD screen or its edges when opening the LCD screen lid or lifting your computer is damaged, ...

User Guide
Page 177
Exit the applications that you are captured images poor in quality? ❑ The images captured under the fluorescent lamp may show reflection of the LCD screen might help file on your software application may appear as a noise. ❑ If the front mirror plate over the lens is normal and does ...
Exit the applications that you are captured images poor in quality? ❑ The images captured under the fluorescent lamp may show reflection of the LCD screen might help file on your software application may appear as a noise. ❑ If the front mirror plate over the lens is normal and does ...

User Guide
Page 193
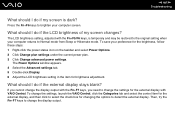
... (page 30) for more information. ❑ Make sure your computer is using battery power, make sure the battery pack is installed properly and is in LCD (Video) Sleep mode, press any key to the external display, press the Fn+F7 keys. If the computer is charged. See Using the Power Saving...
... (page 30) for more information. ❑ Make sure your computer is using battery power, make sure the battery pack is installed properly and is in LCD (Video) Sleep mode, press any key to the external display, press the Fn+F7 keys. If the computer is charged. See Using the Power Saving...
User Guide
Page 194
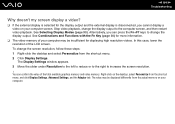
... Display Modes (page 90). Right-click on your computer may be insufficient for displaying high resolution videos. In this case, lower the resolution of the LCD screen. Stop video playback, change the screen resolution, follow these steps: 1 Right-click the desktop and select Personalize from the shortcut menu, and click Display...
... Display Modes (page 90). Right-click on your computer may be insufficient for displaying high resolution videos. In this case, lower the resolution of the LCD screen. Stop video playback, change the screen resolution, follow these steps: 1 Right-click the desktop and select Personalize from the shortcut menu, and click Display...
User Guide
Page 195
... restored to the original setting when your computer returns to brighten your preference for brightness adjustment. To change the settings, launch the VAIO Central, click the Categories tab and select the control item for the external display, and then click to select the check box ... the external display with the Fn+F7 keys, you cannot change the display output with VAIO Central. The Power Options window appears. 4 Select the Advanced settings tab. 5 Double-click Display. 6 Adjust the LCD brightness setting in the item for the brightness, follow these steps: 1 Right-click the...
... restored to the original setting when your computer returns to brighten your preference for brightness adjustment. To change the settings, launch the VAIO Central, click the Categories tab and select the control item for the external display, and then click to select the check box ... the external display with the Fn+F7 keys, you cannot change the display output with VAIO Central. The Power Options window appears. 4 Select the Advanced settings tab. 5 Double-click Display. 6 Adjust the LCD brightness setting in the item for the brightness, follow these steps: 1 Right-click the...


