

User Guide
Page 4
n4 N Precautions ...155 Handling the LCD Screen ...156 Using the Power Source ...157 Handling Your Computer ...158 Handling the Built-in MOTION EYE Camera...160 Handling Floppy Disks ...161 Handling Discs ...162 Using the Battery Pack ...163 Using Headphones ...165 Handling the Memory Stick ...166 Handling the Hard Disk ...167 Updating Your Computer ...168 Troubleshooting ...169 Computer ...171 System Security ...179 Battery...180 Built-in MOTION EYE Camera...182 Internet ...184 Networking ...186 Bluetooth Technology ...189 Optical Discs ...193 Display ...198 Printing ...202 Microphone ...203
n4 N Precautions ...155 Handling the LCD Screen ...156 Using the Power Source ...157 Handling Your Computer ...158 Handling the Built-in MOTION EYE Camera...160 Handling Floppy Disks ...161 Handling Discs ...162 Using the Battery Pack ...163 Using Headphones ...165 Handling the Memory Stick ...166 Handling the Hard Disk ...167 Updating Your Computer ...168 Troubleshooting ...169 Computer ...171 System Security ...179 Battery...180 Built-in MOTION EYE Camera...182 Internet ...184 Networking ...186 Bluetooth Technology ...189 Optical Discs ...193 Display ...198 Printing ...202 Microphone ...203

User Guide
Page 6
... on your computer comes preinstalled with the Microsoft® Windows Vista® 32-bit operating system. Sony has combined leading-edge technology in the supplied manuals including this Sony VAIO® computer, and welcome to provide state-of the VAIO computers with the 64-bit operating system. n6 N Before Use Before Use Congratulations on...
... on your computer comes preinstalled with the Microsoft® Windows Vista® 32-bit operating system. Sony has combined leading-edge technology in the supplied manuals including this Sony VAIO® computer, and welcome to provide state-of the VAIO computers with the 64-bit operating system. n6 N Before Use Before Use Congratulations on...

User Guide
Page 8
... SmartWi Connection Utility Help. * Available on -screen guide: 1 Click Start and Help and Support. 2 Click Use my VAIO. 3 Click VAIO Recovery Center User Guide. ❑ SmartWi™ Connection Utility Help (Selected models only) - To access this on-screen guide: 1 Click Start and Help and Support.... 2 Click Use my VAIO. 3 Click Other Documents. Provides information about...
... SmartWi Connection Utility Help. * Available on -screen guide: 1 Click Start and Help and Support. 2 Click Use my VAIO. 3 Click VAIO Recovery Center User Guide. ❑ SmartWi™ Connection Utility Help (Selected models only) - To access this on-screen guide: 1 Click Start and Help and Support.... 2 Click Use my VAIO. 3 Click Other Documents. Provides information about...

User Guide
Page 11
... the brightness level of the computer's display - Use indirect lighting to your comfort and work efficiency. ❑ Positioning an external display - Make sure the display screen is at a comfortable viewing distance. Choose a location where windows and lights do not cause glare and reflection on the display.
... the brightness level of the computer's display - Use indirect lighting to your comfort and work efficiency. ❑ Positioning an external display - Make sure the display screen is at a comfortable viewing distance. Choose a location where windows and lights do not cause glare and reflection on the display.
User Guide
Page 13
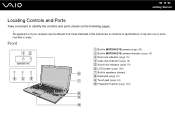
... 36) B Built-in MOTION EYE camera indicator (page 19) C Num lock indicator (page 19) D Caps lock indicator (page 19) E Scroll lock indicator (page 19) F LCD screen (page 156) G Built-in some countries or areas. The appearance of your computer may also vary in speakers (stereo) H Keyboard (page 32) I Touch pad (page...
... 36) B Built-in MOTION EYE camera indicator (page 19) C Num lock indicator (page 19) D Caps lock indicator (page 19) E Scroll lock indicator (page 19) F LCD screen (page 156) G Built-in some countries or areas. The appearance of your computer may also vary in speakers (stereo) H Keyboard (page 32) I Touch pad (page...

User Guide
Page 22
Installing the Battery Pack To install the battery pack 1 Turn off the computer and close the LCD screen lid. 2 Slide the battery LOCK switch (1) inward. n 22 N Getting Started Using the Battery Pack The battery pack supplied with your computer is not fully charged at the time of delivery.
Installing the Battery Pack To install the battery pack 1 Turn off the computer and close the LCD screen lid. 2 Slide the battery LOCK switch (1) inward. n 22 N Getting Started Using the Battery Pack The battery pack supplied with your computer is not fully charged at the time of delivery.
User Guide
Page 29
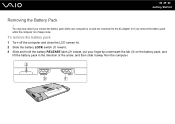
You may lose data if you remove the battery pack while the computer is in the direction of the arrow, and then slide it away from the computer. To remove the battery pack 1 Turn off the computer and close the LCD screen lid. 2 Slide the battery LOCK switch (1) inward. 3 Slide and hold the battery RELEASE latch (2) inward, put your computer is on and not connected to the AC adapter or if you remove the battery pack while your fingertip underneath the tab (3) on the battery pack, and lift the battery pack in Sleep mode. n 29 N Getting Started Removing the Battery Pack !
You may lose data if you remove the battery pack while the computer is in the direction of the arrow, and then slide it away from the computer. To remove the battery pack 1 Turn off the computer and close the LCD screen lid. 2 Slide the battery LOCK switch (1) inward. 3 Slide and hold the battery RELEASE latch (2) inward, put your computer is on and not connected to the AC adapter or if you remove the battery pack while your fingertip underneath the tab (3) on the battery pack, and lift the battery pack in Sleep mode. n 29 N Getting Started Removing the Battery Pack !

User Guide
Page 32
...Using Your VAIO Computer Using the Keyboard Your keyboard is finished launching. Combinations/Feature Fn + % (F2): speaker switch Fn + 2 (F3/F4): volume Fn + 8 (F5/F6): brightness control Fn + /T (F7): display output Fn + / (F9/F10): zoom Functions Turns on some software. Toggles among your computer screen. To...image or a document displayed on and off the built-in ), press the Fn+F10 keys. Changes the size of your computer screen, an external display, and simultaneous output to a desktop computer keyboard, but has additional keys that perform model-specific tasks. To ...
...Using Your VAIO Computer Using the Keyboard Your keyboard is finished launching. Combinations/Feature Fn + % (F2): speaker switch Fn + 2 (F3/F4): volume Fn + 8 (F5/F6): brightness control Fn + /T (F7): display output Fn + / (F9/F10): zoom Functions Turns on some software. Toggles among your computer screen. To...image or a document displayed on and off the built-in ), press the Fn+F10 keys. Changes the size of your computer screen, an external display, and simultaneous output to a desktop computer keyboard, but has additional keys that perform model-specific tasks. To ...

User Guide
Page 34
...the touch pad while pressing the left button. To change the touch pad settings, click Start, All Programs, VAIO Control Center, Keyboard and Mouse and Pointing Device. ! Be sure to connect a mouse before connecting a mouse,.... Press the left button (3) once. Press the right button (4) once. n 34 N Using Your VAIO Computer Action Point Click Double-click Right-click Drag Scroll Description Slide your finger on an item or object... point to, select, drag, and scroll objects on the screen using the touch pad. If you disable the touch pad before disabling the touch pad.
...the touch pad while pressing the left button. To change the touch pad settings, click Start, All Programs, VAIO Control Center, Keyboard and Mouse and Pointing Device. ! Be sure to connect a mouse before connecting a mouse,.... Press the left button (3) once. Press the right button (4) once. n 34 N Using Your VAIO Computer Action Point Click Double-click Right-click Drag Scroll Description Slide your finger on an item or object... point to, select, drag, and scroll objects on the screen using the touch pad. If you disable the touch pad before disabling the touch pad.

User Guide
Page 35
.... The S2 button launches Windows Meeting Space. ✍ The default button assignments may disturb a presentation are disabled, such as a screen saver, the power saving modes, and system message generation. Ejects the optical disc drive tray. Special-function button S1/S2 buttons Functions... By default, the S1 button displays the VAIO Presentation Support window to select the display method in the Presentation Settings window. To change the settings in Presentation mode between...
.... The S2 button launches Windows Meeting Space. ✍ The default button assignments may disturb a presentation are disabled, such as a screen saver, the power saving modes, and system message generation. Ejects the optical disc drive tray. Special-function button S1/S2 buttons Functions... By default, the S1 button displays the VAIO Presentation Support window to select the display method in the Presentation Settings window. To change the settings in Presentation mode between...

User Guide
Page 46
... copy files to the empty disc folder. 3 Close the disc folder. If the AutoPlay window appears, click Burn files to disc and follow the on-screen instructions until the empty disc folder appears. 2 Open the folder that contains the file(s) you want to copy and drag them to a disc 1 Insert a recordable...optical disc drive. 2 If nothing appears on the desktop, click Start, All Programs, and the desired CD software to select an option. n 46 N Using Your VAIO Computer Playing CDs To play the CD. If the Audio CD window appears, click to play an audio CD 1 Insert a disc into the optical disc...
... copy files to the empty disc folder. 3 Close the disc folder. If the AutoPlay window appears, click Burn files to disc and follow the on-screen instructions until the empty disc folder appears. 2 Open the folder that contains the file(s) you want to copy and drag them to a disc 1 Insert a recordable...optical disc drive. 2 If nothing appears on the desktop, click Start, All Programs, and the desired CD software to select an option. n 46 N Using Your VAIO Computer Playing CDs To play the CD. If the Audio CD window appears, click to play an audio CD 1 Insert a disc into the optical disc...

User Guide
Page 51
... 4 Follow the on . To remove an ExpressCard module ✍ To remove an ExpressCard module when your computer is not removed properly, your computer is on -screen instructions to remove the ExpressCard module. 5 Push in the ExpressCard module toward the computer so that the module pops out. 6 Gently take hold of the... ExpressCard module and pull it out of the slot. n 51 N Using Your VAIO Computer Removing an ExpressCard Module Follow the steps below to remove the ExpressCard module while your system may not work properly.
... 4 Follow the on . To remove an ExpressCard module ✍ To remove an ExpressCard module when your computer is not removed properly, your computer is on -screen instructions to remove the ExpressCard module. 5 Push in the ExpressCard module toward the computer so that the module pops out. 6 Gently take hold of the... ExpressCard module and pull it out of the slot. n 51 N Using Your VAIO Computer Removing an ExpressCard Module Follow the steps below to remove the ExpressCard module while your system may not work properly.
User Guide
Page 56
... use the device that it does not contain your computer, follow these steps. ! n 56 N Using Your VAIO Computer To format a Memory Stick The Memory Stick has been formatted in Format options. 5 Click Start. 6 Follow the on-screen instructions. ! This could cause a malfunction. 1 Carefully slide the Memory Stick into the slot until it...
... use the device that it does not contain your computer, follow these steps. ! n 56 N Using Your VAIO Computer To format a Memory Stick The Memory Stick has been formatted in Format options. 5 Click Start. 6 Follow the on-screen instructions. ! This could cause a malfunction. 1 Carefully slide the Memory Stick into the slot until it...

User Guide
Page 62
n 62 N Using Your VAIO Computer ✍ Your computer does not work with party lines, cannot be connected to models with a built-in modem only. 1 Plug one end of these ... modem. To set up a dial-up connection to the Internet window appears. 3 Click Dial-up. 4 Follow the on the computer. To connect a telephone cable ! on -screen instructions. Some of the phone cable (1) into the modem port 2 Plug the other end into the wall jack (2). The Connect to the Internet ! The following...
n 62 N Using Your VAIO Computer ✍ Your computer does not work with party lines, cannot be connected to models with a built-in modem only. 1 Plug one end of these ... modem. To set up a dial-up connection to the Internet window appears. 3 Click Dial-up. 4 Follow the on the computer. To connect a telephone cable ! on -screen instructions. Some of the phone cable (1) into the modem port 2 Plug the other end into the wall jack (2). The Connect to the Internet ! The following...

User Guide
Page 63
...optional docking station and the other end to your network. Connect one end of a network cable (not supplied) to the network (Ethernet) port on -screen instructions. For detailed settings and devices needed to connect to the network, ask your network administrator. ✍ Your computer can connect your computer is attached... which network (Ethernet) port to use. When your computer to 1000BASE-T/100BASE-TX/10BASE-T type networks with the default settings. n 63 N Using Your VAIO Computer Using the Network (LAN) You can be connected to the network with an Ethernet network cable.
...optional docking station and the other end to your network. Connect one end of a network cable (not supplied) to the network (Ethernet) port on -screen instructions. For detailed settings and devices needed to connect to the network, ask your network administrator. ✍ Your computer can connect your computer is attached... which network (Ethernet) port to use. When your computer to 1000BASE-T/100BASE-TX/10BASE-T type networks with the default settings. n 63 N Using Your VAIO Computer Using the Network (LAN) You can be connected to the network with an Ethernet network cable.
User Guide
Page 66
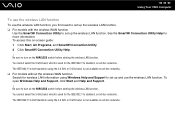
... starting the wireless LAN function. You cannot select the 5 GHz band, which is not available on -screen guide: 1 Click Start, All Programs, and SmartWi Connection Utility. 2 Click SmartWi Connection Utility Help. ! n 66 N Using Your VAIO Computer To use the wireless LAN function To use the wireless LAN function. See the SmartWi Connection...
... starting the wireless LAN function. You cannot select the 5 GHz band, which is not available on -screen guide: 1 Click Start, All Programs, and SmartWi Connection Utility. 2 Click SmartWi Connection Utility Help. ! n 66 N Using Your VAIO Computer To use the wireless LAN function To use the wireless LAN function. See the SmartWi Connection...

User Guide
Page 69
... Start and Help and Support. ! To access this on the WIRELESS switch before starting the Bluetooth function. n 69 N Using Your VAIO Computer Using the Bluetooth Function You can transfer data between your computer and other Bluetooth devices such as another computer or a mobile phone...need to set up the Bluetooth function. ❑ For models with the wireless WAN function Use the SmartWi Connection Utility to turn on -screen guide: 1 Click Start, All Programs, and SmartWi Connection Utility. 2 Click SmartWi Connection Utility Help. ! You can establish wireless communications between...
... Start and Help and Support. ! To access this on the WIRELESS switch before starting the Bluetooth function. n 69 N Using Your VAIO Computer Using the Bluetooth Function You can transfer data between your computer and other Bluetooth devices such as another computer or a mobile phone...need to set up the Bluetooth function. ❑ For models with the wireless WAN function Use the SmartWi Connection Utility to turn on -screen guide: 1 Click Start, All Programs, and SmartWi Connection Utility. 2 Click SmartWi Connection Utility Help. ! You can establish wireless communications between...

User Guide
Page 84
... computer with a computer display or a projector. ! To change when you can connect an external display (not supplied) to the computer for the first time. The screen resolution of your external display may change the display output to the external display, press the Fn+F7 keys. For example, you switch between the...
... computer with a computer display or a projector. ! To change when you can connect an external display (not supplied) to the computer for the first time. The screen resolution of your external display may change the display output to the external display, press the Fn+F7 keys. For example, you switch between the...

User Guide
Page 85
To connect a computer display ! If you want to the docking station. Follow the on-screen instructions to change the performance mode to SPEED mode. 1 If necessary, plug one end of the display's power cord (1) into your display, and the other ...
To connect a computer display ! If you want to the docking station. Follow the on-screen instructions to change the performance mode to SPEED mode. 1 If necessary, plug one end of the display's power cord (1) into your display, and the other ...

User Guide
Page 89
... HDMI output port when your TV (1) into an AC outlet. 2 Plug one end of an HDMI cable (2) (not supplied) to the HDMI output port (3) on -screen instructions to change the performance mode to your computer. To connect a TV to SPEED mode. 1 Plug the power cord of the TV to change the...
... HDMI output port when your TV (1) into an AC outlet. 2 Plug one end of an HDMI cable (2) (not supplied) to the HDMI output port (3) on -screen instructions to change the performance mode to your computer. To connect a TV to SPEED mode. 1 Plug the power cord of the TV to change the...

