User Guide
Page 2
... and Ports...15 About the Indicator Lights ...22 Connecting a Power Source ...24 Using the Battery Pack ...25 Shutting Down Your Computer Safely ...33 Using Your VAIO Computer ...34 Using the Keyboard ...35 Using the Touch Pad ...36 Using Special-function Buttons ...37 Using the Built-in MOTION EYE Camera...39 Using... the Optical Disc Drive ...42 Using the TV Function ...51 Using the ExpressCard Module ...65 Using the Memory Stick ...68 Using the SD Memory Card ...74 Using the CF...
... and Ports...15 About the Indicator Lights ...22 Connecting a Power Source ...24 Using the Battery Pack ...25 Shutting Down Your Computer Safely ...33 Using Your VAIO Computer ...34 Using the Keyboard ...35 Using the Touch Pad ...36 Using Special-function Buttons ...37 Using the Built-in MOTION EYE Camera...39 Using... the Optical Disc Drive ...42 Using the TV Function ...51 Using the ExpressCard Module ...65 Using the Memory Stick ...68 Using the SD Memory Card ...74 Using the CF...
User Guide
Page 3
... Monitors Function ...102 Connecting an External Microphone ...104 Connecting a Universal Serial Bus (USB) Device...105 Connecting a Printer ...108 Connecting an i.LINK Device ...109 Customizing Your VAIO Computer ...111 Setting the Password ...112 Using Fingerprint Authentication ...120 Setting Up Your Computer with the...
... Monitors Function ...102 Connecting an External Microphone ...104 Connecting a Universal Serial Bus (USB) Device...105 Connecting a Printer ...108 Connecting an i.LINK Device ...109 Customizing Your VAIO Computer ...111 Setting the Password ...112 Using Fingerprint Authentication ...120 Setting Up Your Computer with the...
User Guide
Page 4
n4 N Precautions ...143 Handling the LCD Screen ...144 Using the Power Source ...145 Handling Your Computer ...146 Handling the Built-in MOTION EYE Camera...148 Handling Floppy Disks ...149 Handling Discs ...150 Using the Battery Pack ...151 Using Headphones ...153 Handling the Memory Stick ...154 Handling the Hard Disk ...155 Updating Your Computer ...156 Troubleshooting ...157 Computer ...159 System Security ...167 Battery...168 Built-in MOTION EYE Camera...170 Internet ...172 Networking ...174 Bluetooth Technology ...177 Optical Discs ...181 Display ...186 Printing ...190 Microphone ...191
n4 N Precautions ...143 Handling the LCD Screen ...144 Using the Power Source ...145 Handling Your Computer ...146 Handling the Built-in MOTION EYE Camera...148 Handling Floppy Disks ...149 Handling Discs ...150 Using the Battery Pack ...151 Using Headphones ...153 Handling the Memory Stick ...154 Handling the Hard Disk ...155 Updating Your Computer ...156 Troubleshooting ...157 Computer ...159 System Security ...167 Battery...168 Built-in MOTION EYE Camera...170 Internet ...172 Networking ...174 Bluetooth Technology ...177 Optical Discs ...181 Display ...186 Printing ...190 Microphone ...191
User Guide
Page 5
n5 N Mouse ...192 Speakers ...193 Touch Pad...195 Keyboard...196 Floppy Disks ...197 Audio/Video...198 Memory Stick ...202 Peripherals ...203 Support Options ...204 Sony Support Information ...204 Trademarks ...208
n5 N Mouse ...192 Speakers ...193 Touch Pad...195 Keyboard...196 Floppy Disks ...197 Audio/Video...198 Memory Stick ...202 Peripherals ...203 Support Options ...204 Sony Support Information ...204 Trademarks ...208
User Guide
Page 16
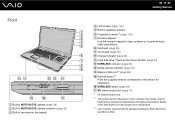
...page 74) *1 On selected models only. *2 The storage device configuration of your configuration. *3 Your computer supports both the standard-size Memory Stick and the Duosize Memory Stick. See the online specifications to this sensor for operations. H Keyboard (page 35) I Touch pad (page 36) J Charge...(page 22) K Hard disk drive*2/Optical disc drive indicator (page 22) L WIRELESS indicator (page 22) M Media Access indicator (page 22) N Memory Stick slot*3 (page 68) O Remote sensor*1 Point the supplied remote commander to find out about your computer may include a built-in speakers (stereo)...
...page 74) *1 On selected models only. *2 The storage device configuration of your configuration. *3 Your computer supports both the standard-size Memory Stick and the Duosize Memory Stick. See the online specifications to this sensor for operations. H Keyboard (page 35) I Touch pad (page 36) J Charge...(page 22) K Hard disk drive*2/Optical disc drive indicator (page 22) L WIRELESS indicator (page 22) M Media Access indicator (page 22) N Memory Stick slot*3 (page 68) O Remote sensor*1 Point the supplied remote commander to find out about your computer may include a built-in speakers (stereo)...
User Guide
Page 20
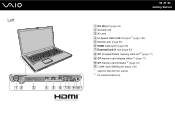
speeds. *2 On selected models only. Left n 20 N Getting Started A DC IN port (page 24) B Security slot C Air vent D Hi-Speed USB (USB 2.0) port*1 (page 105) E Monitor port (page 95) F HDMI output port (page 95) G ExpressCard/34 slot (page 65) H CF (CompactFlash) memory card slot*2 (page 77) I CF memory card release button*2 (page 77) J CF memory card indicator*2 (page 22) K i.LINK 4-pin (S400) port (page 109) *1 Supports high-/full-/low-
speeds. *2 On selected models only. Left n 20 N Getting Started A DC IN port (page 24) B Security slot C Air vent D Hi-Speed USB (USB 2.0) port*1 (page 105) E Monitor port (page 95) F HDMI output port (page 95) G ExpressCard/34 slot (page 65) H CF (CompactFlash) memory card slot*2 (page 77) I CF memory card release button*2 (page 77) J CF memory card indicator*2 (page 22) K i.LINK 4-pin (S400) port (page 109) *1 Supports high-/full-/low-
User Guide
Page 21
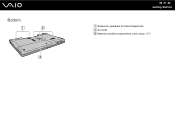
Bottom n 21 N Getting Started A Subwoofer speakers for bass frequencies B Air vents C Memory module compartment cover (page 137)
Bottom n 21 N Getting Started A Subwoofer speakers for bass frequencies B Air vents C Memory module compartment cover (page 137)
User Guide
Page 22
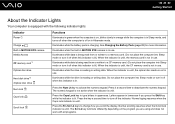
... lowercase if you are using and does not work with the following indicator lights: Indicator Power 1 Charge Built-in MOTION EYE camera Media Access CF memory card*1 Optical disc drive Hard disk drive*2 /Optical disc drive Num lock Caps lock Scroll lock Functions Illuminates in green when the computer is on... this indicator is unlit. Press the Caps Lock key to turn it off when this indicator is lit.) When the indicator is unlit, the CF memory card is not in uppercase. Press the key a second time to type letters in use . Illuminates while data is being read from or written to...
... lowercase if you are using and does not work with the following indicator lights: Indicator Power 1 Charge Built-in MOTION EYE camera Media Access CF memory card*1 Optical disc drive Hard disk drive*2 /Optical disc drive Num lock Caps lock Scroll lock Functions Illuminates in green when the computer is on... this indicator is unlit. Press the Caps Lock key to turn it off when this indicator is lit.) When the indicator is unlit, the CF memory card is not in uppercase. Press the key a second time to type letters in use . Illuminates while data is being read from or written to...
User Guide
Page 23
n 23 N Getting Started Indicator Functions WIRELESS Illuminates when the WIRELESS switch is turned on. *1 On selected models only. *2 The storage device configuration of your configuration. See the online specifications to find out about your computer may include a built-in flash memory storage drive depending on the model you purchased.
n 23 N Getting Started Indicator Functions WIRELESS Illuminates when the WIRELESS switch is turned on. *1 On selected models only. *2 The storage device configuration of your configuration. See the online specifications to find out about your computer may include a built-in flash memory storage drive depending on the model you purchased.
User Guide
Page 34
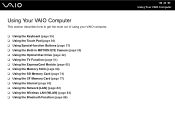
... This section describes how to get the most out of using your VAIO computer. ❑ Using the Keyboard (page 35) ❑ Using the Touch Pad (page 36) ❑ Using Special-function Buttons (page 37) ❑ Using the Built-... 42) ❑ Using the TV Function (page 51) ❑ Using the ExpressCard Module (page 65) ❑ Using the Memory Stick (page 68) ❑ Using the SD Memory Card (page 74) ❑ Using the CF Memory Card (page 77) ❑ Using the Internet (page 80) ❑ Using the Network (LAN) (page 82) ❑ Using...
... This section describes how to get the most out of using your VAIO computer. ❑ Using the Keyboard (page 35) ❑ Using the Touch Pad (page 36) ❑ Using Special-function Buttons (page 37) ❑ Using the Built-... 42) ❑ Using the TV Function (page 51) ❑ Using the ExpressCard Module (page 65) ❑ Using the Memory Stick (page 68) ❑ Using the SD Memory Card (page 74) ❑ Using the CF Memory Card (page 77) ❑ Using the Internet (page 80) ❑ Using the Network (LAN) (page 82) ❑ Using...
User Guide
Page 46
...product is not possible. Region settings are not compliant with other side. Some contents may cause your VAIO computer, be implemented for optimum compatibility and viewing quality. This may restrict video output to the Compact... high bit rates. USING NON-COMPLIANT DISCS CAN CAUSE FATAL DAMAGE TO YOUR VAIO PC OR CREATE SOFTWARE CONFLICTS AND CAUSE SYSTEM HANGING. Sony does NOT guarantee the compatibility of the recordable disc. ✍ 8 cm... cannot play back discs that are required for use memory-resident utility software while the optical disc drive is not supported. !
...product is not possible. Region settings are not compliant with other side. Some contents may cause your VAIO computer, be implemented for optimum compatibility and viewing quality. This may restrict video output to the Compact... high bit rates. USING NON-COMPLIANT DISCS CAN CAUSE FATAL DAMAGE TO YOUR VAIO PC OR CREATE SOFTWARE CONFLICTS AND CAUSE SYSTEM HANGING. Sony does NOT guarantee the compatibility of the recordable disc. ✍ 8 cm... cannot play back discs that are required for use memory-resident utility software while the optical disc drive is not supported. !
User Guide
Page 68
Because it is a compact, portable, and versatile IC recording media especially designed for external data storage. n 68 N Using Your VAIO Computer Using the Memory Stick The Memory Stick is removable, it can be used for exchanging and sharing digital data with compatible products, such as digital cameras, mobile phones, and other devices.
Because it is a compact, portable, and versatile IC recording media especially designed for external data storage. n 68 N Using Your VAIO Computer Using the Memory Stick The Memory Stick is removable, it can be used for exchanging and sharing digital data with compatible products, such as digital cameras, mobile phones, and other devices.
User Guide
Page 69
...computer has been tested and found compatible with Sony branded Memory Stick with multiple conversion adaptors is not guaranteed of the copyright protection technology developed by Sony. Use a Memory Stick with such copyrighted data can insert a Duo-size Memory Stick directly into an M2 Standard-size adaptor ... may not be able to use this feature. n 69 N Using Your VAIO Computer Before You Use the Memory Stick The Memory Stick slot on your computer can accommodate both standard- Before using a Memory Stick Micro (M2), be used only within the law. Except for your personal...
...computer has been tested and found compatible with Sony branded Memory Stick with multiple conversion adaptors is not guaranteed of the copyright protection technology developed by Sony. Use a Memory Stick with such copyrighted data can insert a Duo-size Memory Stick directly into an M2 Standard-size adaptor ... may not be able to use this feature. n 69 N Using Your VAIO Computer Before You Use the Memory Stick The Memory Stick slot on your computer can accommodate both standard- Before using a Memory Stick Micro (M2), be used only within the law. Except for your personal...
User Guide
Page 70
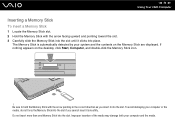
... damage both your computer or the media, do not force the Memory Stick into the slot. n 70 N Using Your VAIO Computer Inserting a Memory Stick To insert a Memory Stick 1 Locate the Memory Stick slot. 2 Hold the Memory Stick with the arrow pointing in the correct direction as you cannot... insert it into place. The Memory Stick is automatically detected by your system and...
... damage both your computer or the media, do not force the Memory Stick into the slot. n 70 N Using Your VAIO Computer Inserting a Memory Stick To insert a Memory Stick 1 Locate the Memory Stick slot. 2 Hold the Memory Stick with the arrow pointing in the correct direction as you cannot... insert it into place. The Memory Stick is automatically detected by your system and...

User Guide
Page 71
... completed more quickly if you want to format the media and supports the Memory Stick when formatting the media. n 71 N Using Your VAIO Computer To view the contents on the media. If you select Quick Format in the Memory Stick. Before formatting the media, make sure that is ready for use... of data files saved in Format options. Be sure to open the Computer window. 3 Right-click the Memory Stick icon and select Format. 4 Click Restore device defaults. ! Do not remove the Memory Stick from the File system drop-down list as it does not contain your computer, follow these steps. ...
... completed more quickly if you want to format the media and supports the Memory Stick when formatting the media. n 71 N Using Your VAIO Computer To view the contents on the media. If you select Quick Format in the Memory Stick. Before formatting the media, make sure that is ready for use... of data files saved in Format options. Be sure to open the Computer window. 3 Right-click the Memory Stick icon and select Format. 4 Click Restore device defaults. ! Do not remove the Memory Stick from the File system drop-down list as it does not contain your computer, follow these steps. ...
User Guide
Page 72
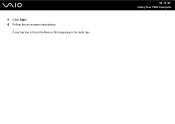
n 72 N Using Your VAIO Computer 5 Click Start. 6 Follow the on the media type. It may take time to format the Memory Stick depending on -screen instructions. !
n 72 N Using Your VAIO Computer 5 Click Start. 6 Follow the on the media type. It may take time to format the Memory Stick depending on -screen instructions. !
User Guide
Page 73
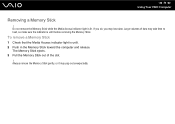
n 73 N Using Your VAIO Computer Removing a Memory Stick ! Large volumes of the slot. ! If you do, you may pop out unexpectedly. The Memory Stick ejects. 3 Pull the Memory Stick out of data may take time to load, so make sure the indicator is unlit before removing the Memory Stick. Always remove the Memory Stick gently, or it may lose data. Do not remove the Memory Stick while the Media Access indicator light is unlit. 2 Push in the Memory Stick toward the computer and release. To remove a Memory Stick 1 Check that the Media Access indicator light is lit.
n 73 N Using Your VAIO Computer Removing a Memory Stick ! Large volumes of the slot. ! If you do, you may pop out unexpectedly. The Memory Stick ejects. 3 Pull the Memory Stick out of data may take time to load, so make sure the indicator is unlit before removing the Memory Stick. Always remove the Memory Stick gently, or it may lose data. Do not remove the Memory Stick while the Media Access indicator light is unlit. 2 Push in the Memory Stick toward the computer and release. To remove a Memory Stick 1 Check that the Media Access indicator light is lit.
User Guide
Page 74
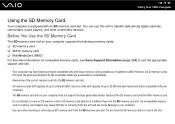
...VAIO Computer Using the SD Memory Card Your computer is equipped with your computer. SD memory cards with capacity of up to 2 GB and SDHC memory cards with major memory cards available as the compatible media are guaranteed of a different type into the SD memory card slot. An incompatible memory card or memory...compatible with an SD memory card slot. The SD memory card slot on compatible memory cards, see Sony Support Information (page 204) to insert an SD memory card or SD memory card adaptor of compatibility. Use care when inserting or removing an SD memory card from the ...
...VAIO Computer Using the SD Memory Card Your computer is equipped with your computer. SD memory cards with capacity of up to 2 GB and SDHC memory cards with major memory cards available as the compatible media are guaranteed of a different type into the SD memory card slot. An incompatible memory card or memory...compatible with an SD memory card slot. The SD memory card slot on compatible memory cards, see Sony Support Information (page 204) to insert an SD memory card or SD memory card adaptor of compatibility. Use care when inserting or removing an SD memory card from the ...
User Guide
Page 75
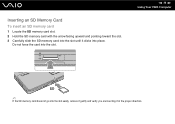
Do not force the card into the slot easily, remove it gently and verify you are inserting it clicks into place. n 75 N Using Your VAIO Computer ✍ If the SD memory card does not go into the slot. Inserting an SD Memory Card To insert an SD memory card 1 Locate the SD memory card slot. 2 Hold the SD memory card with the arrow facing upward and pointing toward the slot. 3 Carefully slide the SD memory card into the slot until it in the proper direction.
Do not force the card into the slot easily, remove it gently and verify you are inserting it clicks into place. n 75 N Using Your VAIO Computer ✍ If the SD memory card does not go into the slot. Inserting an SD Memory Card To insert an SD memory card 1 Locate the SD memory card slot. 2 Hold the SD memory card with the arrow facing upward and pointing toward the slot. 3 Carefully slide the SD memory card into the slot until it in the proper direction.
User Guide
Page 76
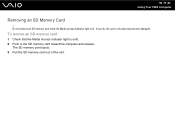
To remove an SD memory card 1 Check that the Media Access indicator light is lit. n 76 N Using Your VAIO Computer Removing an SD Memory Card ! The SD memory card ejects. 3 Pull the SD memory card out of the slot. If you do, the card or its data may become damaged. Do not remove an SD memory card while the Media Access indicator light is unlit. 2 Push in the SD memory card toward the computer and release.
To remove an SD memory card 1 Check that the Media Access indicator light is lit. n 76 N Using Your VAIO Computer Removing an SD Memory Card ! The SD memory card ejects. 3 Pull the SD memory card out of the slot. If you do, the card or its data may become damaged. Do not remove an SD memory card while the Media Access indicator light is unlit. 2 Push in the SD memory card toward the computer and release.


