
User Guide
Page 2
n2 N Contents Before Use ...6 Documentation ...6 Ergonomic Considerations ...8 Getting Started ...10 Locating Controls and Ports...11 About the Indicator Lights ...17 Connecting a Power Source ...18 Using the Battery Pack ...19 Shutting Down Your Computer Safely ...24 Using Your VAIO Computer ...25 Using the Keyboard ...26 Using the Touch Pad ...28 Using the Optical Disc Drive ...29 Using PC Cards ...38 Using the Memory Stick Media ...41 Using the Internet...44 Using Wireless LAN (WLAN) ...45
n2 N Contents Before Use ...6 Documentation ...6 Ergonomic Considerations ...8 Getting Started ...10 Locating Controls and Ports...11 About the Indicator Lights ...17 Connecting a Power Source ...18 Using the Battery Pack ...19 Shutting Down Your Computer Safely ...24 Using Your VAIO Computer ...25 Using the Keyboard ...26 Using the Touch Pad ...28 Using the Optical Disc Drive ...29 Using PC Cards ...38 Using the Memory Stick Media ...41 Using the Internet...44 Using Wireless LAN (WLAN) ...45

User Guide
Page 3
...) Device...64 Connecting a Printer ...67 Connecting an i.LINK Device ...68 Connecting to a Network (LAN) ...70 Customizing Your VAIO Computer ...71 Setting the Password ...72 Setting Up Your Computer with VAIO Central ...75 Using the Power Saving Modes ...76 Managing Power with VAIO Power Management ...81 Upgrading Your VAIO Computer...84 Adding and Removing Memory...85
...) Device...64 Connecting a Printer ...67 Connecting an i.LINK Device ...68 Connecting to a Network (LAN) ...70 Customizing Your VAIO Computer ...71 Setting the Password ...72 Setting Up Your Computer with VAIO Central ...75 Using the Power Saving Modes ...76 Managing Power with VAIO Power Management ...81 Upgrading Your VAIO Computer...84 Adding and Removing Memory...85

User Guide
Page 4
n4 N Precautions ...91 On Handling the LCD Screen ...92 On Using the Power Source ...93 On Handling Your Computer...94 On Handling Floppy Disks ...96 On Handling Discs ...97 On Using the Battery Pack...98 On Using Headphones...99 On Handling Memory Stick Media...99 On Handling the Hard Disk ...100 Troubleshooting ...101 Computer ...102 System Security ...111 Battery...113 Internet ...115 Networking ...117 CDs and DVDs...120 Display ...125 Printing ...127 Microphone ...128 Mouse ...129 Speakers ...130 Touch Pad...131 Keyboard...132
n4 N Precautions ...91 On Handling the LCD Screen ...92 On Using the Power Source ...93 On Handling Your Computer...94 On Handling Floppy Disks ...96 On Handling Discs ...97 On Using the Battery Pack...98 On Using Headphones...99 On Handling Memory Stick Media...99 On Handling the Hard Disk ...100 Troubleshooting ...101 Computer ...102 System Security ...111 Battery...113 Internet ...115 Networking ...117 CDs and DVDs...120 Display ...125 Printing ...127 Microphone ...128 Mouse ...129 Speakers ...130 Touch Pad...131 Keyboard...132
User Guide
Page 11
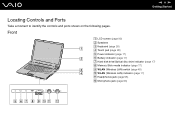
n 11 N Getting Started Locating Controls and Ports Take a moment to identify the controls and ports shown on the following pages. Front A LCD screen (page 92) B Speakers C Keyboard (page 26) D Touch pad (page 28) E Power indicator (page 17) F Battery indicator (page 17) G Hard disk drive/Optical disc drive indicator (page 17) H Memory Stick media indicator (page 17) I WLAN (Wireless LAN) switch (page 45) J WLAN (Wireless LAN) indicator (page 17) K Headphones jack (page 55) L Microphone jack (page 63)
n 11 N Getting Started Locating Controls and Ports Take a moment to identify the controls and ports shown on the following pages. Front A LCD screen (page 92) B Speakers C Keyboard (page 26) D Touch pad (page 28) E Power indicator (page 17) F Battery indicator (page 17) G Hard disk drive/Optical disc drive indicator (page 17) H Memory Stick media indicator (page 17) I WLAN (Wireless LAN) switch (page 45) J WLAN (Wireless LAN) indicator (page 17) K Headphones jack (page 55) L Microphone jack (page 63)

User Guide
Page 14
Right n 14 N Getting Started A PC Card release button (page 40) B PC Card slot (page 38) C i.LINK® (IEEE 1394) S400 port (page 68) D Memory Stick media slot*1 (page 42) E Hi-Speed USB (USB 2.0) ports*2 (page 64) F Monitor (VGA) port (page 57) G DC IN port (page 18) *1 Your computer supports Memory Stick Duo media and Memory Stick PRO with high speed and high capacity capabilities. *2 Supports high-/full-/low- speeds.
Right n 14 N Getting Started A PC Card release button (page 40) B PC Card slot (page 38) C i.LINK® (IEEE 1394) S400 port (page 68) D Memory Stick media slot*1 (page 42) E Hi-Speed USB (USB 2.0) ports*2 (page 64) F Monitor (VGA) port (page 57) G DC IN port (page 18) *1 Your computer supports Memory Stick Duo media and Memory Stick PRO with high speed and high capacity capabilities. *2 Supports high-/full-/low- speeds.
User Guide
Page 17
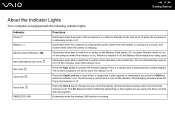
... is on .) When the indicator is off the indicator. Illuminates when data is read from or written to the Memory Stick media. (Do not enter Standby mode or turn off , the Memory Stick media is charging. Press it a second time to type letters in Hibernate mode or off . Press the... Started About the Indicator Lights Your computer is running out of the computer is on the program you scroll the display. Indicator Power 1 Battery e Memory Stick PRO/Duo Hard disk/Optical disc drive Num lock Caps lock Scroll lock WIRELESS LAN Functions Illuminates when the power of power, and double...
... is on .) When the indicator is off the indicator. Illuminates when data is read from or written to the Memory Stick media. (Do not enter Standby mode or turn off , the Memory Stick media is charging. Press it a second time to type letters in Hibernate mode or off . Press the... Started About the Indicator Lights Your computer is running out of the computer is on the program you scroll the display. Indicator Power 1 Battery e Memory Stick PRO/Duo Hard disk/Optical disc drive Num lock Caps lock Scroll lock WIRELESS LAN Functions Illuminates when the power of power, and double...

User Guide
Page 25
Using Your VAIO Computer This section describes how to get the most out of using your computer. ❑ Using the Keyboard (page 26) ❑ Using the Touch Pad (page 28) ❑ Using the Optical Disc Drive (page 29) ❑ Using PC Cards (page 38) ❑ Using the Memory Stick Media (page 41) ❑ Using the Internet (page 44) ❑ Using Wireless LAN (WLAN) (page 45) n 25 N Using Your VAIO Computer
Using Your VAIO Computer This section describes how to get the most out of using your computer. ❑ Using the Keyboard (page 26) ❑ Using the Touch Pad (page 28) ❑ Using the Optical Disc Drive (page 29) ❑ Using PC Cards (page 38) ❑ Using the Memory Stick Media (page 41) ❑ Using the Internet (page 44) ❑ Using Wireless LAN (WLAN) (page 45) n 25 N Using Your VAIO Computer

User Guide
Page 33
... discs in any other applications. ❑ Never touch the surface of the disc irreparably. ❑ Connect and use circular discs. n 33 N Using Your VAIO Computer Notes on writing data to a disc ❑ To make the data on a disc readable on an optical disc drive, you need to close the... writing data onto a disc. ❑ Deactivate the screen saver and exit anti-virus software before writing data onto a disc. ❑ Do not use memory-resident utility software while writing data to power the computer or make sure your software. ❑ Only use the AC adapter to a disc. To complete...
... discs in any other applications. ❑ Never touch the surface of the disc irreparably. ❑ Connect and use circular discs. n 33 N Using Your VAIO Computer Notes on writing data to a disc ❑ To make the data on a disc readable on an optical disc drive, you need to close the... writing data onto a disc. ❑ Deactivate the screen saver and exit anti-virus software before writing data onto a disc. ❑ Do not use memory-resident utility software while writing data to power the computer or make sure your software. ❑ Only use the AC adapter to a disc. To complete...

User Guide
Page 34
... to malfunction. ❑ Deactivate the screen saver and exit anti-virus software before playing a DVD movie. ❑ Do not use memory-resident utility software to remove a USB device, such as VAIO Zone or WinDVD. See the help file on what type of player you can play the disc on playing DVDs To... different from the label on the DVD disc or on the packaging, you want to speed up disc access when playing a DVD. n 34 N Using Your VAIO Computer Notes on your computer. ! When you have audio devices connected, this DVD in audio and video. ❑ When you are labeled on the DVDs...
... to malfunction. ❑ Deactivate the screen saver and exit anti-virus software before playing a DVD movie. ❑ Do not use memory-resident utility software to remove a USB device, such as VAIO Zone or WinDVD. See the help file on what type of player you can play the disc on playing DVDs To... different from the label on the DVD disc or on the packaging, you want to speed up disc access when playing a DVD. n 34 N Using Your VAIO Computer Notes on your computer. ! When you have audio devices connected, this DVD in audio and video. ❑ When you are labeled on the DVDs...

User Guide
Page 41
...found compatible with the Sony branded Memory Stick media with an erasure prevention switch to protect valuable data from but not saved on Memory Stick media, visit the Sony online support Web site at http://esupport.sony.com/EN/ VAIO/ for customers in USA, at http://www.sony.ca/support for ...customers in Latin American countries or areas. ! Sony assumes no liability for exchanging and sharing ...
...found compatible with the Sony branded Memory Stick media with an erasure prevention switch to protect valuable data from but not saved on Memory Stick media, visit the Sony online support Web site at http://esupport.sony.com/EN/ VAIO/ for customers in USA, at http://www.sony.ca/support for ...customers in Latin American countries or areas. ! Sony assumes no liability for exchanging and sharing ...

User Guide
Page 42
... not force the Memory Stick media into the slot if it into the slot. n 42 N Using Your VAIO Computer Inserting a Memory Stick Media To insert a Memory Stick media 1 Hold the Memory Stick media with the arrow facing up and toward the Memory Stick media slot. 2 Lift the Memory Stick media slot ...cover. 3 Carefully slide the Memory Stick media into the slot until it...
... not force the Memory Stick media into the slot if it into the slot. n 42 N Using Your VAIO Computer Inserting a Memory Stick Media To insert a Memory Stick media 1 Hold the Memory Stick media with the arrow facing up and toward the Memory Stick media slot. 2 Lift the Memory Stick media slot ...cover. 3 Carefully slide the Memory Stick media into the slot until it...
User Guide
Page 43
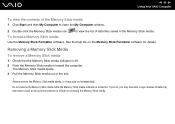
...VAIO Computer To view the contents of the Memory Stick media 1 Click Start and then My Computer to open the My Computer window. 2 Double-click the Memory Stick media icon to view the list of data may take time to load, so be sure the indicator is off . 2 Push the Memory... Stick media in the Memory Stick media. To format a Memory Stick media Use the Memory Stick Formatter software. Large volumes of data files saved in toward the computer. Removing a Memory Stick Media To remove a Memory Stick media 1 Check that the Memory Stick media indicator is turned on...
...VAIO Computer To view the contents of the Memory Stick media 1 Click Start and then My Computer to open the My Computer window. 2 Double-click the Memory Stick media icon to view the list of data may take time to load, so be sure the indicator is off . 2 Push the Memory... Stick media in the Memory Stick media. To format a Memory Stick media Use the Memory Stick Formatter software. Large volumes of data files saved in toward the computer. Removing a Memory Stick Media To remove a Memory Stick media 1 Check that the Memory Stick media indicator is turned on...
User Guide
Page 69
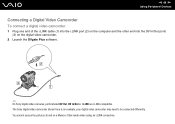
... pictures stored on the digital video camcorder. 2 Launch the DVgate Plus software. ✍ On Sony digital video cameras, ports labeled DV Out, DV In/Out or i.LINK are i.LINK-compatible. The Sony digital video camcorder shown here is an example; n 69 N Using Peripheral Devices Connecting a Digital... Video Camcorder To connect a digital video camcorder 1 Plug one end of the i.LINK cable (1) into the i.LINK port (2) on the computer and the other end into the DV In/Out ports (3) on a Memory...
... pictures stored on the digital video camcorder. 2 Launch the DVgate Plus software. ✍ On Sony digital video cameras, ports labeled DV Out, DV In/Out or i.LINK are i.LINK-compatible. The Sony digital video camcorder shown here is an example; n 69 N Using Peripheral Devices Connecting a Digital... Video Camcorder To connect a digital video camcorder 1 Plug one end of the i.LINK cable (1) into the i.LINK port (2) on the computer and the other end into the DV In/Out ports (3) on a Memory...

User Guide
Page 84
..., if you are not familiar with upgrading memory on a computer. ❑ You do not touch the connectors or open the memory panel. To find the nearest center or agent, visit the Sony online support Web site. n 84 N Upgrading Your VAIO Computer Upgrading Your VAIO Computer Your computer and memory modules use high precision components and electronic...
..., if you are not familiar with upgrading memory on a computer. ❑ You do not touch the connectors or open the memory panel. To find the nearest center or agent, visit the Sony online support Web site. n 84 N Upgrading Your VAIO Computer Upgrading Your VAIO Computer Your computer and memory modules use high precision components and electronic...

User Guide
Page 85
...compliance required for example). If a memory module is , battery or AC adapter) and from ESD. Notes on the configuration of your system. Install the memory module only at an ESD workstation. n 85 N Upgrading Your VAIO Computer Adding and Removing Memory If you want to expand the ...functionality of your computer, you can increase the memory by the computer or Windows becomes unstable, contact ...
...compliance required for example). If a memory module is , battery or AC adapter) and from ESD. Notes on the configuration of your system. Install the memory module only at an ESD workstation. n 85 N Upgrading Your VAIO Computer Adding and Removing Memory If you want to expand the ...functionality of your computer, you can increase the memory by the computer or Windows becomes unstable, contact ...
User Guide
Page 86
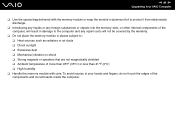
...176;C) or less than 41°F (5°C) ❑ High humidity ❑ Handle the memory module with the memory module or wrap the module in aluminum foil to protect it from electrostatic discharge. ❑ Introducing... any liquids or any foreign substances or objects into the memory slots, or other internal components of the computer, will result in damage to the computer...and any repair costs will not be covered by the warranty. ❑ Do not place the memory module in places subject to your hands and fingers, do not touch the edges of the ...
...176;C) or less than 41°F (5°C) ❑ High humidity ❑ Handle the memory module with the memory module or wrap the module in aluminum foil to protect it from electrostatic discharge. ❑ Introducing... any liquids or any foreign substances or objects into the memory slots, or other internal components of the computer, will result in damage to the computer...and any repair costs will not be covered by the warranty. ❑ Do not place the memory module in places subject to your hands and fingers, do not touch the edges of the ...
User Guide
Page 87
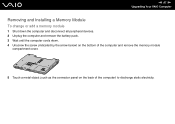
n 87 N Upgrading Your VAIO Computer Removing and Installing a Memory Module To change or add a memory module 1 Shut down the computer and disconnect all peripheral devices. 2 Unplug the computer and remove the battery pack. 3 Wait until the computer cools down. 4 Unscrew the screw (indicated by the arrow below) on the bottom of the computer and remove the memory module compartment cover. 5 Touch a metal object (such as the connector panel on the back of the computer) to discharge static electricity.
n 87 N Upgrading Your VAIO Computer Removing and Installing a Memory Module To change or add a memory module 1 Shut down the computer and disconnect all peripheral devices. 2 Unplug the computer and remove the battery pack. 3 Wait until the computer cools down. 4 Unscrew the screw (indicated by the arrow below) on the bottom of the computer and remove the memory module compartment cover. 5 Touch a metal object (such as the connector panel on the back of the computer) to discharge static electricity.
User Guide
Page 88
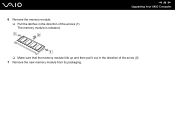
6 Remove the memory module: ❑ Pull the latches in the direction of the arrows (1). The memory module is released. n 88 N Upgrading Your VAIO Computer ❑ Make sure that the memory module tilts up and then pull it out in the direction of the arrow (2). 7 Remove the new memory module from its packaging.
6 Remove the memory module: ❑ Pull the latches in the direction of the arrows (1). The memory module is released. n 88 N Upgrading Your VAIO Computer ❑ Make sure that the memory module tilts up and then pull it out in the direction of the arrow (2). 7 Remove the new memory module from its packaging.

User Guide
Page 89
Do not touch any other components on the computer. n 89 N Upgrading Your VAIO Computer 8 Slide the memory module into the memory module slot and push it in until it clicks into place. ! Do not damage the insulation sheet equipped for module protection. 9 Replace the memory module compartment cover. 10 Tighten the screw on the bottom of the computer. 11 Reinstall the battery and turn on the motherboard.
Do not touch any other components on the computer. n 89 N Upgrading Your VAIO Computer 8 Slide the memory module into the memory module slot and push it in until it clicks into place. ! Do not damage the insulation sheet equipped for module protection. 9 Replace the memory module compartment cover. 10 Tighten the screw on the bottom of the computer. 11 Reinstall the battery and turn on the motherboard.
User Guide
Page 90
You can view the amount of memory 1 Turn on the computer. 2 Click Start, point to All Programs, and click VAIO Central. 3 Click the System Information tab in the VAIO Central window. 4 Double-click the System Information folder. 5 Double-click the System Information icon. If the additional memory does not appear, repeat the whole procedure and restart the computer. n 90 N Upgrading Your VAIO Computer Viewing the Amount of Memory To view the amount of system memory.
You can view the amount of memory 1 Turn on the computer. 2 Click Start, point to All Programs, and click VAIO Central. 3 Click the System Information tab in the VAIO Central window. 4 Double-click the System Information folder. 5 Double-click the System Information icon. If the additional memory does not appear, repeat the whole procedure and restart the computer. n 90 N Upgrading Your VAIO Computer Viewing the Amount of Memory To view the amount of system memory.


