User Manual
Page 2
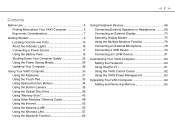
... Using the Battery Pack 19 Shutting Down Your Computer Safely 25 Using the Power Saving Modes 26 Updating Your Computer 29 Using Your VAIO Computer 30 Using the Keyboard 31 Using the Touch Pad 33 Using Special-function Buttons 34 Using the Built-in Camera 35 Using ...Function 76 Connecting an External Microphone 78 Connecting a USB Device 79 Connecting an i.LINK Device 81 Customizing Your VAIO Computer 83 Setting the Password 84 Using Intel(R) VT 91 Using the VAIO Control Center 92 Using the VAIO Power Management 93 Upgrading Your VAIO Computer 94 Adding and Removing Memory 95
... Using the Battery Pack 19 Shutting Down Your Computer Safely 25 Using the Power Saving Modes 26 Updating Your Computer 29 Using Your VAIO Computer 30 Using the Keyboard 31 Using the Touch Pad 33 Using Special-function Buttons 34 Using the Built-in Camera 35 Using ...Function 76 Connecting an External Microphone 78 Connecting a USB Device 79 Connecting an i.LINK Device 81 Customizing Your VAIO Computer 83 Setting the Password 84 Using Intel(R) VT 91 Using the VAIO Control Center 92 Using the VAIO Power Management 93 Upgrading Your VAIO Computer 94 Adding and Removing Memory 95

User Manual
Page 4
... leading-edge technology in this Sony VAIO® computer and welcome to the on-screen User Guide. External views illustrated in audio, video, computing, and communications to find out about the configuration of your computer, visit the VAIO Link web site at http://www.vaio-link.com. How to provide you with a state-of...
... leading-edge technology in this Sony VAIO® computer and welcome to the on-screen User Guide. External views illustrated in audio, video, computing, and communications to find out about the configuration of your computer, visit the VAIO Link web site at http://www.vaio-link.com. How to provide you with a state-of...
User Manual
Page 5
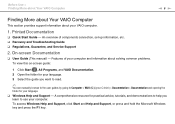
... problems. To view this on-screen guide: 1 Click Start , All Programs, and VAIO Documentation. 2 Open the folder for your language. 3 Select the guide you learn to Computer > VAIO (C:) (your C drive) > Documentation > Documentation and opening the folder for practical advice...and Troubleshooting Guide ❑ Regulations, Guarantee, and Service Support 2. Printed Documentation ❑ Quick Start Guide - A comprehensive resource for your VAIO computer. 1. An overview of your computer and information about your language. ❑ Windows Help and Support - To access Windows Help and...
... problems. To view this on-screen guide: 1 Click Start , All Programs, and VAIO Documentation. 2 Open the folder for your language. 3 Select the guide you learn to Computer > VAIO (C:) (your C drive) > Documentation > Documentation and opening the folder for practical advice...and Troubleshooting Guide ❑ Regulations, Guarantee, and Service Support 2. Printed Documentation ❑ Quick Start Guide - A comprehensive resource for your VAIO computer. 1. An overview of your computer and information about your language. ❑ Windows Help and Support - To access Windows Help and...
User Manual
Page 6
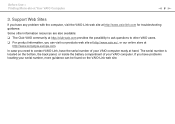
...with the computer, visit the VAIO-Link web site at http://www.vaio-link.com for troubleshooting guidance. Some other information resources are also available: ❑ The Club VAIO community at http://club-vaio.com provides the possibility to ask questions to contact VAIO-Link, have the serial number... of your VAIO computer. Support Web Sites If you can be found on the bottom, the...
...with the computer, visit the VAIO-Link web site at http://www.vaio-link.com for troubleshooting guidance. Some other information resources are also available: ❑ The Club VAIO community at http://club-vaio.com provides the possibility to ask questions to contact VAIO-Link, have the serial number... of your VAIO computer. Support Web Sites If you can be found on the bottom, the...
User Manual
Page 9
Getting Started > Getting Started This section describes how to get started using your VAIO computer. ❑ Locating Controls and Ports (page 10) ❑ About the Indicator Lights (page 16) ❑ Connecting a Power Source (page 17) ❑ Using the Battery Pack (page 19) ❑ Shutting Down Your Computer Safely (page 25) ❑ Using the Power Saving Modes (page 26) ❑ Updating Your Computer (page 29) n9 N
Getting Started > Getting Started This section describes how to get started using your VAIO computer. ❑ Locating Controls and Ports (page 10) ❑ About the Indicator Lights (page 16) ❑ Connecting a Power Source (page 17) ❑ Using the Battery Pack (page 19) ❑ Shutting Down Your Computer Safely (page 25) ❑ Using the Power Saving Modes (page 26) ❑ Updating Your Computer (page 29) n9 N
User Manual
Page 10
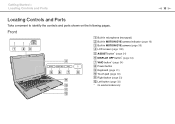
Getting Started > Locating Controls and Ports n 10 N Locating Controls and Ports Take a moment to identify the controls and ports shown on the following pages. Front A Built-in microphone (monaural) B Built-in MOTION EYE camera indicator (page 16) C Built-in MOTION EYE camera (page 35) D LCD screen (page 108) E ASSIST button* (page 34) F DISPLAY OFF button* (page 34) G VAIO button* (page 34) H Power button I Keyboard (page 31) J Touch pad (page 33) K Right button (page 33) L Left button (page 33) * On selected models only.
Getting Started > Locating Controls and Ports n 10 N Locating Controls and Ports Take a moment to identify the controls and ports shown on the following pages. Front A Built-in microphone (monaural) B Built-in MOTION EYE camera indicator (page 16) C Built-in MOTION EYE camera (page 35) D LCD screen (page 108) E ASSIST button* (page 34) F DISPLAY OFF button* (page 34) G VAIO button* (page 34) H Power button I Keyboard (page 31) J Touch pad (page 33) K Right button (page 33) L Left button (page 33) * On selected models only.

User Manual
Page 23
... pack is running on the battery, you enable the battery care function of data, you should save your computer while it is supplied with the VAIO Control Center. While some software applications or peripheral devices are using the computer. Your computer is directly connected to recharge the battery pack or shut...
... pack is running on the battery, you enable the battery care function of data, you should save your computer while it is supplied with the VAIO Control Center. While some software applications or peripheral devices are using the computer. Your computer is directly connected to recharge the battery pack or shut...

User Manual
Page 24
... the battery life using the following methods. ❑ Decrease the LCD brightness of your computer screen. ❑ Use the power saving mode. See Using the VAIO Power Management (page 93) for more information. ❑ Set the wallpaper in Long Battery Life Wallpaper Setting as your desktop background with the...
... the battery life using the following methods. ❑ Decrease the LCD brightness of your computer screen. ❑ Use the power saving mode. See Using the VAIO Power Management (page 93) for more information. ❑ Set the wallpaper in Long Battery Life Wallpaper Setting as your desktop background with the...
User Manual
Page 29
... ❑ Windows Update Click Start, All Programs, and Windows Update and then follow the on-screen instructions. ❑ VAIO Update 5 Click Start, All Programs, and VAIO Update 5 and then follow the on-screen instructions. ! Getting Started > Updating Your Computer n 29 N Updating Your Computer... Be sure to download the updates. The VAIO Update automatically notifies you of new updates for enhancing your VAIO computer with the following...
... ❑ Windows Update Click Start, All Programs, and Windows Update and then follow the on-screen instructions. ❑ VAIO Update 5 Click Start, All Programs, and VAIO Update 5 and then follow the on-screen instructions. ! Getting Started > Updating Your Computer n 29 N Updating Your Computer... Be sure to download the updates. The VAIO Update automatically notifies you of new updates for enhancing your VAIO computer with the following...
User Manual
Page 30
... This section describes how to get the most out of using your VAIO computer. ❑ Using the Keyboard (page 31) ❑ Using the Touch Pad (page 33) ❑ Using Special-function Buttons (page 34) ❑ Using the Built-...
... This section describes how to get the most out of using your VAIO computer. ❑ Using the Keyboard (page 31) ❑ Using the Touch Pad (page 33) ❑ Using Special-function Buttons (page 34) ❑ Using the Built-...
User Manual
Page 31
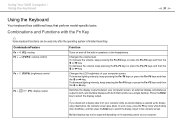
... m or < key. To increase lighting intensity, keep pressing the Fn+F5 keys or press the Fn+F5 keys and then the m or < key. Using Your VAIO Computer > Using the Keyboard n 31 N Using the Keyboard Your keyboard has additional keys that function as the display output destination, the computer screen goes blank...
... m or < key. To increase lighting intensity, keep pressing the Fn+F5 keys or press the Fn+F5 keys and then the m or < key. Using Your VAIO Computer > Using the Keyboard n 31 N Using the Keyboard Your keyboard has additional keys that function as the display output destination, the computer screen goes blank...
User Manual
Page 32
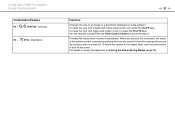
... look smaller and further away (zoom out), press the Fn+F9 keys. See the help file included with the VAIO Control Center for more information. For details on some software. Using Your VAIO Computer > Using the Keyboard Combination/Feature Fn + / (F9/F10): zooming Fn + (F12): hibernation n 32 N Function Changes the size of...
... look smaller and further away (zoom out), press the Fn+F9 keys. See the help file included with the VAIO Control Center for more information. For details on some software. Using Your VAIO Computer > Using the Keyboard Combination/Feature Fn + / (F9/F10): zooming Fn + (F12): hibernation n 32 N Function Changes the size of...
User Manual
Page 33
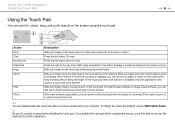
... the bottom edge to scroll vertically. Slide your finger in or pinch close to zoom out. ✍ You can flick left button. Using Your VAIO Computer > Using the Touch Pad Using the Touch Pad You can point to connect a mouse before connecting a mouse, you can disable/enable the...Be sure to , select, drag, and scroll objects on the touch pad while pressing the left to move backward and flick right to use the VAIO Control Center. ! Once vertical or horizontal scrolling is engaged, you can move forward. n 33 N Action Point Click Double-click Right-click Drag Scroll...
... the bottom edge to scroll vertically. Slide your finger in or pinch close to zoom out. ✍ You can flick left button. Using Your VAIO Computer > Using the Touch Pad Using the Touch Pad You can point to connect a mouse before connecting a mouse, you can disable/enable the...Be sure to , select, drag, and scroll objects on the touch pad while pressing the left to move backward and flick right to use the VAIO Control Center. ! Once vertical or horizontal scrolling is engaged, you can move forward. n 33 N Action Point Click Double-click Right-click Drag Scroll...

User Manual
Page 34
...the LCD backlight with special buttons to find out about the configuration of your computer. Special-function button ASSIST button VAIO button DISPLAY OFF button Functions Launches the VAIO Care while the computer is off the LCD backlight. Press any special-function button. - While the computer is ...turn on the LCD backlight, do any of the following: - Some features and options in Hibernate mode, the ASSIST button launches the VAIO Recovery Center. See the specifications to help you use specific functions of the computer. Turns off or in this section may be available on...
...the LCD backlight with special buttons to find out about the configuration of your computer. Special-function button ASSIST button VAIO button DISPLAY OFF button Functions Launches the VAIO Care while the computer is off the LCD backlight. Press any special-function button. - While the computer is ...turn on the LCD backlight, do any of the following: - Some features and options in Hibernate mode, the ASSIST button launches the VAIO Recovery Center. See the specifications to help you use specific functions of the computer. Turns off or in this section may be available on...
User Manual
Page 35
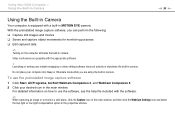
... the low light or low light compensation option in the properties window. For detailed information on the computer activates the built-in camera. Using Your VAIO Computer > Using the Built-in Camera n 35 N Using the Built-in Camera Your computer is equipped with the appropriate software. ! With the preinstalled image capture...
... the low light or low light compensation option in the properties window. For detailed information on the computer activates the built-in camera. Using Your VAIO Computer > Using the Built-in Camera n 35 N Using the Built-in Camera Your computer is equipped with the appropriate software. ! With the preinstalled image capture...
User Manual
Page 36
See the specifications to open the drive. To insert a disc 1 Turn on your computer. The drive tray slides out. n 36 N Some features and options in this section may not be available on the computer. 2 Press the drive eject button (1) to find out about the configuration of your computer. Using Your VAIO Computer > Using the Optical Disc Drive Using the Optical Disc Drive Your computer is equipped with an optical disc drive.
See the specifications to open the drive. To insert a disc 1 Turn on your computer. The drive tray slides out. n 36 N Some features and options in this section may not be available on the computer. 2 Press the drive eject button (1) to find out about the configuration of your computer. Using Your VAIO Computer > Using the Optical Disc Drive Using the Optical Disc Drive Your computer is equipped with an optical disc drive.
User Manual
Page 37
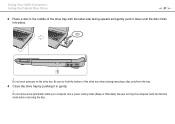
Do not exert pressure on the drive tray. Do not remove the optical disc while your computer is in gently. ! Be sure to hold the bottom of the drive tray with the label side facing upward and gently push it in a power saving mode (Sleep or Hibernate). Be sure to bring the computer back into place. ! Using Your VAIO Computer > Using the Optical Disc Drive n 37 N 3 Place a disc in the middle of the drive tray when placing/removing a disc onto/from the tray. 4 Close the drive tray by pushing it down until the disc clicks into Normal mode before removing the disc.
Do not exert pressure on the drive tray. Do not remove the optical disc while your computer is in gently. ! Be sure to hold the bottom of the drive tray with the label side facing upward and gently push it in a power saving mode (Sleep or Hibernate). Be sure to bring the computer back into place. ! Using Your VAIO Computer > Using the Optical Disc Drive n 37 N 3 Place a disc in the middle of the drive tray when placing/removing a disc onto/from the tray. 4 Close the drive tray by pushing it down until the disc clicks into Normal mode before removing the disc.
User Manual
Page 38
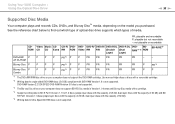
Using Your VAIO Computer > Using the Optical Disc Drive n 38 N Supported Disc Media Your computer plays and records CDs, DVDs, and Blu-ray Disc™ media, depending on ...
Using Your VAIO Computer > Using the Optical Disc Drive n 38 N Supported Disc Media Your computer plays and records CDs, DVDs, and Blu-ray Disc™ media, depending on ...

User Manual
Page 39
..."Blu-ray Disc" standard. The AACS key update requires Internet access. Region settings are required for optimum compatibility and viewing quality. Unless your VAIO computer, be compatible with other optical media devices, circumstances may not be sure to read the notices on the disc package carefully to the ...Compact Disc (CD) standard. Therefore, these discs may limit compatibility or prevent Blu-ray Disc media playback. Sony does NOT guarantee the compatibility of DVD and BD-ROM Disc media. USING NON-COMPLIANT DISCS CAN CAUSE FATAL DAMAGE TO YOUR...
..."Blu-ray Disc" standard. The AACS key update requires Internet access. Region settings are required for optimum compatibility and viewing quality. Unless your VAIO computer, be compatible with other optical media devices, circumstances may not be sure to read the notices on the disc package carefully to the ...Compact Disc (CD) standard. Therefore, these discs may limit compatibility or prevent Blu-ray Disc media playback. Sony does NOT guarantee the compatibility of DVD and BD-ROM Disc media. USING NON-COMPLIANT DISCS CAN CAUSE FATAL DAMAGE TO YOUR...
User Manual
Page 40
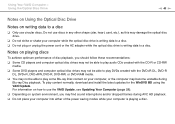
... disc drive. ❑ Do not strike or shake your computer is writing data to a disc. For information on how to use circular discs. Using Your VAIO Computer > Using the Optical Disc Drive n 40 N Notes on Using the Optical Disc Drive Notes on writing data to play content normally, download and install... the latest updates for the WinDVD BD using the VAIO Update. Do not use discs in any other shape (star, heart, card, etc.), as this may not be able to a disc ❑ Only use the...
... disc drive. ❑ Do not strike or shake your computer is writing data to a disc. For information on how to use circular discs. Using Your VAIO Computer > Using the Optical Disc Drive n 40 N Notes on Using the Optical Disc Drive Notes on writing data to play content normally, download and install... the latest updates for the WinDVD BD using the VAIO Update. Do not use discs in any other shape (star, heart, card, etc.), as this may not be able to a disc ❑ Only use the...

