User Manual
Page 5
...the F1 key. On-screen Documentation ❑ User Guide (This manual) - A comprehensive resource for your language. ❑ Windows Help and Support - Printed Documentation ❑ Quick Start Guide - An overview of your computer and information about your VAIO computer. 1. Before Use > Finding... More about Your VAIO Computer n5 N Finding More about Your VAIO Computer This section provides support information about solving common problems. To view this on-screen guide: 1 Click Start , All Programs, and VAIO Documentation. 2 Open the...
...the F1 key. On-screen Documentation ❑ User Guide (This manual) - A comprehensive resource for your language. ❑ Windows Help and Support - Printed Documentation ❑ Quick Start Guide - An overview of your computer and information about your VAIO computer. 1. Before Use > Finding... More about Your VAIO Computer n5 N Finding More about Your VAIO Computer This section provides support information about solving common problems. To view this on-screen guide: 1 Click Start , All Programs, and VAIO Documentation. 2 Open the...
User Manual
Page 6
....com. In case you have any problem with the computer, visit the VAIO-Link web site at http://www.vaio-link.com for troubleshooting guidance. Support Web Sites If you can be found on the bottom, the back panel, or inside the battery compartment of your serial number, more guidance can...
....com. In case you have any problem with the computer, visit the VAIO-Link web site at http://www.vaio-link.com for troubleshooting guidance. Support Web Sites If you can be found on the bottom, the back panel, or inside the battery compartment of your serial number, more guidance can...
User Manual
Page 7
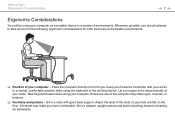
... Considerations n7 N Ergonomic Considerations You will be using your wrists in a neutral, comfortable position while using your computer - Keep your forearms horizontal, with good back support. Excessive use of your computer.
... Considerations n7 N Ergonomic Considerations You will be using your wrists in a neutral, comfortable position while using your computer - Keep your forearms horizontal, with good back support. Excessive use of your computer.
User Manual
Page 11
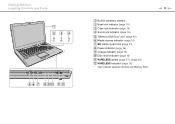
Getting Started > Locating Controls and Ports n 11 N A Built-in speakers (stereo) B Num lock indicator (page 16) C Caps lock indicator (page 16) D Scroll lock indicator (page 16) E "Memory Stick Duo" slot* (page 43) F Media Access indicator (page 16) G SD memory card slot (page 51) H Power indicator (page 16) I Charge indicator (page 16) J Disc drive indicator (page 16) K WIRELESS switch (page 57), (page 62) L WIRELESS indicator (page 16) * Your computer supports only Duo-size "Memory Stick".
Getting Started > Locating Controls and Ports n 11 N A Built-in speakers (stereo) B Num lock indicator (page 16) C Caps lock indicator (page 16) D Scroll lock indicator (page 16) E "Memory Stick Duo" slot* (page 43) F Media Access indicator (page 16) G SD memory card slot (page 51) H Power indicator (page 16) I Charge indicator (page 16) J Disc drive indicator (page 16) K WIRELESS switch (page 57), (page 62) L WIRELESS indicator (page 16) * Your computer supports only Duo-size "Memory Stick".
User Manual
Page 13
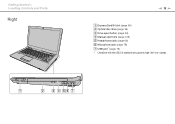
Getting Started > Locating Controls and Ports Right n 13 N A ExpressCard/34 slot (page 49) B Optical disc drive (page 36) C Drive eject button (page 36) D Manual eject hole (page 139) E Headphones jack (page 69) F Microphone jack (page 78) G USB port* (page 79) * Compliant with the USB 2.0 standard and supports high-/full-/low- speeds.
Getting Started > Locating Controls and Ports Right n 13 N A ExpressCard/34 slot (page 49) B Optical disc drive (page 36) C Drive eject button (page 36) D Manual eject hole (page 139) E Headphones jack (page 69) F Microphone jack (page 78) G USB port* (page 79) * Compliant with the USB 2.0 standard and supports high-/full-/low- speeds.
User Manual
Page 14
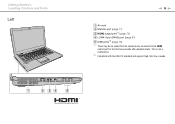
This is not a malfunction. *2 Compliant with the USB 2.0 standard and support high-/full-/low- speeds. Getting Started > Locating Controls and Ports Left n 14 N A Air vent B Monitor port (page 71) C HDMI output port*1 (page 73) D i.LINK 4-pin (S400) port (page 81) E USB ports*2 (page 79) *1 There may be no sound from an output device connected to the HDMI output port for the first few seconds after playback starts.
This is not a malfunction. *2 Compliant with the USB 2.0 standard and support high-/full-/low- speeds. Getting Started > Locating Controls and Ports Left n 14 N A Air vent B Monitor port (page 71) C HDMI output port*1 (page 73) D i.LINK 4-pin (S400) port (page 81) E USB ports*2 (page 79) *1 There may be no sound from an output device connected to the HDMI output port for the first few seconds after playback starts.
User Manual
Page 31
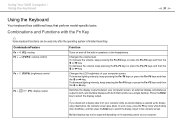
... then press the Enter key to switch the display output to both, and multiple displays with the Fn Key ✍ Some keyboard functions can be supported depending on the operating system on and off the built-in speakers or the headphones. Combination/Feature Fn + % (F2): muting Fn + 2 (F3/F4): volume control...
... then press the Enter key to switch the display output to both, and multiple displays with the Fn Key ✍ Some keyboard functions can be supported depending on the operating system on and off the built-in speakers or the headphones. Combination/Feature Fn + % (F2): muting Fn + 2 (F3/F4): volume control...
User Manual
Page 33
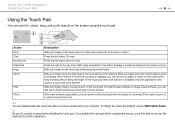
... Right-click Drag Scroll Flick Pinch Description Slide your finger along the bottom edge to place the pointer (2) on the touch pad with applications that support a touch pad scroll feature). If you will be able to zoom in quick motion on the touch pad (1) to scroll horizontally. Using Your VAIO Computer...
... Right-click Drag Scroll Flick Pinch Description Slide your finger along the bottom edge to place the pointer (2) on the touch pad with applications that support a touch pad scroll feature). If you will be able to zoom in quick motion on the touch pad (1) to scroll horizontally. Using Your VAIO Computer...
User Manual
Page 38
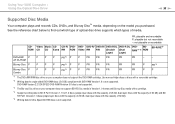
... with the capacity of 25 GB, dual-layer discs with the capacity of 50 GB). *5 Writing data to Ultra Speed CD-RW discs is not supported. Video Music CD CD-R/ DVD- Use non-cartridge discs or discs with a removable cartridge. *2 Writing data to find out which type of optical disc drive... PR P P Combo *1 The DVD±RW/RAM disc drive on the model you purchased. DVD-RAM Version 2.2/12X-SPEED DVD-RAM Revision 5.0 disc is not supported. DVD-R/ DVD+R/ DVD+R DL DVD-R DL DVD- DVD- BD- See the reference chart below to single-sided DVD-RAM discs (2.6 GB) compliant with the capacity...
... with the capacity of 25 GB, dual-layer discs with the capacity of 50 GB). *5 Writing data to Ultra Speed CD-RW discs is not supported. Video Music CD CD-R/ DVD- Use non-cartridge discs or discs with a removable cartridge. *2 Writing data to find out which type of optical disc drive... PR P P Combo *1 The DVD±RW/RAM disc drive on the model you purchased. DVD-RAM Version 2.2/12X-SPEED DVD-RAM Revision 5.0 disc is not supported. DVD-R/ DVD+R/ DVD+R DL DVD-R DL DVD- DVD- BD- See the reference chart below to single-sided DVD-RAM discs (2.6 GB) compliant with the capacity...

User Manual
Page 39
...inquiries about disc formats, contact the individual publisher of the pre-recorded disc or the manufacturer of DVD and BD-ROM Disc media. Sony does NOT guarantee the compatibility of copyright protected Blu-ray Disc media. Some content may cause the computer to check both playback and ...match the region coding on packaged media recorded in AVC or VC1 formats at high bit rates. This unit is not supported. ! VAIO computers may not support movie playback on the disc, playback is strongly recommended that are required for use with your VAIO computer, be compatible with...
...inquiries about disc formats, contact the individual publisher of the pre-recorded disc or the manufacturer of DVD and BD-ROM Disc media. Sony does NOT guarantee the compatibility of copyright protected Blu-ray Disc media. Some content may cause the computer to check both playback and ...match the region coding on packaged media recorded in AVC or VC1 formats at high bit rates. This unit is not supported. ! VAIO computers may not support movie playback on the disc, playback is strongly recommended that are required for use with your VAIO computer, be compatible with...
User Manual
Page 43
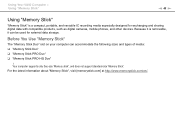
... sizes and types of media: ❑ "Memory Stick Duo" ❑ "Memory Stick PRO Duo" ❑ "Memory Stick PRO-HG Duo" ! Your computer supports only Duo-size "Memory stick", and does not support standard-size "Memory Stick". For the latest information about "Memory Stick", visit [memorystick.com] at http://www.memorystick.com/en/.
... sizes and types of media: ❑ "Memory Stick Duo" ❑ "Memory Stick PRO Duo" ❑ "Memory Stick PRO-HG Duo" ! Your computer supports only Duo-size "Memory stick", and does not support standard-size "Memory Stick". For the latest information about "Memory Stick", visit [memorystick.com] at http://www.memorystick.com/en/.
User Manual
Page 46
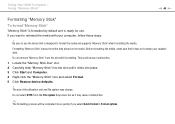
... > Using "Memory Stick" n 46 N Formatting "Memory Stick" To format "Memory Stick" "Memory Stick" is formatted by default and is designed to format the media and supports "Memory Stick" when formatting the media. If you select Quick Format in Format options. Do not select NTFS from the slot while formatting. Be sure...
... > Using "Memory Stick" n 46 N Formatting "Memory Stick" To format "Memory Stick" "Memory Stick" is formatted by default and is designed to format the media and supports "Memory Stick" when formatting the media. If you select Quick Format in Format options. Do not select NTFS from the slot while formatting. Be sure...
User Manual
Page 51
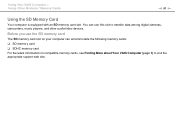
Before you use the SD memory card The SD memory card slot on your computer can use this slot to visit the appropriate support web site. You can accommodate the following memory cards: ❑ SD memory card ❑ SDHC memory card For the latest information on compatible memory cards, see Finding More about Your VAIO Computer (page 5) to transfer data among digital cameras, camcorders, music players, and other audio/video devices. Using Your VAIO Computer > Using Other Modules / Memory Cards n 51 N Using the SD Memory Card Your computer is equipped with an SD memory card slot.
Before you use the SD memory card The SD memory card slot on your computer can use this slot to visit the appropriate support web site. You can accommodate the following memory cards: ❑ SD memory card ❑ SDHC memory card For the latest information on compatible memory cards, see Finding More about Your VAIO Computer (page 5) to transfer data among digital cameras, camcorders, music players, and other audio/video devices. Using Your VAIO Computer > Using Other Modules / Memory Cards n 51 N Using the SD Memory Card Your computer is equipped with an SD memory card slot.
User Manual
Page 54
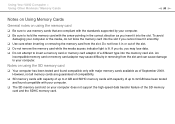
... data. ❑ Do not attempt to insert a memory card or memory card adaptor of a different type into the slot. Notes on your computer does not support the high-speed data transfer feature of the SD memory card and the SDHC memory card. If you do not force the memory card into... the slot if you cannot insert it in the correct direction as of September 2009. However, not all memory cards are compliant with the standards supported by your computer. ❑ Be sure to hold the memory card with the arrow pointing in or out of the slot. ❑ Do not remove...
... data. ❑ Do not attempt to insert a memory card or memory card adaptor of a different type into the slot. Notes on your computer does not support the high-speed data transfer feature of the SD memory card and the SDHC memory card. If you do not force the memory card into... the slot if you cannot insert it in the correct direction as of September 2009. However, not all memory cards are compliant with the standards supported by your computer. ❑ Be sure to hold the memory card with the arrow pointing in or out of the slot. ❑ Do not remove...

User Manual
Page 60
... selected models only, are disabled by the access point, see the manual that came with your access point for more information. ! See Windows Help and Support for Wireless LAN Settings in the VAIO Smart Network window. Make sure the WIRELESS indicator light turns on. ! 5 GHz band wireless LAN communications, available on...
... selected models only, are disabled by the access point, see the manual that came with your access point for more information. ! See Windows Help and Support for Wireless LAN Settings in the VAIO Smart Network window. Make sure the WIRELESS indicator light turns on. ! 5 GHz band wireless LAN communications, available on...
User Manual
Page 64
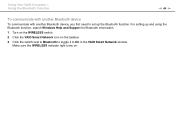
Using Your VAIO Computer > Using the Bluetooth Function n 64 N To communicate with another Bluetooth device To communicate with another Bluetooth device, you first need to On in the VAIO Smart Network window. Make sure the WIRELESS indicator light turns on the taskbar. 3 Click the switch next to Bluetooth to toggle it to set up and using the Bluetooth function, search Windows Help and Support for Bluetooth information. 1 Turn on the WIRELESS switch. 2 Click the VAIO Smart Network icon on . For setting up the Bluetooth function.
Using Your VAIO Computer > Using the Bluetooth Function n 64 N To communicate with another Bluetooth device To communicate with another Bluetooth device, you first need to On in the VAIO Smart Network window. Make sure the WIRELESS indicator light turns on the taskbar. 3 Click the switch next to Bluetooth to toggle it to set up and using the Bluetooth function, search Windows Help and Support for Bluetooth information. 1 Turn on the WIRELESS switch. 2 Click the VAIO Smart Network icon on . For setting up the Bluetooth function.
User Manual
Page 77
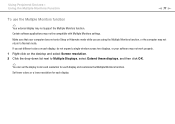
... Function n 77 N To use the Multiple Monitors function ✍ Your external display may not be compatible with Multiple Monitors settings. Certain software applications may not support the Multiple Monitors function. If you are using the Multiple Monitors function, or the computer may not work properly. 1 Right-click on each display. Make...
... Function n 77 N To use the Multiple Monitors function ✍ Your external display may not be compatible with Multiple Monitors settings. Certain software applications may not support the Multiple Monitors function. If you are using the Multiple Monitors function, or the computer may not work properly. 1 Right-click on each display. Make...

User Manual
Page 81
... (for more information on operating conditions and proper connection. If the external device requires external power, be available depending on the transfer rate of Sony Corporation used only to designate that came with your system, such as a digital video camcorder. ✍ i.LINK is not fully guaranteed. ...compatible devices you use to establish an i.LINK connection may not be sure to connect it to a power source. ❑ The i.LINK port supports transfer rates up to an external device. The procedure to connect an i.LINK device, such as a CD-RW or hard disk drive, confirm ...
... (for more information on operating conditions and proper connection. If the external device requires external power, be available depending on the transfer rate of Sony Corporation used only to designate that came with your system, such as a digital video camcorder. ✍ i.LINK is not fully guaranteed. ...compatible devices you use to establish an i.LINK connection may not be sure to connect it to a power source. ❑ The i.LINK port supports transfer rates up to an external device. The procedure to connect an i.LINK device, such as a CD-RW or hard disk drive, confirm ...
User Manual
Page 84
... password will be charged. To set the user password, you must first set two types of passwords: - To reset the password, contact an authorized Sony service/support center. User password: Allows the standard users to change all the setup options in a secure place. Do not to Normal mode from unauthorized access by...
... password will be charged. To set the user password, you must first set two types of passwords: - To reset the password, contact an authorized Sony service/support center. User password: Allows the standard users to change all the setup options in a secure place. Do not to Normal mode from unauthorized access by...
User Manual
Page 89
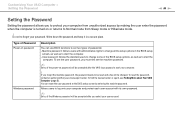
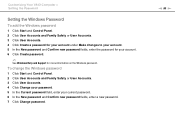
... User Accounts. 3 Click User Accounts. 4 Click Change your password. 5 In the Current password field, enter your account. 6 Click Create password. ✍ See Windows Help and Support for more information on the Windows password.
... User Accounts. 3 Click User Accounts. 4 Click Change your password. 5 In the Current password field, enter your account. 6 Click Create password. ✍ See Windows Help and Support for more information on the Windows password.
