
User Manual
Page 3
... Your VAIO Computer 143 Adding and Removing Memory 144 Precautions 150 Safety Information 151 Care and Maintenance Information 154 Handling Your Computer 155 Handling the LCD Screen 157 Using the Power Source 158 Handling the Built-in Camera 159 Handling Discs 160 Using the Battery Pack 161 Handling "Memory Stick 162 Handling...
... Your VAIO Computer 143 Adding and Removing Memory 144 Precautions 150 Safety Information 151 Care and Maintenance Information 154 Handling Your Computer 155 Handling the LCD Screen 157 Using the Power Source 158 Handling the Built-in Camera 159 Handling Discs 160 Using the Battery Pack 161 Handling "Memory Stick 162 Handling...

User Manual
Page 11
...button (page 36) * On selected models only. Getting Started > Locating Controls and Ports n 11 N Locating Controls and Ports Take a moment to an optimum level. Front A LCD screen (page 157) B Keyboard (page 33) C Built-in MOTION EYE camera (page 38) D Built-in MOTION EYE camera indicator (page 17) E Built-in specifications. The appearance... in this manual due to variations in speakers (stereo) F Ambient light sensor (page 35), (page 201) Measures ambient light intensity for automatically adjusting the LCD brightness to identify the controls and ports shown on the following pages. !
...button (page 36) * On selected models only. Getting Started > Locating Controls and Ports n 11 N Locating Controls and Ports Take a moment to an optimum level. Front A LCD screen (page 157) B Keyboard (page 33) C Built-in MOTION EYE camera (page 38) D Built-in MOTION EYE camera indicator (page 17) E Built-in specifications. The appearance... in this manual due to variations in speakers (stereo) F Ambient light sensor (page 35), (page 201) Measures ambient light intensity for automatically adjusting the LCD brightness to identify the controls and ports shown on the following pages. !

User Manual
Page 20
Getting Started > Using the Battery Pack Using the Battery Pack The battery pack is already installed on your computer without installing the battery pack as it may cause the computer to malfunction. Installing/Removing the Battery Pack To install the battery pack 1 Turn off the computer and close the LCD screen lid. 2 Slide the battery LOCK switch (1) outward. n 20 N Do not use your computer at the time of delivery but is not fully charged. !
Getting Started > Using the Battery Pack Using the Battery Pack The battery pack is already installed on your computer without installing the battery pack as it may cause the computer to malfunction. Installing/Removing the Battery Pack To install the battery pack 1 Turn off the computer and close the LCD screen lid. 2 Slide the battery LOCK switch (1) outward. n 20 N Do not use your computer at the time of delivery but is not fully charged. !
User Manual
Page 23
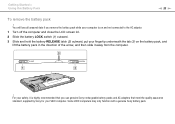
.... For your safety, it away from the computer. ! You will lose all unsaved data if you use genuine Sony rechargeable battery packs and AC adapters that meet the quality assurance standard, supplied by Sony for your fingertip underneath the tab (3) on the battery pack, and lift the battery pack in the direction... that you remove the battery pack while your computer is on and not connected to the AC adapter. 1 Turn off the computer and close the LCD screen lid. 2 Slide the battery LOCK switch (1) outward. 3 Slide and hold the battery RELEASE latch (2) outward, put your VAIO computer.
.... For your safety, it away from the computer. ! You will lose all unsaved data if you use genuine Sony rechargeable battery packs and AC adapters that meet the quality assurance standard, supplied by Sony for your fingertip underneath the tab (3) on the battery pack, and lift the battery pack in the direction... that you remove the battery pack while your computer is on and not connected to the AC adapter. 1 Turn off the computer and close the LCD screen lid. 2 Slide the battery LOCK switch (1) outward. 3 Slide and hold the battery RELEASE latch (2) outward, put your VAIO computer.
User Manual
Page 26
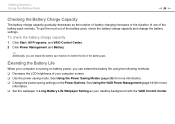
... Center. Getting Started > Using the Battery Pack n 26 N Checking the Battery Charge Capacity The battery charge capacity gradually decreases as your computer screen. ❑ Use the power saving mode. See Using the Power Saving Modes (page 28) for more information. ❑ Change the power ...saving settings on battery power, you can extend the battery life using the following methods. ❑ Decrease the LCD brightness of the battery pack, check the battery charge capacity and change the battery settings. Extending the Battery Life When your computer is ...
... Center. Getting Started > Using the Battery Pack n 26 N Checking the Battery Charge Capacity The battery charge capacity gradually decreases as your computer screen. ❑ Use the power saving mode. See Using the Power Saving Modes (page 28) for more information. ❑ Change the power ...saving settings on battery power, you can extend the battery life using the following methods. ❑ Decrease the LCD brightness of the battery pack, check the battery charge capacity and change the battery settings. Extending the Battery Life When your computer is ...

User Manual
Page 28
... a low power consumption mode. Going back to suit your computer is in storage device(s) and power is in this mode. Sleep mode turns off the LCD screen and places the built-in storage device(s) and the CPU into Hibernate mode or turn it is turned off . The orange power indicator light blinks...
... a low power consumption mode. Going back to suit your computer is in storage device(s) and power is in this mode. Sleep mode turns off the LCD screen and places the built-in storage device(s) and the CPU into Hibernate mode or turn it is turned off . The orange power indicator light blinks...

User Manual
Page 33
...the Fn+F4 keys and then the M or , key, or keep pressing the Fn+F3 keys. Press the Enter key to the computer screen. Use of your computer screen and an external display. To increase lighting intensity, keep pressing the Fn+F5 keys or press the Fn+F5 keys and then the...+ % (F2): muting Fn + 2 (F3/F4): volume control Fn + 8 (F5/F6): brightness control Fn + /T (F7): display output Function Turns on the connected external display. Changes the LCD brightness of multiple monitors may not be used only after the operating system is selected as the display output destination, the computer...
...the Fn+F4 keys and then the M or , key, or keep pressing the Fn+F3 keys. Press the Enter key to the computer screen. Use of your computer screen and an external display. To increase lighting intensity, keep pressing the Fn+F5 keys or press the Fn+F5 keys and then the...+ % (F2): muting Fn + 2 (F3/F4): volume control Fn + 8 (F5/F6): brightness control Fn + /T (F7): display output Function Turns on the connected external display. Changes the LCD brightness of multiple monitors may not be used only after the operating system is selected as the display output destination, the computer...

User Manual
Page 109
n 109 N Using Peripheral Devices > Connecting a Port Replicator 6 Gently push down the computer until it clicks into place. 7 Lift open the LCD screen lid and turn on the computer.
n 109 N Using Peripheral Devices > Connecting a Port Replicator 6 Gently push down the computer until it clicks into place. 7 Lift open the LCD screen lid and turn on the computer.

User Manual
Page 115
...automatically change the settings, see Selecting Display Modes (page 122). Follow the steps in this problem by lowering the screen resolution of the display. To change the LCD resolution of your computer. ! Using Peripheral Devices > Connecting an External Display n 115 N Connecting an External ...Display Some features and options in Why doesn't my screen display a video? (page 201) to solve this section may be available...
...automatically change the settings, see Selecting Display Modes (page 122). Follow the steps in this problem by lowering the screen resolution of the display. To change the LCD resolution of your computer. ! Using Peripheral Devices > Connecting an External Display n 115 N Connecting an External ...Display Some features and options in Why doesn't my screen display a video? (page 201) to solve this section may be available...

User Manual
Page 150
... computer from potential damage. ❑ Safety Information (page 151) ❑ Care and Maintenance Information (page 154) ❑ Handling Your Computer (page 155) ❑ Handling the LCD Screen (page 157) ❑ Using the Power Source (page 158) ❑ Handling the Built-in Camera (page 159) ❑ Handling Discs (page 160) ❑ Using the...
... computer from potential damage. ❑ Safety Information (page 151) ❑ Care and Maintenance Information (page 154) ❑ Handling Your Computer (page 155) ❑ Handling the LCD Screen (page 157) ❑ Using the Power Source (page 158) ❑ Handling the Built-in Camera (page 159) ❑ Handling Discs (page 160) ❑ Using the...

User Manual
Page 154
...hold the disc by its continuous reliability. Do not use a soft cloth to pressure. Rubbing the surface could damage the screen. ❑ To protect the LCD screen and keyboard from the center out. ❑ If the disc is sensitive to wipe the surface from damage, for ...wrinkles on the keyboard before cleaning your computer. ❑ Make sure you unplug the AC adapter and remove the battery pack before closing the LCD screen lid. Precautions > Care and Maintenance Information n 154 N Care and Maintenance Information Computer ❑ Clean the cabinet with a soft, dry or...
...hold the disc by its continuous reliability. Do not use a soft cloth to pressure. Rubbing the surface could damage the screen. ❑ To protect the LCD screen and keyboard from the center out. ❑ If the disc is sensitive to wipe the surface from damage, for ...wrinkles on the keyboard before cleaning your computer. ❑ Make sure you unplug the AC adapter and remove the battery pack before closing the LCD screen lid. Precautions > Care and Maintenance Information n 154 N Care and Maintenance Information Computer ❑ Clean the cabinet with a soft, dry or...
User Manual
Page 156
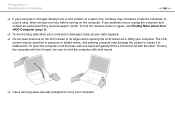
... 5). ❑ To avoid losing data when your computer is brought directly from a cold location to hold the base with one hand and gently lift the LCD screen lid with both hands. ❑ Use a carrying case specially designed to carry your computer. Precautions > Handling Your Computer n 156 N ❑ If your computer is damaged..., back up your data regularly. ❑ Do not exert pressure on the computer. If any problems occur, unplug the computer and contact an authorized Sony service/support center.
... 5). ❑ To avoid losing data when your computer is brought directly from a cold location to hold the base with one hand and gently lift the LCD screen lid with both hands. ❑ Use a carrying case specially designed to carry your computer. Precautions > Handling Your Computer n 156 N ❑ If your computer is damaged..., back up your data regularly. ❑ Do not exert pressure on the computer. If any problems occur, unplug the computer and contact an authorized Sony service/support center.
User Manual
Page 157
... to prevent residual images. ❑ The LCD screen becomes warm during operation. Precautions > Handling the LCD Screen n 157 N Handling the LCD Screen ❑ Do not leave the LCD screen facing the sun. This could damage the LCD screen. You may make your computer unstable. Sony assumes no liability for selection, as it may scratch the LCD screen or soil it . Be sure to...
... to prevent residual images. ❑ The LCD screen becomes warm during operation. Precautions > Handling the LCD Screen n 157 N Handling the LCD Screen ❑ Do not leave the LCD screen facing the sun. This could damage the LCD screen. You may make your computer unstable. Sony assumes no liability for selection, as it may scratch the LCD screen or soil it . Be sure to...

User Manual
Page 199
...plugged into Normal mode. See Combinations and Functions with the Fn Key (page 33) for more information. ❑ While a performance selection is in LCD (Video) Sleep mode, press any key to bring the computer back into a power source and turned on and the power indicator light is lit. ...battery pack is installed properly and is directed to the external display, press the Fn+F7 keys. Troubleshooting > Display n 199 N Display Why did my screen go blank if the computer loses power or enters a power saving mode (Sleep or Hibernate). If the computer is normal and does not indicate a ...
...plugged into Normal mode. See Combinations and Functions with the Fn Key (page 33) for more information. ❑ While a performance selection is in LCD (Video) Sleep mode, press any key to bring the computer back into a power source and turned on and the power indicator light is lit. ...battery pack is installed properly and is directed to the external display, press the Fn+F7 keys. Troubleshooting > Display n 199 N Display Why did my screen go blank if the computer loses power or enters a power saving mode (Sleep or Hibernate). If the computer is normal and does not indicate a ...

User Manual
Page 201
...amount of memory on your computer. What should I do if my screen is unblocked. In such a case, lower the resolution of the LCD screen. Press the Fn+F7 keys to change the display output to the computer screen, and then restart video playback. See Combinations and Functions with the Fn... Key (page 33) for more information. ❑ The video memory of your screen dark. To change the display...
...amount of memory on your computer. What should I do if my screen is unblocked. In such a case, lower the resolution of the LCD screen. Press the Fn+F7 keys to change the display output to the computer screen, and then restart video playback. See Combinations and Functions with the Fn... Key (page 33) for more information. ❑ The video memory of your screen dark. To change the display...
Brochure
Page 2
VPCZ122GX/S VAIO® Z Series Laptop PC Specifications Uncompromising uUltSrBaP-oprto(sr):ta3 ... Neoprene Case (VGP-AMC3) Docking Station (VGP-PRZ10) Carrying Case (VGP-CKS3/B) Privacy Filter/ LCD Screen Protector (VGP-FL14) L3 Cache: 3MB Sony® Creativity Suite: PMB - For priority support, please call 239-768-76059 . See actual ...Read / Write (CD/-R/-RW) DVD Support: Read / Write (DVD±R/±RW/±R DL/- Color: Silver Display Screen Size: 13.1"4 Service and Warranty Information UPC Code: 027242802995 Resolution: 1600 x 900 Back Light Technology: LED Telephone Support: ...
VPCZ122GX/S VAIO® Z Series Laptop PC Specifications Uncompromising uUltSrBaP-oprto(sr):ta3 ... Neoprene Case (VGP-AMC3) Docking Station (VGP-PRZ10) Carrying Case (VGP-CKS3/B) Privacy Filter/ LCD Screen Protector (VGP-FL14) L3 Cache: 3MB Sony® Creativity Suite: PMB - For priority support, please call 239-768-76059 . See actual ...Read / Write (CD/-R/-RW) DVD Support: Read / Write (DVD±R/±RW/±R DL/- Color: Silver Display Screen Size: 13.1"4 Service and Warranty Information UPC Code: 027242802995 Resolution: 1600 x 900 Back Light Technology: LED Telephone Support: ...
Brochure
Page 3
... ExpanscioonndSiltoiotnss of their respective Port Replicator Connector(s): 1 (Bottom) Sony For Business - Norton Internet Security™ 2010 30-day subscriptioSneisrvpircee-inastnadlleWd oanrryaonutrySoInnfyoVrmAIaOtPioCn. After Screen Siyzoeu: r1330.1-d"4ays are registered trademarks and Core is not manufactured... decreases Privacy Filter/ LCD Screen Protector (VGP-FL14) L3 Ca8.cheSe: 3eMaBctual limited warranty for any particular software packages and/or non-Sony add-RoonHhSa®rd: wCaormepolpiatinotns except those mentioned here. VPCZ122GX/S VAIO® Z...
... ExpanscioonndSiltoiotnss of their respective Port Replicator Connector(s): 1 (Bottom) Sony For Business - Norton Internet Security™ 2010 30-day subscriptioSneisrvpircee-inastnadlleWd oanrryaonutrySoInnfyoVrmAIaOtPioCn. After Screen Siyzoeu: r1330.1-d"4ays are registered trademarks and Core is not manufactured... decreases Privacy Filter/ LCD Screen Protector (VGP-FL14) L3 Ca8.cheSe: 3eMaBctual limited warranty for any particular software packages and/or non-Sony add-RoonHhSa®rd: wCaormepolpiatinotns except those mentioned here. VPCZ122GX/S VAIO® Z...

