
Operating Instructions
Page 2
...of Controls .... 6 Top/Front/Left Side 6 Rear/Right Side/Bottom 6 Control Panel 7 Connector Panel 8 Remote Commander 10 Presentation Tool (VPL-CX86 only 12 Projecting the Picture Installing the Projector 13 Connecting the Projector 14 Connecting a Computer 14 Connecting a VCR 15 Projecting 16 Turning...SET SETTING Menu 30 The MENU SETTING Menu ...........32 The INSTALL SETTING Menu .......33 The INFORMATION Menu 35 Maintenance Replacing the Lamp 37 Cleaning the Air Filter 39 Others Troubleshooting 40 Messages List 44 Specifications 45 Installation Diagram 51 "Side Shot" and "V ...
...of Controls .... 6 Top/Front/Left Side 6 Rear/Right Side/Bottom 6 Control Panel 7 Connector Panel 8 Remote Commander 10 Presentation Tool (VPL-CX86 only 12 Projecting the Picture Installing the Projector 13 Connecting the Projector 14 Connecting a Computer 14 Connecting a VCR 15 Projecting 16 Turning...SET SETTING Menu 30 The MENU SETTING Menu ...........32 The INSTALL SETTING Menu .......33 The INFORMATION Menu 35 Maintenance Replacing the Lamp 37 Cleaning the Air Filter 39 Others Troubleshooting 40 Messages List 44 Specifications 45 Installation Diagram 51 "Side Shot" and "V ...

Operating Instructions
Page 4
Features High brightness, high picture quality High brightness Adopting Sony's unique optical system provides a high-efficiency optical ...sets optimum conditions for Air Shot Help" on a larger screen even in Help. It allows the 190 W UHP lamp to give a light output of the network and wireless LAN configurations, allowing you to start a wireless presentation easily ... trapezoidal correction function), enabling projection from a computer to adjust the size and focus of network presentations (VPL-CX86 only) Air Shot Air Shot features data transmission from the side of the screen. This enables...
Features High brightness, high picture quality High brightness Adopting Sony's unique optical system provides a high-efficiency optical ...sets optimum conditions for Air Shot Help" on a larger screen even in Help. It allows the 190 W UHP lamp to give a light output of the network and wireless LAN configurations, allowing you to start a wireless presentation easily ... trapezoidal correction function), enabling projection from a computer to adjust the size and focus of network presentations (VPL-CX86 only) Air Shot Air Shot features data transmission from the side of the screen. This enables...
Operating Instructions
Page 5
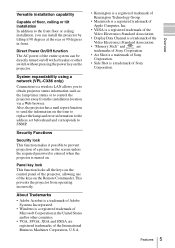
... projector. About Trademarks • Adobe Acrobat is a trademark of Adobe Systems Incorporated. • Windows is a trademark of Sony Corporation. Panel key lock This function locks all the keys on the control panel of the projector, allowing use of the keys...Sony Corporation. • Side Shot is a registered trademark of Microsoft Corporation in front. This prevents the projector from the installation location via a Web browser. System expandability using a network (VPL-CX86 only) Connection to a wireless LAN allows you to obtain projector status information such as the lamp...
... projector. About Trademarks • Adobe Acrobat is a trademark of Adobe Systems Incorporated. • Windows is a trademark of Sony Corporation. Panel key lock This function locks all the keys on the control panel of the projector, allowing use of the keys...Sony Corporation. • Side Shot is a registered trademark of Microsoft Corporation in front. This prevents the projector from the installation location via a Web browser. System expandability using a network (VPL-CX86 only) Connection to a wireless LAN allows you to obtain projector status information such as the lamp...
Operating Instructions
Page 6
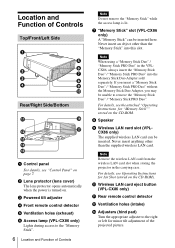
...Powered tilt adjuster d Front remote control detector e Ventilation holes (exhaust) f Access lamp (VPL-CX86 only) Lights during access to the "Memory Stick". 6 Location and Function of Controls Note Do not remove the "Memory Stick" while the access lamp is turned on page 7. If you insert a "Memory Stick Duo" / ..."Memory Stick PRO Duo" without the Memory Stick Duo Adapter, you may be inserted here. j Wireless LAN card eject button (VPL-CX86 only) k Rear remote control detector l ...
...Powered tilt adjuster d Front remote control detector e Ventilation holes (exhaust) f Access lamp (VPL-CX86 only) Lights during access to the "Memory Stick". 6 Location and Function of Controls Note Do not remove the "Memory Stick" while the access lamp is turned on page 7. If you insert a "Memory Stick Duo" / ..."Memory Stick PRO Duo" without the Memory Stick Duo Adapter, you may be inserted here. j Wireless LAN card eject button (VPL-CX86 only) k Rear remote control detector l ...
Operating Instructions
Page 7
... in standby mode, you push this may cause injury. • To maintain optimal performance, clean the air filter every 1000 hours. Overview n Ventilation holes (intake)/Lamp cover o Ventilation holes (intake)/Air filter cover Notes • Do not place anything near the ventilation holes as this may cause internal heat build-up...
... in standby mode, you push this may cause injury. • To maintain optimal performance, clean the air filter every 1000 hours. Overview n Ventilation holes (intake)/Lamp cover o Ventilation holes (intake)/Air filter cover Notes • Do not place anything near the ventilation holes as this may cause internal heat build-up...
Operating Instructions
Page 8
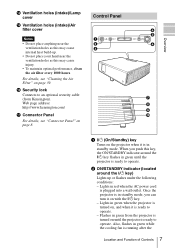
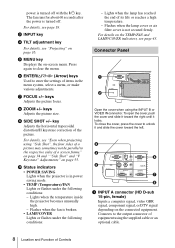
...Press again to the respective sides of a picture may sometimes not be parallel to clear the menu. Flashes when the fan is broken. • LAMP/COVER Lights or flashes under the following conditions: - Connector Panel Open the cover when using "Side Shot", the four sides of a screen frame." ... details, see page 19. j Status indicators • POWER SAVING Lights when the projector is turned off . h ZOOM +/- Lights when the lamp has reached the end of the picture. Flashes when the lamp cover or air filter cover is turned off with the ?/1 key. For details on the TEMP/FAN and...
...Press again to the respective sides of a picture may sometimes not be parallel to clear the menu. Flashes when the fan is broken. • LAMP/COVER Lights or flashes under the following conditions: - Connector Panel Open the cover when using "Side Shot", the four sides of a screen frame." ... details, see page 19. j Status indicators • POWER SAVING Lights when the projector is turned off . h ZOOM +/- Lights when the lamp has reached the end of the picture. Flashes when the lamp cover or air filter cover is turned off with the ?/1 key. For details on the TEMP/FAN and...
Operating Instructions
Page 31
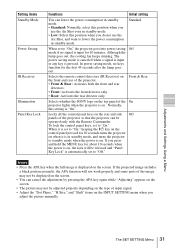
... appears on the screen. • The picture may not be operated only with the Remote Commander. Although the lamp goes out, the cooling fan keeps running. Front & Rear Selects whether the SONY logo on the top panel of the On projector lights when the projector is on . Adjustments and Settings Using...: Normally, select this position when you adjust the picture manually. In power saving mode, no signal is input for the first 45 seconds after the lamp goes out. When it , the APA function will be released and "Panel Key Lock" is automatically set to "Off." Notes • Press the...
... appears on the screen. • The picture may not be operated only with the Remote Commander. Although the lamp goes out, the cooling fan keeps running. Front & Rear Selects whether the SONY logo on the top panel of the On projector lights when the projector is on . Adjustments and Settings Using...: Normally, select this position when you adjust the picture manually. In power saving mode, no signal is input for the first 45 seconds after the lamp goes out. When it , the APA function will be released and "Panel Key Lock" is automatically set to "Off." Notes • Press the...
Operating Instructions
Page 33
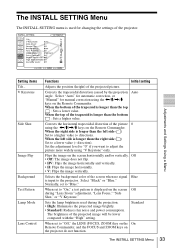
The INSTALL SETTING Menu The INSTALL SETTING menu is used for manual correction using the Adjustments and Settings Using a Menu Setting items Tilt... Corrects the trapezoidal distortion caused by the projection angle. V Keystone Side Shot Image Flip Background Test Pattern Lamp Mode Lens Control Functions Initial setting Adjusts the position (height) of the projector. Select "Auto" for automatic correction, or "Manual" for changing the settings of the projected picture.
The INSTALL SETTING Menu The INSTALL SETTING menu is used for manual correction using the Adjustments and Settings Using a Menu Setting items Tilt... Corrects the trapezoidal distortion caused by the projection angle. V Keystone Side Shot Image Flip Background Test Pattern Lamp Mode Lens Control Functions Initial setting Adjusts the position (height) of the projector. Select "Auto" for automatic correction, or "Manual" for changing the settings of the projected picture.
Operating Instructions
Page 35
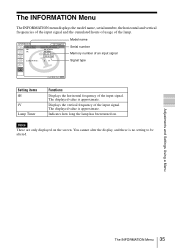
INFORMATION VPL-CX86 fH: fV: Input A Serial No. 3 3 3 3 3 3 3 48.47kHz 60.00Hz No. 23 1024x768 Lamp Timer: 2 H Model name Serial number Memory number of an input signal Signal type Setting items fH fV Lamp Timer Functions Displays the horizontal frequency of the input signal. The displayed value is approximate.... frequency of the input signal. You cannot alter the display, and these is no setting to be altered. Indicates how long the lamp has been turned on the screen. The INFORMATION Menu The INFORMATION menu displays the model name, serial number, the horizontal and vertical ...
INFORMATION VPL-CX86 fH: fV: Input A Serial No. 3 3 3 3 3 3 3 48.47kHz 60.00Hz No. 23 1024x768 Lamp Timer: 2 H Model name Serial number Memory number of an input signal Signal type Setting items fH fV Lamp Timer Functions Displays the horizontal frequency of the input signal. The displayed value is approximate.... frequency of the input signal. You cannot alter the display, and these is no setting to be altered. Indicates how long the lamp has been turned on the screen. The INFORMATION Menu The INFORMATION menu displays the model name, serial number, the horizontal and vertical ...
Operating Instructions
Page 37
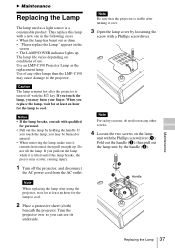
... new one in the following cases. • When the lamp has burnt out or dims • "Please replace the Lamp." Handle Maintenance Replacing the Lamp 37 Thus replace this lamp with a Phillips screwdriver. appears on the screen • The LAMP/COVER indicator lights up . Use of use. Note Be... to cool. 2 Place a protective sheet (cloth) beneath the projector. Note When replacing the lamp after the projector is a consumable product. Do not tilt the lamp. Use an LMP-C190 Projector Lamp as a light source is turned off the projector, and disconnect the AC power cord from the...
... new one in the following cases. • When the lamp has burnt out or dims • "Please replace the Lamp." Handle Maintenance Replacing the Lamp 37 Thus replace this lamp with a Phillips screwdriver. appears on the screen • The LAMP/COVER indicator lights up . Use of use. Note Be... to cool. 2 Place a protective sheet (cloth) beneath the projector. Note When replacing the lamp after the projector is a consumable product. Do not tilt the lamp. Use an LMP-C190 Projector Lamp as a light source is turned off the projector, and disconnect the AC power cord from the...

Operating Instructions
Page 38
...over. 8 Connect the power cord. For disposal or recycling information, please contact your hands into the lamp replacement slot, and do not allow any liquid or other objects into the slot to attach the lamp cover securely as it was. Tighten the two screws (b). If not, the projector cannot be regulated... if sold in the United States. 5 Insert the new lamp all the way in until it is not secured properly. 6 Close the lamp cover and tighten the screw. Fold down the handle to touch the glass surface of the used...
...over. 8 Connect the power cord. For disposal or recycling information, please contact your hands into the lamp replacement slot, and do not allow any liquid or other objects into the slot to attach the lamp cover securely as it was. Tighten the two screws (b). If not, the projector cannot be regulated... if sold in the United States. 5 Insert the new lamp all the way in until it is not secured properly. 6 Close the lamp cover and tighten the screw. Fold down the handle to touch the glass surface of the used...
Operating Instructions
Page 40
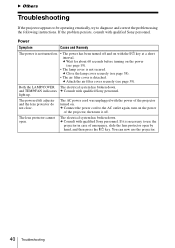
Power Symptom Cause and Remedy The power is not turned on. • The power has been turned off . Both the LAMP/COVER The electrical system has broken down . The powered tilt adjuster and the lens protector do not close. c Connect the power cord to ... is detached. c Wait for about 60 seconds before turning on . c Consult with qualified Sony personnel. c Close the lamp cover securely (see page 39). If the problem persists, consult with qualified Sony personnel. c Attach the air filter cover securely (see page 38). • The air filter cover is not secured. and TEMP/...
Power Symptom Cause and Remedy The power is not turned on. • The power has been turned off . Both the LAMP/COVER The electrical system has broken down . The powered tilt adjuster and the lens protector do not close. c Connect the power cord to ... is detached. c Wait for about 60 seconds before turning on . c Consult with qualified Sony personnel. c Close the lamp cover securely (see page 39). If the problem persists, consult with qualified Sony personnel. c Attach the air filter cover securely (see page 38). • The air filter cover is not secured. and TEMP/...
Operating Instructions
Page 41
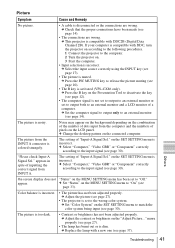
... "Color System" on the MENU SETTING menu to release the picture muting (see page 12). • The computer signal is incorrect. c Replace the lamp with a new one (see page 14). Picture Symptom Cause and Remedy No picture. • A cable is colored strangely. c Press the PIC MUTING... incorrect. on the Presentation Tool to an external monitor (see page 37). c Press the B key on the SET SETTING menu is activated (VPL-CX86 only). c Change the desktop pattern on the "Adjust Picture..." c Adjust the contrast or brightness on the connected computer. If your computer ...
... "Color System" on the MENU SETTING menu to release the picture muting (see page 12). • The computer signal is incorrect. c Replace the lamp with a new one (see page 14). Picture Symptom Cause and Remedy No picture. • A cable is colored strangely. c Press the PIC MUTING... incorrect. on the Presentation Tool to an external monitor (see page 37). c Press the B key on the SET SETTING menu is activated (VPL-CX86 only). c Change the desktop pattern on the "Adjust Picture..." c Adjust the contrast or brightness on the connected computer. If your computer ...

Operating Instructions
Page 43
... Attach the cover securely (see page 31). c Replace the lamp (see page 37). • The lamp has reached a high temperature. c Consult with the presentation tool (VPLCX86 only). and TEMP/FAN indicators c Consult with qualified Sony personnel. • The internal temperature is designed to a problem...The TEMP/FAN indicator lights up. • The lamp cover or the air filter cover is broken. c Consult with qualified Sony personnel. not function. Indicators Symptom Cause and Remedy The LAMP/COVER indicator flashes. Both the LAMP/COVER The electrical system has broken down . c ...
... Attach the cover securely (see page 31). c Replace the lamp (see page 37). • The lamp has reached a high temperature. c Consult with the presentation tool (VPLCX86 only). and TEMP/FAN indicators c Consult with qualified Sony personnel. • The internal temperature is designed to a problem...The TEMP/FAN indicator lights up. • The lamp cover or the air filter cover is broken. c Consult with qualified Sony personnel. not function. Indicators Symptom Cause and Remedy The LAMP/COVER indicator flashes. Both the LAMP/COVER The electrical system has broken down . c ...
Operating Instructions
Page 44
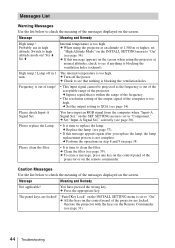
...the keys on the Remote Commander (see if anything is blocking the ventilation holes (exhaust). c If this message appears again after you replace the lamp, the lamp replacement process is not complete. High temp.! correctly (see page 14). "Panel Key Lock" on the screen. min. c Set the output setting... • If this message appears on the INSTALL SETTING menu to "On" (see page 39). Please check Input-A Signal Sel. Please replace the Lamp. • It is time to clean the filter. Message Meaning and Remedy High temp.! Please clean the filter. • It is time to ...
...the keys on the Remote Commander (see if anything is blocking the ventilation holes (exhaust). c If this message appears again after you replace the lamp, the lamp replacement process is not complete. High temp.! correctly (see page 14). "Panel Key Lock" on the screen. min. c Set the output setting... • If this message appears on the INSTALL SETTING menu to "On" (see page 39). Please check Input-A Signal Sel. Please replace the Lamp. • It is time to clean the filter. Message Meaning and Remedy High temp.! Please clean the filter. • It is time to ...
Operating Instructions
Page 45
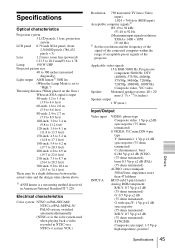
... panel 0.79-inch XGA panel, about 2,360,000 pixels (786,432 pixels × 3) Lens 1.2 times zoom lens (powered) f 23.5 to 28.2 mm/F1.6 to 1.78 Lamp 190 W UHP Projected picture size 40 to 300 inches (measured diagonally) Light output ANSI lumen1) 3000 lm (When the... Lamp Mode is set to "High.") Throwing distance (When placed on a NTSC4.43 system VCR.) Resolution 750 horizontal TV lines (Video input) 1,024 × 768 dots (...
... panel 0.79-inch XGA panel, about 2,360,000 pixels (786,432 pixels × 3) Lens 1.2 times zoom lens (powered) f 23.5 to 28.2 mm/F1.6 to 1.78 Lamp 190 W UHP Projected picture size 40 to 300 inches (measured diagonally) Light output ANSI lumen1) 3000 lm (When the... Lamp Mode is set to "High.") Throwing distance (When placed on a NTSC4.43 system VCR.) Resolution 750 horizontal TV lines (Video input) 1,024 × 768 dots (...
Operating Instructions
Page 47
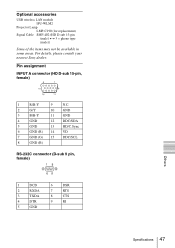
For details, please consult your nearest Sony dealer. Pin assignment INPUT A connector (HD D-sub 15-pin, female) 1 R/R-Y 9 N.C. 2 G/Y 10 GND 3 B/B-Y 11 GND 4 GND 12 DDC/SDA 5 GND 13 HD/C.Sync 6 GND (R) 14 VD 7 ... connector (D-sub 9 pin, female) 1 DCD 2 RXDA 3 TXDA 4 DTR 5 GND 6 DSR 7 RTS 8 CTS 9 RI Specifications 47 Others Optional accessories USB wireless LAN module IFU-WLM2 Projector Lamp LMP-C190 (for replacement) Signal Cable SMF-402 (HD D-sub 15-pin (male) y 3 × phono type (male)) Some of the items may not be available...
For details, please consult your nearest Sony dealer. Pin assignment INPUT A connector (HD D-sub 15-pin, female) 1 R/R-Y 9 N.C. 2 G/Y 10 GND 3 B/B-Y 11 GND 4 GND 12 DDC/SDA 5 GND 13 HD/C.Sync 6 GND (R) 14 VD 7 ... connector (D-sub 9 pin, female) 1 DCD 2 RXDA 3 TXDA 4 DTR 5 GND 6 DSR 7 RTS 8 CTS 9 RI Specifications 47 Others Optional accessories USB wireless LAN module IFU-WLM2 Projector Lamp LMP-C190 (for replacement) Signal Cable SMF-402 (HD D-sub 15-pin (male) y 3 × phono type (male)) Some of the items may not be available...
Operating Instructions
Page 59
... H H Size 28, 29 High Altitude Mode 34 Hue 27 I Illumination 31 Image Flip 33 Input-A Signal Sel 30 Input-C Select 30 Installation 13 L Lamp Mode 33 Lamp replacement 37 Lamp Timer 35 Language 32 selecting the menu language 20 Lens Control 33 Lens protector 6 Location and function of controls connector panel 8 control panel...
... H H Size 28, 29 High Altitude Mode 34 Hue 27 I Illumination 31 Image Flip 33 Input-A Signal Sel 30 Input-C Select 30 Installation 13 L Lamp Mode 33 Lamp replacement 37 Lamp Timer 35 Language 32 selecting the menu language 20 Lens Control 33 Lens protector 6 Location and function of controls connector panel 8 control panel...


