
Operating Instructions
Page 2
... Location and Function of Controls .... 6 Top/Front/Left Side 6 Rear/Right Side/Bottom 6 Control Panel 7 Connector Panel 8 Remote Commander 10 Presentation Tool (VPL-CX86 only 12 Projecting the Picture Installing the Projector 13 Connecting the Projector 14 Connecting a Computer 14 Connecting a VCR 15 Projecting ... Function to Manual Adjustments 23 Controlling the Computer Using the Supplied Remote Commander (When Using the USB Cable 23 Controlling the Computer Using the Supplied Presentation Tool (When Using the Air Shot) (VPL-CX86 only 23 2 Off & Go Function 23 Direct Power On...
... Location and Function of Controls .... 6 Top/Front/Left Side 6 Rear/Right Side/Bottom 6 Control Panel 7 Connector Panel 8 Remote Commander 10 Presentation Tool (VPL-CX86 only 12 Projecting the Picture Installing the Projector 13 Connecting the Projector 14 Connecting a Computer 14 Connecting a VCR 15 Projecting ... Function to Manual Adjustments 23 Controlling the Computer Using the Supplied Remote Commander (When Using the USB Cable 23 Controlling the Computer Using the Supplied Presentation Tool (When Using the Air Shot) (VPL-CX86 only 23 2 Off & Go Function 23 Direct Power On...

Operating Instructions
Page 4
...projector will work even after turning it off and the power cord is supplied, with the Remote Commander away from the side of an image with the projector allowing you to run an optimum...in a limited space. Features High brightness, high picture quality High brightness Adopting Sony's unique optical system provides a high-efficiency optical system. It allows the 190 W UHP lamp to... give a light output of network presentations (VPL-CX86 only) Air Shot Air Shot features data transmission from a computer to start a wireless...
...projector will work even after turning it off and the power cord is supplied, with the Remote Commander away from the side of an image with the projector allowing you to run an optimum...in a limited space. Features High brightness, high picture quality High brightness Adopting Sony's unique optical system provides a high-efficiency optical system. It allows the 190 W UHP lamp to... give a light output of network presentations (VPL-CX86 only) Air Shot Air Shot features data transmission from a computer to start a wireless...
Operating Instructions
Page 5
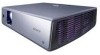
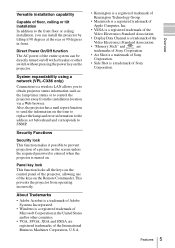
... Standard Association. • "Memory Stick" and are trademarks of Sony Corporation. • Air Shot is a trademark of Sony Corporation. • Side Shot is turned on the Remote Commander. Direct Power On/Off function The AC power of Sony Corporation. Features 5 Overview System expandability using a network (VPL-CX86 only) Connection to a wireless LAN allows you can...
... Standard Association. • "Memory Stick" and are trademarks of Sony Corporation. • Air Shot is a trademark of Sony Corporation. • Side Shot is turned on the Remote Commander. Direct Power On/Off function The AC power of Sony Corporation. Features 5 Overview System expandability using a network (VPL-CX86 only) Connection to a wireless LAN allows you can...
Operating Instructions
Page 6
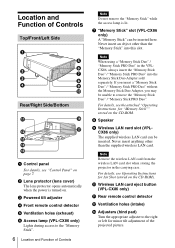
...inserted here. Never insert anything other than the supplied wireless LAN card. c Powered tilt adjuster d Front remote control detector e Ventilation holes (exhaust) f Access lamp (VPL-CX86 only) Lights during access to the "Memory Stick". 6 Location and Function of Controls Top/Front/Left...Stick Duo" / "Memory Stick PRO Duo" without the Memory Stick Duo Adapter, you may be inserted. j Wireless LAN card eject button (VPL-CX86 only) k Rear remote control detector l Ventilation holes (intake) m Adjusters (hind pad) Turn the appropriate adjuster to remove the "Memory Stick Duo" / "Memory ...
...inserted here. Never insert anything other than the supplied wireless LAN card. c Powered tilt adjuster d Front remote control detector e Ventilation holes (exhaust) f Access lamp (VPL-CX86 only) Lights during access to the "Memory Stick". 6 Location and Function of Controls Top/Front/Left...Stick Duo" / "Memory Stick PRO Duo" without the Memory Stick Duo Adapter, you may be inserted. j Wireless LAN card eject button (VPL-CX86 only) k Rear remote control detector l Ventilation holes (intake) m Adjusters (hind pad) Turn the appropriate adjuster to remove the "Memory Stick Duo" / "Memory ...
Operating Instructions
Page 9
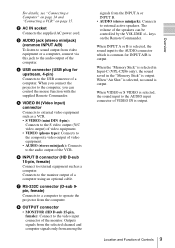
... Connect to the monitor output of the speakers can control the mouse function with the supplied Remote Commander. The volume of a computer using an optional cable. When the "Memory Stick" is selected in Input-C (VPL-CX86 only), the sound saved in the "Memory Stick" is output. When you can...When "Air Shot" is selected, no sound is output. For details, see "Connecting a Computer" on page 14 and "Connecting a VCR" on the Remote Commander. When VIDEO or S VIDEO is selected, the sound input to the AUDIO connector which is common for upstream, 4-pin) Connects to the audio output...
... Connect to the monitor output of the speakers can control the mouse function with the supplied Remote Commander. The volume of a computer using an optional cable. When the "Memory Stick" is selected in Input-C (VPL-CX86 only), the sound saved in the "Memory Stick" is output. When you can...When "Air Shot" is selected, no sound is output. For details, see "Connecting a Computer" on page 14 and "Connecting a VCR" on the Remote Commander. When VIDEO or S VIDEO is selected, the sound input to the AUDIO connector which is common for upstream, 4-pin) Connects to the audio output...
Operating Instructions
Page 10
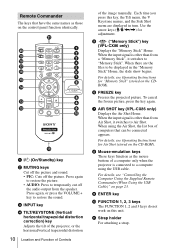
.... Use the arrow keys (M/m/ a ?/1 (On/Standby) key b MUTING keys Cut off the picture and sound. • PIC: Cuts off the audio output from the speaker. Remote Commander The keys that have the same names as those on the control panel function identically.
.... Use the arrow keys (M/m/ a ?/1 (On/Standby) key b MUTING keys Cut off the picture and sound. • PIC: Cuts off the audio output from the speaker. Remote Commander The keys that have the same names as those on the control panel function identically.
Operating Instructions
Page 11
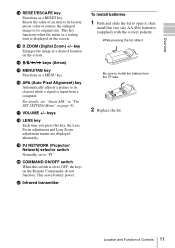
key Enlarges the image at a desired location on the screen. Overview l RESET/ESCAPE key Functions as a RESET key. m D ZOOM (Digital Zoom) +/- n M/m/ This key functions when the menu or a setting item is displayed on the screen. Resets the value of an item to its factory preset value or returns the enlarged image to its original size.
key Enlarges the image at a desired location on the screen. Overview l RESET/ESCAPE key Functions as a RESET key. m D ZOOM (Digital Zoom) +/- n M/m/ This key functions when the menu or a setting item is displayed on the screen. Resets the value of an item to its factory preset value or returns the enlarged image to its original size.
Operating Instructions
Page 12
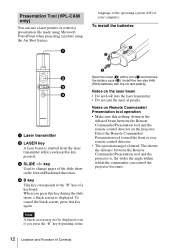
... with the correct polarity. The shorter the distance between the Remote Commander/Presentation tool and the remote control detector on the projector. Direct the Remote Commander/ Presentation tool toward the front or rear remote control detector. • The operation range is emitted from... system (OS) of a keyboard. Notes on Remote Commander/ Presentation tool operation • Make sure that nothing obstructs the infrared beam between the Remote Commander/Presentation tool and the projector is displayed. Presentation Tool (VPL-CX86 only) You can control the projector becomes....
... with the correct polarity. The shorter the distance between the Remote Commander/Presentation tool and the remote control detector on the projector. Direct the Remote Commander/ Presentation tool toward the front or rear remote control detector. • The operation range is emitted from... system (OS) of a keyboard. Notes on Remote Commander/ Presentation tool operation • Make sure that nothing obstructs the infrared beam between the Remote Commander/Presentation tool and the projector is displayed. Presentation Tool (VPL-CX86 only) You can control the projector becomes....

Operating Instructions
Page 16
... connect to a video GBR/ Component output connector Right side Projecting ON/STANDBY indicator to video GBR/ component output to audio output (L) to audio output (R) Rear remote control detector VCR A Stereo audio connecting cable (not supplied) (Use a no-resistance cable.) B SMF-402 Signal Cable (not supplied) HD D-sub 15-pin (male) ↔...
... connect to a video GBR/ Component output connector Right side Projecting ON/STANDBY indicator to video GBR/ component output to audio output (L) to audio output (R) Rear remote control detector VCR A Stereo audio connecting cable (not supplied) (Use a no-resistance cable.) B SMF-402 Signal Cable (not supplied) HD D-sub 15-pin (male) ↔...
Operating Instructions
Page 17
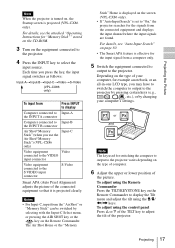
... attached "Operating Instructions for switching the computer to output to select the input source. Projecting the Picture Note When the projector is turned on the Remote Commander. Notes • For Input-C, input from a computer only. 5 Switch the equipment connected to output to the projector. F7 or Fx and Fn Note The... VGA / , etc.), or by selecting with the Input-C Select menu, or pressing the AIR SHOT key or the key on , the Startup screen is projected (VPL-CX86 only). To adjust using the Remote Commander Press the TILT/KEYSTONE key on the type of your computer's settings.
... attached "Operating Instructions for switching the computer to output to select the input source. Projecting the Picture Note When the projector is turned on the Remote Commander. Notes • For Input-C, input from a computer only. 5 Switch the equipment connected to output to the projector. F7 or Fx and Fn Note The... VGA / , etc.), or by selecting with the Input-C Select menu, or pressing the AIR SHOT key or the key on , the Startup screen is projected (VPL-CX86 only). To adjust using the Remote Commander Press the TILT/KEYSTONE key on the type of your computer's settings.
Operating Instructions
Page 18
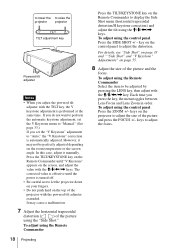
Press the TILT/KEYSTONE key on the Remote Commander until "V Keystone" appears on the room temperature or the screen angle. to lower the to raise the projector projector TILT adjustment key Powered tilt ...
Press the TILT/KEYSTONE key on the Remote Commander until "V Keystone" appears on the room temperature or the screen angle. to lower the to raise the projector projector TILT adjustment key Powered tilt ...
Operating Instructions
Page 20
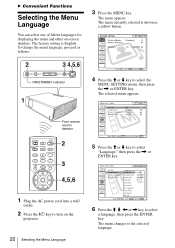
... the selected language. The menu changes to select the MENU SETTING menu, then press the , or ENTER key. The menu currently selected is English. Front remote control detector 5 Press the M or m key to select "Language," then press the , or ENTER key. 1 Plug the AC power cord into a wall outlet. 2 Press the...
... the selected language. The menu changes to select the MENU SETTING menu, then press the , or ENTER key. The menu currently selected is English. Front remote control detector 5 Press the M or m key to select "Language," then press the , or ENTER key. 1 Plug the AC power cord into a wall outlet. 2 Press the...
Operating Instructions
Page 23
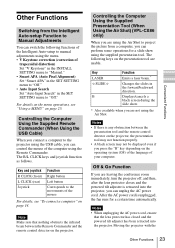
...a MENU" on page 14. Controlling the Computer Using the Supplied Presentation Tool (When Using the Air Shot) (VPL-CX86 only) When you are not using the Remote Commander. Moving the projector with the Other Functions 23 Convenient Functions Notes • When unplugging the AC power cord..., ensure that nothing obstructs the infrared beam between the presentation tool and the remote control detector on the projector, the presentation tool may not function properly. • A black screen may not be displayed even if...
...a MENU" on page 14. Controlling the Computer Using the Supplied Presentation Tool (When Using the Air Shot) (VPL-CX86 only) When you are not using the Remote Commander. Moving the projector with the Other Functions 23 Convenient Functions Notes • When unplugging the AC power cord..., ensure that nothing obstructs the infrared beam between the presentation tool and the remote control detector on the projector, the presentation tool may not function properly. • A black screen may not be displayed even if...
Operating Instructions
Page 24
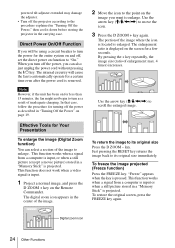
... also just unplug the power cord without pressing the ?/1 key. Effective Tools for the entire system on and off, set the direct power on the Remote Commander. powered tilt adjuster extended may damage the adjuster. • Turn off the projector according to enlarge. When you can select a section of the image...
... also just unplug the power cord without pressing the ?/1 key. Effective Tools for the entire system on and off, set the direct power on the Remote Commander. powered tilt adjuster extended may damage the adjuster. • Turn off the projector according to enlarge. When you can select a section of the image...
Operating Instructions
Page 26
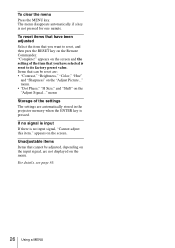
... signal, are not displayed on the screen and the setting of the settings The settings are : • "Contrast," "Brightness," "Color," "Hue" and "Sharpness" on the Remote Commander. menu. • "Dot Phase," "H Size," and "Shift" on the screen. appears on the "Adjust Signal..." To reset items that have selected is pressed. appears...
... signal, are not displayed on the screen and the setting of the settings The settings are : • "Contrast," "Brightness," "Color," "Hue" and "Sharpness" on the Remote Commander. menu. • "Dot Phase," "H Size," and "Shift" on the screen. appears on the "Adjust Signal..." To reset items that have selected is pressed. appears...
Operating Instructions
Page 30
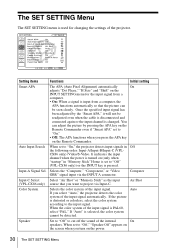
...Selects the color system of the input signal automatically. When set to project via the INPUT A connector. If you press the APA key on the Remote Commander even if "Smart APA" set to cut off the sound of the projector. The SET SETTING Menu The SET SETTING menu is changed. ...Computer Input-C Select Select "Air Shot" or "Memory Stick" as the input (VPL-CX86 only) source that the picture can adjust the picture by the "Smart APA," it will not be detected. Once the specified input signal has...
...Selects the color system of the input signal automatically. When set to project via the INPUT A connector. If you press the APA key on the Remote Commander even if "Smart APA" set to cut off the sound of the projector. The SET SETTING Menu The SET SETTING menu is changed. ...Computer Input-C Select Select "Air Shot" or "Memory Stick" as the input (VPL-CX86 only) source that the picture can adjust the picture by the "Smart APA," it will not be detected. Once the specified input signal has...
Operating Instructions
Page 31
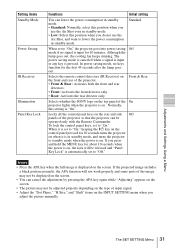
... press and hold the MENU key for 10 minutes. Adjustments and Settings Using a Menu The SET SETTING Menu 31 Front & Rear Selects whether the SONY logo on the top panel of the On projector lights when the projector is on the front and rear of input signal. • Adjust the...saving Off mode if no keys function for 10 seconds turns the projector on when it , the APA function will be operated only with the Remote Commander. Setting items Standby Mode Power Saving IR Receiver Illumination Panel Key Lock Functions Initial setting You can lower the power consumption in standby mode...
... press and hold the MENU key for 10 minutes. Adjustments and Settings Using a Menu The SET SETTING Menu 31 Front & Rear Selects whether the SONY logo on the top panel of the On projector lights when the projector is on the front and rear of input signal. • Adjust the...saving Off mode if no keys function for 10 seconds turns the projector on when it , the APA function will be operated only with the Remote Commander. Setting items Standby Mode Power Saving IR Receiver Illumination Panel Key Lock Functions Initial setting You can lower the power consumption in standby mode...
Operating Instructions
Page 33
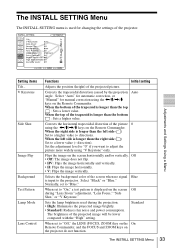
V Keystone Side Shot Image Flip Background Test Pattern Lamp Mode Lens Control Functions Initial setting Adjusts the position (height) of the projector. Adjustments and Settings Using a Menu Setting items Tilt... Corrects the trapezoidal distortion caused by the projection angle. Select "Auto" for automatic correction, or "Manual" for changing the settings of the projected picture. The INSTALL SETTING Menu The INSTALL SETTING menu is used for manual correction using the
V Keystone Side Shot Image Flip Background Test Pattern Lamp Mode Lens Control Functions Initial setting Adjusts the position (height) of the projector. Adjustments and Settings Using a Menu Setting items Tilt... Corrects the trapezoidal distortion caused by the projection angle. Select "Auto" for automatic correction, or "Manual" for changing the settings of the projected picture. The INSTALL SETTING Menu The INSTALL SETTING menu is used for manual correction using the

Operating Instructions
Page 38
.... If not, the projector cannot be regulated if sold in the USA This product contains mercury. Disposal of this product may be turned on the Remote Commander in red. 9 Press the following order for less than five seconds each: RESET, The ON/STANDBY indicator around the ?/1 key lights in the following...
.... If not, the projector cannot be regulated if sold in the USA This product contains mercury. Disposal of this product may be turned on the Remote Commander in red. 9 Press the following order for less than five seconds each: RESET, The ON/STANDBY indicator around the ?/1 key lights in the following...
Operating Instructions
Page 39
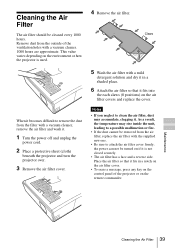
... it in a notch on the air filter cover. • To erase a message, press any key on the control panel of the projector or on the remote commander. the power can not be cleaned every 1000 hours. Notes • If you neglect to clean the air filter, dust may rise inside the...
... it in a notch on the air filter cover. • To erase a message, press any key on the control panel of the projector or on the remote commander. the power can not be cleaned every 1000 hours. Notes • If you neglect to clean the air filter, dust may rise inside the...


