
Operating Instructions
Page 1
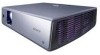
2-634-395-11 (1) Data Projector Operating Instructions VPL-CX86 VPL-CX80 © 2005 Sony Corporation
2-634-395-11 (1) Data Projector Operating Instructions VPL-CX86 VPL-CX80 © 2005 Sony Corporation

Operating Instructions
Page 2
... Side 6 Rear/Right Side/Bottom 6 Control Panel 7 Connector Panel 8 Remote Commander 10 Presentation Tool (VPL-CX86 only 12 Projecting the Picture Installing the Projector 13 Connecting the Projector 14 Connecting a Computer 14 Connecting a VCR 15 Projecting 16 Turning Off the Power 19 Convenient Functions Selecting...Remote Commander (When Using the USB Cable 23 Controlling the Computer Using the Supplied Presentation Tool (When Using the Air Shot) (VPL-CX86 only 23 2 Off & Go Function 23 Direct Power On/Off Function ....24 Effective Tools for Your Presentation 24 Adjustments ...
... Side 6 Rear/Right Side/Bottom 6 Control Panel 7 Connector Panel 8 Remote Commander 10 Presentation Tool (VPL-CX86 only 12 Projecting the Picture Installing the Projector 13 Connecting the Projector 14 Connecting a Computer 14 Connecting a VCR 15 Projecting 16 Turning Off the Power 19 Convenient Functions Selecting...Remote Commander (When Using the USB Cable 23 Controlling the Computer Using the Supplied Presentation Tool (When Using the Air Shot) (VPL-CX86 only 23 2 Off & Go Function 23 Direct Power On/Off Function ....24 Effective Tools for Your Presentation 24 Adjustments ...

Operating Instructions
Page 3
... Stick". User's Guide for the VPLCX86/VPL-CX80) (on the CD-ROM) (this manual) This Operating Instructions describes the setup and operations of this product. Note You must have made the required connections. Projector Station for Presentation (VPL-CX86 only) (Japanese and English only)... manuals and softwares are supplied with this unit. Also, the Operating Instructions for the VPL-CX86/ VPL-CX80). Operating Instructions (for the VPLCX76/VPL-CX70) (on the CD-ROM) Projector Station for transmitting data from a computer to install this manual. Operating Instructions for Air...
... Stick". User's Guide for the VPLCX86/VPL-CX80) (on the CD-ROM) (this manual) This Operating Instructions describes the setup and operations of this product. Note You must have made the required connections. Projector Station for Presentation (VPL-CX86 only) (Japanese and English only)... manuals and softwares are supplied with this unit. Also, the Operating Instructions for the VPL-CX86/ VPL-CX80). Operating Instructions (for the VPLCX76/VPL-CX70) (on the CD-ROM) Projector Station for transmitting data from a computer to install this manual. Operating Instructions for Air...

Operating Instructions
Page 4
...during your Air Shot presentation. Variety of network presentations (VPL-CX86 only) Air Shot Air Shot features data transmission from a computer to give a light output of the supplied wireless LAN card (for the projector) and the USB wireless LAN module (for projection. ... easily if you are using the wireless LAN for Presentation" in a quiet environment. Features High brightness, high picture quality High brightness Adopting Sony's unique optical system provides a high-efficiency optical system. A Simple Mode is very short, approximately 2.4 m (7.8 feet), when projecting an...
...during your Air Shot presentation. Variety of network presentations (VPL-CX86 only) Air Shot Air Shot features data transmission from a computer to give a light output of the supplied wireless LAN card (for the projector) and the USB wireless LAN module (for projection. ... easily if you are using the wireless LAN for Presentation" in a quiet environment. Features High brightness, high picture quality High brightness Adopting Sony's unique optical system provides a high-efficiency optical system. A Simple Mode is very short, approximately 2.4 m (7.8 feet), when projecting an...
Operating Instructions
Page 5
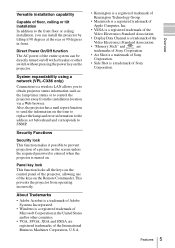
... AC power of floor, ceiling or tilt installation In addition to SNMP. Panel key lock This function locks all the keys on the projector. About Trademarks • Adobe Acrobat is a trademark of Adobe Systems Incorporated. • Windows is a trademark of the keys on ...or other switch without pressing the power key on the control panel of the projector, allowing use of Sony Corporation. This prevents the projector from the installation location via a Web browser. System expandability using a network (VPL-CX86 only) Connection to a wireless LAN allows you can be directly turned ...
... AC power of floor, ceiling or tilt installation In addition to SNMP. Panel key lock This function locks all the keys on the projector. About Trademarks • Adobe Acrobat is a trademark of Adobe Systems Incorporated. • Windows is a trademark of the keys on ...or other switch without pressing the power key on the control panel of the projector, allowing use of Sony Corporation. This prevents the projector from the installation location via a Web browser. System expandability using a network (VPL-CX86 only) Connection to a wireless LAN allows you can be directly turned ...
Operating Instructions
Page 6
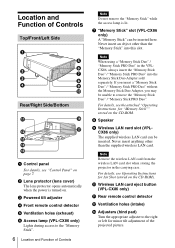
...Never insert anything other than the supplied wireless LAN card. Note Remove the wireless LAN card from the wireless LAN card slot when storing the projector in the VPLCX86, always insert the "Memory Stick Duo" / "Memory Stick PRO Duo" into this slot. h Speaker i Wireless LAN card... slot (VPLCX86 only) The supplied wireless LAN card can be inserted. j Wireless LAN card eject button (VPL-CX86 only) k Rear remote control detector l Ventilation holes (intake) m Adjusters (hind pad) Turn the appropriate adjuster to the "Memory Stick". 6 Location...
...Never insert anything other than the supplied wireless LAN card. Note Remove the wireless LAN card from the wireless LAN card slot when storing the projector in the VPLCX86, always insert the "Memory Stick Duo" / "Memory Stick PRO Duo" into this slot. h Speaker i Wireless LAN card... slot (VPLCX86 only) The supplied wireless LAN card can be inserted. j Wireless LAN card eject button (VPL-CX86 only) k Rear remote control detector l Ventilation holes (intake) m Adjusters (hind pad) Turn the appropriate adjuster to the "Memory Stick". 6 Location...
Operating Instructions
Page 7
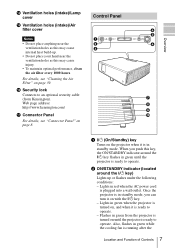
...Cleaning the Air Filter" on page 8. Control Panel a ?/1 (On/Standby) key Turns on the projector when it on with the ?/1 key. - When you can turn it is in green until the projector is in standby mode, you push this may cause injury. • To maintain optimal performance, ...the air filter every 1000 hours. b ON/STANDBY indicator (located around the ?/1 key flashes in standby mode. Once the projector is ready to an optional security cable (from the projector is turned on , and when it is plugged into a wall outlet. Overview n Ventilation holes (intake)/Lamp cover o ...
...Cleaning the Air Filter" on page 8. Control Panel a ?/1 (On/Standby) key Turns on the projector when it on with the ?/1 key. - When you can turn it is in green until the projector is in standby mode, you push this may cause injury. • To maintain optimal performance, ...the air filter every 1000 hours. b ON/STANDBY indicator (located around the ?/1 key flashes in standby mode. Once the projector is ready to an optional security cable (from the projector is turned on , and when it is plugged into a wall outlet. Overview n Ventilation holes (intake)/Lamp cover o ...
Operating Instructions
Page 8
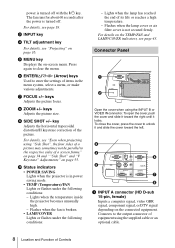
h ZOOM +/- i SIDE SHOT +/- Lights when the temperature inside the projector becomes unusually high. - For details on the TEMP/FAN and LAMP/COVER indicators, see page 19. For details, see page 43. keys Adjusts the picture ... lamp has reached the end of the picture. keys Adjusts the picture size. power is turned off . j Status indicators • POWER SAVING Lights when the projector is not secured firmly. f ENTER/f/F/g/G (Arrow) keys Used to the respective sides of equipment using the INPUT B or VIDEO IN connector. Connects to the output...
h ZOOM +/- i SIDE SHOT +/- Lights when the temperature inside the projector becomes unusually high. - For details on the TEMP/FAN and LAMP/COVER indicators, see page 19. For details, see page 43. keys Adjusts the picture ... lamp has reached the end of the picture. keys Adjusts the picture size. power is turned off . j Status indicators • POWER SAVING Lights when the projector is not secured firmly. f ENTER/f/F/g/G (Arrow) keys Used to the respective sides of equipment using the INPUT B or VIDEO IN connector. Connects to the output...
Operating Instructions
Page 9
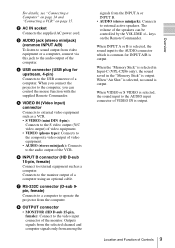
... input) connector Connects to external video equipment such as a computer. keys on page 15. When the "Memory Stick" is selected in Input-C (VPL-CX86 only), the sound saved in the "Memory Stick" is output. When "Air Shot" is selected, no sound is output. Outputs signals from... the Remote Commander. When you can be controlled by the VOLUME +/- g RS-232C connector (D-sub 9pin, female) Connects to a computer to operate the projector from the INPUT A or INPUT B. • AUDIO (stereo minijack): Connects to the audio output of video equipment. • AUDIO (stereo minijack): Connects...
... input) connector Connects to external video equipment such as a computer. keys on page 15. When the "Memory Stick" is selected in Input-C (VPL-CX86 only), the sound saved in the "Memory Stick" is output. When "Air Shot" is selected, no sound is output. Outputs signals from... the Remote Commander. When you can be controlled by the VOLUME +/- g RS-232C connector (D-sub 9pin, female) Connects to a computer to operate the projector from the INPUT A or INPUT B. • AUDIO (stereo minijack): Connects to the audio output of video equipment. • AUDIO (stereo minijack): Connects...
Operating Instructions
Page 10
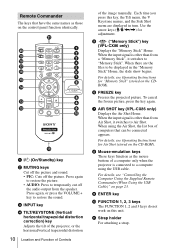
... menus, and the Side Shot menu are displayed in turn. c INPUT key d TILT/KEYSTONE (Vertical/ horizontal trapezoidal distortion correction) key Adjusts the tilt of the projector, or the horizonal/vertical trapezoidal distortion 10 Location and Function of Controls of the image manually. Press again, or press the VOLUME + key to temporarily...
... menus, and the Side Shot menu are displayed in turn. c INPUT key d TILT/KEYSTONE (Vertical/ horizontal trapezoidal distortion correction) key Adjusts the tilt of the projector, or the horizonal/vertical trapezoidal distortion 10 Location and Function of Controls of the image manually. Press again, or press the VOLUME + key to temporarily...
Operating Instructions
Page 11
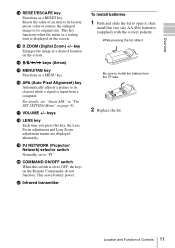
key Enlarges the image at a desired location on the screen. n M/m/ Overview l RESET/ESCAPE key Functions as a RESET key. This key functions when the menu or a setting item is displayed on the screen. m D ZOOM (Digital Zoom) +/- Resets the value of an item to its factory preset value or returns the enlarged image to its original size.
key Enlarges the image at a desired location on the screen. n M/m/ Overview l RESET/ESCAPE key Functions as a RESET key. This key functions when the menu or a setting item is displayed on the screen. m D ZOOM (Digital Zoom) +/- Resets the value of an item to its factory preset value or returns the enlarged image to its original size.
Operating Instructions
Page 12
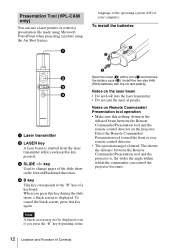
... control detector on Remote Commander/ Presentation tool operation • Make sure that nothing obstructs the infrared beam between the Remote Commander/Presentation tool and the projector is limited. c SLIDE G/g key Used to the "B" key of Controls d B key This key corresponds to change pages of your computer. Direct the... can use a laser pointer or control a presentation file made using Microsoft PowerPoint when projecting a picture using the Air Shot feature. Presentation Tool (VPL-CX86 only) You can control the projector becomes. 12 Location and Function of a keyboard.
... control detector on Remote Commander/ Presentation tool operation • Make sure that nothing obstructs the infrared beam between the Remote Commander/Presentation tool and the projector is limited. c SLIDE G/g key Used to the "B" key of Controls d B key This key corresponds to change pages of your computer. Direct the... can use a laser pointer or control a presentation file made using Microsoft PowerPoint when projecting a picture using the Air Shot feature. Presentation Tool (VPL-CX86 only) You can control the projector becomes. 12 Location and Function of a keyboard.
Operating Instructions
Page 13
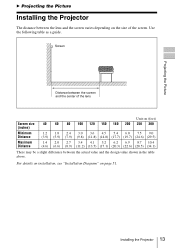
Installing the Projector 13 For details on installation, see "Installation Diagram" on the size of the screen. Screen Distance between the screen and the center of the lens ... between the lens and the screen varies depending on page 51. Use the following table as a guide. Projecting the Picture B Projecting the Picture Installing the Projector The distance between the actual value and the design value shown in the table above.
Installing the Projector 13 For details on installation, see "Installation Diagram" on the size of the screen. Screen Distance between the screen and the center of the lens ... between the lens and the screen varies depending on page 51. Use the following table as a guide. Projecting the Picture B Projecting the Picture Installing the Projector The distance between the actual value and the design value shown in the table above.
Operating Instructions
Page 14
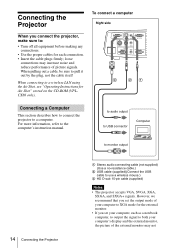
...the external monitor may increase noise and reduce performance of your computer to XGA mode for the external monitor. • If you connect the projector, make sure to: • Turn off all equipment before making any connections. • Use the proper cables for Air Shot" stored ...on the CD-ROM (VPLCX86 only). to audio output to USB connector Computer to monitor output 14 Connecting the Projector A Stereo audio connecting cable (not supplied) (Use a no-resistance cable.) B USB cable (supplied)(Connect the USB cable to a computer. When pulling ...
...the external monitor may increase noise and reduce performance of your computer to XGA mode for the external monitor. • If you connect the projector, make sure to: • Turn off all equipment before making any connections. • Use the proper cables for Air Shot" stored ...on the CD-ROM (VPLCX86 only). to audio output to USB connector Computer to monitor output 14 Connecting the Projector A Stereo audio connecting cable (not supplied) (Use a no-resistance cable.) B USB cable (supplied)(Connect the USB cable to a computer. When pulling ...

Operating Instructions
Page 15
... correctly when connected to the projector using the USB cable. • This projector is not guaranteed for the ...cable, restart the computer, then connect the computer to the projector via the USB cable. For more information, refer to audio... Projector 15 Projecting the Picture appear properly. Recommended operating environment When you use the projector in suspend, or standby mode, disconnect the projector... as illustrated. USB function When connecting the projector to only the external monitor. For details,... projector to the projector using the USB cable for suspend or standby ...
... correctly when connected to the projector using the USB cable. • This projector is not guaranteed for the ...cable, restart the computer, then connect the computer to the projector via the USB cable. For more information, refer to audio... Projector 15 Projecting the Picture appear properly. Recommended operating environment When you use the projector in suspend, or standby mode, disconnect the projector... as illustrated. USB function When connecting the projector to only the external monitor. For details,... projector to the projector using the USB cable for suspend or standby ...

Operating Instructions
Page 16
The ON/STANDBY indicator lights in green and the Intelligent Auto-setup starts. The ON/STANDBY indicator flashes in red and the projector goes into a wall outlet, then connect all equipment. The lens protector opens, and the powered tilt adjustor rises and stops at the ... 16 Projecting setting on the INPUT SETTING menu according to the input signal. • When you connect the projector to a video GBR output connector, select "Video GBR" or when you connect the projector to audio output (R) Rear remote control detector VCR A Stereo audio connecting cable (not supplied) (Use a no...
The ON/STANDBY indicator lights in green and the Intelligent Auto-setup starts. The ON/STANDBY indicator flashes in red and the projector goes into a wall outlet, then connect all equipment. The lens protector opens, and the powered tilt adjustor rises and stops at the ... 16 Projecting setting on the INPUT SETTING menu according to the input signal. • When you connect the projector to a video GBR output connector, select "Video GBR" or when you connect the projector to audio output (R) Rear remote control detector VCR A Stereo audio connecting cable (not supplied) (Use a no...
Operating Instructions
Page 17
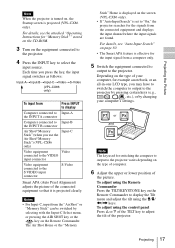
... for example a notebook, or an all-in-one LCD type, you use the Air Shot/"Memory Stick") (VPL-CX86 only) Input-C Video equipment Video connected to the VIDEO input connector Video equipment connected to the projector by pressing certain keys (e.g., / , LCD VGA / , etc.), or by selecting with the Input-C Select... menu, or pressing the AIR SHOT key or the key on the screen (VPL-CX86 only). • If "Auto Input Search" is set to "On," the projector searches for the signals from the connected equipment and displays the input channel where the input signals are ...
... for example a notebook, or an all-in-one LCD type, you use the Air Shot/"Memory Stick") (VPL-CX86 only) Input-C Video equipment Video connected to the VIDEO input connector Video equipment connected to the projector by pressing certain keys (e.g., / , LCD VGA / , etc.), or by selecting with the Input-C Select... menu, or pressing the AIR SHOT key or the key on the screen (VPL-CX86 only). • If "Auto Input Search" is set to "On," the projector searches for the signals from the connected equipment and displays the input channel where the input signals are ...
Operating Instructions
Page 18
... want to perform the automatic keystone adjustment, set the V Keystone menu to "Manual." (See page 33.) If you set the "V Keystone" adjustment to raise the projector projector TILT adjustment key Powered tilt adjuster Notes • When you adjust the powered tilt adjuster with the M/m/ Press the TILT/KEYSTONE key on the Remote...
... want to perform the automatic keystone adjustment, set the V Keystone menu to "Manual." (See page 33.) If you set the "V Keystone" adjustment to raise the projector projector TILT adjustment key Powered tilt adjuster Notes • When you adjust the powered tilt adjuster with the M/m/ Press the TILT/KEYSTONE key on the Remote...
Operating Instructions
Page 19
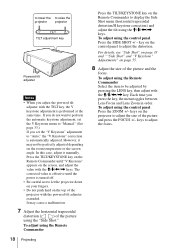
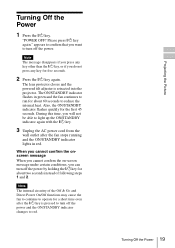
... up the ON/STANDBY indicator again with the ?/1 key. 3 Unplug the AC power cord from the wall outlet after the ?/1 key is retracted into the projector. During this time, you do not press any key other than the ?/1 key, or if you will not be able to run for five seconds...
... up the ON/STANDBY indicator again with the ?/1 key. 3 Unplug the AC power cord from the wall outlet after the ?/1 key is retracted into the projector. During this time, you do not press any key other than the ?/1 key, or if you will not be able to run for five seconds...
Operating Instructions
Page 20
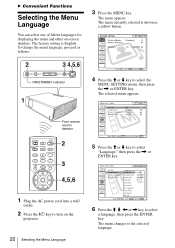
... to the selected language. B Convenient Functions Selecting the Menu Language You can select one of fifteen languages for displaying the menu and other on the projector. 20 Selecting the Menu Language 6 Press the M, m, < or , key to select the MENU SETTING menu, then press the , or ENTER key. The menu appears...
... to the selected language. B Convenient Functions Selecting the Menu Language You can select one of fifteen languages for displaying the menu and other on the projector. 20 Selecting the Menu Language 6 Press the M, m, < or , key to select the MENU SETTING menu, then press the , or ENTER key. The menu appears...


