

Brochure
Page 1
...and delivers exceptional reliability and longevity. Colour Light Output provides users with 2000 ANSI lumens VPL-EW7 WXGA portable projector The VPL-EW7 projector features a native WXGA (1280x800) resolution, making it is switched off if no need ...VPL-EW7 projector has a range of connectivity options which minimises degradation of 8 degrees that measures a projector's ability to be unplugged as soon as it ideal for 10 minutes and lights again when a signal is input or any key is a metric that automatically displays perfectly proportioned images. This projector incorporates Sony...
...and delivers exceptional reliability and longevity. Colour Light Output provides users with 2000 ANSI lumens VPL-EW7 WXGA portable projector The VPL-EW7 projector features a native WXGA (1280x800) resolution, making it is switched off if no need ...VPL-EW7 projector has a range of connectivity options which minimises degradation of 8 degrees that measures a projector's ability to be unplugged as soon as it ideal for 10 minutes and lights again when a signal is input or any key is a metric that automatically displays perfectly proportioned images. This projector incorporates Sony...
Brochure
Page 2
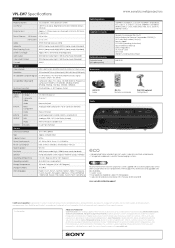
... in 5 languages • Collection and delivery anywhere in EU, Norway and Switzerland www.sonybiz.net/primesupport © 2009 Sony Corporation. All other trademarks are approximate. Prime Support Plus extensions and upgrades are subject to change without notice. Reproduction in ...Broadcast, Video Security and Retail, Transport & Large Venue markets. VPL-EW7 Specifications Optical Projector System 3 LCD panels, 1 lens projector system LCD Panel 0.59" TFT LCD panel, (BrightEra) 3,072,000 (1280x800 (WXGA x3) pixels Projector Lens Approx. 1.2 times zoom lens (manual), f=18.53 to...
... in 5 languages • Collection and delivery anywhere in EU, Norway and Switzerland www.sonybiz.net/primesupport © 2009 Sony Corporation. All other trademarks are approximate. Prime Support Plus extensions and upgrades are subject to change without notice. Reproduction in ...Broadcast, Video Security and Retail, Transport & Large Venue markets. VPL-EW7 Specifications Optical Projector System 3 LCD panels, 1 lens projector system LCD Panel 0.59" TFT LCD panel, (BrightEra) 3,072,000 (1280x800 (WXGA x3) pixels Projector Lens Approx. 1.2 times zoom lens (manual), f=18.53 to...
User Manual
Page 1
VPL-EX70 VPL-EX7 VPL-EW7 Not all models are available in all countries. 4-168-644-11 (1) Data Projector Operating Instructions Before operating the unit, please read this manual thoroughly and retain it for future reference. Please check with your local Sony Authorized Dealer. © 2009 Sony Corporation
VPL-EX70 VPL-EX7 VPL-EW7 Not all models are available in all countries. 4-168-644-11 (1) Data Projector Operating Instructions Before operating the unit, please read this manual thoroughly and retain it for future reference. Please check with your local Sony Authorized Dealer. © 2009 Sony Corporation

User Manual
Page 4
... Controls .. 11 Top/Right Side/Front 11 Rear/Bottom 11 Control Panel 13 Connector Panel 15 Remote Commander 16 Projecting the Picture Installing the Projector 18 Connecting the Projector 18 Connecting a Computer 18 Connecting a VCR 20 Projecting 21 Turning Off the Power 23 Convenient Functions Selecting the Menu Language .......... 24 Security Lock...
... Controls .. 11 Top/Right Side/Front 11 Rear/Bottom 11 Control Panel 13 Connector Panel 15 Remote Commander 16 Projecting the Picture Installing the Projector 18 Connecting the Projector 18 Connecting a Computer 18 Connecting a VCR 20 Projecting 21 Turning Off the Power 23 Convenient Functions Selecting the Menu Language .......... 24 Security Lock...

User Manual
Page 5
... the best picture, the front of the screen should be near the unit and easily accessible. • The unit is not disconnected to the projector. Stubborn stains may be removed with a soft cloth such as a cleaning cloth or glass cleaning cloth lightly dampened with water. • Never...to the following: • Avoid touching the lens. Cleaning the lens The lens surface is recommended. If voltage adaptation is required, consult with qualified Sony personnel. • Should any windows that face the screen with opaque draperies. • It is hot. • Be careful not to get ...
... the best picture, the front of the screen should be near the unit and easily accessible. • The unit is not disconnected to the projector. Stubborn stains may be removed with a soft cloth such as a cleaning cloth or glass cleaning cloth lightly dampened with water. • Never...to the following: • Avoid touching the lens. Cleaning the lens The lens surface is recommended. If voltage adaptation is required, consult with qualified Sony personnel. • Should any windows that face the screen with opaque draperies. • It is hot. • Be careful not to get ...

User Manual
Page 6
... pieces of paper or clumps of dust. 6 Notes on Installation and Usage Notes on Installation and Usage Unsuitable Installation Do not install the projector in contact with a stained cloth, the cabinet may be turned off . Do not place the unit on surfaces (rugs, blankets, etc....) or near materials (curtains, draperies) that appear continuously on the LCD data projector. LCD data projector This LCD data projector is manufactured using high-precision technology. When internal heat builds up . When the images are projected onto the screens from ...
... pieces of paper or clumps of dust. 6 Notes on Installation and Usage Notes on Installation and Usage Unsuitable Installation Do not install the projector in contact with a stained cloth, the cabinet may be turned off . Do not place the unit on surfaces (rugs, blankets, etc....) or near materials (curtains, draperies) that appear continuously on the LCD data projector. LCD data projector This LCD data projector is manufactured using high-precision technology. When internal heat builds up . When the images are projected onto the screens from ...

User Manual
Page 7
..., and this may cause a malfunction of the unit or damage it on a level surface or suspending from the ceiling. Unsuitable Conditions Do not use the projector under the following conditions. Do not tilt the unit to the right or left Avoid tilting the unit to moisture condensation or a rise in temperature... smoke sensor Avoid installing the unit in such a location may occur. Locations subject to direct cool or warm air from an air-conditioner Installing the projector in a very dusty or extremely smoky environment.
..., and this may cause a malfunction of the unit or damage it on a level surface or suspending from the ceiling. Unsuitable Conditions Do not use the projector under the following conditions. Do not tilt the unit to the right or left Avoid tilting the unit to moisture condensation or a rise in temperature... smoke sensor Avoid installing the unit in such a location may occur. Locations subject to direct cool or warm air from an air-conditioner Installing the projector in a very dusty or extremely smoky environment.

User Manual
Page 8
... reliability of the lens that covers the ventilation holes (exhaust/ intake); Use the PIC MUTING key to shock, as this mode when using the projector at an altitude of preventing theft, by using this bar, it to cut off the picture. Do not use the Security bar for example. ...Note on carrying the projector The unit is not a malfunction of the carrying case. Do not block the ventilation holes Avoid using a thick-piled carpet or anything that may...
... reliability of the lens that covers the ventilation holes (exhaust/ intake); Use the PIC MUTING key to shock, as this mode when using the projector at an altitude of preventing theft, by using this bar, it to cut off the picture. Do not use the Security bar for example. ...Note on carrying the projector The unit is not a malfunction of the carrying case. Do not block the ventilation holes Avoid using a thick-piled carpet or anything that may...

User Manual
Page 9
...(separately printed manual) This manual describes basic operations for this product includes the Main unit (projector) and the following manuals are supplied with the projector. Included Attachments The package for projecting pictures after you have Adobe Acrobat Reader 5.0 or higher ...operations of this projector. Operating Instructions (on the CD-ROM. Check them before use of this projector. It also describes important precautions for safe handling and use . Main unit (projector) (1) RM-PJ6 Remote Commander (1) HD D-sub 15 pin cable (1.8 m) (1) (1-967100-11/Sony) About the...
...(separately printed manual) This manual describes basic operations for this product includes the Main unit (projector) and the following manuals are supplied with the projector. Included Attachments The package for projecting pictures after you have Adobe Acrobat Reader 5.0 or higher ...operations of this projector. Operating Instructions (on the CD-ROM. Check them before use of this projector. It also describes important precautions for safe handling and use . Main unit (projector) (1) RM-PJ6 Remote Commander (1) HD D-sub 15 pin cable (1.8 m) (1) (1-967100-11/Sony) About the...

User Manual
Page 13
... while the cooling fan is running after the power is turned off. • Lights in orange when the power saving mode is on the projector when the projector is in red when the AC power cord is not secured firmly. • A repetition rate of 3 flashes when the lamp has reached the ...: • A repetition rate of its life or reaches a high temperature. Location and Function of items in green from the time when the projector is turned on until the projector is ready to operate. • Flashes in the menu system, select a menu, or make various adjustments. The fan runs for about 90...
... while the cooling fan is running after the power is turned off. • Lights in orange when the power saving mode is on the projector when the projector is in red when the AC power cord is not secured firmly. • A repetition rate of 3 flashes when the lamp has reached the ...: • A repetition rate of its life or reaches a high temperature. Location and Function of items in green from the time when the projector is turned on until the projector is ready to operate. • Flashes in the menu system, select a menu, or make various adjustments. The fan runs for about 90...
User Manual
Page 16
... Digital RGB/Component connector (for HDMI and HDCP) (VPL-EW7 only): Connects to HDMI connector of INPUT A. When INPUT B is selected, the output audio is not provided in this jack to the audio output of the computer when you operate the projector from among the signals connected to INPUT A or INPUT... B (VPL-EX70 only). • AUDIO (stereo minijack): Connects to the connector of the computer. f AUTO FOCUS key This...
... Digital RGB/Component connector (for HDMI and HDCP) (VPL-EW7 only): Connects to HDMI connector of INPUT A. When INPUT B is selected, the output audio is not provided in this jack to the audio output of the computer when you operate the projector from among the signals connected to INPUT A or INPUT... B (VPL-EX70 only). • AUDIO (stereo minijack): Connects to the connector of the computer. f AUTO FOCUS key This...

User Manual
Page 17
.... This function is available when the PC signal is , the wider the angle within which the commander can control the projector becomes. The shorter the distance between the Remote Commander and the remote control detector on page 34. For details, see "Smart APA"... the illustration. 2 Install the lithium battery. m LENS key This function is not provided in "The SET SETTING Menu" on the projector. Use the arrow keys (v/V/b/B) for adjustment. n KEYSTONE (Trapezoidal distortion correction) /TILT key Adjusts the vertical trapezoidal distortion of Controls 17 Overview Pressing ...
.... This function is available when the PC signal is , the wider the angle within which the commander can control the projector becomes. The shorter the distance between the Remote Commander and the remote control detector on page 34. For details, see "Smart APA"... the illustration. 2 Install the lithium battery. m LENS key This function is not provided in "The SET SETTING Menu" on the projector. Use the arrow keys (v/V/b/B) for adjustment. n KEYSTONE (Trapezoidal distortion correction) /TILT key Adjusts the vertical trapezoidal distortion of Controls 17 Overview Pressing ...

User Manual
Page 18
... sure to a computer. Connecting a Computer This section describes how to connect the projector to : • Turn off all equipment before making any connections. • Use the proper cables for each connection. • Insert the cable plugs... details, see "Installation Diagram" on a floor or desktop (floor installation), but also can be sure to the computer's instruction manual. 18 Installing the Projector / Connecting the Projector When pulling out a cable, be suspended from a ceiling with a dedicated mounting device (ceiling installation). B Projecting the Picture Installing the...
... sure to a computer. Connecting a Computer This section describes how to connect the projector to : • Turn off all equipment before making any connections. • Use the proper cables for each connection. • Insert the cable plugs... details, see "Installation Diagram" on a floor or desktop (floor installation), but also can be sure to the computer's instruction manual. 18 Installing the Projector / Connecting the Projector When pulling out a cable, be suspended from a ceiling with a dedicated mounting device (ceiling installation). B Projecting the Picture Installing the...

User Manual
Page 19
... rows of the external monitor may not appear properly. Set your computer's display and the external monitor, to DVI-D output connector Computer to following connectors: VPL-EX70/EX7: AUDIO INPUT connector VPL-EW7: INPUT A AUDIO connector • The projector accepts VGA, SVGA, XGA, SXGA, SXGA+, WXGA signals.
... rows of the external monitor may not appear properly. Set your computer's display and the external monitor, to DVI-D output connector Computer to following connectors: VPL-EX70/EX7: AUDIO INPUT connector VPL-EW7: INPUT A AUDIO connector • The projector accepts VGA, SVGA, XGA, SXGA, SXGA+, WXGA signals.
User Manual
Page 20
... stereo audio connection, connect the stereo audio connecting cable to following connectors: VPL-EX70/EX7: AUDIO INPUT connector VPL-EW7: INPUT A AUDIO connector • Set the aspect ratio using "Aspect" on the INPUT SETTING menu according to the instruction manuals of this projector is not compatible with DSD (Direct Stream Digital) Signal or CEC...
... stereo audio connection, connect the stereo audio connecting cable to following connectors: VPL-EX70/EX7: AUDIO INPUT connector VPL-EW7: INPUT A AUDIO connector • Set the aspect ratio using "Aspect" on the INPUT SETTING menu according to the instruction manuals of this projector is not compatible with DSD (Direct Stream Digital) Signal or CEC...

User Manual
Page 21
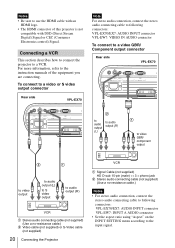
Projecting 21 • When you connect the projector to a video GBR output connector, select "Video GBR" or when you connect the projector to a component output connector, select "Component" with the "Input-A Signal Sel." Projecting 1,2 4 7 Projecting the Picture 1 Front remote 8 control detector 4 INPUT NETWORK USB MENU APA 2 ENTER RESET KEYSTONE AUTO FOCUS LENS /TILT PIC MUTING D ZOOM VOLUME FREEZE AUDIO MUTING 7 7 1 Plug the AC power cord into a wall outlet, and connect all equipment, then remove the lens cover. setting on the SET SETTING menu.
Projecting 21 • When you connect the projector to a video GBR output connector, select "Video GBR" or when you connect the projector to a component output connector, select "Component" with the "Input-A Signal Sel." Projecting 1,2 4 7 Projecting the Picture 1 Front remote 8 control detector 4 INPUT NETWORK USB MENU APA 2 ENTER RESET KEYSTONE AUTO FOCUS LENS /TILT PIC MUTING D ZOOM VOLUME FREEZE AUDIO MUTING 7 7 1 Plug the AC power cord into a wall outlet, and connect all equipment, then remove the lens cover. setting on the SET SETTING menu.
User Manual
Page 22
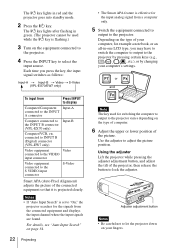
..., you press the key, the input signal switches as follows: Input-A t Input-B t Video t S-Video (VPL-EX70/EW7 only) To input from Press INPUT to display Computer/Component Input-A connected to the INPUT A connector Computer connected to "On," the projector searches for the signals from a computer only. 5 Switch the equipment connected to output to...
..., you press the key, the input signal switches as follows: Input-A t Input-B t Video t S-Video (VPL-EX70/EW7 only) To input from Press INPUT to display Computer/Component Input-A connected to the INPUT A connector Computer connected to "On," the projector searches for the signals from a computer only. 5 Switch the equipment connected to output to...

User Manual
Page 23
...manually. If you do not want to light up the ?/1 key again with the adjuster out. In this time, you adjust the tilt of the projector with the v/V/b/B keys. 8 Adjust the size of the picture and the focus. Adjust the picture size using the Zoom ring and adjust the picture focus... using the Focus ring. For VPL-EX70/EW7 • When you will not be perfectly adjusted depending on the room temperature or the screen angle. However, it may cause malfunction. 7 Adjust ...
...manually. If you do not want to light up the ?/1 key again with the adjuster out. In this time, you adjust the tilt of the projector with the v/V/b/B keys. 8 Adjust the size of the picture and the focus. Adjust the picture size using the Zoom ring and adjust the picture focus... using the Focus ring. For VPL-EX70/EW7 • When you will not be perfectly adjusted depending on the room temperature or the screen angle. However, it may cause malfunction. 7 Adjust ...

User Manual
Page 24
To change the menu language, proceed as follows: 2 4,5,6 3 1 24 Selecting the Menu Language Front remote control detector 3 INPUT NETWORK USB MENU APA 2 ENTER RESET KEYSTONE AUTO FOCUS LENS /TILT PIC MUTING D ZOOM VOLUME FREEZE AUDIO MUTING 4,5,6 1 Plug the AC power cord into a wall outlet. 2 Press the ?/1 key to turn on -screen displays. The menu appears. The factory setting is English. B Convenient Functions Selecting the Menu Language You can select one of several languages for displaying the menu and other on the projector. 3 Press the MENU key.
To change the menu language, proceed as follows: 2 4,5,6 3 1 24 Selecting the Menu Language Front remote control detector 3 INPUT NETWORK USB MENU APA 2 ENTER RESET KEYSTONE AUTO FOCUS LENS /TILT PIC MUTING D ZOOM VOLUME FREEZE AUDIO MUTING 4,5,6 1 Plug the AC power cord into a wall outlet. 2 Press the ?/1 key to turn on -screen displays. The menu appears. The factory setting is English. B Convenient Functions Selecting the Menu Language You can select one of several languages for displaying the menu and other on the projector. 3 Press the MENU key.

User Manual
Page 25
... appears. 5 Press the v or V key to the selected language. If you do not input the correct password, you will not be able to use the projector if you set password. Notes • You will not be necessary only when the power is turned on after plugging the power cord. Be please... to select the MENU SETTING menu, then press the B or ENTER key. Use: Cancel: Other key Next, the screen for one minute. Security Lock The projector is equipped with a security lock function. To clear the menu Press the MENU key. To use this screen even if you can prevent valid usage...
... appears. 5 Press the v or V key to the selected language. If you do not input the correct password, you will not be able to use the projector if you set password. Notes • You will not be necessary only when the power is turned on after plugging the power cord. Be please... to select the MENU SETTING menu, then press the B or ENTER key. Use: Cancel: Other key Next, the screen for one minute. Security Lock The projector is equipped with a security lock function. To clear the menu Press the MENU key. To use this screen even if you can prevent valid usage...


