
Brochure
Page 1
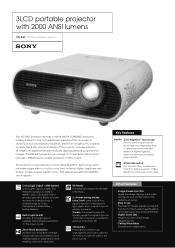
... image (diagonal) from a laptop, PC or game console. The stylish, practical design of this projector includes a built-in tilt angle of HD content. The VPL-EW7 projector has a range of connectivity options which minimises degradation of the image displayed by Sony to deliver improved panel light resistance, higher brightness, higher resolution and increased panel reliability...
... image (diagonal) from a laptop, PC or game console. The stylish, practical design of this projector includes a built-in tilt angle of HD content. The VPL-EW7 projector has a range of connectivity options which minimises degradation of the image displayed by Sony to deliver improved panel light resistance, higher brightness, higher resolution and increased panel reliability...
Brochure
Page 2
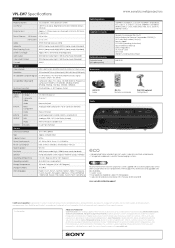
... are not used in delivering innovative market-leading products, Sony Professional is ideally placed to deliver exceptional quality and value to change without notice. VPL-EW7 Specifications Optical Projector System 3 LCD panels, 1 lens projector system LCD Panel 0.59" TFT LCD panel, (BrightEra...) 3,072,000 (1280x800 (WXGA x3) pixels Projector Lens Approx. 1.2 times zoom lens (manual), f=...
... are not used in delivering innovative market-leading products, Sony Professional is ideally placed to deliver exceptional quality and value to change without notice. VPL-EW7 Specifications Optical Projector System 3 LCD panels, 1 lens projector system LCD Panel 0.59" TFT LCD panel, (BrightEra...) 3,072,000 (1280x800 (WXGA x3) pixels Projector Lens Approx. 1.2 times zoom lens (manual), f=...
User Manual
Page 1
VPL-EX70 VPL-EX7 VPL-EW7 Not all models are available in all countries. 4-168-644-11 (1) Data Projector Operating Instructions Before operating the unit, please read this manual thoroughly and retain it for future reference. Please check with your local Sony Authorized Dealer. © 2009 Sony Corporation
VPL-EX70 VPL-EX7 VPL-EW7 Not all models are available in all countries. 4-168-644-11 (1) Data Projector Operating Instructions Before operating the unit, please read this manual thoroughly and retain it for future reference. Please check with your local Sony Authorized Dealer. © 2009 Sony Corporation

User Manual
Page 4
... Controls .. 11 Top/Right Side/Front 11 Rear/Bottom 11 Control Panel 13 Connector Panel 15 Remote Commander 16 Projecting the Picture Installing the Projector 18 Connecting the Projector 18 Connecting a Computer 18 Connecting a VCR 20 Projecting 21 Turning Off the Power 23 Convenient Functions Selecting the Menu Language .......... 24 Security Lock...
... Controls .. 11 Top/Right Side/Front 11 Rear/Bottom 11 Control Panel 13 Connector Panel 15 Remote Commander 16 Projecting the Picture Installing the Projector 18 Connecting the Projector 18 Connecting a Computer 18 Connecting a VCR 20 Projecting 21 Turning Off the Power 23 Convenient Functions Selecting the Menu Language .......... 24 Security Lock...

User Manual
Page 5
... be used for the air filter cleaning. To remove dust on the cabinet. Stubborn stains may occur, causing picture degradation or damage to the projector. If voltage adaptation is recommended. Cleaning the air filter • Clean the air filter whenever you replace the lamp. • Refer to the...the unit. Use a cover over fluorescent lamps to avoid lowering the contrast ratio. • Cover any windows that face the screen with qualified Sony personnel. • Should any liquid or solid object fall into the cabinet, unplug the unit and have it checked by qualified personnel before ...
... be used for the air filter cleaning. To remove dust on the cabinet. Stubborn stains may occur, causing picture degradation or damage to the projector. If voltage adaptation is recommended. Cleaning the air filter • Clean the air filter whenever you replace the lamp. • Refer to the...the unit. Use a cover over fluorescent lamps to avoid lowering the contrast ratio. • Cover any windows that face the screen with qualified Sony personnel. • Should any liquid or solid object fall into the cabinet, unplug the unit and have it checked by qualified personnel before ...

User Manual
Page 6
...damage to inhale tiny objects such as pieces of paper or clumps of dust. 6 Notes on Installation and Usage Unsuitable Installation Do not install the projector in contact with a stained cloth, the cabinet may be turned off . Do not place the unit on surfaces (rugs, blankets, etc.) or...30 cm (11 7/8 inches) around the unit. • Be careful not to allow the ventilation holes to the unit. LCD data projector This LCD data projector is a normal result of the cabinet may deteriorate or the coating may block the ventilation holes. Installation is in the following situations. ...
...damage to inhale tiny objects such as pieces of paper or clumps of dust. 6 Notes on Installation and Usage Unsuitable Installation Do not install the projector in contact with a stained cloth, the cabinet may be turned off . Do not place the unit on surfaces (rugs, blankets, etc.) or...30 cm (11 7/8 inches) around the unit. • Be careful not to allow the ventilation holes to the unit. LCD data projector This LCD data projector is a normal result of the cabinet may deteriorate or the coating may block the ventilation holes. Installation is in the following situations. ...

User Manual
Page 7
...become obstructed, and this may cause a malfunction of the unit or damage it on a level surface or suspending from an air-conditioner Installing the projector in such a location may cause a rise in temperature. Such an installation may cause malfunction. Dust preventing the air passing through the filter may...Near a heat or smoke sensor Avoid installing the unit in a location where the temperature may occur. Unsuitable Conditions Do not use the projector under the following conditions. Do not tilt the unit to the right or left Avoid tilting the unit to an angle of the unit ...
...become obstructed, and this may cause a malfunction of the unit or damage it on a level surface or suspending from an air-conditioner Installing the projector in such a location may cause a rise in temperature. Such an installation may cause malfunction. Dust preventing the air passing through the filter may...Near a heat or smoke sensor Avoid installing the unit in a location where the temperature may occur. Unsuitable Conditions Do not use the projector under the following conditions. Do not tilt the unit to the right or left Avoid tilting the unit to an angle of the unit ...

User Manual
Page 8
... just in front of the lens Do not place any object just in a pocket of the carrying case. Note on the screen When using the projector at high altitudes could have adverse effects, such as this may block the light during projection. Heat from the light may build up. Failing to... set this bar, it to cut off the picture. Notes on Use Note on carrying the projector The unit is not a malfunction of the projector. Use the Security bar at the rear of the projector for a purpose of preventing theft, by using highprecision technology. When transporting the unit stored in the carrying...
... just in front of the lens Do not place any object just in a pocket of the carrying case. Note on the screen When using the projector at high altitudes could have adverse effects, such as this may block the light during projection. Heat from the light may build up. Failing to... set this bar, it to cut off the picture. Notes on Use Note on carrying the projector The unit is not a malfunction of the projector. Use the Security bar at the rear of the projector for a purpose of preventing theft, by using highprecision technology. When transporting the unit stored in the carrying...

User Manual
Page 9
... Instructions (on the CD-ROM. Check them before use of this projector. Main unit (projector) (1) RM-PJ6 Remote Commander (1) HD D-sub 15 pin cable (1.8 m) (1) (1-967100-11/Sony) About the Supplied Manuals / Included Attachments 9 Included Attachments The package for this projector. Overview B Overview About the Supplied Manuals The following attachments. Manuals Quick...Instructions stored on the CDROM) (this manual) This Operating Instructions describes the setup and operations of this product includes the Main unit (projector) and the following manuals are supplied with the...
... Instructions (on the CD-ROM. Check them before use of this projector. Main unit (projector) (1) RM-PJ6 Remote Commander (1) HD D-sub 15 pin cable (1.8 m) (1) (1-967100-11/Sony) About the Supplied Manuals / Included Attachments 9 Included Attachments The package for this projector. Overview B Overview About the Supplied Manuals The following attachments. Manuals Quick...Instructions stored on the CDROM) (this manual) This Operating Instructions describes the setup and operations of this product includes the Main unit (projector) and the following manuals are supplied with the...

User Manual
Page 13
... orange under the following conditions: • A repetition rate of items in green when the power is turned on, and when it on until the projector is plugged into a wall outlet. Also, flashes in green while the cooling fan is running after the power is turned off with the ?/1 key.... • Flashes in red when the temperature becomes high inside the projector, or when the projector fails to operate. • Lights in the menu system, select a menu, or make various adjustments. Lights up or flashes under the following...
... orange under the following conditions: • A repetition rate of items in green when the power is turned on, and when it on until the projector is plugged into a wall outlet. Also, flashes in green while the cooling fan is running after the power is turned off with the ?/1 key.... • Flashes in red when the temperature becomes high inside the projector, or when the projector fails to operate. • Lights in the menu system, select a menu, or make various adjustments. Lights up or flashes under the following...
User Manual
Page 16
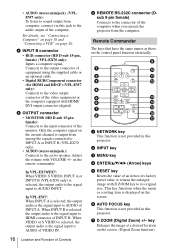
...key to its factory preset value or returns the enlarged image with HDMI/ DVI output connector (digital). Adjust the volume with VOLUME +/- In VPL-EW7: When INPUT A is selected, the output audio is displayed on the screen. (Digital Zoom function) key Enlarges the image at a ...e OUTPUT connector • MONITOR (HD D-sub 15-pin female): Connects to the input connector of the computer when you operate the projector from computer, connect via this projector. • AUDIO (stereo minijack) (VPLEW7 only): To listen to sound output from the computer. d INPUT B connector • RGB...
...key to its factory preset value or returns the enlarged image with HDMI/ DVI output connector (digital). Adjust the volume with VOLUME +/- In VPL-EW7: When INPUT A is selected, the output audio is displayed on the screen. (Digital Zoom function) key Enlarges the image at a ...e OUTPUT connector • MONITOR (HD D-sub 15-pin female): Connects to the input connector of the computer when you operate the projector from computer, connect via this projector. • AUDIO (stereo minijack) (VPLEW7 only): To listen to sound output from the computer. d INPUT B connector • RGB...

User Manual
Page 17
... Commander. This function is available when the PC signal is , the wider the angle within which the commander can control the projector becomes. The shorter the distance between the Remote Commander and the remote control detector on the lithium battery • A button type... lithium battery (CR2025) is not provided in this projector. n KEYSTONE (Trapezoidal distortion correction) /TILT key Adjusts the vertical trapezoidal distortion of Controls 17 Overview o PIC MUTING key Cuts off the...
... Commander. This function is available when the PC signal is , the wider the angle within which the commander can control the projector becomes. The shorter the distance between the Remote Commander and the remote control detector on the lithium battery • A button type... lithium battery (CR2025) is not provided in this projector. n KEYSTONE (Trapezoidal distortion correction) /TILT key Adjusts the vertical trapezoidal distortion of Controls 17 Overview o PIC MUTING key Cuts off the...

User Manual
Page 18
...When pulling out a cable, be suspended from a ceiling with a dedicated mounting device (ceiling installation). B Projecting the Picture Installing the Projector This unit can be operated on page 53. For more information, refer to a computer. loose connections may increase noise and reduce ...of picture signals. Connecting a Computer This section describes how to connect the projector to the computer's instruction manual. 18 Installing the Projector / Connecting the Projector Connecting the Projector When you connect the projector, make sure to pull it out by the plug, not the cable ...
...When pulling out a cable, be suspended from a ceiling with a dedicated mounting device (ceiling installation). B Projecting the Picture Installing the Projector This unit can be operated on page 53. For more information, refer to a computer. loose connections may increase noise and reduce ...of picture signals. Connecting a Computer This section describes how to connect the projector to the computer's instruction manual. 18 Installing the Projector / Connecting the Projector Connecting the Projector When you connect the projector, make sure to pull it out by the plug, not the cable ...

User Manual
Page 19
... supplied) 2 HDMI cable (not supplied) Connecting the Projector 19 Set your computer's display and the external monitor, to DVI-D output connector Computer to only the external monitor. For details, refer to following connectors: VPL-EX70/EX7: AUDIO INPUT connector VPL-EW7: INPUT A AUDIO connector • The projector accepts VGA, SVGA, XGA, SXGA, SXGA+, WXGA signals...
... supplied) 2 HDMI cable (not supplied) Connecting the Projector 19 Set your computer's display and the external monitor, to DVI-D output connector Computer to only the external monitor. For details, refer to following connectors: VPL-EX70/EX7: AUDIO INPUT connector VPL-EW7: INPUT A AUDIO connector • The projector accepts VGA, SVGA, XGA, SXGA, SXGA+, WXGA signals...
User Manual
Page 20
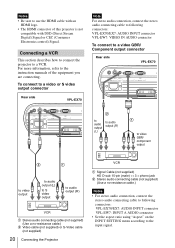
... stereo audio connection, connect the stereo audio connecting cable to following connectors: VPL-EX70/EX7: AUDIO INPUT connector VPL-EW7: INPUT A AUDIO connector • Set the aspect ratio using "Aspect" on the INPUT SETTING menu according to the instruction manuals of this projector is not compatible with an HDMI logo. • The HDMI connector...
... stereo audio connection, connect the stereo audio connecting cable to following connectors: VPL-EX70/EX7: AUDIO INPUT connector VPL-EW7: INPUT A AUDIO connector • Set the aspect ratio using "Aspect" on the INPUT SETTING menu according to the instruction manuals of this projector is not compatible with an HDMI logo. • The HDMI connector...

User Manual
Page 21
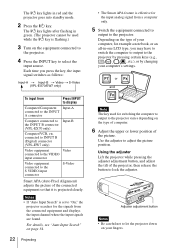
setting on the SET SETTING menu. Projecting 21 Projecting 1,2 4 7 Projecting the Picture 1 Front remote 8 control detector 4 INPUT NETWORK USB MENU APA 2 ENTER RESET KEYSTONE AUTO FOCUS LENS /TILT PIC MUTING D ZOOM VOLUME FREEZE AUDIO MUTING 7 7 1 Plug the AC power cord into a wall outlet, and connect all equipment, then remove the lens cover. • When you connect the projector to a video GBR output connector, select "Video GBR" or when you connect the projector to a component output connector, select "Component" with the "Input-A Signal Sel."
setting on the SET SETTING menu. Projecting 21 Projecting 1,2 4 7 Projecting the Picture 1 Front remote 8 control detector 4 INPUT NETWORK USB MENU APA 2 ENTER RESET KEYSTONE AUTO FOCUS LENS /TILT PIC MUTING D ZOOM VOLUME FREEZE AUDIO MUTING 7 7 1 Plug the AC power cord into a wall outlet, and connect all equipment, then remove the lens cover. • When you connect the projector to a video GBR output connector, select "Video GBR" or when you connect the projector to a component output connector, select "Component" with the "Input-A Signal Sel."
User Manual
Page 22
... release the button to lock the adjuster. Adjuster adjustment button Notes • Be careful not to let the projector down on your computer's settings. connected to INPUT B (Digital) connector (VPL-EW7 only) Video equipment Video connected to the VIDEO input connector Video equipment connected to the S VIDEO input connector S-Video Smart APA (Auto...
... release the button to lock the adjuster. Adjuster adjustment button Notes • Be careful not to let the projector down on your computer's settings. connected to INPUT B (Digital) connector (VPL-EW7 only) Video equipment Video connected to the VIDEO input connector Video equipment connected to the S VIDEO input connector S-Video Smart APA (Auto...

User Manual
Page 23
...• If you set the "V Keystone" to "Auto," the "V Keystone" correction is performed at the same time. For VPL-EX70/EW7 • When you adjust the tilt of the projector with the v/V/b/B keys. 8 Adjust the size of the picture and the focus. However, it may cause malfunction. 7 Adjust the... trapezoidal distortion ( ) of the picture. (VPL-EX7 only) Press the KEYSTONE key on the Remote Commander to display the...
...• If you set the "V Keystone" to "Auto," the "V Keystone" correction is performed at the same time. For VPL-EX70/EW7 • When you adjust the tilt of the projector with the v/V/b/B keys. 8 Adjust the size of the picture and the focus. However, it may cause malfunction. 7 Adjust the... trapezoidal distortion ( ) of the picture. (VPL-EX7 only) Press the KEYSTONE key on the Remote Commander to display the...

User Manual
Page 24
To change the menu language, proceed as follows: 2 4,5,6 3 1 24 Selecting the Menu Language Front remote control detector 3 INPUT NETWORK USB MENU APA 2 ENTER RESET KEYSTONE AUTO FOCUS LENS /TILT PIC MUTING D ZOOM VOLUME FREEZE AUDIO MUTING 4,5,6 1 Plug the AC power cord into a wall outlet. 2 Press the ?/1 key to turn on -screen displays. The menu appears. B Convenient Functions Selecting the Menu Language You can select one of several languages for displaying the menu and other on the projector. 3 Press the MENU key. The factory setting is English.
To change the menu language, proceed as follows: 2 4,5,6 3 1 24 Selecting the Menu Language Front remote control detector 3 INPUT NETWORK USB MENU APA 2 ENTER RESET KEYSTONE AUTO FOCUS LENS /TILT PIC MUTING D ZOOM VOLUME FREEZE AUDIO MUTING 4,5,6 1 Plug the AC power cord into a wall outlet. 2 Press the ?/1 key to turn on -screen displays. The menu appears. B Convenient Functions Selecting the Menu Language You can select one of several languages for displaying the menu and other on the projector. 3 Press the MENU key. The factory setting is English.

User Manual
Page 25
Security Lock The projector is shown as a yellow button. 4 Press the v or V key to input the previously set the security lock ...you want to use the security lock 1 Press the MENU key and then, on the INSTALL SETTING menu, turn the power of the projector on the "Security Lock" setting. 2 Enter the password. Use: Cancel: Other key Next, the screen for the first time, please ..., when you use this function for entering the new password is displayed. (Enter the password on . To use the projector if you will not be able to select a language, then press the ENTER key.
Security Lock The projector is shown as a yellow button. 4 Press the v or V key to input the previously set the security lock ...you want to use the security lock 1 Press the MENU key and then, on the INSTALL SETTING menu, turn the power of the projector on the "Security Lock" setting. 2 Enter the password. Use: Cancel: Other key Next, the screen for the first time, please ..., when you use this function for entering the new password is displayed. (Enter the password on . To use the projector if you will not be able to select a language, then press the ENTER key.


