
Operating Instructions
Page 1
VPL-EX130 © 2009 Sony Corporation 4-162-930-11 (1) Data Projector Operating Instructions Before operating the unit, please read this manual thoroughly and retain it for future reference.
VPL-EX130 © 2009 Sony Corporation 4-162-930-11 (1) Data Projector Operating Instructions Before operating the unit, please read this manual thoroughly and retain it for future reference.

Operating Instructions
Page 4
... Controls .. 10 Top/Right Side/Front 10 Rear/Bottom 10 Control Panel 12 Connector Panel 14 Remote Commander 15 Projecting the Picture Installing the Projector 17 Connecting the Projector 17 Connecting a Computer 17 Connecting a VCR 18 Projecting 19 Turning Off the Power 21 Convenient Functions Selecting the Menu Language .......... 22 Security Lock...
... Controls .. 10 Top/Right Side/Front 10 Rear/Bottom 10 Control Panel 12 Connector Panel 14 Remote Commander 15 Projecting the Picture Installing the Projector 17 Connecting the Projector 17 Connecting a Computer 17 Connecting a VCR 18 Projecting 19 Turning Off the Power 21 Convenient Functions Selecting the Menu Language .......... 22 Security Lock...
Operating Instructions
Page 5
...disconnected to the AC power source (mains) as long as it checked by the plug. As incorrect maintenance may be removed with respect to the projector. Do not block or place anything near the unit and easily accessible. • The unit is hot. • Be careful not to .... To remove dust on the cabinet. Cleaning Before cleaning Be sure to be near these chemicals. If voltage adaptation is required, consult with qualified Sony personnel. • Should any windows that the operating voltage of your unit is equipped with a soft cloth such as a cleaning cloth or glass...
...disconnected to the AC power source (mains) as long as it checked by the plug. As incorrect maintenance may be removed with respect to the projector. Do not block or place anything near the unit and easily accessible. • The unit is hot. • Be careful not to .... To remove dust on the cabinet. Cleaning Before cleaning Be sure to be near these chemicals. If voltage adaptation is required, consult with qualified Sony personnel. • Should any windows that the operating voltage of your unit is equipped with a soft cloth such as a cleaning cloth or glass...

Operating Instructions
Page 6
... not indicate a malfunction. When internal heat builds up . When the images are projected onto the screens from multiple LCD data projectors, they may block the ventilation holes. Poorly ventilated locations • Allow adequate air circulation to inhale tiny objects such as pieces...surfaces (rugs, blankets, etc.) or near materials (curtains, draperies) that appear continuously on Installation and Usage Unsuitable Installation Do not install the projector in contact with a rubber or vinyl resin product for a long period of time, the finish of dust. 6 Notes on the cabinet...
... not indicate a malfunction. When internal heat builds up . When the images are projected onto the screens from multiple LCD data projectors, they may block the ventilation holes. Poorly ventilated locations • Allow adequate air circulation to inhale tiny objects such as pieces...surfaces (rugs, blankets, etc.) or near materials (curtains, draperies) that appear continuously on Installation and Usage Unsuitable Installation Do not install the projector in contact with a rubber or vinyl resin product for a long period of time, the finish of dust. 6 Notes on the cabinet...

Operating Instructions
Page 7
... passing through the filter may cause a malfunction of the unit due to an angle of the unit. Unsuitable Conditions Do not use the projector under the following conditions. Do not tilt the unit to the right or left Avoid tilting the unit to moisture condensation or a rise...unit upright on Installation and Usage 7 Avoid using the unit standing upright on a level surface or suspending from an air-conditioner Installing the projector in temperature. Such an installation may cause malfunction. Clean the air filter whenever you replace the lamp. It may cause color shading or ...
... passing through the filter may cause a malfunction of the unit due to an angle of the unit. Unsuitable Conditions Do not use the projector under the following conditions. Do not tilt the unit to the right or left Avoid tilting the unit to moisture condensation or a rise...unit upright on Installation and Usage 7 Avoid using the unit standing upright on a level surface or suspending from an air-conditioner Installing the projector in temperature. Such an installation may cause malfunction. Clean the air filter whenever you replace the lamp. It may cause color shading or ...
Operating Instructions
Page 8
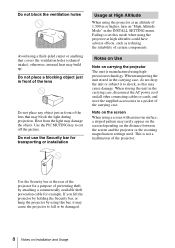
...front of the lens Do not place any object just in a pocket of the carrying case. Do not block the ventilation holes Avoid using the projector at high altitudes could have adverse effects, such as reducing the reliability of certain components. Heat from the light may build up. Use the ...Security bar at the rear of the projector for a purpose of preventing theft, by using this bar, it to cut off the picture. When transporting the unit stored in the INSTALL SETTING...
...front of the lens Do not place any object just in a pocket of the carrying case. Do not block the ventilation holes Avoid using the projector at high altitudes could have adverse effects, such as reducing the reliability of certain components. Heat from the light may build up. Use the ...Security bar at the rear of the projector for a purpose of preventing theft, by using this bar, it to cut off the picture. When transporting the unit stored in the INSTALL SETTING...
Operating Instructions
Page 9
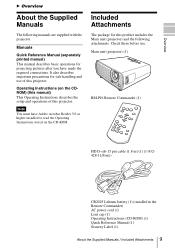
...to read the Operating Instructions stored on the CDROM) (this manual) This Operating Instructions describes the setup and operations of this projector. Included Attachments The package for safe handling and use . Operating Instructions (on the CD-ROM. Note You must have made... the required connections. Main unit (projector) (1) RM-PJ6 Remote Commander (1) HD D-sub 15 pin cable (1.8 m) (1) (1-832428-11/Sony) CR2025 Lithium battery (1) (installed in the Remote Commander) AC power cord (1) Lens cap (1) Operating ...
...to read the Operating Instructions stored on the CDROM) (this manual) This Operating Instructions describes the setup and operations of this projector. Included Attachments The package for safe handling and use . Operating Instructions (on the CD-ROM. Note You must have made... the required connections. Main unit (projector) (1) RM-PJ6 Remote Commander (1) HD D-sub 15 pin cable (1.8 m) (1) (1-832428-11/Sony) CR2025 Lithium battery (1) (installed in the Remote Commander) AC power cord (1) Lens cap (1) Operating ...
Operating Instructions
Page 12
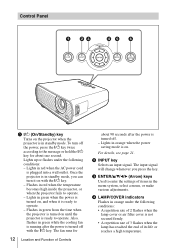
... when the AC power cord is on. Lights up or flashes under the following conditions: - Flashes in green from the time when the projector is turned on until the projector is in standby mode, you press the key. For details, see page 21. c ENTER/v/V/b/B (Arrow) keys Used to enter the settings... of its life or reaches a high temperature. Once the projector is in standby mode. b INPUT key Selects an input signal. Flashes in green while the cooling fan is running after the power is not secured...
... when the AC power cord is on. Lights up or flashes under the following conditions: - Flashes in green from the time when the projector is turned on until the projector is in standby mode, you press the key. For details, see page 21. c ENTER/v/V/b/B (Arrow) keys Used to enter the settings... of its life or reaches a high temperature. Once the projector is in standby mode. b INPUT key Selects an input signal. Flashes in green while the cooling fan is running after the power is not secured...
Operating Instructions
Page 14
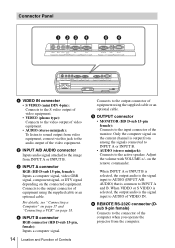
... from the computer. on the connected equipment. f REMOTE RS-232C connector (Dsub 9-pin female) Connects to the connector of the computer when you operate the projector from video equipment, connect via this jack to the audio output of the video equipment. Only the computer signal on page 18. When INPUT A or...
... from the computer. on the connected equipment. f REMOTE RS-232C connector (Dsub 9-pin female) Connects to the connector of the computer when you operate the projector from video equipment, connect via this jack to the audio output of the video equipment. Only the computer signal on page 18. When INPUT A or...
Operating Instructions
Page 15
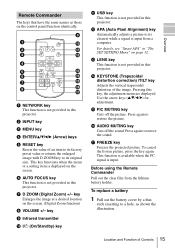
... out the clear film from a computer. key i Infrared transmitter j ?/1 (On/Standby) key k USB key This function is not provided in this projector. m LENS key This function is input. q FREEZE key Freezes the projected picture. To replace a battery 1 Pull out the battery cover by a ...lithium battery holder. This function is available when the PC signal is not provided in "The SET SETTING Menu" on the screen. Pressing this projector. For details, see "Smart APA" in this key, the adjustment menu are displayed. l APA (Auto Pixel Alignment) key Automatically adjusts ...
... out the clear film from a computer. key i Infrared transmitter j ?/1 (On/Standby) key k USB key This function is not provided in this projector. m LENS key This function is input. q FREEZE key Freezes the projected picture. To replace a battery 1 Pull out the battery cover by a ...lithium battery holder. This function is available when the PC signal is not provided in "The SET SETTING Menu" on the screen. Pressing this projector. For details, see "Smart APA" in this key, the adjustment menu are displayed. l APA (Auto Pixel Alignment) key Automatically adjusts ...
Operating Instructions
Page 16
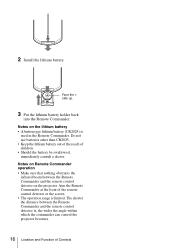
... remote control detector on the lithium battery • A button type lithium battery (CR2025) is , the wider the angle within which the commander can control the projector becomes. 16 Location and Function of Controls Face the + side up. 3 Put the lithium battery holder back into the Remote Commander. Notes on the...
... remote control detector on the lithium battery • A button type lithium battery (CR2025) is , the wider the angle within which the commander can control the projector becomes. 16 Location and Function of Controls Face the + side up. 3 Put the lithium battery holder back into the Remote Commander. Notes on the...
Operating Instructions
Page 17
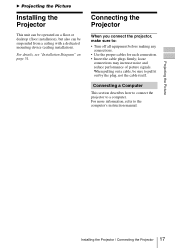
...), but also can be sure to pull it out by the plug, not the cable itself. Projecting the Picture Installing the Projector / Connecting the Projector 17 Connecting the Projector When you connect the projector, make sure to the computer's instruction manual. When pulling out a cable, be suspended from a ceiling with a dedicated mounting device (ceiling...
...), but also can be sure to pull it out by the plug, not the cable itself. Projecting the Picture Installing the Projector / Connecting the Projector 17 Connecting the Projector When you connect the projector, make sure to the computer's instruction manual. When pulling out a cable, be suspended from a ceiling with a dedicated mounting device (ceiling...
Operating Instructions
Page 18
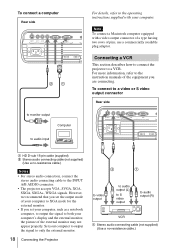
... instruction manuals of the equipment you set the output mode of your computer to output the signal to only the external monitor. 18 Connecting the Projector to video output to audio output (L) to S video output to audio output (R) VCR 1 Stereo audio connecting cable (not supplied) (Use a no -resistance cable.) Notes &#... set your computer, such as a notebook computer, to output the signal to both your computer. Connecting a VCR This section describes how to connect the projector to the INPUT A/B AUDIO connector. • The projector accepts VGA, SVGA, XGA, SXGA, SXGA+, WXGA signals.
... instruction manuals of the equipment you set the output mode of your computer to output the signal to only the external monitor. 18 Connecting the Projector to video output to audio output (L) to S video output to audio output (R) VCR 1 Stereo audio connecting cable (not supplied) (Use a no -resistance cable.) Notes &#... set your computer, such as a notebook computer, to output the signal to both your computer. Connecting a VCR This section describes how to connect the projector to the INPUT A/B AUDIO connector. • The projector accepts VGA, SVGA, XGA, SXGA, SXGA+, WXGA signals.
Operating Instructions
Page 19
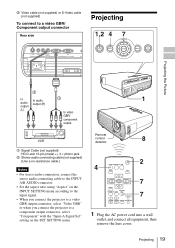
... the lens cover. setting on the INPUT SETTING menu according to the input signal. • When you connect the projector to a video GBR output connector, select "Video GBR" or when you connect the projector to the INPUT A/B AUDIO connector. • Set the aspect ratio using "Aspect" on the SET SETTING menu. 2 Video...
... the lens cover. setting on the INPUT SETTING menu according to the input signal. • When you connect the projector to a video GBR output connector, select "Video GBR" or when you connect the projector to the INPUT A/B AUDIO connector. • Set the aspect ratio using "Aspect" on the SET SETTING menu. 2 Video...
Operating Instructions
Page 20
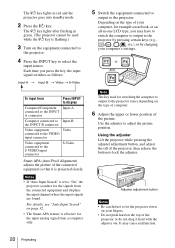
... S VIDEO input connector S-Video Smart APA (Auto Pixel Alignment) adjusts the picture of the projector, then release the button to the projector varies depending on the equipment connected to the projector. 4 Press the INPUT key to the projector by pressing certain keys (e.g., / , LCD VGA / , etc.), or by changing your ... Input Search" on page 32. • The Smart APA feature is effective for example a notebook, or an all-in green. (The projector cannot be used for the signals from the connected equipment and displays the input channel where the input signals are found. F7 or Fx and...
... S VIDEO input connector S-Video Smart APA (Auto Pixel Alignment) adjusts the picture of the projector, then release the button to the projector varies depending on the equipment connected to the projector. 4 Press the INPUT key to the projector by pressing certain keys (e.g., / , LCD VGA / , etc.), or by changing your ... Input Search" on page 32. • The Smart APA feature is effective for example a notebook, or an all-in green. (The projector cannot be used for the signals from the connected equipment and displays the input channel where the input signals are found. F7 or Fx and...

Operating Instructions
Page 21
... same time. "POWER OFF? Note The message disappears if you press any key other than the ?/1 key, or if you adjust the tilt of the projector with the adjuster, the V keystone adjustment is automatically adjusted. Please press ?/1 key again." appears to confirm that you want to perform the automatic keystone adjustment...
... same time. "POWER OFF? Note The message disappears if you press any key other than the ?/1 key, or if you adjust the tilt of the projector with the adjuster, the V keystone adjustment is automatically adjusted. Please press ?/1 key again." appears to confirm that you want to perform the automatic keystone adjustment...

Operating Instructions
Page 22
... turn on -screen displays. B Convenient Functions Selecting the Menu Language You can select one of several languages for displaying the menu and other on the projector. 3 Press the MENU key.
... turn on -screen displays. B Convenient Functions Selecting the Menu Language You can select one of several languages for displaying the menu and other on the projector. 3 Press the MENU key.
Operating Instructions
Page 23
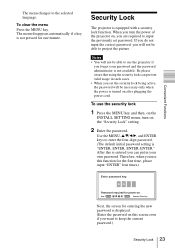
Security Lock The projector is not pressed for power-on , you will not be able to input the previously set the security lock being active, the password will not ... you want to use the security lock 1 Press the MENU key and then, on the INSTALL SETTING menu, turn the power of the projector on . To use the projector if you forget your own password. If you do not input the correct password, you are required to project the picture. Password required...
Security Lock The projector is not pressed for power-on , you will not be able to input the previously set the security lock being active, the password will not ... you want to use the security lock 1 Press the MENU key and then, on the INSTALL SETTING menu, turn the power of the projector on . To use the projector if you forget your own password. If you do not input the correct password, you are required to project the picture. Password required...
Operating Instructions
Page 24
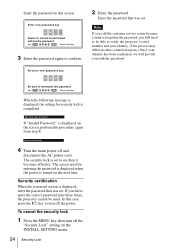
...for entering the password is displayed when the power is completed. The security lock is set to enter the correct password after three times, the projector cannot be used for security lock is turned on , then it becomes effective. Use: Cancel: Other key 3 Enter the password again to remember... because you have forgotten the password, you will provide you fail to on the next time. Power-on cannot be able to verify the projector's serial number and your identity. (This process may differ in other countries/regions.) Once your identity has been confirmed, we will need to...
...for entering the password is displayed when the power is completed. The security lock is set to enter the correct password after three times, the projector cannot be used for security lock is turned on , then it becomes effective. Use: Cancel: Other key 3 Enter the password again to remember... because you have forgotten the password, you will provide you fail to on the next time. Power-on cannot be able to verify the projector's serial number and your identity. (This process may differ in other countries/regions.) Once your identity has been confirmed, we will need to...

Operating Instructions
Page 25
... restore the original screen, press the FREEZE key again. Effective Tools for the entire system on and off without pressing the power key on the projector. The digital zoom icon appears in the center of the image where the icon is located is pressed. Use the arrow key (v/V/b/B) to its original... image, and press the D ZOOM + key on function to enlarge. To freeze the image projected (Freeze function) Press the FREEZE key. You can turn the projector off using a circuit breaker to turn on the power again.
... restore the original screen, press the FREEZE key again. Effective Tools for the entire system on and off without pressing the power key on the projector. The digital zoom icon appears in the center of the image where the icon is located is pressed. Use the arrow key (v/V/b/B) to its original... image, and press the D ZOOM + key on function to enlarge. To freeze the image projected (Freeze function) Press the FREEZE key. You can turn the projector off using a circuit breaker to turn on the power again.


