
Brochure
Page 1
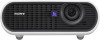
Dynamic Detail Enhancer Generates high quality images through the Interlace/Progressive conversion processor, resulting in 8° tilt angle gives a perfectly proportioned presentation on the screen or...contrast of lighting conditions. PrimeSupport All Sony business projectors come supplied with excellent picture quality in XGA (1024 x 768) resolution, allows users to deliver bright and colourful presentations in a variety of 900:1. Built-in optical shift A built-in extremely accurate image reproduction. Product Information VPL-EX70 3LCD portable projector with 2600 ANSI ...
Dynamic Detail Enhancer Generates high quality images through the Interlace/Progressive conversion processor, resulting in 8° tilt angle gives a perfectly proportioned presentation on the screen or...contrast of lighting conditions. PrimeSupport All Sony business projectors come supplied with excellent picture quality in XGA (1024 x 768) resolution, allows users to deliver bright and colourful presentations in a variety of 900:1. Built-in optical shift A built-in extremely accurate image reproduction. Product Information VPL-EX70 3LCD portable projector with 2600 ANSI ...

User Manual
Page 12
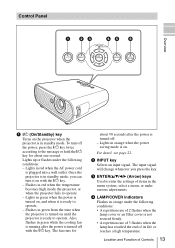
...to an optional security cable (from Kensington). g Ventilation holes (intake)/Air filter cover h Adjusters (fore pad) i Lamp cover j Adjuster k Connector Panel For details, see "Cleaning the Air Filter" on page 15. a Ventilation holes (exhaust) b Lens Remove the lens cover before projection. Web page address: http://www.kensington...Security bar p Security lock Connects to pull out, pull out the Security bar using a screwdriver. e Zoom ring Adjusts the picture size. For details, see "Connector Panel" on page 42. 12 Location and Function of Controls m Adjuster adjustment button For...
...to an optional security cable (from Kensington). g Ventilation holes (intake)/Air filter cover h Adjusters (fore pad) i Lamp cover j Adjuster k Connector Panel For details, see "Cleaning the Air Filter" on page 15. a Ventilation holes (exhaust) b Lens Remove the lens cover before projection. Web page address: http://www.kensington...Security bar p Security lock Connects to pull out, pull out the Security bar using a screwdriver. e Zoom ring Adjusts the picture size. For details, see "Connector Panel" on page 42. 12 Location and Function of Controls m Adjuster adjustment button For...
User Manual
Page 13
... running after the power is turned off. - Also, flashes in green when the power is turned on, and when it on with the ?/1 key. For detail, see page 22. b INPUT key Selects an input signal. The input signal will change whenever you can turn off with the ?/1 key. - d LAMP/COVER indicators...
... running after the power is turned off. - Also, flashes in green when the power is turned on, and when it on with the ?/1 key. For detail, see page 22. b INPUT key Selects an input signal. The input signal will change whenever you can turn off with the ?/1 key. - d LAMP/COVER indicators...

User Manual
Page 14
f PIC MUTING key Cuts off the picture. Press again to restore the picture. 14 Location and Function of Controls Press again to clear the menu. e MENU key Displays the on-screen menu. For detail, see page 45.
f PIC MUTING key Cuts off the picture. Press again to restore the picture. 14 Location and Function of Controls Press again to clear the menu. e MENU key Displays the on-screen menu. For detail, see page 45.
User Manual
Page 15
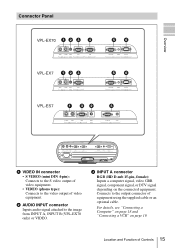
Overview Connector Panel VPL-EX70 1 2 3 4 56 VPL-EX7 1 2 3 56 VPL-ES7 1 32 5 a VIDEO IN connector • S VIDEO (mini DIN 4-pin): Connects to the S video output of video equipment. • VIDEO (phono type): Connects to the video output of Controls 15 For details, see "Connecting a Computer" on page 18 and "Connecting a VCR" on the connected equipment. Location... 15-pin, female): Inputs a computer signal, video GBR signal, component signal, or DTV signal depending on page 19. Connects to the image from INPUT A, INPUT B (VPL-EX70 only) or VIDEO.
Overview Connector Panel VPL-EX70 1 2 3 4 56 VPL-EX7 1 2 3 56 VPL-ES7 1 32 5 a VIDEO IN connector • S VIDEO (mini DIN 4-pin): Connects to the S video output of video equipment. • VIDEO (phono type): Connects to the video output of Controls 15 For details, see "Connecting a Computer" on page 18 and "Connecting a VCR" on the connected equipment. Location... 15-pin, female): Inputs a computer signal, video GBR signal, component signal, or DTV signal depending on page 19. Connects to the image from INPUT A, INPUT B (VPL-EX70 only) or VIDEO.

User Manual
Page 17
... input from the lithium battery holder. l APA (Auto Pixel Alignment) key Automatically adjusts a picture to a hole, as shown the illustration. 2 Install the lithium battery. For details, see "Smart APA" in this key, the adjustment menu are displayed. Pressing this projector. Use the arrow keys (v/V/b/B) for adjustment. o PIC MUTING key Cuts off...
... input from the lithium battery holder. l APA (Auto Pixel Alignment) key Automatically adjusts a picture to a hole, as shown the illustration. 2 Install the lithium battery. For details, see "Smart APA" in this key, the adjustment menu are displayed. Pressing this projector. Use the arrow keys (v/V/b/B) for adjustment. o PIC MUTING key Cuts off...

User Manual
Page 18
... to : • Turn off all equipment before making any connections. • Use the proper cables for each connection. • Insert the cable plugs firmly; For details, see "Installation Diagram" on a floor or desktop (floor installation), but also can be sure to pull it out by the plug, not the cable itself...
... to : • Turn off all equipment before making any connections. • Use the proper cables for each connection. • Insert the cable plugs firmly; For details, see "Installation Diagram" on a floor or desktop (floor installation), but also can be sure to pull it out by the plug, not the cable itself...

User Manual
Page 19
...connect the stereo audio connecting cable to audio output (R) VCR Connecting the Projector 19 Projecting the Picture To connect a computer Rear side VPL-EX70 to a VCR. Connecting a VCR This section describes how to connect the projector to monitor output Computer appear properly. For more information... S video output to the AUDIO INPUT connector. • The projector accepts VGA, SVGA, XGA, SXGA, SXGA+, WXGA signals. For details, refer to the instruction manuals of the equipment you set the output mode of your computer. Set your computer's display and the external ...
...connect the stereo audio connecting cable to audio output (R) VCR Connecting the Projector 19 Projecting the Picture To connect a computer Rear side VPL-EX70 to a VCR. Connecting a VCR This section describes how to connect the projector to monitor output Computer appear properly. For more information... S video output to the AUDIO INPUT connector. • The projector accepts VGA, SVGA, XGA, SXGA, SXGA+, WXGA signals. For details, refer to the instruction manuals of the equipment you set the output mode of your computer. Set your computer's display and the external ...

User Manual
Page 21
...from Press INPUT to display Computer/Component Input-A connected to the INPUT A connector Computer connected to Input-B the INPUT B connector (VPL-EX70 only) Video equipment Video connected to the VIDEO input connector Video equipment connected to select the input source. Depending on the equipment connected...may cause malfunction. Use the adjuster to the projector varies depending on page 33. • The Smart APA feature is projected clearly. For details, see "Auto Input Search" on the type of computer. 6 Adjust the upper or lower position of the projector, then release the ...
...from Press INPUT to display Computer/Component Input-A connected to the INPUT A connector Computer connected to Input-B the INPUT B connector (VPL-EX70 only) Video equipment Video connected to the VIDEO input connector Video equipment connected to select the input source. Depending on the equipment connected...may cause malfunction. Use the adjuster to the projector varies depending on page 33. • The Smart APA feature is projected clearly. For details, see "Auto Input Search" on the type of computer. 6 Adjust the upper or lower position of the projector, then release the ...
User Manual
Page 28
... its factory preset value. The menu disappears automatically if a key is no input signal, "Cannot adjust this item." Items that have selected is pressed. For details, see page 39. 28 Using a MENU If no signal is input If there is not pressed for one minute. To reset items that can be...
... its factory preset value. The menu disappears automatically if a key is no input signal, "Cannot adjust this item." Items that have selected is pressed. For details, see page 39. 28 Using a MENU If no signal is input If there is not pressed for one minute. To reset items that can be...

User Manual
Page 29
... Menu 29 The higher the setting, the more purplish the picture becomes. Selects a gamma correction curve. • Graphics: Improves the reproduction of input signals. For details, see "Input signals and adjustable/setting items" on the kind of halftones.
... Menu 29 The higher the setting, the more purplish the picture becomes. Selects a gamma correction curve. • Graphics: Improves the reproduction of input signals. For details, see "Input signals and adjustable/setting items" on the kind of halftones.
User Manual
Page 30
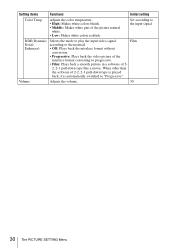
.... Setting items Functions Initial setting Color Temp. Set according to the input signal DDE (Dynamic Selects the mode to play the input video signal Film Detail according to progressive. • Film: Plays back a smooth picture in a software of the picture natural white. • Low: Makes white colors reddish...
.... Setting items Functions Initial setting Color Temp. Set according to the input signal DDE (Dynamic Selects the mode to play the input video signal Film Detail according to progressive. • Film: Plays back a smooth picture in a software of the picture natural white. • Low: Makes white colors reddish...
User Manual
Page 31
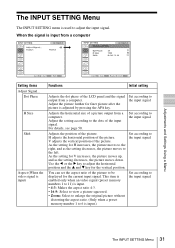
... to adjust the input signal. Adjust the setting according to the dots of the picture to the input signal The INPUT SETTING Menu 31 For details, see page 50. Set according to the left. As the setting for the vertical position. This item is enabled only when an video signal (preset...
... to adjust the input signal. Adjust the setting according to the dots of the picture to the input signal The INPUT SETTING Menu 31 For details, see page 50. Set according to the left. As the setting for the vertical position. This item is enabled only when an video signal (preset...
User Manual
Page 36
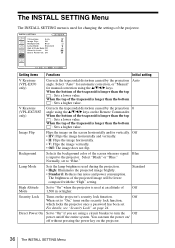
... Mode: Standard High Altitude Mode:Off Security Lock: Off Direct Power On: Off Input-A Setting items Functions Initial setting V Keystone (VPL-EX70 only) Corrects the trapezoidal distortion caused by the projection 0 angle using a circuit breaker to turn the power on the security lock function... for automatic correction, or "Manual" for changing the settings of the trapezoid is longer than the top : Sets a lower value. For details, see "Security Lock" on the projector's security lock function. Standard High Altitude Set to the projector. When the bottom of Off Mode ...
... Mode: Standard High Altitude Mode:Off Security Lock: Off Direct Power On: Off Input-A Setting items Functions Initial setting V Keystone (VPL-EX70 only) Corrects the trapezoidal distortion caused by the projection 0 angle using a circuit breaker to turn the power on the security lock function... for automatic correction, or "Manual" for changing the settings of the trapezoid is longer than the top : Sets a lower value. For details, see "Security Lock" on the projector's security lock function. Standard High Altitude Set to the projector. When the bottom of Off Mode ...