
Operating Instructions
Page 1
VPL-FHZ65/FHZ60/FHZ57 VPL-FWZ65/FWZ60 Not all models are available in all countries and area. 4-573-698-17 (1) Data Projector Operating Instructions Before operating the unit, please read this manual and supplied Quick Reference Manual thoroughly and retain it for future reference. Please check with your local Sony Authorized Dealer. © 2015 Sony Corporation
VPL-FHZ65/FHZ60/FHZ57 VPL-FWZ65/FWZ60 Not all models are available in all countries and area. 4-573-698-17 (1) Data Projector Operating Instructions Before operating the unit, please read this manual and supplied Quick Reference Manual thoroughly and retain it for future reference. Please check with your local Sony Authorized Dealer. © 2015 Sony Corporation
Operating Instructions
Page 9
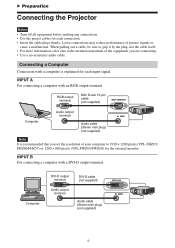
... not the cable itself. • For more information, refer also to 1920 × 1200 pixels (VPL-FHZ65/ FHZ60/FHZ57) or 1280 × 800 pixels (VPL-FWZ65/FWZ60) for each connection. • Insert the cable plugs firmly; Connecting a Computer Connection with a... computer is recommended that you are connecting. • Use a no-resistance audio cable. Loose connections may reduce performance of the equipment you set the resolution of your computer to the instruction manuals...
... not the cable itself. • For more information, refer also to 1920 × 1200 pixels (VPL-FHZ65/ FHZ60/FHZ57) or 1280 × 800 pixels (VPL-FWZ65/FWZ60) for each connection. • Insert the cable plugs firmly; Connecting a Computer Connection with a... computer is recommended that you are connecting. • Use a no-resistance audio cable. Loose connections may reduce performance of the equipment you set the resolution of your computer to the instruction manuals...
Operating Instructions
Page 18
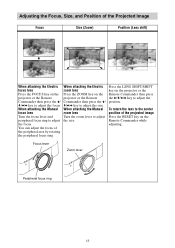
... or the Remote Commander then press the V/ v/B/b key to the center position of the peripheral area by rotating the peripheral focus ring. When attaching the Manual focus lens Turn the focus lever and peripheral focus ring to adjust the size. When attaching the...
... or the Remote Commander then press the V/ v/B/b key to the center position of the peripheral area by rotating the peripheral focus ring. When attaching the Manual focus lens Turn the focus lever and peripheral focus ring to adjust the size. When attaching the...

Operating Instructions
Page 29
This option is available only when "Aspect" is set to "Zoom." 29 In this case, adjust the "Phase," "Pitch," and "Shift" items manually. *6: Available when a computer or video signal is input from the RGB/YPBPR input terminal (INPUT A). *5: If the projected image includes a large amount of black portion ...
This option is available only when "Aspect" is set to "Zoom." 29 In this case, adjust the "Phase," "Pitch," and "Shift" items manually. *6: Available when a computer or video signal is input from the RGB/YPBPR input terminal (INPUT A). *5: If the projected image includes a large amount of black portion ...
Operating Instructions
Page 34
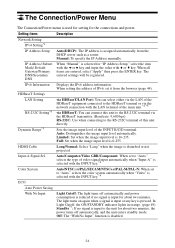
... the unit for about two minutes, the power turns off automatically, and the unit enters standby mode. Manual: To specify the IP Address manually. IP Address/ Subnet Mask/ Default Gateway/Primary DNS/Secondary DNS When "Manual" is selected with V or v key. When setting the address of IPv6, set to "Auto," selects the color...
... the unit for about two minutes, the power turns off automatically, and the unit enters standby mode. Manual: To specify the IP Address manually. IP Address/ Subnet Mask/ Default Gateway/Primary DNS/Secondary DNS When "Manual" is selected with V or v key. When setting the address of IPv6, set to "Auto," selects the color...
Operating Instructions
Page 35
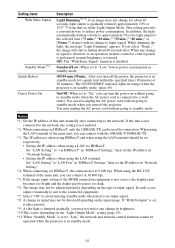
... mode for a quick start to darken about 10 seconds, light output is no change to the network. If "With No Input" is set, it manually to suit to the connected equipment. *7: Select "Off" to avoid entering standby mode when there is gradually reduced (approximately 10% to 15%*10) from... Mode" is in standby mode. (page 49) On/Off: When set the IP address in "Network Setting." *4: When connecting via HDBaseT. If this unit manually after connecting to input signal. When using the LAN terminal should be used for connection. When any change in brightness. *10:This varies depending on...
... mode for a quick start to darken about 10 seconds, light output is no change to the network. If "With No Input" is set, it manually to suit to the connected equipment. *7: Select "Off" to avoid entering standby mode when there is gradually reduced (approximately 10% to 15%*10) from... Mode" is in standby mode. (page 49) On/Off: When set the IP address in "Network Setting." *4: When connecting via HDBaseT. If this unit manually after connecting to input signal. When using the LAN terminal should be used for connection. When any change in brightness. *10:This varies depending on...
Operating Instructions
Page 44
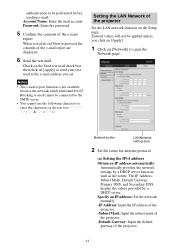
... Gateway, Primary DNS, and Secondary DNS display the values provided by a DHCP server function, such as the router. Specify an IP address: Set the network manually. -IP Address: Input the IP address of the projector. -Subnet Mask: Input the subnet mask of the projector. -Default Gateway: Input the default gateway of...
... Gateway, Primary DNS, and Secondary DNS display the values provided by a DHCP server function, such as the router. Specify an IP address: Set the network manually. -IP Address: Input the IP address of the projector. -Subnet Mask: Input the subnet mask of the projector. -Default Gateway: Input the default gateway of...

Operating Instructions
Page 45
.... 3 Set the items for Advertisement are enabled only when this function is enabled at the factory default. 45 Specify an IPv6 address: Set the network manually. -IPv6 Address: Input the IP address of the projector. -Prefix: Input the prefix of the projector. -Default Gateway: Input the default gateway of the projector...
.... 3 Set the items for Advertisement are enabled only when this function is enabled at the factory default. 45 Specify an IPv6 address: Set the network manually. -IPv6 Address: Input the IP address of the projector. -Prefix: Input the prefix of the projector. -Default Gateway: Input the default gateway of the projector...

Operating Instructions
Page 52
.... Troubleshooting Before asking to have been performed. 31 changed. Check if the input source is correctly selected. 17 Check if the picture is set "Aspect" manually. Check if the connecting cable is disabled. 6, 31 On-screen display does The on .
.... Troubleshooting Before asking to have been performed. 31 changed. Check if the input source is correctly selected. 17 Check if the picture is set "Aspect" manually. Check if the connecting cable is disabled. 6, 31 On-screen display does The on .
Operating Instructions
Page 59
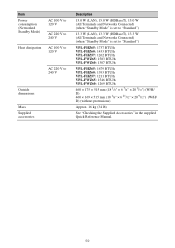
..." is set to "Standard") VPL-FHZ65: 1737 BTU/h VPL-FHZ60: 1433 BTU/h VPL-FHZ57: 1262 BTU/h VPL-FWZ65: 1583 BTU/h VPL-FWZ60: 1307 BTU/h VPL-FHZ65: 1679 BTU/h VPL-FHZ60: 1393 BTU/h VPL-FHZ57: 1211 BTU/h VPL-FWZ65: 1546 BTU/h VPL-FWZ60: 1269 BTU/h 460 ×...; 175 × 515 mm (18 1/8" × 6 7/8" × 20 9/32") (W/H/ D) 460 × 169 × 515 mm (18 1/8" × 6 21/32" × 20 9/32") (W/H/ D) (without protrusions) Approx. 16 kg (34 lb) See "Checking the Supplied Accessories" in the supplied Quick Reference Manual...
..." is set to "Standard") VPL-FHZ65: 1737 BTU/h VPL-FHZ60: 1433 BTU/h VPL-FHZ57: 1262 BTU/h VPL-FWZ65: 1583 BTU/h VPL-FWZ60: 1307 BTU/h VPL-FHZ65: 1679 BTU/h VPL-FHZ60: 1393 BTU/h VPL-FHZ57: 1211 BTU/h VPL-FWZ65: 1546 BTU/h VPL-FWZ60: 1269 BTU/h 460 ×...; 175 × 515 mm (18 1/8" × 6 7/8" × 20 9/32") (W/H/ D) 460 × 169 × 515 mm (18 1/8" × 6 21/32" × 20 9/32") (W/H/ D) (without protrusions) Approx. 16 kg (34 lb) See "Checking the Supplied Accessories" in the supplied Quick Reference Manual...
Operating Instructions
Page 60
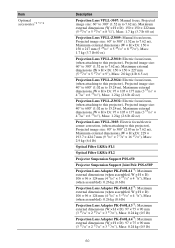
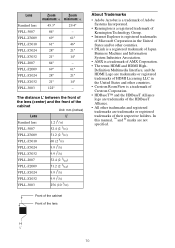
... external dimensions (W × H × D): 150 × 150 × 222 mm (5 29/32" × 5 29/32" × 8 3/4"), Mass: 1.7 kg (3.7 lb 60 oz) Projection Lens VPLL-Z3009: Manual focus/zoom, Projected image size: 60" to 300" (1.52 m to 7.62 m), Maximum external dimensions (W × H × D): 150 × 150 × 217 mm (5 29/32" ×...
... external dimensions (W × H × D): 150 × 150 × 222 mm (5 29/32" × 5 29/32" × 8 3/4"), Mass: 1.7 kg (3.7 lb 60 oz) Projection Lens VPLL-Z3009: Manual focus/zoom, Projected image size: 60" to 300" (1.52 m to 7.62 m), Maximum external dimensions (W × H × D): 150 × 150 × 217 mm (5 29/32" ×...
Operating Instructions
Page 61
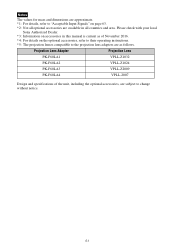
... projection lenses compatible to the projection lens adapters are as of the unit, including the optional accessories, are available in this manual is current as follows. Please check with your local Sony Authorized Dealer. *3: Information on accessories in all optional accessories are subject to change without notice. 61 Projection Lens Adapter Projection...
... projection lenses compatible to the projection lens adapters are as of the unit, including the optional accessories, are available in this manual is current as follows. Please check with your local Sony Authorized Dealer. *3: Information on accessories in all optional accessories are subject to change without notice. 61 Projection Lens Adapter Projection...
Operating Instructions
Page 70
Front of the cabinet Front of their respective holders. In this manual, ™ and ® marks are trademarks of the HDBaseT Alliance. • All other countries. • PJLink is a registered trademark of Japan Business Machine and Information ...
Front of the cabinet Front of their respective holders. In this manual, ™ and ® marks are trademarks of the HDBaseT Alliance. • All other countries. • PJLink is a registered trademark of Japan Business Machine and Information ...
Startup Guide
Page 26
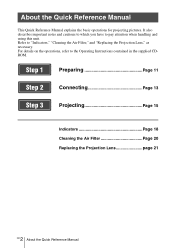
... Page 15 Indicators Page 18 Cleaning the Air Filter Page 20 Replacing the Projection Lens page 21 2 GB About the Quick Reference Manual About the Quick Reference Manual This Quick Reference Manual explains the basic operations for projecting pictures. Refer to "Indicators," "Cleaning the Air Filter," and "Replacing the Projection Lens," as necessary...
... Page 15 Indicators Page 18 Cleaning the Air Filter Page 20 Replacing the Projection Lens page 21 2 GB About the Quick Reference Manual About the Quick Reference Manual This Quick Reference Manual explains the basic operations for projecting pictures. Refer to "Indicators," "Cleaning the Air Filter," and "Replacing the Projection Lens," as necessary...
Startup Guide
Page 27
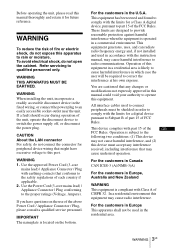
... that conforms to the safety regulations of CISPR 32. For the customers in Canada CAN ICES-3 (A)/NMB-3(A) For the customers in this manual could void your authority to operate this port. WARNING To reduce the risk of the unit, operate the disconnect device to radio communications....B of part 15 of the GB FCC Rules. WARNING THIS APPARATUS MUST BE EARTHED. IMPORTANT The nameplate is compliant with the instruction manual, may cause radio interference. All interface cables used to connect peripherals must accept any changes or modifications not expressly approved in Europe, ...
... that conforms to the safety regulations of CISPR 32. For the customers in Canada CAN ICES-3 (A)/NMB-3(A) For the customers in this manual could void your authority to operate this port. WARNING To reduce the risk of the unit, operate the disconnect device to radio communications....B of part 15 of the GB FCC Rules. WARNING THIS APPARATUS MUST BE EARTHED. IMPORTANT The nameplate is compliant with the instruction manual, may cause radio interference. All interface cables used to connect peripherals must accept any changes or modifications not expressly approved in Europe, ...
Startup Guide
Page 35
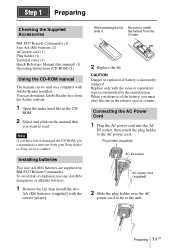
...Remote Commander (1) Size AA (R6) batteries (2) AC power cord (1) Plug holder (1) Terminal cover (1) Quick Reference Manual (this manual) (1) Operating Instructions (CD-ROM) (1) Using the CD-ROM manual The manual can be read . Note If you have lost or damaged the CD-ROM, you dispose of explosion if battery... is incorrectly replaced. Replace only with Adobe Reader installed. When you can download Adobe Reader free from your Sony dealer or Sony service counter. ...
...Remote Commander (1) Size AA (R6) batteries (2) AC power cord (1) Plug holder (1) Terminal cover (1) Quick Reference Manual (this manual) (1) Operating Instructions (CD-ROM) (1) Using the CD-ROM manual The manual can be read . Note If you have lost or damaged the CD-ROM, you dispose of explosion if battery... is incorrectly replaced. Replace only with Adobe Reader installed. When you can download Adobe Reader free from your Sony dealer or Sony service counter. ...
Startup Guide
Page 37
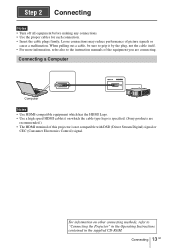
For information on which the cable type logo is specified. (Sony products are connecting. When pulling out a cable, be sure to grip it by the plug, not the cable itself. • For more information, refer also ...) Notes • Use HDMI-compatible equipment which has the HDMI Logo. • Use a high speed HDMI cable(s) on other connecting methods, refer to the instruction manuals of the equipment you are recommended.) • The HDMI terminal of picture signals or cause a malfunction. Loose connections may reduce performance of this projector is...
For information on which the cable type logo is specified. (Sony products are connecting. When pulling out a cable, be sure to grip it by the plug, not the cable itself. • For more information, refer also ...) Notes • Use HDMI-compatible equipment which has the HDMI Logo. • Use a high speed HDMI cable(s) on other connecting methods, refer to the instruction manuals of the equipment you are recommended.) • The HDMI terminal of picture signals or cause a malfunction. Loose connections may reduce performance of this projector is...
Startup Guide
Page 40
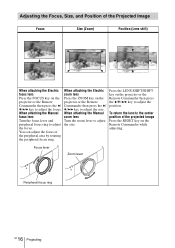
... the projected image Press the RESET key on the projector or the Remote Commander then press the V/ v/B/b key to adjust the size. When attaching the Manual zoom lens Turn the zoom lever to adjust the focus. Press the LENS SHIFT/SHIFT key on the projector or the Remote Commander then press...
... the projected image Press the RESET key on the projector or the Remote Commander then press the V/ v/B/b key to adjust the size. When attaching the Manual zoom lens Turn the zoom lever to adjust the focus. Press the LENS SHIFT/SHIFT key on the projector or the Remote Commander then press...


