The Sony Guide to Home Theater
Page 50
...Front projectors are also "active," meaning that enables you to rediscover your A/V receiver at high signal quality. Satellite Speaker. Subwoofer. The highest quality sound source available today, Super Audio CD supports both stereo and multi-channel music reproduction. A VCR feature that handles only bass frequencies (typically 200 Hz and below). The Sony... Sony FD Trinitron CRT that reproduces all brands and models.) VCRPlus+ Gold technology. the point of programs, the ability to pause live TV and the ability to automatically suggest TV shows you might like image. Cinema ...
...Front projectors are also "active," meaning that enables you to rediscover your A/V receiver at high signal quality. Satellite Speaker. Subwoofer. The highest quality sound source available today, Super Audio CD supports both stereo and multi-channel music reproduction. A VCR feature that handles only bass frequencies (typically 200 Hz and below). The Sony... Sony FD Trinitron CRT that reproduces all brands and models.) VCRPlus+ Gold technology. the point of programs, the ability to pause live TV and the ability to automatically suggest TV shows you might like image. Cinema ...

Operating Instructions (primary manual)
Page 5
...Check the carton to project the picture, etc. Connections and Preparations Connections and Preparations This section describes how to install the projector and screen, how to connect the equipment from which you want to make sure it contains the following items: Remote ...control (1), Size AA (R6) batteries (2) Signal interface cable (1) Air filter (for replacement) (1) Cinema filter (1) Adjuster spacers (2) AC power cord (1) Operating Instructions (1) Inserting the batteries into the remote control Insert the batteries E side first as ...
...Check the carton to project the picture, etc. Connections and Preparations Connections and Preparations This section describes how to install the projector and screen, how to connect the equipment from which you want to make sure it contains the following items: Remote ...control (1), Size AA (R6) batteries (2) Signal interface cable (1) Air filter (for replacement) (1) Cinema filter (1) Adjuster spacers (2) AC power cord (1) Operating Instructions (1) Inserting the batteries into the remote control Insert the batteries E side first as ...

Operating Instructions (primary manual)
Page 7
...mode in the INSTALL SETTING menu. Follow the steps below . 7 Step 1: Installing the Projector GB Cinema Filter To remove the Cinema Filter, turn it according to install the Conversion Lens. To attach the Cinema Filter 1 Turn off the power and disconnect the power cord. 2 Remove the lens cap... the thread around the projector's lens, then turn on the projector. For details on installing the Lens, refer also to the installation manual supplied with the Lens. 1 Turn off the power and disconnect the power cord. Using the supplied Cinema Filter The Cinema Filter is supplied with...
...mode in the INSTALL SETTING menu. Follow the steps below . 7 Step 1: Installing the Projector GB Cinema Filter To remove the Cinema Filter, turn it according to install the Conversion Lens. To attach the Cinema Filter 1 Turn off the power and disconnect the power cord. 2 Remove the lens cap... the thread around the projector's lens, then turn on the projector. For details on installing the Lens, refer also to the installation manual supplied with the Lens. 1 Turn off the power and disconnect the power cord. Using the supplied Cinema Filter The Cinema Filter is supplied with...
Operating Instructions (primary manual)
Page 12
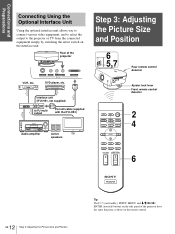
DVD player, etc. Interface unit (IFU-HS1, not supplied) to the projector or TV from the connected equipment simply by switching the select switch on /standby), INPUT, MENU, and m/M/ Connections and Preparations Connecting Using the ... the IFU-HS1) Audio amplifier Active TV speakers Step 3: Adjusting the Picture Size and Position 6 5,7 Rear remote control detector Ajuster lock lever Front remote control detector LIGHT INPUT DYNAMIC STANDARD CINEMA PICTURE MODE USER 1 USER 2 USER 3 ENTER APA DDE MENU WIDE MODE MUTING RESET VOLUME SIDE SHOT ++ -- 2 4 6 12 GB Step 3: ...
DVD player, etc. Interface unit (IFU-HS1, not supplied) to the projector or TV from the connected equipment simply by switching the select switch on /standby), INPUT, MENU, and m/M/ Connections and Preparations Connecting Using the ... the IFU-HS1) Audio amplifier Active TV speakers Step 3: Adjusting the Picture Size and Position 6 5,7 Rear remote control detector Ajuster lock lever Front remote control detector LIGHT INPUT DYNAMIC STANDARD CINEMA PICTURE MODE USER 1 USER 2 USER 3 ENTER APA DDE MENU WIDE MODE MUTING RESET VOLUME SIDE SHOT ++ -- 2 4 6 12 GB Step 3: ...

Operating Instructions (primary manual)
Page 16
...screen displays. The menu presently selected is English. 1 Plug the AC power cord into standby mode. ON/ Lights in red and the projector goes into a wall outlet. The menu appears. MENU PICTURE SETTING Picture Mode: Adjust Picture... The ON/STANDBY indicator lights in red. ...The ON/STANDBY indicator lights in green. Vo l u m e : 30 Input A Tip You can select one of the M/m/ LIGHT INPUT DYNAMIC STANDARD CINEMA PICTURE MODE USER 1 USER 2 USER 3 ENTER APA DDE MENU WIDE MODE MUTING RESET VOLUME SIDE SHOT ++ -- 2 4-6 3 ON/ Lights in green. STANDBY ...
...screen displays. The menu presently selected is English. 1 Plug the AC power cord into standby mode. ON/ Lights in red and the projector goes into a wall outlet. The menu appears. MENU PICTURE SETTING Picture Mode: Adjust Picture... The ON/STANDBY indicator lights in red. ...The ON/STANDBY indicator lights in green. Vo l u m e : 30 Input A Tip You can select one of the M/m/ LIGHT INPUT DYNAMIC STANDARD CINEMA PICTURE MODE USER 1 USER 2 USER 3 ENTER APA DDE MENU WIDE MODE MUTING RESET VOLUME SIDE SHOT ++ -- 2 4-6 3 ON/ Lights in green. STANDBY ...

Operating Instructions (primary manual)
Page 18
... the Screen Projecting This section describes how to operate the projector to view the picture from the equipment connected to suit your taste. The ON/STANDBY indicator lights in red. 18 GB Projecting the Picture on the Screen LIGHT INPUT DYNAMIC STANDARD CINEMA PICTURE MODE USER 1 USER 2 USER 3 ENTER APA DDE MENU...
... the Screen Projecting This section describes how to operate the projector to view the picture from the equipment connected to suit your taste. The ON/STANDBY indicator lights in red. 18 GB Projecting the Picture on the Screen LIGHT INPUT DYNAMIC STANDARD CINEMA PICTURE MODE USER 1 USER 2 USER 3 ENTER APA DDE MENU...
Operating Instructions (primary manual)
Page 20
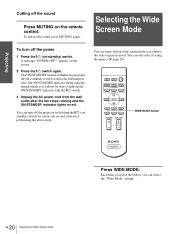
...Press WIDE MODE. To restore the sound, press MUTING again. You can also select it using the menu. (1 page 26) LIGHT INPUT DYNAMIC STANDARD CINEMA PICTURE MODE USER 1 USER 2 USER 3 ENTER APA DDE MENU WIDE MODE MUTING RESET VOLUME SIDE SHOT ++ -- Selecting the Wide Screen Mode To ...turn off the projector by holding the [/1 (on the remote control. The ON/STANDBY indicator flashes in red. Also, the ON/STANDBY indicator flashes quickly during which you ...
...Press WIDE MODE. To restore the sound, press MUTING again. You can also select it using the menu. (1 page 26) LIGHT INPUT DYNAMIC STANDARD CINEMA PICTURE MODE USER 1 USER 2 USER 3 ENTER APA DDE MENU WIDE MODE MUTING RESET VOLUME SIDE SHOT ++ -- Selecting the Wide Screen Mode To ...turn off the projector by holding the [/1 (on the remote control. The ON/STANDBY indicator flashes in red. Also, the ON/STANDBY indicator flashes quickly during which you ...
Operating Instructions (primary manual)
Page 22
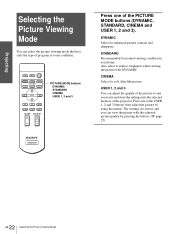
... quality of the picture to reduce roughness when viewing the picture with the adjusted picture quality by using the menus. PICTURE MODE buttons DYNAMIC STANDARD CINEMA USER 1, 2 and 3 Press one of the USER 1, 2 and 3 buttons, then adjust the picture by pressing the button. (1 page 25...) 22 GB Selecting the Picture Viewing Mode Press one of the projector. STANDARD Recommended for normal viewing condition in your taste and store the settings into the selected memory of the PICTURE MODE buttons (DYNAMIC, STANDARD...
... quality of the picture to reduce roughness when viewing the picture with the adjusted picture quality by using the menus. PICTURE MODE buttons DYNAMIC STANDARD CINEMA USER 1, 2 and 3 Press one of the USER 1, 2 and 3 buttons, then adjust the picture by pressing the button. (1 page 25...) 22 GB Selecting the Picture Viewing Mode Press one of the projector. STANDARD Recommended for normal viewing condition in your taste and store the settings into the selected memory of the PICTURE MODE buttons (DYNAMIC, STANDARD...

Operating Instructions (primary manual)
Page 23
...-screen menu. You can hide this indicator using the menus. LIGHT INPUT DYNAMIC STANDARD CINEMA PICTURE MODE USER 1 USER 2 USER 3 ENTER APA DDE MENU WIDE MODE MUTING RESET VOLUME SIDE SHOT ++ -- 2-4 1 23 Operation through the Menus The projector is input. You can change the menu language, see "Selecting the Menu Language" on...
...-screen menu. You can hide this indicator using the menus. LIGHT INPUT DYNAMIC STANDARD CINEMA PICTURE MODE USER 1 USER 2 USER 3 ENTER APA DDE MENU WIDE MODE MUTING RESET VOLUME SIDE SHOT ++ -- 2-4 1 23 Operation through the Menus The projector is input. You can change the menu language, see "Selecting the Menu Language" on...

Operating Instructions (primary manual)
Page 25
...becomes. INPUT SETTING menu The INPUT SETTING menu is used for adjusting the picture. Dynamic: Select for soft, film-like picture. Cinema: Select for enhanced picture contrast and sharpness. Adjust Picture... Items that can also adjust the volume. Standard: Recommended for correcting distortion...view the picture with Dynamic. Sharpness The higher the setting, the sharper the picture. Using the Menus Menu Lists Menu Configurations The projector is used to display the horizontal and vertical frequencies of the input signal and the used time of the lamp. INSTALL SETTING ...
...becomes. INPUT SETTING menu The INPUT SETTING menu is used for adjusting the picture. Dynamic: Select for soft, film-like picture. Cinema: Select for enhanced picture contrast and sharpness. Adjust Picture... Items that can also adjust the volume. Standard: Recommended for correcting distortion...view the picture with Dynamic. Sharpness The higher the setting, the sharper the picture. Using the Menus Menu Lists Menu Configurations The projector is used to display the horizontal and vertical frequencies of the input signal and the used time of the lamp. INSTALL SETTING ...

Operating Instructions (primary manual)
Page 34
Optional accessories Signal interface unit IFU-HS1 Projector Lamp LMP-H150 (for replacement) Air filter PK-HS1FL (for replacement) Signal interface cables SIC-HS10/SIC-HS20/SIC-HS30/ SIC-HS40 Projection lens Short Focused Conversion Lens VPLL-CW20 Projection Distances for replacement) (1) Cinema Filter (1) Adjuster specers (2) Operating Instructions (1) Design and specifications are subject...
Optional accessories Signal interface unit IFU-HS1 Projector Lamp LMP-H150 (for replacement) Air filter PK-HS1FL (for replacement) Signal interface cables SIC-HS10/SIC-HS20/SIC-HS30/ SIC-HS40 Projection lens Short Focused Conversion Lens VPLL-CW20 Projection Distances for replacement) (1) Cinema Filter (1) Adjuster specers (2) Operating Instructions (1) Design and specifications are subject...

Operating Instructions (primary manual)
Page 43
...size and position........... 12 the picture 25, 28 zoom 13, 19 Air filter 32 B Black Level Adj (Adjust 26 Brightness 25 C Cinema Black 26 Color 25 Color System 27 Color Temp 26 Connections AV amplifier 11 computer 11 DVD player equipped with the component video connectors/ ...INFORMATION menu 27 INPUT SETTING menu 26 Input-A Signal Sel 27 INSTALL SETTING menu 27 Installing the Projector and a Screen 8 L Lamp replacement 31 Lamp Timer 27 Language 27 Location of controls front 40 rear 41 remote control 42 M Menu clearing the menu display......... 24 operation 23 reset 24...
...size and position........... 12 the picture 25, 28 zoom 13, 19 Air filter 32 B Black Level Adj (Adjust 26 Brightness 25 C Cinema Black 26 Color 25 Color System 27 Color Temp 26 Connections AV amplifier 11 computer 11 DVD player equipped with the component video connectors/ ...INFORMATION menu 27 INPUT SETTING menu 26 Input-A Signal Sel 27 INSTALL SETTING menu 27 Installing the Projector and a Screen 8 L Lamp replacement 31 Lamp Timer 27 Language 27 Location of controls front 40 rear 41 remote control 42 M Menu clearing the menu display......... 24 operation 23 reset 24...

Marketing Specifications & Features
Page 2
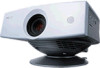
...;2002 Sony Electronics Inc. Product Information VPL-HS2 Cineza™ LCD Front Projector KEY TECHNOLOGY Side Shot 2™ Digital Keystoning Digital horizontal and vertical keystone adjustment capabilities with the projector) before they can be restored before playback is prohibited. Picture Modes Choose from 3 preset picture modes that best suit the source and viewing environment (Standard/Dynamic/Cinema) Cinema Filter This...
...;2002 Sony Electronics Inc. Product Information VPL-HS2 Cineza™ LCD Front Projector KEY TECHNOLOGY Side Shot 2™ Digital Keystoning Digital horizontal and vertical keystone adjustment capabilities with the projector) before they can be restored before playback is prohibited. Picture Modes Choose from 3 preset picture modes that best suit the source and viewing environment (Standard/Dynamic/Cinema) Cinema Filter This...


