
Operating Instructions
Page 6
Maintenance Other Maintenance 34 (GB) Replacing the Lamp 34 (GB) Cleaning the Air Filter 35 (GB) Troubleshooting 36 (GB) Specifications 38 (GB) Index 42 (GB) 6 (GB)
Maintenance Other Maintenance 34 (GB) Replacing the Lamp 34 (GB) Cleaning the Air Filter 35 (GB) Troubleshooting 36 (GB) Specifications 38 (GB) Index 42 (GB) 6 (GB)

Operating Instructions
Page 7
...running. Never use a damp cloth, detergent solution, or thinner. • Clean the filter at the factory. This is recommended that the carpet and wall paper be near these ...malfunction. 7 (GB) On repacking Save the original shipping carton and packing material; the air coming out is equipped with ventilation holes (intake) on the bottom and ventilation holes (... or abrasive cleansers, since these holes, or internal heat build-up the projector. On LCD projector The LCD projector is on the LCD projector. Never pull the cord itself has been turned off the power with the ...
...running. Never use a damp cloth, detergent solution, or thinner. • Clean the filter at the factory. This is recommended that the carpet and wall paper be near these ...malfunction. 7 (GB) On repacking Save the original shipping carton and packing material; the air coming out is equipped with ventilation holes (intake) on the bottom and ventilation holes (... or abrasive cleansers, since these holes, or internal heat build-up the projector. On LCD projector The LCD projector is on the LCD projector. Never pull the cord itself has been turned off the power with the ...

Operating Instructions
Page 9
... socket Connects the supplied AC power cord. 0 Rear remote control detector (SIRCS receiver) qa Lamp cover qs Rear adjusters qd Ventilation holes (intake)/air filter cover About ventilation holes Notes • Do not place anything near the ventilation holes, or you may cause internal heat build-up. Location and Function...is projected on page 35 (GB). Do not put your hand near the ventilation holes as it may be burned. • Clean the air filter every 300 hours to use the adjusters, see "Cleaning the Air Filter" on the out of the screen, adjust the picture using these adjusters.
... socket Connects the supplied AC power cord. 0 Rear remote control detector (SIRCS receiver) qa Lamp cover qs Rear adjusters qd Ventilation holes (intake)/air filter cover About ventilation holes Notes • Do not place anything near the ventilation holes, or you may cause internal heat build-up. Location and Function...is projected on page 35 (GB). Do not put your hand near the ventilation holes as it may be burned. • Clean the air filter every 300 hours to use the adjusters, see "Cleaning the Air Filter" on the out of the screen, adjust the picture using these adjusters.

Operating Instructions
Page 11
... Displays the test pattern on the screen for focus adjustment. Press again to 6. When turning off the power, press the I / 1 (on / standby) key Turns the projector on and off the power" on page 20 (GB). 2 INPUT key Selects the input signal. You can easily set the video memory, see "To turn... item back to set , change and view the image in green when the power is turned on the control panel will turn off when the projector is on, the keys on . The ON/STANDBY indicator lights in a suitable setting. For more details on the screen.
... Displays the test pattern on the screen for focus adjustment. Press again to 6. When turning off the power, press the I / 1 (on / standby) key Turns the projector on and off the power" on page 20 (GB). 2 INPUT key Selects the input signal. You can easily set the video memory, see "To turn... item back to set , change and view the image in green when the power is turned on the control panel will turn off when the projector is on, the keys on . The ON/STANDBY indicator lights in a suitable setting. For more details on the screen.

Operating Instructions
Page 20
... an infringement of the rights of aspects. When changing the aspect, check the following: • Select an aspect taking into account that if the projector is used . 2,438 1,371 1,829 Size (Inch) 80 The 110 inch picture is displayed. 4:3 screen 16:9 picture Unit (mm) 1,626... authors or producers which changes the aspect ratio of the projector. Also, the ON/STANDBY indicator flashes quickly for five seconds. 2 Press the I / 1 key on the control panel. About the air filter cleaning Clean the air filter every 300 hours to breakdown of the original picture will ...
... an infringement of the rights of aspects. When changing the aspect, check the following: • Select an aspect taking into account that if the projector is used . 2,438 1,371 1,829 Size (Inch) 80 The 110 inch picture is displayed. 4:3 screen 16:9 picture Unit (mm) 1,626... authors or producers which changes the aspect ratio of the projector. Also, the ON/STANDBY indicator flashes quickly for five seconds. 2 Press the I / 1 key on the control panel. About the air filter cleaning Clean the air filter every 300 hours to breakdown of the original picture will ...
Operating Instructions
Page 32
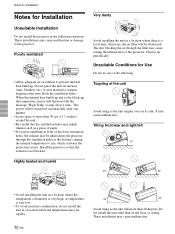
...the unit other than 20 degrees. Poorly ventilated • Allow adequate air circulation to rise, which activates the protection circuit. Unsuitable Conditions for Installation NotesforInstallation Very dusty Unsuitable Installation Do not install the projector in the following . It may cause malfunction or damage to the ...block-up, the temperature sensor will be inhaled into the projector through the filter may cause raising the internal heat of dust; These installations may cause malfunction. Do not place the unit on its...
...the unit other than 20 degrees. Poorly ventilated • Allow adequate air circulation to rise, which activates the protection circuit. Unsuitable Conditions for Installation NotesforInstallation Very dusty Unsuitable Installation Do not install the projector in the following . It may cause malfunction or damage to the ...block-up, the temperature sensor will be inhaled into the projector through the filter may cause raising the internal heat of dust; These installations may cause malfunction. Do not place the unit on its...

Operating Instructions
Page 35
Maintenance 6 Close the lamp cover and tighten the screw. 7 Turn the projector back over. 8 Connect the power cord and turn the projector to the standby mode. 9 Press the following keys on the control panel in the following order for less than in five seconds each: RESET,
Maintenance 6 Close the lamp cover and tighten the screw. 7 Turn the projector back over. 8 Connect the power cord and turn the projector to the standby mode. 9 Press the following keys on the control panel in the following order for less than in five seconds each: RESET,

Operating Instructions
Page 36
The lamp cover is detached. The air filter cover is detached. Close the air filter cover securely (see page 16 (GB)). The picture ...GB) and 16 (GB)). Connect the remote control cable to both the LCD of dots in the SET SETTING menu (see page 13 (GB)). Change the setting of...securely (see page 14 (GB)). Cause Remedy Cable is not connected to the CONTROL S IN connector (projector) or CONTROL S OUT (Remote Commander). Invalid input setting. Set the INPUT-A/B setting according to OFF...Remedy Replace with qualified Sony personnel. Install batteries (see page 14 (GB)). 36 (GB)
The lamp cover is detached. The air filter cover is detached. Close the air filter cover securely (see page 16 (GB)). The picture ...GB) and 16 (GB)). Connect the remote control cable to both the LCD of dots in the SET SETTING menu (see page 13 (GB)). Change the setting of...securely (see page 14 (GB)). Cause Remedy Cable is not connected to the CONTROL S IN connector (projector) or CONTROL S OUT (Remote Commander). Invalid input setting. Set the INPUT-A/B setting according to OFF...Remedy Replace with qualified Sony personnel. Install batteries (see page 14 (GB)). 36 (GB)

Operating Instructions
Page 37
...failed. TEMP/FAN indicators light up . Lamp off the power. Please check INPUT-B setting. The resolution setting of the output signal of the projector. Check to the XGA (see page 16 (GB)). Caution messages Use the list below to cool down the lamp and turn on the screen.... The fan is detached. Consult with qualified Sony personnel. Please replace the LAMP. Set INPUT-B correctly (see pages 34 (GB) and 35 (GB)). Please replace the lamp. Remedy Check connections (see page 34 (GB)). Cause The lamp cover or the air filter cover is broken. The TEMP/FAN indicator flashes...
...failed. TEMP/FAN indicators light up . Lamp off the power. Please check INPUT-B setting. The resolution setting of the output signal of the projector. Check to the XGA (see page 16 (GB)). Caution messages Use the list below to cool down the lamp and turn on the screen.... The fan is detached. Consult with qualified Sony personnel. Please replace the LAMP. Set INPUT-B correctly (see pages 34 (GB) and 35 (GB)). Please replace the lamp. Remedy Check connections (see page 34 (GB)). Cause The lamp cover or the air filter cover is broken. The TEMP/FAN indicator flashes...

Operating Instructions
Page 39
Specifications Optional accessories Projector Lamp LMP-P200 (for replacement) Projector Suspension Support PSS-610 Some of the items may not be available in accordance with European standard EN55103-1: 24.3A (230V) ... Remote Commander RM-PJVW10 (1) Size AA (R6) batteries (2) Lens Cap (1) AC power cord (1) Air filter (for replacement) (1) Operating Instructions (1) Design and specifications are subject to change without notice. For details, please consult your nearest Sony office. 39 (GB) Other VD: Vertical sync input: 1-5 Vp-p high impedance, positive/ negative REMOTE...
Specifications Optional accessories Projector Lamp LMP-P200 (for replacement) Projector Suspension Support PSS-610 Some of the items may not be available in accordance with European standard EN55103-1: 24.3A (230V) ... Remote Commander RM-PJVW10 (1) Size AA (R6) batteries (2) Lens Cap (1) AC power cord (1) Air filter (for replacement) (1) Operating Instructions (1) Design and specifications are subject to change without notice. For details, please consult your nearest Sony office. 39 (GB) Other VD: Vertical sync input: 1-5 Vp-p high impedance, positive/ negative REMOTE...

Operating Instructions
Page 42
... settings 21 (GB) the picture 21 (GB), 22 (GB) the picture size/shift 23 (GB), 24 (GB) Adjusting the size of the picture 18 (GB) Air filter 35 (GB) ASPECT 24 (GB) B Battery installation 14 (GB) notes 14 (GB) BRIGHT 22 (GB) C CINEMA BLACK 28 (GB) COLOR 22 (GB) COLOR SYS (System... menu 22 (GB) Power turn off 20 (GB) turn on 18 (GB) POWER SAVING 11 (GB), 27 (GB) Precautions 7 (GB) Projecting 18 (GB) PSS-610 Projector Suspension Support 30 (GB) R Remote Commander battery installation 14 (GB) location and function of controls 13 (GB) Remote control detector front 9 (GB) rear 9 (GB) Reset...
... settings 21 (GB) the picture 21 (GB), 22 (GB) the picture size/shift 23 (GB), 24 (GB) Adjusting the size of the picture 18 (GB) Air filter 35 (GB) ASPECT 24 (GB) B Battery installation 14 (GB) notes 14 (GB) BRIGHT 22 (GB) C CINEMA BLACK 28 (GB) COLOR 22 (GB) COLOR SYS (System... menu 22 (GB) Power turn off 20 (GB) turn on 18 (GB) POWER SAVING 11 (GB), 27 (GB) Precautions 7 (GB) Projecting 18 (GB) PSS-610 Projector Suspension Support 30 (GB) R Remote Commander battery installation 14 (GB) location and function of controls 13 (GB) Remote control detector front 9 (GB) rear 9 (GB) Reset...


