

Limited Warranty (U.S. Only)
Page 1
...of technology, or modification of or to any part of this Limited Warranty, "refurbished" means a product or part that for the LCD Projector Lamp the period will be ninety (90) days from state to any repair, replacement part or replacement product for the remainder of one (1) year...does not cover product issues caused by any other rights which vary from the original date of purchase of Sony. 4-263-748-01 VPL Front Projector LIMITED WARRANTY Sony Electronics Inc. ("Sony") warrants this product (including any accessories) against defects in material or workmanship for the time periods and ...
...of technology, or modification of or to any part of this Limited Warranty, "refurbished" means a product or part that for the LCD Projector Lamp the period will be ninety (90) days from state to any repair, replacement part or replacement product for the remainder of one (1) year...does not cover product issues caused by any other rights which vary from the original date of purchase of Sony. 4-263-748-01 VPL Front Projector LIMITED WARRANTY Sony Electronics Inc. ("Sony") warrants this product (including any accessories) against defects in material or workmanship for the time periods and ...
Operating Instructions
Page 3
About the simulated 3D feature .......56 Troubleshooting 57 Warning Indicators 60 Message Lists 61 Replacing the Lamp and Cleaning the Ventilation Holes (intake 63 Cleaning 66 Specifications 67 Preset Signals 68 Input Signals and Adjustable/ Setting Items 71 Compatible 3D Signals 73 3D Signals and Adjustable/Setting Items 73 Aspect Mode 74 Storage Conditions of Adjustable/ Setting Items 75 Projection Distance and Lens Shift Range 78 Dimensions 82 Index 85 3
About the simulated 3D feature .......56 Troubleshooting 57 Warning Indicators 60 Message Lists 61 Replacing the Lamp and Cleaning the Ventilation Holes (intake 63 Cleaning 66 Specifications 67 Preset Signals 68 Input Signals and Adjustable/ Setting Items 71 Compatible 3D Signals 73 3D Signals and Adjustable/Setting Items 73 Aspect Mode 74 Storage Conditions of Adjustable/ Setting Items 75 Projection Distance and Lens Shift Range 78 Dimensions 82 Index 85 3
Operating Instructions
Page 4
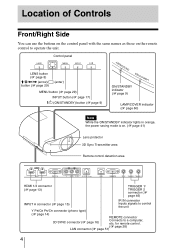
Control panel LENS button (1 page 8) M/m/ Location of Controls Front/Right Side You can use the buttons on the control panel with the same names as those on the remote control to operate the unit.
Control panel LENS button (1 page 8) M/m/ Location of Controls Front/Right Side You can use the buttons on the control panel with the same names as those on the remote control to operate the unit.
Operating Instructions
Page 5
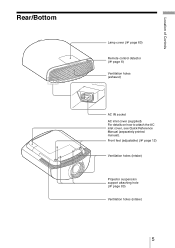
Front feet (adjustable) (1 page 12) Ventilation holes (intake) Projector suspension support attaching hole (1 page 83) Ventilation holes (intake) 5 Location of Controls Rear/Bottom Lamp cover (1 page 63) Remote control detector (1 page 8) Ventilation holes (exhaust) AC IN socket AC inlet cover (supplied) For details on how to attach the AC inlet cover, see Quick Reference Manual (separately printed manual).
Front feet (adjustable) (1 page 12) Ventilation holes (intake) Projector suspension support attaching hole (1 page 83) Ventilation holes (intake) 5 Location of Controls Rear/Bottom Lamp cover (1 page 63) Remote control detector (1 page 8) Ventilation holes (exhaust) AC IN socket AC inlet cover (supplied) For details on how to attach the AC inlet cover, see Quick Reference Manual (separately printed manual).
Operating Instructions
Page 32
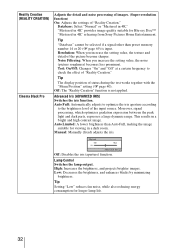
...: Adjusts the settings of "Reality Creation." Database: Select "Normal" or "Mastered in 4K" releasing from Sony Pictures Home Entertainment. Tip "Database" cannot be selected if a signal other than Auto Full, making the image suitable for longer lamp life. 32 Noise Filtering: When you increase the setting value, the texture and detail of... in a dark room. Auto Limited: A lower brightness than preset memory number 14 or 20 (1 page 69) is not applied. Manual: Manually (fixed) adjusts the iris. Lamp Control Switches the...
...: Adjusts the settings of "Reality Creation." Database: Select "Normal" or "Mastered in 4K" releasing from Sony Pictures Home Entertainment. Tip "Database" cannot be selected if a signal other than Auto Full, making the image suitable for longer lamp life. 32 Noise Filtering: When you increase the setting value, the texture and detail of... in a dark room. Auto Limited: A lower brightness than preset memory number 14 or 20 (1 page 69) is not applied. Manual: Manually (fixed) adjusts the iris. Lamp Control Switches the...
Operating Instructions
Page 41
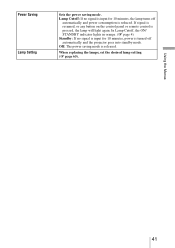
Off: The power saving mode is pressed, the lamp will light again. When replacing the lamps, set the desired lamp setting (1 page 65). If signal is resumed, or any button on the control panel or remote control is released. In Lamp Cutoff, the ON/ STANDBY indicator lights in orange. (1 page 4)... is input for 10 minutes, power is reduced. Using the Menus 41 Power Saving Lamp Setting Sets the power saving mode. Lamp Cutoff: If no signal is input for 10 minutes, the lamp turns off automatically and power consumption is turned off automatically and the projector goes into standby...
Off: The power saving mode is pressed, the lamp will light again. When replacing the lamps, set the desired lamp setting (1 page 65). If signal is resumed, or any button on the control panel or remote control is released. In Lamp Cutoff, the ON/ STANDBY indicator lights in orange. (1 page 4)... is input for 10 minutes, power is reduced. Using the Menus 41 Power Saving Lamp Setting Sets the power saving mode. Lamp Cutoff: If no signal is input for 10 minutes, the lamp turns off automatically and power consumption is turned off automatically and the projector goes into standby...

Operating Instructions
Page 49
... Displays the model name (VPL-VW1100ES). Displays the preset memory number of screen may not be registered to an optimum picture. Indicates how long the lamp has been turned on the input signal used for input signals appropriately according to... input signal. Displays the vertical frequency of the input signal. When input signals with "Adjust Signal" of the lamp. Signal type Using the Menus Model name Serial No. This unit also contains 20 different user memories beside the preset... hours of usage of the Screen menu, it to the unit. Model name: VPL-VW1100ES Serial No.
... Displays the model name (VPL-VW1100ES). Displays the preset memory number of screen may not be registered to an optimum picture. Indicates how long the lamp has been turned on the input signal used for input signals appropriately according to... input signal. Displays the vertical frequency of the input signal. When input signals with "Adjust Signal" of the lamp. Signal type Using the Menus Model name Serial No. This unit also contains 20 different user memories beside the preset... hours of usage of the Screen menu, it to the unit. Model name: VPL-VW1100ES Serial No.
Operating Instructions
Page 53
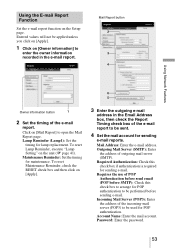
...Report button 2 3 4 Using Network Features 6 5 Owner information button 1 2 Set the timing of outgoing mail server (SMTP). To reset Lamp Reminder, execute "Lamp Setting" on the Setup page. Outgoing Mail Server (SMTP): Enter the address of the e-mail report. Using the E-mail Report Function Set ...on [Mail Report] to be used for POP authentication to open the Mail Report page. Lamp Reminder (Lamp1): Set the timing for maintenance. Maintenance Reminder: Set the timing for lamp replacement. Mail Address: Enter the e-mail address. Account Name: Enter the mail account. Required...
...Report button 2 3 4 Using Network Features 6 5 Owner information button 1 2 Set the timing of outgoing mail server (SMTP). To reset Lamp Reminder, execute "Lamp Setting" on the Setup page. Outgoing Mail Server (SMTP): Enter the address of the e-mail report. Using the E-mail Report Function Set ...on [Mail Report] to be used for POP authentication to open the Mail Report page. Lamp Reminder (Lamp1): Set the timing for maintenance. Maintenance Reminder: Set the timing for lamp replacement. Mail Address: Enter the e-mail address. Account Name: Enter the mail account. Required...
Operating Instructions
Page 55
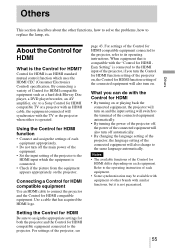
to a Sony Control for HDMI compatible TV or a projector with an HDMI cable, the equipment connected will synchronize with the "Control for HDMI Easy Setting" is connected ... operating instruction of each equipment. • Some synchronization may be available with equipment of other functions, how to solve the problems, how to replace the lamp, etc. Connecting a Control for HDMI compatible equipment Use an HDMI cable to connect the projector and the Control for HDMI compatible equipment connected to the...
to a Sony Control for HDMI compatible TV or a projector with an HDMI cable, the equipment connected will synchronize with the "Control for HDMI Easy Setting" is connected ... operating instruction of each equipment. • Some synchronization may be available with equipment of other functions, how to solve the problems, how to replace the lamp, etc. Connecting a Control for HDMI compatible equipment Use an HDMI cable to connect the projector and the Control for HDMI compatible equipment connected to the...
Operating Instructions
Page 57
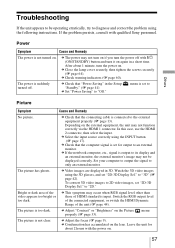
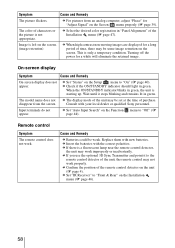
...an external monitor, the external monitor's image may occur when RGB signal level other than those of HDMI standard is suddenly turned off with qualified Sony personnel. Watch the 3D video images using the INPUT button (1 page 17). c Adjust "Contrast" or "Brightness" on the lens. c ... video images to an external monitor. Bright or dark area of the unit (1 page 44). menu The picture is too dark. c Close the lamp cover securely, then tighten the screws securely (1 page 64). c Check warning indicators (1 page 60). menu is connected to only an external monitor....
...an external monitor, the external monitor's image may occur when RGB signal level other than those of HDMI standard is suddenly turned off with qualified Sony personnel. Watch the 3D video images using the INPUT button (1 page 17). c Adjust "Contrast" or "Brightness" on the lens. c ... video images to an external monitor. Bright or dark area of the unit (1 page 44). menu The picture is too dark. c Close the lamp cover securely, then tighten the screws securely (1 page 64). c Check warning indicators (1 page 60). menu is connected to only an external monitor....
Operating Instructions
Page 58
... c Batteries could be set at the time of time, there may not work properly. c Insert the batteries with your local dealer or qualified Sony personnel. c Set "IR Receiver" to "Off" (1 page 44). Symptom Cause and Remedy The picture flickers. c Select the desired color registration... & Rear" on the Screen menu properly (1 page 39). Remote control Symptom The remote control does not work improperly or inadvertently. This is a fluorescent lamp near the remote control detector, the unit may be weak. c Set "Status" on the unit (1 page 4). The color of the Installation menu (1...
... c Batteries could be set at the time of time, there may not work properly. c Insert the batteries with your local dealer or qualified Sony personnel. c Set "IR Receiver" to "Off" (1 page 44). Symptom Cause and Remedy The picture flickers. c Select the desired color registration... & Rear" on the Screen menu properly (1 page 39). Remote control Symptom The remote control does not work improperly or inadvertently. This is a fluorescent lamp near the remote control detector, the unit may be weak. c Set "Status" on the unit (1 page 4). The color of the Installation menu (1...
Operating Instructions
Page 60
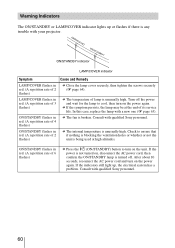
... at the end of its service life. Consult with qualified Sony personnel. LAMP/COVER flashes in red. (A repetition rate of lamp is turned off the power and wait for the lamp to cool, then turn on the power again. Consult with qualified Sony personnel. 60 If the indicators still light up or flashes ...if there is any trouble with a new one (1 page 63). If the power is not turned on, disconnect the AC power cord, then confirm the ON/STANDBY lamp is unusually high. ON/STANDBY ...
... at the end of its service life. Consult with qualified Sony personnel. LAMP/COVER flashes in red. (A repetition rate of lamp is turned off the power and wait for the lamp to cool, then turn on the power again. Consult with qualified Sony personnel. 60 If the indicators still light up or flashes ...if there is any trouble with a new one (1 page 63). If the power is not turned on, disconnect the AC power cord, then confirm the ON/STANDBY lamp is unusually high. ON/STANDBY ...
Operating Instructions
Page 61
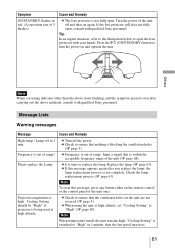
... the power. Replace the lamp (1 page 63). c If this message, press any button either on the unit are not covered (1 page 5). Note To clear this message appears again after carrying out the above methods, consult with qualified Sony personnel. Press the ?/1 (ON/STANDBY) button to "High" in ...1 min. c Turn off in 1 minute, then the fan speed increases. 61 Frequency is not complete. Cooling Setting should be "High" if projector is high. Please replace the Lamp. c When using ...
... the power. Replace the lamp (1 page 63). c If this message, press any button either on the unit are not covered (1 page 5). Note To clear this message appears again after carrying out the above methods, consult with qualified Sony personnel. Press the ?/1 (ON/STANDBY) button to "High" in ...1 min. c Turn off in 1 minute, then the fan speed increases. 61 Frequency is not complete. Cooling Setting should be "High" if projector is high. Please replace the Lamp. c When using ...
Operating Instructions
Page 62
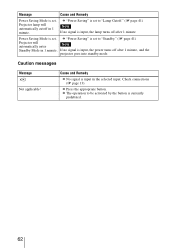
...Projector will automatically cutoff in 1 minute. c "Power Saving" is set . Check connections (1 page 13). c Press the appropriate button. c The operation to "Lamp Cutoff." (1 page 41) Note If no signal is input, the power turns off after 1 minute, and the projector goes into standby mode. c "Power Saving..." is set to be activated by the button is set . Projector lamp will automatically enter Note Standby Mode in the selected input. If no signal is input in 1 minute. Power Saving Mode is currently prohibited...
...Projector will automatically cutoff in 1 minute. c "Power Saving" is set . Check connections (1 page 13). c Press the appropriate button. c The operation to "Lamp Cutoff." (1 page 41) Note If no signal is input, the power turns off after 1 minute, and the projector goes into standby mode. c "Power Saving..." is set to be activated by the button is set . Projector lamp will automatically enter Note Standby Mode in the selected input. If no signal is input in 1 minute. Power Saving Mode is currently prohibited...
Operating Instructions
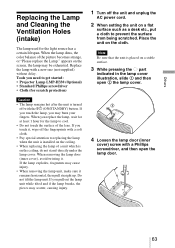
Page 63
...pressing the part indicated in the lamp cover illustration, slide 1 and then open the lamp door. 63 appears on the ceiling, do not stand directly under the lamp cover. Replace the lamp with a Phillips screwdriver, and then open 2 the lamp cover. 4 Loosen the lamp door (inner cover) screw ...to prevent the surface from being scratched. Tools you may be exhausted. Others Replacing the Lamp and Cleaning the Ventilation Holes (intake) The lamp used for scratch protection) Caution • The lamp remains hot after the unit is turned off the fingerprints with the ?/1 (ON/STANDBY...
...pressing the part indicated in the lamp cover illustration, slide 1 and then open the lamp door. 63 appears on the ceiling, do not stand directly under the lamp cover. Replace the lamp with a Phillips screwdriver, and then open 2 the lamp cover. 4 Loosen the lamp door (inner cover) screw ...to prevent the surface from being scratched. Tools you may be exhausted. Others Replacing the Lamp and Cleaning the Ventilation Holes (intake) The lamp used for scratch protection) Caution • The lamp remains hot after the unit is turned off the fingerprints with the ?/1 (ON/STANDBY...
Operating Instructions
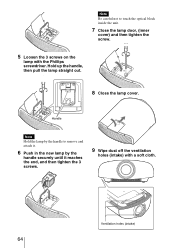
Page 64
Note Be careful not to remove and attach it. 6 Push in the new lamp by the handle securely until it reaches the end, and then tighten the 3 screws. 9 Wipe dust off the ventilation holes (intake) with the Phillips screwdriver. Handle Note Hold the lamp by the handle to touch the optical block inside the unit. 7 Close the lamp door, (inner cover) and then tighten the screw. 5 Loosen the 3 screws on the lamp with a soft cloth. Hold up the handle, then pull the lamp straight out. 8 Close the lamp cover. Ventilation holes (intake) 64
Note Be careful not to remove and attach it. 6 Push in the new lamp by the handle securely until it reaches the end, and then tighten the 3 screws. 9 Wipe dust off the ventilation holes (intake) with the Phillips screwdriver. Handle Note Hold the lamp by the handle to touch the optical block inside the unit. 7 Close the lamp door, (inner cover) and then tighten the screw. 5 Loosen the 3 screws on the lamp with a soft cloth. Hold up the handle, then pull the lamp straight out. 8 Close the lamp cover. Ventilation holes (intake) 64
Operating Instructions
Page 65
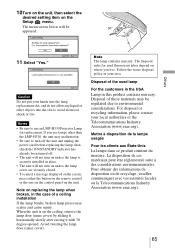
...be 30° appeared. For disposal or recycling information, please contact your area. Note The lamp contains mercury. The disposal rules for replacement. Disposal of a ceiling installation If the lamp breaks, broken lamp pieces may malfunction. • Be sure to turn off the unit and unplug the power cord...veuillez communiquer avec vos autorités locales ou la Telecommunications Industry Association (www.eiae.org). 65 Caution Do not put your hands into the lamp replacement slot, and do not allow any liquid or other than the LMP-H330, the unit may scatter and cause injury. If you ...
...be 30° appeared. For disposal or recycling information, please contact your area. Note The lamp contains mercury. The disposal rules for replacement. Disposal of a ceiling installation If the lamp breaks, broken lamp pieces may malfunction. • Be sure to turn off the unit and unplug the power cord...veuillez communiquer avec vos autorités locales ou la Telecommunications Industry Association (www.eiae.org). 65 Caution Do not put your hands into the lamp replacement slot, and do not allow any liquid or other than the LMP-H330, the unit may scatter and cause injury. If you ...
Operating Instructions
Page 67
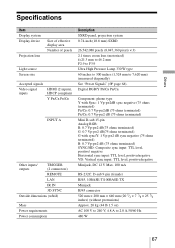
....8 mm) SXRD 26,542,080 pixels (8,847,360 pixels × 3) 2.1 times zoom lens (motorized) f=21.3 mm to 46.2 mm F2.9 to F3.9 Ultra High Pressure Lamp 330 W type 60 inches to 300 inches (1,524 mm to 2.0 A,50/60 Hz 480 W 67 Digital RGB/Y PB/CB PR/CR Component: phono type Y with...
....8 mm) SXRD 26,542,080 pixels (8,847,360 pixels × 3) 2.1 times zoom lens (motorized) f=21.3 mm to 46.2 mm F2.9 to F3.9 Ultra High Pressure Lamp 330 W type 60 inches to 300 inches (1,524 mm to 2.0 A,50/60 Hz 480 W 67 Digital RGB/Y PB/CB PR/CR Component: phono type Y with...

Operating Instructions
Page 68
... (720 × 480p) 6 576/50p 576/50p 31.250 50.000 SonG/Y - (Progressive PAL) (720 × 576p) 68 Please check with your local Sony Authorized Dealer. • Information on accessories in all countries and area. Preset memory no condensation) -20°C to +60°C (-4°F to +140°F) ... formats which you can project using this manual is current as of this unit and its optional accessories are available in this unit. Projector Lamp: LMP-H330 (for replacement) Projector Suspension Support: PSS-H10 3D glasses: TDG-PJ1 3D Sync Transmitter: TMR-PJ2 Notes • The...
... (720 × 480p) 6 576/50p 576/50p 31.250 50.000 SonG/Y - (Progressive PAL) (720 × 576p) 68 Please check with your local Sony Authorized Dealer. • Information on accessories in all countries and area. Preset memory no condensation) -20°C to +60°C (-4°F to +140°F) ... formats which you can project using this manual is current as of this unit and its optional accessories are available in this unit. Projector Lamp: LMP-H330 (for replacement) Projector Suspension Support: PSS-H10 3D glasses: TDG-PJ1 3D Sync Transmitter: TMR-PJ2 Notes • The...
Operating Instructions
Page 71
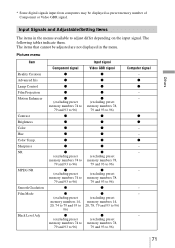
... signal - z - - - - - - 71 The items that cannot be displayed as preset memory number of Component or Video GBR signal. Picture menu Item Reality Creation Advanced Iris Lamp Control Film Projection Motion Enhancer Contrast Brightness Color Hue Color Temp. Input signal Component signal Video GBR signal z z z z z z z z z (excluding preset memory numbers 74 to 79...
... signal - z - - - - - - 71 The items that cannot be displayed as preset memory number of Component or Video GBR signal. Picture menu Item Reality Creation Advanced Iris Lamp Control Film Projection Motion Enhancer Contrast Brightness Color Hue Color Temp. Input signal Component signal Video GBR signal z z z z z z z z z (excluding preset memory numbers 74 to 79...


