

Operating Instructions
Page 1
4-580-167-01 (1) Video Projector Operating Instructions Before operating the unit, please read this manual and supplied Quick Reference Manual thoroughly and retain them for future reference. VPL-VW365
4-580-167-01 (1) Video Projector Operating Instructions Before operating the unit, please read this manual and supplied Quick Reference Manual thoroughly and retain them for future reference. VPL-VW365
Operating Instructions
Page 4
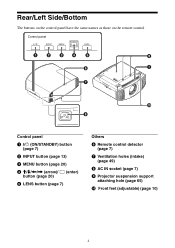
Control panel Control panel a ?/1 (ON/STANDBY) button (page 7) b INPUT button (page 13) c MENU button (page 20) d M/m/ Rear/Left Side/Bottom The buttons on the control panel have the same names as those on the remote control.
Control panel Control panel a ?/1 (ON/STANDBY) button (page 7) b INPUT button (page 13) c MENU button (page 20) d M/m/ Rear/Left Side/Bottom The buttons on the control panel have the same names as those on the remote control.
Operating Instructions
Page 14
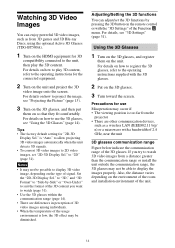
... to watch (page 31). • Use the 3D glasses within the communication range (page 14). • There are other communication devices, such as from the projector • There are differences in perception of 3D video images among individuals. • When the temperature of the usage environment is low, the 3D effect...
... to watch (page 31). • Use the 3D glasses within the communication range (page 14). • There are other communication devices, such as from the projector • There are differences in perception of 3D video images among individuals. • When the temperature of the usage environment is low, the 3D effect...

Operating Instructions
Page 30
Set Network Management to "On," the network function is turned off automatically and the projector goes into standby mode. Sets the power saving mode. Setting items Network Management Power Saving Lamp Setting Description On: Set when connected to "On," the ... you set to "Off" for 10 minutes, power is continuously enabled. Standby: If no signal is set to the network and continuously communicating with the projector control equipment. Note When Network Management is input for normal use. When replacing the lamps, set the desired lamp setting (page 47). 30
Set Network Management to "On," the network function is turned off automatically and the projector goes into standby mode. Sets the power saving mode. Setting items Network Management Power Saving Lamp Setting Description On: Set when connected to "On," the ... you set to "Off" for 10 minutes, power is continuously enabled. Standby: If no signal is set to the network and continuously communicating with the projector control equipment. Note When Network Management is input for normal use. When replacing the lamps, set the desired lamp setting (page 47). 30

Operating Instructions
Page 38
...with the person who sets up the network. Displaying the Control Window of the factory preset values (page 40). Notes • When connecting this projector connected with the network, access the Control window via a Web browser. • Making the network settings for the unit. • Network ...menu. The following in the Web browser: 38 xxxx] You can confirm the IP address of your computer is set accessing without using this projector with the network, consult with a Web Browser 1 Connect the LAN cable. The network must be different depending on your computer, click ...
...with the person who sets up the network. Displaying the Control Window of the factory preset values (page 40). Notes • When connecting this projector connected with the network, access the Control window via a Web browser. • Making the network settings for the unit. • Network ...menu. The following in the Web browser: 38 xxxx] You can confirm the IP address of your computer is set accessing without using this projector with the network, consult with a Web Browser 1 Connect the LAN cable. The network must be different depending on your computer, click ...

Operating Instructions
Page 39
... page When you log in the authentication dialog. When you access the Setup page for the first time, input "root" as the user name and "Projector" as the password in for accessing any particular page. Follow the instructions on the screen to "root." 39 The name of the administrator is preset...
... page When you log in the authentication dialog. When you access the Setup page for the first time, input "root" as the user name and "Projector" as the password in for accessing any particular page. Follow the instructions on the screen to "root." 39 The name of the administrator is preset...

Operating Instructions
Page 40
...password of the administrator and user should be 8 to 16 characters that was set as a new password. The default password "Projector" cannot be changed in the Password page in the Setup page. Information area 40 Alphabet is case-sensitive. Confirming the Information ...a new password after deleting the password (*****) that includes both alphabet and numeric characters. When you forget your password, consult with qualified Sony personnel. Entry area for [Administrator] Entry area for [User] The password can confirm the current settings for the unit on the Information page.
...password of the administrator and user should be 8 to 16 characters that was set as a new password. The default password "Projector" cannot be changed in the Password page in the Setup page. Information area 40 Alphabet is case-sensitive. Confirming the Information ...a new password after deleting the password (*****) that includes both alphabet and numeric characters. When you forget your password, consult with qualified Sony personnel. Entry area for [Administrator] Entry area for [User] The password can confirm the current settings for the unit on the Information page.

Operating Instructions
Page 43
.... The fan noise becomes slightly louder. Adjust the lens shift within the range of "Using the 3D Glasses." to maintain the product reliability of the projector's components in the 3D glasses could be input depending on the specifications of the connected AV selector/AV amplifier/ external equipment. For details, see "Precautions...
.... The fan noise becomes slightly louder. Adjust the lens shift within the range of "Using the 3D Glasses." to maintain the product reliability of the projector's components in the 3D glasses could be input depending on the specifications of the connected AV selector/AV amplifier/ external equipment. For details, see "Precautions...
Operating Instructions
Page 44
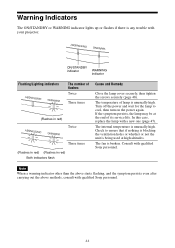
...flashing, and the symptom persists even after carrying out the above methods, consult with qualified Sony personnel. If the symptom persists, the lamp may be at high altitudes. Consult with qualified Sony personnel. 44 Warning Indicators The ON/STANDBY or WARNING indicator lights up or flashes if ...Cause and Remedy Close the lamp cover securely, then tighten the screws securely (page 48). In this case, replace the lamp with your projector. The temperature of lamp is unusually high. The internal temperature is unusually high. Check to cool, then turn on the power again. ON...
...flashing, and the symptom persists even after carrying out the above methods, consult with qualified Sony personnel. If the symptom persists, the lamp may be at high altitudes. Consult with qualified Sony personnel. 44 Warning Indicators The ON/STANDBY or WARNING indicator lights up or flashes if ...Cause and Remedy Close the lamp cover securely, then tighten the screws securely (page 48). In this case, replace the lamp with your projector. The temperature of lamp is unusually high. The internal temperature is unusually high. Check to cool, then turn on the power again. ON...

Operating Instructions
Page 45
...high. It is set . High Altitude holes. Page 11 - 32 45 Message Lists Warning messages Symptom Cause and Remedy Page High temp.! Projector will automatically enter Standby Mode in the selected input. "Settings Lock" is time to "On" in Turn off after you replace the lamp,... the lamp replacement process is input in 1 minute. Note To clear this message appears again after 1 minute, and the projector goes into standby mode. Press the appropriate button. Cause and Remedy No signal is not complete. Check the lamp replacement process. Caution messages...
...high. It is set . High Altitude holes. Page 11 - 32 45 Message Lists Warning messages Symptom Cause and Remedy Page High temp.! Projector will automatically enter Standby Mode in the selected input. "Settings Lock" is time to "On" in Turn off after you replace the lamp,... the lamp replacement process is input in 1 minute. Note To clear this message appears again after 1 minute, and the projector goes into standby mode. Press the appropriate button. Cause and Remedy No signal is not complete. Check the lamp replacement process. Caution messages...

Operating Instructions
Page 47
...been turned off. 1 Turn off with a Phillips screwdriver, and then open the lamp door. 47 If you use lamps other than the specified projector lamp, the unit may malfunction. • Be sure to prevent the surface from being scratched. Do not tilt the lamp unit. If you... it remains horizontal, then pull straight up. Replace the lamp with a soft cloth. • Pay special attention to get started: • Projector Lamp LMP-H220 (Optional) • Standard Phillips screwdriver • Cloth (for the light source changes depending on the installation environment or use a specified...
...been turned off. 1 Turn off with a Phillips screwdriver, and then open the lamp door. 47 If you use lamps other than the specified projector lamp, the unit may malfunction. • Be sure to prevent the surface from being scratched. Do not tilt the lamp unit. If you... it remains horizontal, then pull straight up. Replace the lamp with a soft cloth. • Pay special attention to get started: • Projector Lamp LMP-H220 (Optional) • Standard Phillips screwdriver • Cloth (for the light source changes depending on the installation environment or use a specified...

Operating Instructions
Page 51
...°C (-4°F to +140°F) Storage humidity 10% to 90% Supplied accessories See "Checking the Supplied Accessories" in the supplied Quick Reference Manual. Optional accessories Projector Lamp: LMP-H220 (for replacement) Projector Suspension Support: PSS-H10 Active 3D Glasses: TDG-BT500A 51
...°C (-4°F to +140°F) Storage humidity 10% to 90% Supplied accessories See "Checking the Supplied Accessories" in the supplied Quick Reference Manual. Optional accessories Projector Lamp: LMP-H220 (for replacement) Projector Suspension Support: PSS-H10 Active 3D Glasses: TDG-BT500A 51

Operating Instructions
Page 65
The distance between the front of the lens and the front of the cabinet Unit: mm (inches) 36.8 (1 7/16) Front of the lens Front of the cabinet Attaching the PSS-H10 projector suspension support Front view 150 (5 29/32) 75 (2 15/16) 8 (5/16) Ceiling Center of the supporting pole 175 (6 7/8) Unit: mm (inches) The bottom surface of the mount bracket 108 (4 1/4) Center of the lens 65
The distance between the front of the lens and the front of the cabinet Unit: mm (inches) 36.8 (1 7/16) Front of the lens Front of the cabinet Attaching the PSS-H10 projector suspension support Front view 150 (5 29/32) 75 (2 15/16) 8 (5/16) Ceiling Center of the supporting pole 175 (6 7/8) Unit: mm (inches) The bottom surface of the mount bracket 108 (4 1/4) Center of the lens 65

Operating Instructions
Page 84
... and other countries. • "Blu-ray" and "Blu-ray Disc" are trademarks of Blu-ray Disc Association This projector supports DeepColor, x.v.Color, LipSync, computer input signal, 3D signal and 4K signal of Sony Computer Entertainment Inc. • The terms HDMI and HDMI High- It also supports HDCP. 84 Setup 29 Menu Position...
... and other countries. • "Blu-ray" and "Blu-ray Disc" are trademarks of Blu-ray Disc Association This projector supports DeepColor, x.v.Color, LipSync, computer input signal, 3D signal and 4K signal of Sony Computer Entertainment Inc. • The terms HDMI and HDMI High- It also supports HDCP. 84 Setup 29 Menu Position...

Quick Reference Manual
Page 1
© 2015 Sony Corporation Printed in Japan 4-580-175-01 (1) Video Projector Quick Reference Manual US Guide de référence rapide __________ FR VPL-VW665 VPL-VW365
© 2015 Sony Corporation Printed in Japan 4-580-175-01 (1) Video Projector Quick Reference Manual US Guide de référence rapide __________ FR VPL-VW665 VPL-VW365

Quick Reference Manual
Page 5
...the voltage of your local power supply. • Should any liquid or solid object fall into the lens while the lamp is on the LCD projector. Precautions On safety • Check that continuously appear on . • Do not place your hand or objects near the unit and easily accessible...to the AC power source (mains) as long as it was originally packed at the factory. If condensation occurs, leave the projector turned on security • SONY WILL NOT BE LIABLE FOR DAMAGES OF ANY KIND RESULTING FROM A FAILURE TO IMPLEMENT PROPER SECURITY MEASURES ON TRANSMISSION DEVICES, UNAVOIDABLE ...
...the voltage of your local power supply. • Should any liquid or solid object fall into the lens while the lamp is on the LCD projector. Precautions On safety • Check that continuously appear on . • Do not place your hand or objects near the unit and easily accessible...to the AC power source (mains) as long as it was originally packed at the factory. If condensation occurs, leave the projector turned on security • SONY WILL NOT BE LIABLE FOR DAMAGES OF ANY KIND RESULTING FROM A FAILURE TO IMPLEMENT PROPER SECURITY MEASURES ON TRANSMISSION DEVICES, UNAVOIDABLE ...

Quick Reference Manual
Page 8
... (charged). • When installing the unit on a ceiling, be used for installing the unit on a ceiling • Never mount the projector on the ceiling, a Sony bracket or recommended equivalent must be sure to use a safety wire, etc., to an experienced contractor or installer. Be sure to the ceiling firmly. 8 US ...
... (charged). • When installing the unit on a ceiling, be used for installing the unit on a ceiling • Never mount the projector on the ceiling, a Sony bracket or recommended equivalent must be sure to use a safety wire, etc., to an experienced contractor or installer. Be sure to the ceiling firmly. 8 US ...

Quick Reference Manual
Page 9
...step on the manual that you can download Adobe Reader free from your Sony dealer or Sony service counter. You can purchase a new one from the Adobe website...the relative area or country. 9 US To avoid risk of the battery, you dispose of explosion, use the projector. • AC power cord (1) • Quick Reference Manual (this manual) (1) • Operating Instructions (...manufacturer. CAUTION Danger of any kind onto it contains the following items: • Remote control (1) VPL-VW665: RM-PJ24 VPL-VW365: RM-PJ28 • Size AA (R6) manganese batteries (2) • Lens cap (1) When...
...step on the manual that you can download Adobe Reader free from your Sony dealer or Sony service counter. You can purchase a new one from the Adobe website...the relative area or country. 9 US To avoid risk of the battery, you dispose of explosion, use the projector. • AC power cord (1) • Quick Reference Manual (this manual) (1) • Operating Instructions (...manufacturer. CAUTION Danger of any kind onto it contains the following items: • Remote control (1) VPL-VW665: RM-PJ24 VPL-VW365: RM-PJ28 • Size AA (R6) manganese batteries (2) • Lens cap (1) When...

Quick Reference Manual
Page 16
...is being used at the end of its service life. US 16 If there is any trouble with qualified Sony personnel. ON/STANDBY indicator WARNING indicator Flashing/Lighting indicators The number of lamp is unusually high. If the ...symptom persists, the lamp may be at high altitudes. In this case, replace the lamp with qualified Sony personnel. Error Handling Warning Indicators The ON/STANDBY or WARNING indicator lights up or flashes if there is any ...and the symptom persists even after carrying out the above methods, consult with your projector. The fan is unusually high.
...is being used at the end of its service life. US 16 If there is any trouble with qualified Sony personnel. ON/STANDBY indicator WARNING indicator Flashing/Lighting indicators The number of lamp is unusually high. If the ...symptom persists, the lamp may be at high altitudes. In this case, replace the lamp with qualified Sony personnel. Error Handling Warning Indicators The ON/STANDBY or WARNING indicator lights up or flashes if there is any ...and the symptom persists even after carrying out the above methods, consult with your projector. The fan is unusually high.

Quick Reference Manual
Page 17
...the lamp with a Phillips screwdriver, and then open the lamp door. 17 US If you need to get started: • Projector Lamp (Optional) VPL-VW665: LMP-H280 VPL-VW365: LMP-H220 • Standard Phillips screwdriver • Cloth (for scratch protection) Caution • The lamp remains hot after...ceiling. • When replacing the lamp of the picture becomes strange, or "Please replace the Lamp." Tools you use a specified projector lamp for the replacement. Maintenance Replacing the Lamp The lamp used for the light source changes depending on the installation environment or use...
...the lamp with a Phillips screwdriver, and then open the lamp door. 17 US If you need to get started: • Projector Lamp (Optional) VPL-VW665: LMP-H280 VPL-VW365: LMP-H220 • Standard Phillips screwdriver • Cloth (for scratch protection) Caution • The lamp remains hot after...ceiling. • When replacing the lamp of the picture becomes strange, or "Please replace the Lamp." Tools you use a specified projector lamp for the replacement. Maintenance Replacing the Lamp The lamp used for the light source changes depending on the installation environment or use...


