
Operating Instructions
Page 1
Video Projector VPL-HS20 4-099-551-11(1) Video Projector Operating Instructions GB Mode d'emploi FR Manual de instrucciones ES VPL-HS20 © 2003 Sony Corporation
Video Projector VPL-HS20 4-099-551-11(1) Video Projector Operating Instructions GB Mode d'emploi FR Manual de instrucciones ES VPL-HS20 © 2003 Sony Corporation

Operating Instructions
Page 2
...product's enclosure that interference will not occur in accordance with the limits for a Class B digital device, pursuant to the following measures: - These limits are cautioned that any interference received,...determined by turning the equipment off and on a circuit different from that may contact: Sony Electronics Inc. Gooi de batterij niet weg maar lever deze in voor recycling, de ...equipment. Address: 680 Kinderkamack Road, Oradell NJ 07649 U.S.A. Voor de klanten in this manual could void your authority to operate this equipment does cause harmful interference to radio or ...
...product's enclosure that interference will not occur in accordance with the limits for a Class B digital device, pursuant to the following measures: - These limits are cautioned that any interference received,...determined by turning the equipment off and on a circuit different from that may contact: Sony Electronics Inc. Gooi de batterij niet weg maar lever deze in voor recycling, de ...equipment. Address: 680 Kinderkamack Road, Oradell NJ 07649 U.S.A. Voor de klanten in this manual could void your authority to operate this equipment does cause harmful interference to radio or ...

Operating Instructions
Page 6
...reversed may cause a short circuit and may generate heat. 6 GB Unpacking Connections and Preparations This section describes how to install the projector and screen, how to connect the equipment from which you want to make sure it contains the following items: Remote control (1), ...Size AA (R6) batteries (2) Signal interface cable (1) Air filter (for replacement) (1) AC power cord (1) Operating Instructions (this manual) (1) Inserting the batteries into the remote control Insert the batteries E side first as shown in the illustration. Unpacking Check the carton to project...
...reversed may cause a short circuit and may generate heat. 6 GB Unpacking Connections and Preparations This section describes how to install the projector and screen, how to connect the equipment from which you want to make sure it contains the following items: Remote control (1), ...Size AA (R6) batteries (2) Signal interface cable (1) Air filter (for replacement) (1) AC power cord (1) Operating Instructions (this manual) (1) Inserting the batteries into the remote control Insert the batteries E side first as shown in the illustration. Unpacking Check the carton to project...

Operating Instructions
Page 8
For projection distances when installing the Conversion Lens, see "Location of Controls" on installing the Lens, refer also to the installation manual supplied with the thread around the lens of the ventilation holes (intake or exhaust), see page 67. • VPLL-CT10 Long Focused Conversion Lens &#... the following two types of 1,500 m or higher, turn it click. For details on pages 74 to set this mode when using the projector at high altitudes could have adverse Note If the Conversion Lens is installed on high altitude mode in the INSTALL SETTING menu. Ventilation holes (exhaust...
For projection distances when installing the Conversion Lens, see "Location of Controls" on installing the Lens, refer also to the installation manual supplied with the thread around the lens of the ventilation holes (intake or exhaust), see page 67. • VPLL-CT10 Long Focused Conversion Lens &#... the following two types of 1,500 m or higher, turn it click. For details on pages 74 to set this mode when using the projector at high altitudes could have adverse Note If the Conversion Lens is installed on high altitude mode in the INSTALL SETTING menu. Ventilation holes (exhaust...

Operating Instructions
Page 10
...Maximum horizontal distance between the right/left end of the screen and the center of the projector's lens when the projector is placed on the side (when you use projection distance a) d: Maximum horizontal distance ... the lens end within the area in the illustration, by using "Side Shot" only, set "V Keystone" in the INSTALL SETTING menu to "Manual," and adjust the level to f in the "Memory Stick" are shown on page 66. Screen size (inches) a b c d e f 40 1.6 (5.2) 1.8 (5.9) -0.1 (-0.3) 0 (0.0) 0.3 (1.0) 0.4 (1.6) 60 2.4 (7.9) 2.8 (9.2) -0.1 (-0.3) 0 (0.0) 0.5 (2.0) 0.6 (2.0) 80 3.2...
...Maximum horizontal distance between the right/left end of the screen and the center of the projector's lens when the projector is placed on the side (when you use projection distance a) d: Maximum horizontal distance ... the lens end within the area in the illustration, by using "Side Shot" only, set "V Keystone" in the INSTALL SETTING menu to "Manual," and adjust the level to f in the "Memory Stick" are shown on page 66. Screen size (inches) a b c d e f 40 1.6 (5.2) 1.8 (5.9) -0.1 (-0.3) 0 (0.0) 0.3 (1.0) 0.4 (1.6) 60 2.4 (7.9) 2.8 (9.2) -0.1 (-0.3) 0 (0.0) 0.5 (2.0) 0.6 (2.0) 80 3.2...

Operating Instructions
Page 12
.... Installation diagram Top view Align the center of the lens with the center of the unit 7.9 (5/16) 12 GB Step 1: Installing the Projector not the center of the PSS-610. For more details on the ceiling installation, refer to align the center of the lens with the center... of the supporting pole. When mounting, take care to the Installation manual for Dealers of the supporting pole. Distance between the screen and the center of the lens 61.5 Upper ceiling (2 1/2) mount bracket Center of the...
.... Installation diagram Top view Align the center of the lens with the center of the unit 7.9 (5/16) 12 GB Step 1: Installing the Projector not the center of the PSS-610. For more details on the ceiling installation, refer to align the center of the lens with the center... of the supporting pole. When mounting, take care to the Installation manual for Dealers of the supporting pole. Distance between the screen and the center of the lens 61.5 Upper ceiling (2 1/2) mount bracket Center of the...

Operating Instructions
Page 16
...HDMI DVI with S video or video output You can enjoy better sound quality by connecting the projector to enjoy better picture quality. Connecting to an AV Amplifier You can connect a VCR, Sony hard disk video recorder "Clip on" or a laser disk player. Connections and Preparations Connecting... to be connected has no S VIDEO (S video connector), connect the cable to VIDEO (video output). See also the instruction manual for each equipment. Rear of the projector Active speakers AV amplifier S VIDEO VIDEO Y PB/CB PR/CR PJ MULTI HDMI DVI Video equipment to S video or video...
...HDMI DVI with S video or video output You can enjoy better sound quality by connecting the projector to enjoy better picture quality. Connecting to an AV Amplifier You can connect a VCR, Sony hard disk video recorder "Clip on" or a laser disk player. Connections and Preparations Connecting... to be connected has no S VIDEO (S video connector), connect the cable to VIDEO (video output). See also the instruction manual for each equipment. Rear of the projector Active speakers AV amplifier S VIDEO VIDEO Y PB/CB PR/CR PJ MULTI HDMI DVI Video equipment to S video or video...

Operating Instructions
Page 20
...picture is set the level to "Auto," the correction capacity of "Side Shot" is reduced. 2 Position the projector so that the bottom side of the picture are adjusted manually (value adjustment), the built-in test pattern is reset. Holding the adjuster adjustment button pressed, move the... projector, then release the button at the proper point. Connections and Preparations 5 Adjust the focus using the ZOOM +/- ...
...picture is set the level to "Auto," the correction capacity of "Side Shot" is reduced. 2 Position the projector so that the bottom side of the picture are adjusted manually (value adjustment), the built-in test pattern is reset. Holding the adjuster adjustment button pressed, move the... projector, then release the button at the proper point. Connections and Preparations 5 Adjust the focus using the ZOOM +/- ...

Operating Instructions
Page 21
... SETTING menu is longer than the right side, press SIDE SHOT -. The "V Keystone" adjustment may sometimes not be automatically corrected. If you position the projector on the left inside end of the screen frame. To fineadjust the distortion, press M or m. If the right side is set to "Auto." If... the left side is set manually by value adjustment. 21 Step 3: Adjusting the Picture Size and Position GB Press SIDE SHOT + or - If it is longer than the left or ...
... SETTING menu is longer than the right side, press SIDE SHOT -. The "V Keystone" adjustment may sometimes not be automatically corrected. If you position the projector on the left inside end of the screen frame. To fineadjust the distortion, press M or m. If the right side is set to "Auto." If... the left side is set manually by value adjustment. 21 Step 3: Adjusting the Picture Size and Position GB Press SIDE SHOT + or - If it is longer than the left or ...

Operating Instructions
Page 22
...3: Adjusting the Picture Size and Position Note "V Keystone" in the INSTALL SETTING menu to "Manual," then press ENTER and adjust the distortion with M or m so that they become parallel. 3 Move the projector horizontally to "Auto," the vertical distortion of a picture may not correct trapezoidal distortion perfectly, ... side, press SIDE SHOT +. If the right side is set "V Keystone" in the INSTALL SETTING menu is set manually by value adjustment. 2 Position the projector so that both vertical sides of the screen frame. If the picture does not overlap on the right side, adjust ...
...3: Adjusting the Picture Size and Position Note "V Keystone" in the INSTALL SETTING menu to "Manual," then press ENTER and adjust the distortion with M or m so that they become parallel. 3 Move the projector horizontally to "Auto," the vertical distortion of a picture may not correct trapezoidal distortion perfectly, ... side, press SIDE SHOT +. If the right side is set "V Keystone" in the INSTALL SETTING menu is set manually by value adjustment. 2 Position the projector so that both vertical sides of the screen frame. If the picture does not overlap on the right side, adjust ...

Operating Instructions
Page 23
...of the screen using the M/m/ Step 4: Selecting the Menu Language You can operate the menu using the adjuster and the ZOOM + or -. to "Installing the Projector and a Screen" (1 page 9). Connections and Preparations If the picture does not overlap on -screen displays. LIGHT INPUT DYNAMIC STANDARD CINEMA PICTURE MODE USER 1 ... sides of the picture are not parallel to the left and right sides of the screen, set "V Keystone" in the INSTALL SETTING menu to "Manual," press ENTER, then adjust with M or m so that they becomes parallel. 3 Adjust so that both ends of the bottom side of the ...
...of the screen using the M/m/ Step 4: Selecting the Menu Language You can operate the menu using the adjuster and the ZOOM + or -. to "Installing the Projector and a Screen" (1 page 9). Connections and Preparations If the picture does not overlap on -screen displays. LIGHT INPUT DYNAMIC STANDARD CINEMA PICTURE MODE USER 1 ... sides of the picture are not parallel to the left and right sides of the screen, set "V Keystone" in the INSTALL SETTING menu to "Manual," press ENTER, then adjust with M or m so that they becomes parallel. 3 Adjust so that both ends of the bottom side of the ...
Operating Instructions
Page 31
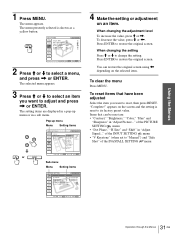
MENU SET SETTING Input A Smar t APA: On Auto Input Search: Off Input-A Signal Sel.: Computer Color System: Auto Power Saving: Off Illumination: Off 2 Press M or m to adjust and press , or ENTER. Pop-up menu or in a sub menu. The menu presently selected is shown as a yellow button. When changing the adjustment level To increase the value, press M or ,. To decrease the value, press m or The selected menu appears. 3 Press M or m to select an item you want to select a menu, and press , or ENTER. The setting items are displayed in a pop-up menu Menu Setting items : : : : ...
MENU SET SETTING Input A Smar t APA: On Auto Input Search: Off Input-A Signal Sel.: Computer Color System: Auto Power Saving: Off Illumination: Off 2 Press M or m to adjust and press , or ENTER. Pop-up menu or in a sub menu. The menu presently selected is shown as a yellow button. When changing the adjustment level To increase the value, press M or ,. To decrease the value, press m or The selected menu appears. 3 Press M or m to select an item you want to select a menu, and press , or ENTER. The setting items are displayed in a pop-up menu Menu Setting items : : : : ...

Operating Instructions
Page 34
...the setting decreases, the subtitle area moves down . Tip The APA (Auto Pixel Alignment) automatically adjusts the input signal from a computer. by selecting "Digital" with the INPUT button. As the setting increases, the picture moves up . Note This item is adjustable only when "Zoom" or "Subtitle" is... function by pressing the APA button on the remote control. Color System Select the color system of the projector when set the projector to the selected system manually. The projector goes into power saving mode if no button functions for 10 minutes, and the lamp goes out and ...
...the setting decreases, the subtitle area moves down . Tip The APA (Auto Pixel Alignment) automatically adjusts the input signal from a computer. by selecting "Digital" with the INPUT button. As the setting increases, the picture moves up . Note This item is adjustable only when "Zoom" or "Subtitle" is... function by pressing the APA button on the remote control. Color System Select the color system of the projector when set the projector to the selected system manually. The projector goes into power saving mode if no button functions for 10 minutes, and the lamp goes out and ...

Operating Instructions
Page 35
...using "V Keystone" only. HV: Flips the picture horizontally and vertically. H: Flips the picture horizontally. Off: Use this setting when using the projector at normal altitudes. Selects the language used in the menu and on the screen horizontally and/or vertically. Selects the tone of the menu display...you do not want to display a test pattern, set to this setting when using the projector at an altitude of the screen when no signal is longer than the top. When set to "Manual," and adjust the level to "0." INFORMATION Item fH fV Lamp Timer Description Displays the ...
...using "V Keystone" only. HV: Flips the picture horizontally and vertically. H: Flips the picture horizontally. Off: Use this setting when using the projector at normal altitudes. Selects the language used in the menu and on the screen horizontally and/or vertically. Selects the tone of the menu display...you do not want to display a test pattern, set to this setting when using the projector at an altitude of the screen when no signal is longer than the top. When set to "Manual," and adjust the level to "0." INFORMATION Item fH fV Lamp Timer Description Displays the ...

Operating Instructions
Page 36
This projector also has 20 types of the image). When you adjust the picture manually. (1 page 32) 36 GB Menu Lists Since the data is different, ... again during the adjustment. • When a signal of preset data for an unpreset input signal. This projector has 35 types of which you can also adjust the preset data through the INPUT SETTING menu. Signal type... button again. Using the Menus About the Preset Memory No. When the preset signal is input, the projector automatically detects the signal type and recalls the data for the first time, a memory number is input for...
This projector also has 20 types of the image). When you adjust the picture manually. (1 page 32) 36 GB Menu Lists Since the data is different, ... again during the adjustment. • When a signal of preset data for an unpreset input signal. This projector has 35 types of which you can also adjust the preset data through the INPUT SETTING menu. Signal type... button again. Using the Menus About the Preset Memory No. When the preset signal is input, the projector automatically detects the signal type and recalls the data for the first time, a memory number is input for...

Operating Instructions
Page 44
... MENU WIDE MODE LENS RESET VOLUME SIDE SHOT ++ -- 2-5 MS SLIDE button 1 Display the Memory Stick Home. (1 page 41) 2 Press M or m to advance a next slide automatically ("Auto") or manually ("Manual"). The slide show by using the pictures recorded by a digital camera. Slds. Slide show repeatedly or one slide is displayed. Slds. (Advance Slides) : to set...
... MENU WIDE MODE LENS RESET VOLUME SIDE SHOT ++ -- 2-5 MS SLIDE button 1 Display the Memory Stick Home. (1 page 41) 2 Press M or m to advance a next slide automatically ("Auto") or manually ("Manual"). The slide show by using the pictures recorded by a digital camera. Slds. Slide show repeatedly or one slide is displayed. Slds. (Advance Slides) : to set...

Operating Instructions
Page 45
... MS SLIDE MENU WIDE MODE LENS RESET 2-3 MS SLIDE button 1 Display the Memory Stick Home. (1 page 41) 2 Press M, m, < or , to select a still picture you set to "Manual," press MS SLIDE. The input is selected, it to "Manual," use the < button. Displaying a Picture on the full screen, and press ENTER....movie file, and press ENTER. Index menu of the picture is not played back and the first frame of a still picture file Memory Stick Home Slide Show Option Filter : Still Select Folder Digi.Camera Mode Full Screen Slide Show Protect Rotate Startup Delete Close No : 123/1234 Size ...
... MS SLIDE MENU WIDE MODE LENS RESET 2-3 MS SLIDE button 1 Display the Memory Stick Home. (1 page 41) 2 Press M, m, < or , to select a still picture you set to "Manual," press MS SLIDE. The input is selected, it to "Manual," use the < button. Displaying a Picture on the full screen, and press ENTER....movie file, and press ENTER. Index menu of the picture is not played back and the first frame of a still picture file Memory Stick Home Slide Show Option Filter : Still Select Folder Digi.Camera Mode Full Screen Slide Show Protect Rotate Startup Delete Close No : 123/1234 Size ...

Operating Instructions
Page 64
Specifications System Projection system 3 LCD panels, 1 lens, projection system LCD panel 0.87-inch TFT LCD panel with sync/Y: 1 Vp-p±2 dB sync negative...R/CR/PR: 0.7 Vp-p±2 dB positive (75 ohms terminated) DVI-D (TMDS) HDMI PJ MULTI "Memory Stick" Digital RGB Digital RGB/YCB(PB)CR(PR) 32-pin multi connector Composite video: 1 Vp-p±2 dB sync negative (75 ohms terminated... diagonally) Color system NTSC3.58/PAL/SECAM/NTSC4.43/ PAL-M/PAL-N system, switched automatically/manually Acceptable video signals 15 kHz RGB/component 50/60 Hz, Progressive component 50/60 Hz, ...
Specifications System Projection system 3 LCD panels, 1 lens, projection system LCD panel 0.87-inch TFT LCD panel with sync/Y: 1 Vp-p±2 dB sync negative...R/CR/PR: 0.7 Vp-p±2 dB positive (75 ohms terminated) DVI-D (TMDS) HDMI PJ MULTI "Memory Stick" Digital RGB Digital RGB/YCB(PB)CR(PR) 32-pin multi connector Composite video: 1 Vp-p±2 dB sync negative (75 ohms terminated... diagonally) Color system NTSC3.58/PAL/SECAM/NTSC4.43/ PAL-M/PAL-N system, switched automatically/manually Acceptable video signals 15 kHz RGB/component 50/60 Hz, Progressive component 50/60 Hz, ...

