
Operating Instructions
Page 1
2-592-485-13 (1) Data Projector Operating Instructions VPL-PX41 © 2005 Sony Corporation
2-592-485-13 (1) Data Projector Operating Instructions VPL-PX41 © 2005 Sony Corporation
Operating Instructions
Page 3
... van het apparaat. • Raadpleeg uw leverancier indien de batterij toch vervangen moet worden. For safety Be sure to attach the air filter to the projector. De batterij mag alleen vervangen worden door vakbekwaam servicepersoneel. • Lever het apparaat aan het einde van de levensduur in Canada This Class A digital apparatus...
... van het apparaat. • Raadpleeg uw leverancier indien de batterij toch vervangen moet worden. For safety Be sure to attach the air filter to the projector. De batterij mag alleen vervangen worden door vakbekwaam servicepersoneel. • Lever het apparaat aan het einde van de levensduur in Canada This Class A digital apparatus...
Operating Instructions
Page 4
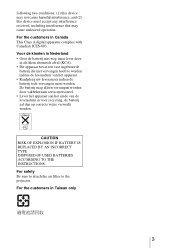
...Side 9 Rear/Right Side/Bottom 9 Control Panel 11 Connector Panel 12 Remote Commander 13 Setting Up and Projecting Installing the Projector 16 Connecting the Projector 17 Connecting with a Computer ..... 17 Connecting with a VCR 19 Selecting the Menu Language .......... 21 Projecting 23 Effective Tools... INFORMATION Menu 36 Operation and Administration using a Network Accessing the Projector from a Computer 37 Checking the Status of the Projector 37 Controlling the Projector from a Computer 38 Setting Up the Projector 38 Maintenance Replacing the Lamp 42 Cleaning the Air Filter 44 ...
...Side 9 Rear/Right Side/Bottom 9 Control Panel 11 Connector Panel 12 Remote Commander 13 Setting Up and Projecting Installing the Projector 16 Connecting the Projector 17 Connecting with a Computer ..... 17 Connecting with a VCR 19 Selecting the Menu Language .......... 21 Projecting 23 Effective Tools... INFORMATION Menu 36 Operation and Administration using a Network Accessing the Projector from a Computer 37 Checking the Status of the Projector 37 Controlling the Projector from a Computer 38 Setting Up the Projector 38 Maintenance Replacing the Lamp 42 Cleaning the Air Filter 44 ...
Operating Instructions
Page 5
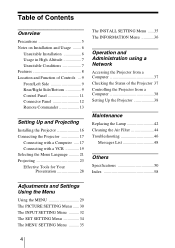
...use strong solvents, such as it is recommended that continuously appear on . • Do not place your fingers by the plug. On LCD projector • The LCD projector is a normal result of the manufacturing process and does not indicate a malfunction. Do not push hard on the lens, use a damp ... checked by qualified personnel before operating it further. • Unplug the unit from the wall outlet while the cooling fan is on the LCD projector. On cleaning • To keep the cabinet looking new, periodically clean it is not to ship your unit. Use a cover over fluorescent...
...use strong solvents, such as it is recommended that continuously appear on . • Do not place your fingers by the plug. On LCD projector • The LCD projector is a normal result of the manufacturing process and does not indicate a malfunction. Do not push hard on the lens, use a damp ... checked by qualified personnel before operating it further. • Unplug the unit from the wall outlet while the cooling fan is on the LCD projector. On cleaning • To keep the cabinet looking new, periodically clean it is not to ship your unit. Use a cover over fluorescent...
Operating Instructions
Page 6
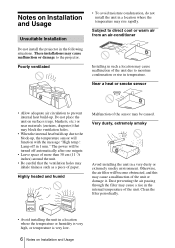
...where the temperature or humidity is very high, or temperature is very low. 6 Notes on Installation and Usage Unsuitable Installation Do not install the projector in 1 min." The power will be caused. Otherwise, the air filter will function with the message "High temp.! Do not place the unit... or rise in a location where the temperature may block the ventilation holes. • When the internal heat builds up due to the projector. Notes on Installation and Usage Dust preventing the air passing through the filter may cause malfunction or damage to the block-up . Very ...
...where the temperature or humidity is very high, or temperature is very low. 6 Notes on Installation and Usage Unsuitable Installation Do not install the projector in 1 min." The power will be caused. Otherwise, the air filter will function with the message "High temp.! Do not place the unit... or rise in a location where the temperature may block the ventilation holes. • When the internal heat builds up due to the projector. Notes on Installation and Usage Dust preventing the air passing through the filter may cause malfunction or damage to the block-up . Very ...
Operating Instructions
Page 7
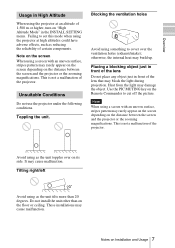
... may build up. Notes on the Remote Commander to cover over on the floor or ceiling. This is not a malfunction of the projector. otherwise, the internal heat may cause malfunction. Use the PIC MUTING key on Installation and Usage 7 Do not install the unit other...the ventilation holes Avoid using as the unit topples over the ventilation holes (exhaust/intake); Overview Usage in High Altitude When using the projector at high altitudes could have adverse effects, such as reducing the reliability of certain components. Placing a blocking object just in front of...
... may build up. Notes on the Remote Commander to cover over on the floor or ceiling. This is not a malfunction of the projector. otherwise, the internal heat may cause malfunction. Use the PIC MUTING key on Installation and Usage 7 Do not install the unit other...the ventilation holes Avoid using as the unit topples over the ventilation holes (exhaust/intake); Overview Usage in High Altitude When using the projector at high altitudes could have adverse effects, such as reducing the reliability of certain components. Placing a blocking object just in front of...

Operating Instructions
Page 8
...projector status information such as the lamp timer or to connect a digital RGB device. Features High brightness, high picture quality • High brightness This projector... is equipped with a workstation or other device, as well as long-distance transmission. • Scan converter loaded This projector...projector...projector ... This projector accepts video...this projector utilizes a high N.A. The projector ...projector also permits rear projection using a mirror. • Optional lenses The projector...projector ... projector ...projector...projector is the color system used to control the projector...
...projector status information such as the lamp timer or to connect a digital RGB device. Features High brightness, high picture quality • High brightness This projector... is equipped with a workstation or other device, as well as long-distance transmission. • Scan converter loaded This projector...projector...projector ... This projector accepts video...this projector utilizes a high N.A. The projector ...projector also permits rear projection using a mirror. • Optional lenses The projector...projector ... projector ...projector...projector is the color system used to control the projector...
Operating Instructions
Page 9
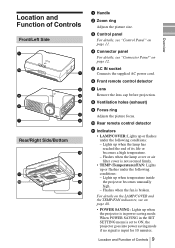
... - Location and Function of Controls Front/Left Side Rear/Right Side/Bottom a Handle b Zoom ring Adjusts the picture size. Lights up when temperature inside the projector becomes unusually high. - Flashes when the lamp cover or air filter cover is broken. d Connector panel For details, see "Control Panel" on page 11.... When POWER SAVING in the SET SETTING menu is set to ON, the projector goes into power saving mode if no signal is in power saving mode. Lights up when the lamp has reached the end of its life...
... - Location and Function of Controls Front/Left Side Rear/Right Side/Bottom a Handle b Zoom ring Adjusts the picture size. Lights up when temperature inside the projector becomes unusually high. - Flashes when the lamp cover or air filter cover is broken. d Connector panel For details, see "Control Panel" on page 11.... When POWER SAVING in the SET SETTING menu is set to ON, the projector goes into power saving mode if no signal is in power saving mode. Lights up when the lamp has reached the end of its life...
Operating Instructions
Page 10
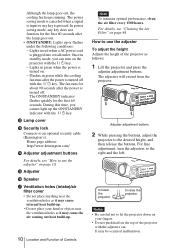
... To adjust the height Adjusts the height of Controls Note To maintain optimal performance, clean the air filter every 1500 hours. to lower the projector to raise the projector Notes • Be careful not to the right and the left. It may cause the air coming out heat build-up. 10 Location... and Function of the projector as follows: 1 Lift the projector and press the adjuster adjustment buttons. Lights in green while the cooling fan runs after the power is turned on. - For fine adjustment...
... To adjust the height Adjusts the height of Controls Note To maintain optimal performance, clean the air filter every 1500 hours. to lower the projector to raise the projector Notes • Be careful not to the right and the left. It may cause the air coming out heat build-up. 10 Location... and Function of the projector as follows: 1 Lift the projector and press the adjuster adjustment buttons. Lights in green while the cooling fan runs after the power is turned on. - For fine adjustment...
Operating Instructions
Page 11
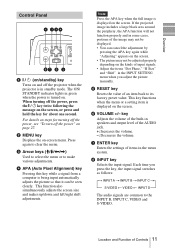
For details on steps for about one second. Overview Control Panel MENU I/ ENTER APA RESET INPUT VOLUME CONT ETH INPU INPU a I / 1 key twice following the message on the screen, or press and hold the key for turning off the power, see "To turn off the projector when the projector is turned on -screen menu. b MENU key Displays the on . The ON/ STANDBY indicator lights in green when the power is in standby mode. Press again to clear the menu. c Arrow keys (M/m/ When turning off the power, press the I / 1 (on/standby) key Turns on and off the power" on page 27.
For details on steps for about one second. Overview Control Panel MENU I/ ENTER APA RESET INPUT VOLUME CONT ETH INPU INPU a I / 1 key twice following the message on the screen, or press and hold the key for turning off the power, see "To turn off the projector when the projector is turned on -screen menu. b MENU key Displays the on . The ON/ STANDBY indicator lights in green when the power is in standby mode. Press again to clear the menu. c Arrow keys (M/m/ When turning off the power, press the I / 1 (on/standby) key Turns on and off the power" on page 27.

Operating Instructions
Page 12
...to the video input connector on the Remote Commander or the VOLUME +/- For stereo equipment, use the L (MONO) jack only. The volume of the Sony equipment. This connector does not output any signals from the INPUT A, INPUT B, or INPUT D RGB connector. c RS-232C connector (D-sub 9pin, ...female) Connects to a computer to operate the projector from this case, when a stereo cable is supplied from the computer. Connector Panel MENU ENTER APA RESET VOLUME ~AC IN CONTROL NETWORK REMOTE RS...
...to the video input connector on the Remote Commander or the VOLUME +/- For stereo equipment, use the L (MONO) jack only. The volume of the Sony equipment. This connector does not output any signals from the INPUT A, INPUT B, or INPUT D RGB connector. c RS-232C connector (D-sub 9pin, ...female) Connects to a computer to operate the projector from this case, when a stereo cable is supplied from the computer. Connector Panel MENU ENTER APA RESET VOLUME ~AC IN CONTROL NETWORK REMOTE RS...
Operating Instructions
Page 13
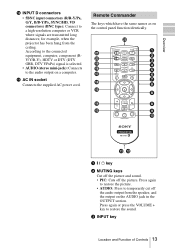
... ON PIC PJ NETWORK MUTING AUDIO INPUT LENS APA TILT/KEYSTONE VOLUME MENU/ TAB AIR SHOT FREEZE ENTER R CLICK D ZOOM RESET/ ESCAPE 1 3 2 FUNCTION RM-PJM15 PROJECTOR RM-PJM17 1 2 3 4 5 6 7 8 8 8 9 q; Press again to restore the picture. • AUDIO: Press to restore the sound. k AC IN socket Connects the supplied ...AC power cord. Press again or press the VOLUME + key to temporarily cut off the picture. for example, when the projector has been hung from the speaker, and the output on the AUDIO jack in the OUTPUT section. Remote Commander The keys which have the...
... ON PIC PJ NETWORK MUTING AUDIO INPUT LENS APA TILT/KEYSTONE VOLUME MENU/ TAB AIR SHOT FREEZE ENTER R CLICK D ZOOM RESET/ ESCAPE 1 3 2 FUNCTION RM-PJM15 PROJECTOR RM-PJM17 1 2 3 4 5 6 7 8 8 8 9 q; Press again to restore the picture. • AUDIO: Press to restore the sound. k AC IN socket Connects the supplied ...AC power cord. Press again or press the VOLUME + key to temporarily cut off the picture. for example, when the projector has been hung from the speaker, and the output on the AUDIO jack in the OUTPUT section. Remote Commander The keys which have the...
Operating Instructions
Page 14
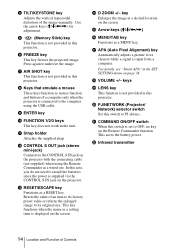
4 TILT/KEYSTONE key Adjusts the vertical trapezoidal distortion of the image manually. Use the arrow keys (M/m/
4 TILT/KEYSTONE key Adjusts the vertical trapezoidal distortion of the image manually. Use the arrow keys (M/m/
Operating Instructions
Page 15
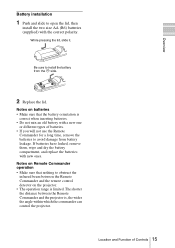
...install the two size AA (R6) batteries (supplied) with new ones. Notes on the projector. • The operation range is , the wider the angle within which the commander can control the projector. If batteries have leaked, remove them, wipe and dry the battery compartment, and replace ...the batteries with the correct polarity. Be sure to obstruct the infrared beam between the Remote Commander and the projector is limited. While pressing the ...
...install the two size AA (R6) batteries (supplied) with new ones. Notes on the projector. • The operation range is , the wider the angle within which the commander can control the projector. If batteries have leaked, remove them, wipe and dry the battery compartment, and replace ...the batteries with the correct polarity. Be sure to obstruct the infrared beam between the Remote Commander and the projector is limited. While pressing the ...
Operating Instructions
Page 16
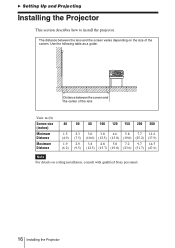
... 1.5 2.3 3.0 3.8 4.6 5.8 7.7 11.6 (4.9) (7.5) (10.0) (12.5) (15.0) (19.0) (25.2) (37.9) 1.9 2.9 3.8 4.8 5.8 7.2 9.7 14.5 (6.2) (9.5) (12.5) (15.7) (19.0) (23.6) (31.7) (47.6) Note For details on ceiling installation, consult with qualified Sony personnel. 16 Installing the Projector The distance between the screen and the center of the screen. Use the following table as a guide. B Setting Up and Projecting Installing the...
... 1.5 2.3 3.0 3.8 4.6 5.8 7.7 11.6 (4.9) (7.5) (10.0) (12.5) (15.0) (19.0) (25.2) (37.9) 1.9 2.9 3.8 4.8 5.8 7.2 9.7 14.5 (6.2) (9.5) (12.5) (15.7) (19.0) (23.6) (31.7) (47.6) Note For details on ceiling installation, consult with qualified Sony personnel. 16 Installing the Projector The distance between the screen and the center of the screen. Use the following table as a guide. B Setting Up and Projecting Installing the...
Operating Instructions
Page 17
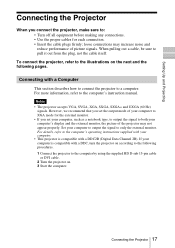
... Set your computer is compatible with a DDC2B (Digital Data Channel 2B). Connecting with a Computer This section describes how to connect the projector to the computer's instruction manual. However, we recommend that you set the output mode of your computer to XGA mode for the external monitor.... • If you connect the projector, make sure to: • Turn off all equipment before making any connections. • Use the proper cables for each connection. • Insert ...
... Set your computer is compatible with a DDC2B (Digital Data Channel 2B). Connecting with a Computer This section describes how to connect the projector to the computer's instruction manual. However, we recommend that you set the output mode of your computer to XGA mode for the external monitor.... • If you connect the projector, make sure to: • Turn off all equipment before making any connections. • Use the proper cables for each connection. • Insert ...

Operating Instructions
Page 18
...case, disconnect the USB cable, restart the computer, then connect the computer to use a DVI equipment. When you use the projector in suspend, standby mode, disconnect the projector from the USB port on a computer that came with Windows 98, Windows 98 SE, Windows ME, Windows 2000 or Windows...)a) to audio output HD D-sub 15-pin cable (supplied) to the projector via the USB cable. b) Connect a DVI cable to the projector using the USB cable for all the recommended computer environments. 18 Connecting the Projector The USB mouse function can be used on the computer. • Operations...
...case, disconnect the USB cable, restart the computer, then connect the computer to use a DVI equipment. When you use the projector in suspend, standby mode, disconnect the projector from the USB port on a computer that came with Windows 98, Windows 98 SE, Windows ME, Windows 2000 or Windows...)a) to audio output HD D-sub 15-pin cable (supplied) to the projector via the USB cable. b) Connect a DVI cable to the projector using the USB cable for all the recommended computer environments. 18 Connecting the Projector The USB mouse function can be used on the computer. • Operations...
Operating Instructions
Page 19
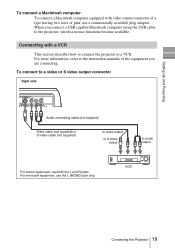
... of pins, use the L (MONO) jack only. For more information, refer to audio output For stereo equipment, use both the L and R jacks. VCR Connecting the Projector 19 Connecting with video output connector of a type having two rows of the equipment you connect a USB capable Macintosh computer using the USB cable to... you are connecting. Setting Up and Projecting To connect a Macintosh computer To connect a Macintosh computer equipped with a VCR This section describes how to connect the projector to the projector, wireless mouse functions become available.
... of pins, use the L (MONO) jack only. For more information, refer to audio output For stereo equipment, use both the L and R jacks. VCR Connecting the Projector 19 Connecting with video output connector of a type having two rows of the equipment you connect a USB capable Macintosh computer using the USB cable to... you are connecting. Setting Up and Projecting To connect a Macintosh computer To connect a Macintosh computer equipped with a VCR This section describes how to connect the projector to the projector, wireless mouse functions become available.
Operating Instructions
Page 20
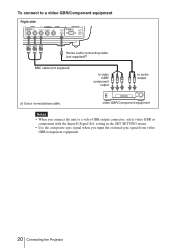
... a) Use a no-resistance cable. video GBR/Component equipment Notes • When you input the external sync signal from video GBR/component equipment. 20 Connecting the Projector
... a) Use a no-resistance cable. video GBR/Component equipment Notes • When you input the external sync signal from video GBR/component equipment. 20 Connecting the Projector

Operating Instructions
Page 21
... Front remote control detector 2 3 4,5,6 MENU APA I/ ENTER RESET INPUT VOLUME 1 Plug the AC power cord into a wall outlet. 2 Press the I / 1 key to turn on the projector. 3 Press the MENU key. The factory setting is shown as a yellow button. PICTURE SETTING Input A Picture Mode: Adjust Picture... The menu presently selected is English...
... Front remote control detector 2 3 4,5,6 MENU APA I/ ENTER RESET INPUT VOLUME 1 Plug the AC power cord into a wall outlet. 2 Press the I / 1 key to turn on the projector. 3 Press the MENU key. The factory setting is shown as a yellow button. PICTURE SETTING Input A Picture Mode: Adjust Picture... The menu presently selected is English...


