Operating Instructions
Page 12
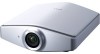
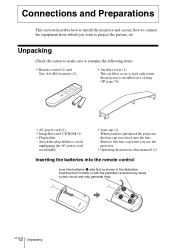
... may generate heat. GB 12 Unpacking Remove this lens cap when you have purchased the projector, the lens cap was fitted onto the lens. Unpacking Check the carton to make sure...Size AA (R6) batteries (2) • Air filter cover (1) This air filter cover is used only when the projector is installed on a ceiling. (1 page 76) • AC power cord (1) • ImageDirector2 CD-ROM (1)...holder to project the picture, etc. Connections and Preparations This section describes how to install the projector and screen, how to connect the equipment from which you want to avoid unplugging the AC...
... may generate heat. GB 12 Unpacking Remove this lens cap when you have purchased the projector, the lens cap was fitted onto the lens. Unpacking Check the carton to make sure...Size AA (R6) batteries (2) • Air filter cover (1) This air filter cover is used only when the projector is installed on a ceiling. (1 page 76) • AC power cord (1) • ImageDirector2 CD-ROM (1)...holder to project the picture, etc. Connections and Preparations This section describes how to install the projector and screen, how to connect the equipment from which you want to avoid unplugging the AC...

Operating Instructions
Page 20
.... If the equipment to be connected has no S video connector, connect the cable to the video output. 20 GB Step 2: Connecting the Projector See also the instruction manual of the projector Speakers AV amplifier Video equipment to S video or video output : Video signal flow S video or video cable (not supplied) Tip If you...
.... If the equipment to be connected has no S video connector, connect the cable to the video output. 20 GB Step 2: Connecting the Projector See also the instruction manual of the projector Speakers AV amplifier Video equipment to S video or video output : Video signal flow S video or video cable (not supplied) Tip If you...
Operating Instructions
Page 50
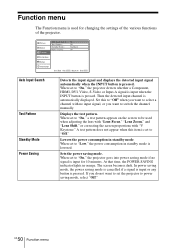
... into power saving mode if no input signal, or you do not want to set to switch the channel manually. When set the projector to select a channel with "V Keystone." Function menu The Function menu is used when adjusting the lens with "Lens Focus," "Lens Zoom," and ..."Lens Shift," or correcting the screen proportions with no signal is input for changing the settings of the various functions of the projector. GB 50 Function menu Picture Signal Function Auto Input Search : Test Pattern : Standby Mode : Power Saving: Off Off Standard Off Installation Setup ...
... into power saving mode if no input signal, or you do not want to set to switch the channel manually. When set the projector to select a channel with "V Keystone." Function menu The Function menu is used when adjusting the lens with "Lens Focus," "Lens Zoom," and ..."Lens Shift," or correcting the screen proportions with no signal is input for changing the settings of the various functions of the projector. GB 50 Function menu Picture Signal Function Auto Input Search : Test Pattern : Standby Mode : Power Saving: Off Off Standard Off Installation Setup ...

Operating Instructions
Page 52
...Address Setup IP Address Subnet Mask Default Gateway Primary DNS Secondry DNS MAC Address Selects either "Auto (DHCP)" or "Manual." You cannot change. On: Use this setting when using the projector at normal altitudes. Network Setting You can set "Standby Mode" to "Standard" in the Function menu. (1 ... priority. (1.0.0.0 to 223.255.255.255) Sets the alternative DNS server. (1.0.0.0 to 223.255.255.255) Displays MAC address of the projector. When you select "Manual," set the following "IP Address," "Subnet Mask," and "Default Gateway." High Altitude Mode Use this item is set to "On," the ...
...Address Setup IP Address Subnet Mask Default Gateway Primary DNS Secondry DNS MAC Address Selects either "Auto (DHCP)" or "Manual." You cannot change. On: Use this setting when using the projector at normal altitudes. Network Setting You can set "Standby Mode" to "Standard" in the Function menu. (1 ... priority. (1.0.0.0 to 223.255.255.255) Sets the alternative DNS server. (1.0.0.0 to 223.255.255.255) Displays MAC address of the projector. When you select "Manual," set the following "IP Address," "Subnet Mask," and "Default Gateway." High Altitude Mode Use this item is set to "On," the ...
Operating Instructions
Page 58
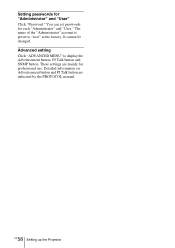
It cannot be changed. Setting passwords for each "Administrator" and "User." You can set passwords for "Administrator" and "User" Click "Password." Advanced setting Click "ADVANCED MENU" to "root" at the factory. These settings are indicated by the PROTOCOL manual. 58 GB Setting up the Projector Detailed information on Advertisement button and PJ Talk button are mainly for professional use. The name of the "Administrator" account is preset to display the Advertisement button, PJ Talk button and SNMP button.
It cannot be changed. Setting passwords for each "Administrator" and "User." You can set passwords for "Administrator" and "User" Click "Password." Advanced setting Click "ADVANCED MENU" to "root" at the factory. These settings are indicated by the PROTOCOL manual. 58 GB Setting up the Projector Detailed information on Advertisement button and PJ Talk button are mainly for professional use. The name of the "Administrator" account is preset to display the Advertisement button, PJ Talk button and SNMP button.

Operating Instructions
Page 78
... the center of the lens is different from that of the PSS-H10. The installation measurements are shown below when installing the projector on a ceiling, refer to the Installation manual for installation. Make sure to the center of the screen. 252.7 (10) 130 (51/8) Front of the cabinet Center ...lens 303 (12) Upper ceiling mount bracket Center of the supporting pole (The center of the supporting pole is parallel to consult with a qualified Sony personnel for Dealers of the unit.) GB 78 Ceiling Installation Screen Size 40 60 80 100 120 150 (inches) x Minimum 305 457 610 ...
... the center of the lens is different from that of the PSS-H10. The installation measurements are shown below when installing the projector on a ceiling, refer to the Installation manual for installation. Make sure to the center of the screen. 252.7 (10) 130 (51/8) Front of the cabinet Center ...lens 303 (12) Upper ceiling mount bracket Center of the supporting pole (The center of the supporting pole is parallel to consult with a qualified Sony personnel for Dealers of the unit.) GB 78 Ceiling Installation Screen Size 40 60 80 100 120 150 (inches) x Minimum 305 457 610 ...
Operating Instructions
Page 81
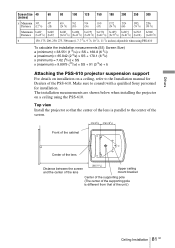
The installation measurements are shown below when installing the projector on a ceiling, refer to the center of the screen. ... supporting pole (The center of the supporting pole is parallel to the Installation manual for installation. Top view Install the projector so that the center of the lens is different from that of the PSS...SS + 170.1 (6 3/4) x (minimum) = 7.62 (5/16) × SS x (maximum) = 9.8979 (13/32) × SS + 91 (3 5/8) + b Attaching the PSS-610 projector suspension support For details on installation on a ceiling using the PSS-610. Make sure to consult with a qualified...
The installation measurements are shown below when installing the projector on a ceiling, refer to the center of the screen. ... supporting pole (The center of the supporting pole is parallel to the Installation manual for installation. Top view Install the projector so that the center of the lens is different from that of the PSS...SS + 170.1 (6 3/4) x (minimum) = 7.62 (5/16) × SS x (maximum) = 9.8979 (13/32) × SS + 91 (3 5/8) + b Attaching the PSS-610 projector suspension support For details on installation on a ceiling using the PSS-610. Make sure to consult with a qualified...


