
Operating Instructions
Page 2
... cause harmful interference, and (2) this device must accept any interference received, including interference that may call: Sony Customer Information Service Center 1-800-222-7669 or http://www.sony.com/ The number below is encouraged to try to the presence of important operating and maintenance (servicing) ... radio/ TV technician for a Class B digital device, pursuant to provide reasonable protection against harmful interference in this manual could void your authority to operate this apparatus to radio communications. You are designed to Part 15 of Conformity Trade Name...
... cause harmful interference, and (2) this device must accept any interference received, including interference that may call: Sony Customer Information Service Center 1-800-222-7669 or http://www.sony.com/ The number below is encouraged to try to the presence of important operating and maintenance (servicing) ... radio/ TV technician for a Class B digital device, pursuant to provide reasonable protection against harmful interference in this manual could void your authority to operate this apparatus to radio communications. You are designed to Part 15 of Conformity Trade Name...
Operating Instructions
Page 12
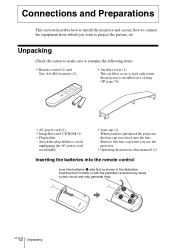
... items: • Remote control (1) and Size AA (R6) batteries (2) • Air filter cover (1) This air filter cover is used only when the projector is installed on a ceiling. (1 page 76) • AC power cord (1) • ImageDirector2 CD-ROM (1) • Plug holder Attach the plug holder...(1) When you want to connect the equipment from which you have purchased the projector, the lens cap was fitted onto the lens. Remove this lens cap when you use the projector. • Operating Instructions (this manual) (1) Inserting the batteries into the remote control Insert the batteries E side...
... items: • Remote control (1) and Size AA (R6) batteries (2) • Air filter cover (1) This air filter cover is used only when the projector is installed on a ceiling. (1 page 76) • AC power cord (1) • ImageDirector2 CD-ROM (1) • Plug holder Attach the plug holder...(1) When you want to connect the equipment from which you have purchased the projector, the lens cap was fitted onto the lens. Remove this lens cap when you use the projector. • Operating Instructions (this manual) (1) Inserting the batteries into the remote control Insert the batteries E side...

Operating Instructions
Page 20
Right side of each equipment. See also the instruction manual of the projector Speakers AV amplifier Video equipment to S video or video output : Video signal flow S video or video cable (not supplied) Tip If you do not know ... cable, S VIDEO INPUT (S video input connector) or VIDEO INPUT (video input connector), connect it to S VIDEO to the video output. 20 GB Step 2: Connecting the Projector
Right side of each equipment. See also the instruction manual of the projector Speakers AV amplifier Video equipment to S video or video output : Video signal flow S video or video cable (not supplied) Tip If you do not know ... cable, S VIDEO INPUT (S video input connector) or VIDEO INPUT (video input connector), connect it to S VIDEO to the video output. 20 GB Step 2: Connecting the Projector
Operating Instructions
Page 50
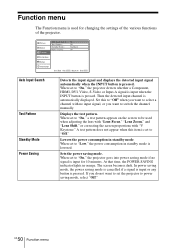
... proportions with no signal is input for changing the settings of the various functions of the projector. Picture Signal Function Auto Input Search : Test Pattern : Standby Mode : Power Saving: ... is set to "On," the projector goes into power saving mode if no input signal, or you want to switch the channel manually. If you want to set to... "On," a test pattern appears on the screen to power saving mode, select "Off." At that time, the POWER SAVING indicator lights in standby mode. Set this item is pressed. When set the projector...
... proportions with no signal is input for changing the settings of the various functions of the projector. Picture Signal Function Auto Input Search : Test Pattern : Standby Mode : Power Saving: ... is set to "On," the projector goes into power saving mode if no input signal, or you want to switch the channel manually. If you want to set to... "On," a test pattern appears on the screen to power saving mode, select "Off." At that time, the POWER SAVING indicator lights in standby mode. Set this item is pressed. When set the projector...

Operating Instructions
Page 52
...then press ENTER. IP Address Setup IP Address Subnet Mask Default Gateway Primary DNS Secondry DNS MAC Address Selects either "Auto (DHCP)" or "Manual." When you select "Manual," set internet protocols such as a priority. (1.0.0.0 to 223.255.255.255) Sets the alternative DNS server. (1.0.0.0 to 223.255.255... use the Network setting function, set to "Standard" in the Function menu. (1 page 50) GB 52 Installation Menu After completing all of the projector. Note When this item is set "Standby Mode" to "On," the number of turns of 1,500 m or higher. You cannot change. Off...
...then press ENTER. IP Address Setup IP Address Subnet Mask Default Gateway Primary DNS Secondry DNS MAC Address Selects either "Auto (DHCP)" or "Manual." When you select "Manual," set internet protocols such as a priority. (1.0.0.0 to 223.255.255.255) Sets the alternative DNS server. (1.0.0.0 to 223.255.255... use the Network setting function, set to "Standard" in the Function menu. (1 page 50) GB 52 Installation Menu After completing all of the projector. Note When this item is set "Standby Mode" to "On," the number of turns of 1,500 m or higher. You cannot change. Off...

Operating Instructions
Page 54
If the picture is distorted or colorless, select the color system appropriate for the input signal. Note Normally, set the color system to "Auto." Color System Selects the color system of the input signal automatically from among NTSC3.58, PAL, SECAM, NTSC4.43, PAL-M, PAL-N, or PAL60. "NTSC3.58"-"PAL-N": Allows you to set this to the selected system manually. Auto: Selects the color system of the input signal. GB 54 Setup Menu
If the picture is distorted or colorless, select the color system appropriate for the input signal. Note Normally, set the color system to "Auto." Color System Selects the color system of the input signal automatically from among NTSC3.58, PAL, SECAM, NTSC4.43, PAL-M, PAL-N, or PAL60. "NTSC3.58"-"PAL-N": Allows you to set this to the selected system manually. Auto: Selects the color system of the input signal. GB 54 Setup Menu
Operating Instructions
Page 58
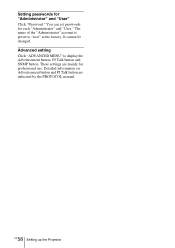
Advanced setting Click "ADVANCED MENU" to "root" at the factory. Detailed information on Advertisement button and PJ Talk button are mainly for "Administrator" and "User" Click "Password." Setting passwords for professional use. These settings are indicated by the PROTOCOL manual. 58 GB Setting up the Projector The name of the "Administrator" account is preset to display the Advertisement button, PJ Talk button and SNMP button. You can set passwords for each "Administrator" and "User." It cannot be changed.
Advanced setting Click "ADVANCED MENU" to "root" at the factory. Detailed information on Advertisement button and PJ Talk button are mainly for "Administrator" and "User" Click "Password." Setting passwords for professional use. These settings are indicated by the PROTOCOL manual. 58 GB Setting up the Projector The name of the "Administrator" account is preset to display the Advertisement button, PJ Talk button and SNMP button. You can set passwords for each "Administrator" and "User." It cannot be changed.

Operating Instructions
Page 69
... 300 inches (measured diagonally) Color system NTSC3.58/PAL/SECAM/NTSC4.43/ PAL-M/PAL-N/PAL60 system, switched automatically/ manually (PAL60 system not switched manually) Acceptable video signals 15 kHz RGB/component 50/60 Hz, Progressive component 50/ 60 Hz, DTV (480/60i,...) G with sync/Y: 1 Vp-p±2 dB sync negative (75 ohms terminated) B/CB (PB): 0.7 Vp-p±2 dB (75 ohms terminated) SYNC/HD: Composite sync input: TTL level, positive/ negative Horizontal sync input: TTL level, positive/negative VD: Vertical sync input: TTL level, positive/ negative TRIGGER...
... 300 inches (measured diagonally) Color system NTSC3.58/PAL/SECAM/NTSC4.43/ PAL-M/PAL-N/PAL60 system, switched automatically/ manually (PAL60 system not switched manually) Acceptable video signals 15 kHz RGB/component 50/60 Hz, Progressive component 50/ 60 Hz, DTV (480/60i,...) G with sync/Y: 1 Vp-p±2 dB sync negative (75 ohms terminated) B/CB (PB): 0.7 Vp-p±2 dB (75 ohms terminated) SYNC/HD: Composite sync input: TTL level, positive/ negative Horizontal sync input: TTL level, positive/negative VD: Vertical sync input: TTL level, positive/ negative TRIGGER...

Operating Instructions
Page 78
Make sure to the Installation manual for installation. Screen Size 40 60 80 100 120 150 (inches) x Minimum 305 457 610 762 914 1143 Distance (12 1/8) (18) (24 1/8) (30) (36) (45) ... supporting pole (The center of the supporting pole is different from that of the PSS-H10. The installation measurements are shown below when installing the projector on a ceiling, refer to consult with a qualified Sony personnel for Dealers of the unit.) GB 78 Ceiling Installation
Make sure to the Installation manual for installation. Screen Size 40 60 80 100 120 150 (inches) x Minimum 305 457 610 762 914 1143 Distance (12 1/8) (18) (24 1/8) (30) (36) (45) ... supporting pole (The center of the supporting pole is different from that of the PSS-H10. The installation measurements are shown below when installing the projector on a ceiling, refer to consult with a qualified Sony personnel for Dealers of the unit.) GB 78 Ceiling Installation
Operating Instructions
Page 81
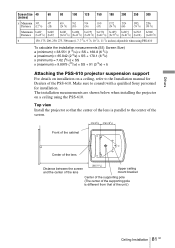
...the supporting pole (The center of the supporting pole is different from that of the PSS-610. Make sure to the Installation manual for installation. Others Screen Size 40 60 80 100 120 150 180 200 250 300 (inches) x Minimum 305 457 610... a (maximum) = 65.842 (2 5/8) × SS + 170.1 (6 3/4) x (minimum) = 7.62 (5/16) × SS x (maximum) = 9.8979 (13/32) × SS + 91 (3 5/8) + b Attaching the PSS-610 projector suspension support For details on installation on a ceiling, refer to consult with a qualified Sony personnel for Dealers of the unit.) Ceiling Installation 81 GB
...the supporting pole (The center of the supporting pole is different from that of the PSS-610. Make sure to the Installation manual for installation. Others Screen Size 40 60 80 100 120 150 180 200 250 300 (inches) x Minimum 305 457 610... a (maximum) = 65.842 (2 5/8) × SS + 170.1 (6 3/4) x (minimum) = 7.62 (5/16) × SS x (maximum) = 9.8979 (13/32) × SS + 91 (3 5/8) + b Attaching the PSS-610 projector suspension support For details on installation on a ceiling, refer to consult with a qualified Sony personnel for Dealers of the unit.) Ceiling Installation 81 GB

