

Operating Instructions
Page 2
... changes or modifications not expressly approved in the literature accompanying the appliance. Declaration of important operating and maintenance (servicing) instructions in this manual could void your authority to qualified personnel only. Address: 16530 Via Esprillo, San Diego, CA 92127 U.S.A. This equipment has been tested.... For customers in the USA If you have any questions about this product, you may call: Sony Customer Information Service Center 1-800-222-7669 or http://www.sony.com/ The number below is intended to alert the user to the presence of the following two conditions...
... changes or modifications not expressly approved in the literature accompanying the appliance. Declaration of important operating and maintenance (servicing) instructions in this manual could void your authority to qualified personnel only. Address: 16530 Via Esprillo, San Diego, CA 92127 U.S.A. This equipment has been tested.... For customers in the USA If you have any questions about this product, you may call: Sony Customer Information Service Center 1-800-222-7669 or http://www.sony.com/ The number below is intended to alert the user to the presence of the following two conditions...

Operating Instructions
Page 11
... put onto the lens. Unpacking Check the carton to direct sunlight, or a damp room. 11 Remove this lens cap when you use the projector. • Operating Instructions (this manual) • AC power cord (1) • ImageDirector3 CD-ROM (1) Inserting the batteries into the remote control Push and slide to project the picture, etc...
... put onto the lens. Unpacking Check the carton to direct sunlight, or a damp room. 11 Remove this lens cap when you use the projector. • Operating Instructions (this manual) • AC power cord (1) • ImageDirector3 CD-ROM (1) Inserting the batteries into the remote control Push and slide to project the picture, etc...

Operating Instructions
Page 19
..., connect the cable to enjoy better picture quality. Connections and Preparations To connect to a VCR equipped with component video connectors. See also the instruction manual of the projector Speakers AV amplifier Video equipment to S video or video output : Video signal flow S video or video cable (not supplied) Tip If you do not...
..., connect the cable to enjoy better picture quality. Connections and Preparations To connect to a VCR equipped with component video connectors. See also the instruction manual of the projector Speakers AV amplifier Video equipment to S video or video output : Video signal flow S video or video cable (not supplied) Tip If you do not...

Operating Instructions
Page 32
... press the button, the setting is changed in each picture mode. Adjusting the Picture Quality You can be stored in the order of "Auto1", "Auto2", "Manual" and "Off". 32 GAMMA CORRECTION button Each time you press the button, the setting of the button is switched either to "Normal" or "Wide" to...
... press the button, the setting is changed in each picture mode. Adjusting the Picture Quality You can be stored in the order of "Auto1", "Auto2", "Manual" and "Off". 32 GAMMA CORRECTION button Each time you press the button, the setting of the button is switched either to "Normal" or "Wide" to...

Operating Instructions
Page 41
... Black Pro Advanced Iris Switches the iris function during projection. Auto2: An optimum iris becomes smaller than when set , and store your favorite color temperature. Manual: Manually adjusts the Iris. Low: Enhances the black by pressing the BRIGHTNESS+/- on the remote control. The lower the setting, the softer the picture, thus reducing...
... Black Pro Advanced Iris Switches the iris function during projection. Auto2: An optimum iris becomes smaller than when set , and store your favorite color temperature. Manual: Manually adjusts the Iris. Low: Enhances the black by pressing the BRIGHTNESS+/- on the remote control. The lower the setting, the softer the picture, thus reducing...

Operating Instructions
Page 47
... color system to "Auto." Selects the color system of the input signal automatically from the equipment by selecting "Input-A" with this to the selected system manually. Note Normally, set this item set the desired lamp setting. (1 page 59) 47 Computer: Inputs the signal from a DVD player/ recorder, Blu-ray Disc player...
... color system to "Auto." Selects the color system of the input signal automatically from the equipment by selecting "Input-A" with this to the selected system manually. Note Normally, set this item set the desired lamp setting. (1 page 59) 47 Computer: Inputs the signal from a DVD player/ recorder, Blu-ray Disc player...
Operating Instructions
Page 48
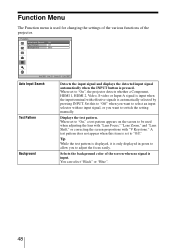
...1, HDMI 2, Video, S-video or Input-A signal is input when the input terminal with "V Keystone." When set to switch the setting manually. Auto Input Search Test Pattern Background Detects the input signal and displays the detected input signal automatically when the INPUT button is automatically selected ...by pressing INPUT. Displays the test pattern. Tip While the test pattern is displayed, it is input. Selects the background color of the projector. Set this item is used when adjusting the lens with "Lens Focus," "Lens Zoom," and "Lens Shift," or correcting the screen ...
...1, HDMI 2, Video, S-video or Input-A signal is input when the input terminal with "V Keystone." When set to switch the setting manually. Auto Input Search Test Pattern Background Detects the input signal and displays the detected input signal automatically when the INPUT button is automatically selected ...by pressing INPUT. Displays the test pattern. Tip While the test pattern is displayed, it is input. Selects the background color of the projector. Set this item is used when adjusting the lens with "Lens Focus," "Lens Zoom," and "Lens Shift," or correcting the screen ...
Operating Instructions
Page 61
... lens, projection system LCD panel 0.61-inch (15.4 mm) SXRD panel 6,220,800 pixels (2,073,600 pixels × 3) Lens...) Color system NTSC3.58/PAL/SECAM/NTSC4.43/ PAL-M/PAL-N/PAL60 system, switched automatically/manually (PAL60 system not switched manually) Acceptable video signals 15 kHz RGB/component 50/60 Hz, Progressive component 50/60 Hz...Vp-p±2 dB sync negative (75 ohms terminated) B/CB (PB): 0.7 Vp-p±2 dB (75 ohms terminated) SYNC/HD: Composite sync input: TTL level, positive/ negative Horizontal sync input: TTL level, positive/negative VD: Vertical sync input:...
... lens, projection system LCD panel 0.61-inch (15.4 mm) SXRD panel 6,220,800 pixels (2,073,600 pixels × 3) Lens...) Color system NTSC3.58/PAL/SECAM/NTSC4.43/ PAL-M/PAL-N/PAL60 system, switched automatically/manually (PAL60 system not switched manually) Acceptable video signals 15 kHz RGB/component 50/60 Hz, Progressive component 50/60 Hz...Vp-p±2 dB sync negative (75 ohms terminated) B/CB (PB): 0.7 Vp-p±2 dB (75 ohms terminated) SYNC/HD: Composite sync input: TTL level, positive/ negative Horizontal sync input: TTL level, positive/negative VD: Vertical sync input:...
Operating Instructions
Page 70
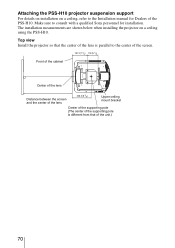
Top view Install the projector so that the center of the lens is parallel to the center of the screen. 191.3 (7 5/8) 130 (5 1/8) Front of the cabinet Center of the lens ... mount bracket Center of the supporting pole (The center of the supporting pole is different from that of the PSS-H10. Attaching the PSS-H10 projector suspension support For details on installation on a ceiling using the PSS-H10. The installation measurements are shown below when installing the...
Top view Install the projector so that the center of the lens is parallel to the center of the screen. 191.3 (7 5/8) 130 (5 1/8) Front of the cabinet Center of the lens ... mount bracket Center of the supporting pole (The center of the supporting pole is different from that of the PSS-H10. Attaching the PSS-H10 projector suspension support For details on installation on a ceiling using the PSS-H10. The installation measurements are shown below when installing the...

