
Instruction Manual
Page 3
... 19 18 Inspection and Maintenance 19 18.1 Inspecting and Maintaining the Backpack Battery . . . 19 19 Troubleshooting Guide 20 19.1 Backpack Battery 20 20 Specifications 22 20.1 STIHL AR Series Battery 22 20.2 STIHL AL 300 22 20.3 STIHL AL 500 22 20.4 Symbols on the Backpack Battery 22 20.5 Engineering Improvements 23 21 Replacement Parts and Equipment 24...
... 19 18 Inspection and Maintenance 19 18.1 Inspecting and Maintaining the Backpack Battery . . . 19 19 Troubleshooting Guide 20 19.1 Backpack Battery 20 20 Specifications 22 20.1 STIHL AR Series Battery 22 20.2 STIHL AL 300 22 20.3 STIHL AL 500 22 20.4 Symbols on the Backpack Battery 22 20.5 Engineering Improvements 23 21 Replacement Parts and Equipment 24...
Instruction Manual
Page 4
...24.2 Common Law Trademarks 25 25 Addresses 25 25.1 STIHL Incorporated 25 1 Introduction Thank you do not understand any of the instructions in this manual, please go to www.stihlusa.com (for your backpack battery without this instruction manual. Read this Manual 2.1 Signal ...read and observe the following symbols and signal words: DANGER Indicates a hazardous situation that requires your STIHL backpack battery and, if followed, reduce the risk of the backpack battery can cause serious injury. Allow only persons who fully understand the information in death or serious injury...
...24.2 Common Law Trademarks 25 25 Addresses 25 25.1 STIHL Incorporated 25 1 Introduction Thank you do not understand any of the instructions in this manual, please go to www.stihlusa.com (for your backpack battery without this instruction manual. Read this Manual 2.1 Signal ...read and observe the following symbols and signal words: DANGER Indicates a hazardous situation that requires your STIHL backpack battery and, if followed, reduce the risk of the backpack battery can cause serious injury. Allow only persons who fully understand the information in death or serious injury...
Instruction Manual
Page 5
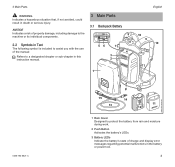
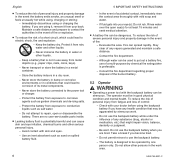
... to assist you with the use of the manual: Refers to a designated chapter or sub-chapter in this instruction manual. 3 Main Parts 3.1 Backpack Battery 9 8 56 7 4 3 2 1 English 10 9 10 7 7 0000-GXX-2666-A0 0458-794-8621-C 15 13 # 14 11 12 1 Rain Cover... Designed to protect the battery from rain and moisture during work. 2 Push Button Activates the battery's LEDs. 3 Battery LEDs Indicate the battery's state of charge and display error messages regarding potential malfunctions in death or serious injury.
... to assist you with the use of the manual: Refers to a designated chapter or sub-chapter in this instruction manual. 3 Main Parts 3.1 Backpack Battery 9 8 56 7 4 3 2 1 English 10 9 10 7 7 0000-GXX-2666-A0 0458-794-8621-C 15 13 # 14 11 12 1 Rain Cover... Designed to protect the battery from rain and moisture during work. 2 Push Button Activates the battery's LEDs. 3 Battery LEDs Indicate the battery's state of charge and display error messages regarding potential malfunctions in death or serious injury.
Instruction Manual
Page 6
... the manual for connecting the battery to a charger and supplying power to a STIHL power tool with an AP battery compartment. 13 Connecting Cord Transmits electric current from the battery to the power tool. 14 Battery-Side Plug Connects the connecting cord to the battery. 15 Tool-Side Plug Fits...can lead to fire or incinerate, @ 5.1. English 4 Cover Covers the connecting cord socket and USB port (AR 1000 only). 5 Socket Socket on the battery for the connecting cord. 6 USB Port (AR 1000 only) Charges USB compatible electronic devices. 7 Hook and Eye Fasteners Secure the connecting cord to the ...
... the manual for connecting the battery to a charger and supplying power to a STIHL power tool with an AP battery compartment. 13 Connecting Cord Transmits electric current from the battery to the power tool. 14 Battery-Side Plug Connects the connecting cord to the battery. 15 Tool-Side Plug Fits...can lead to fire or incinerate, @ 5.1. English 4 Cover Covers the connecting cord socket and USB port (AR 1000 only). 5 Socket Socket on the battery for the connecting cord. 6 USB Port (AR 1000 only) Charges USB compatible electronic devices. 7 Hook and Eye Fasteners Secure the connecting cord to the ...

Instruction Manual
Page 7
..., leak, ignite or explode, resulting in -tree surgery and maintenance if using an AR battery with a MSA top-handle chain saw. Use only with STIHL TSA cut-off machines or STIHL RMA lawn mowers. STIHL BGA blowers ■ Do not use STIHL AR batteries with STIHL MSA top-handle chain saws while climbing in a tree for in severe or...
..., leak, ignite or explode, resulting in -tree surgery and maintenance if using an AR battery with a MSA top-handle chain saw. Use only with STIHL TSA cut-off machines or STIHL RMA lawn mowers. STIHL BGA blowers ■ Do not use STIHL AR batteries with STIHL MSA top-handle chain saws while climbing in a tree for in severe or...
Instruction Manual
Page 8
...spread rapidly. Although water can be strenuous. Be alert. Take a break if you are tired. Rinse water over the open or disassemble the battery. Contact the fire department. - To reduce the risk of personal injury from metal objects (e.g., paper clips, nails, coins, keys). - Do... liquids. - To reduce the risk of severe personal injury and property damage in a dry room. - If you become tired. - Store the battery indoors in the event of any substance (drug, alcohol or medication, etc.) that might impair vision, balance, dexterity or judgment. - Avoid contact with...
...spread rapidly. Although water can be strenuous. Be alert. Take a break if you are tired. Rinse water over the open or disassemble the battery. Contact the fire department. - To reduce the risk of personal injury from metal objects (e.g., paper clips, nails, coins, keys). - Do... liquids. - To reduce the risk of severe personal injury and property damage in a dry room. - If you become tired. - Store the battery indoors in the event of any substance (drug, alcohol or medication, etc.) that might impair vision, balance, dexterity or judgment. - Avoid contact with...
Instruction Manual
Page 9
...any other end is positioned and secured so that it for carrying or hanging up the battery or power tool. ■ ■ The two ends of damage. Use only accessories specifically authorized by STIHL for signs of the connecting cord are in good condition. - A damaged connecting cord ...for use with sharp objects, moving parts, or otherwise be reached or damaged by an authorized STIHL servicing dealer before use . Position the connecting cord so that it from the backpack battery, grasp the battery-side plug, not the connecting cord. - The plug on , tripped over, come in ...
...any other end is positioned and secured so that it for carrying or hanging up the battery or power tool. ■ ■ The two ends of damage. Use only accessories specifically authorized by STIHL for signs of the connecting cord are in good condition. - A damaged connecting cord ...for use with sharp objects, moving parts, or otherwise be reached or damaged by an authorized STIHL servicing dealer before use . Position the connecting cord so that it from the backpack battery, grasp the battery-side plug, not the connecting cord. - The plug on , tripped over, come in ...
Instruction Manual
Page 10
...Remain aware of the location of control during operation: - Prevent it off your back and contact your authorized STIHL servicing dealer immediately. Disconnect the battery from the power tool before storing. ■ To reduce the risk of serious personal injury from loss of ...INSTRUCTIONS through the backpack guides and with the backpack battery in use , charge or store a malfunctioning, damaged, cracked, leaking or deformed battery. Never leave the battery unattended when it will not interfere with your authorized STIHL servicing dealer immediately. If four LEDs flash red and...
...Remain aware of the location of control during operation: - Prevent it off your back and contact your authorized STIHL servicing dealer immediately. Disconnect the battery from the power tool before storing. ■ To reduce the risk of serious personal injury from loss of ...INSTRUCTIONS through the backpack guides and with the backpack battery in use , charge or store a malfunctioning, damaged, cracked, leaking or deformed battery. Never leave the battery unattended when it will not interfere with your authorized STIHL servicing dealer immediately. If four LEDs flash red and...
Instruction Manual
Page 11
...Improper storage can result in use , damage to the backpack battery and an increased risk of electric shock when charging: - STIHL recommends that could lead to repair, open or disassemble the battery. Never store the battery in damp or corrosive environments or in the appropriate sections of... short circuit and fire: - Strictly follow the cleaning and maintenance instructions in conditions that only identical STIHL replacement parts be used for the backpack battery. Regularly check the electrical contacts of the charger and ensure that all repair work be accessed by ...
...Improper storage can result in use , damage to the backpack battery and an increased risk of electric shock when charging: - STIHL recommends that could lead to repair, open or disassemble the battery. Never store the battery in damp or corrosive environments or in the appropriate sections of... short circuit and fire: - Strictly follow the cleaning and maintenance instructions in conditions that only identical STIHL replacement parts be used for the backpack battery. Regularly check the electrical contacts of the charger and ensure that all repair work be accessed by ...
Instruction Manual
Page 12
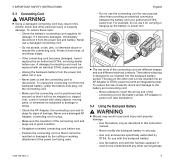
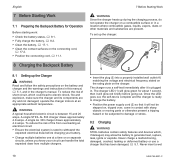
...-C A single AL 300 charger draws approximately 4.4 amps. To reduce the risk of short circuit, which , if damaged, may allow the battery to charge the battery. ► Position the power supply cord (2) so that has been damaged, @ 5.1. English 7 Before Starting Work 0000-GXX-3228-A1 ... with sharp objects or moving parts or otherwise present a tripping hazard or be subjected to damage or stress. 8.2 Charging WARNING STIHL batteries contain safety features and devices which could lead to withstand the expected electrical draw before going out. WARNING A typical household electric ...
...-C A single AL 300 charger draws approximately 4.4 amps. To reduce the risk of short circuit, which , if damaged, may allow the battery to charge the battery. ► Position the power supply cord (2) so that has been damaged, @ 5.1. English 7 Before Starting Work 0000-GXX-3228-A1 ... with sharp objects or moving parts or otherwise present a tripping hazard or be subjected to damage or stress. 8.2 Charging WARNING STIHL batteries contain safety features and devices which could lead to withstand the expected electrical draw before going out. WARNING A typical household electric ...

Instruction Manual
Page 13
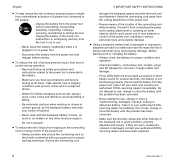
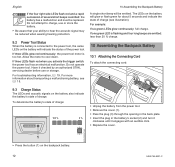
...charged when it stops. For a complete list of approximate charging times, see www.stihl.com/charging-times. 9 LED Diagnostics and Acoustic Signals 9.1 Battery Status Six LEDs and an acoustic signal indicate the status of the battery. 1 0000-GXX-2680-A0 0000-GXX-3229-A1 ► Push the plug ... A short beep The acoustic signal works as it to 40 °C). When the LEDs on the AR battery glow green and show the state of the power tool. Replace the battery. If one LED glows red continuously: the battery is complete. 9 LED Diagnostics and Acoustic Signals AP Adapter. Never use or store the...
...charged when it stops. For a complete list of approximate charging times, see www.stihl.com/charging-times. 9 LED Diagnostics and Acoustic Signals 9.1 Battery Status Six LEDs and an acoustic signal indicate the status of the battery. 1 0000-GXX-2680-A0 0000-GXX-3229-A1 ► Push the plug ... A short beep The acoustic signal works as it to 40 °C). When the LEDs on the AR battery glow green and show the state of the power tool. Replace the battery. If one LED glows red continuously: the battery is complete. 9 LED Diagnostics and Acoustic Signals AP Adapter. Never use or store the...
Instruction Manual
Page 14
... (3) through the opening in the back plate. ► Insert the plug in the battery's socket (2) and turn it clockwise until it checked by an authorized STIHL servicing dealer before use or store the battery. ► Be aware that your ability to hear the acoustic signal may be reduced ...when wearing hearing protection. 9.2 Power Tool Status When the battery is too hot. For troubleshooting information, @ 19....
... (3) through the opening in the back plate. ► Insert the plug in the battery's socket (2) and turn it clockwise until it checked by an authorized STIHL servicing dealer before use or store the battery. ► Be aware that your ability to hear the acoustic signal may be reduced ...when wearing hearing protection. 9.2 Power Tool Status When the battery is too hot. For troubleshooting information, @ 19....
Instruction Manual
Page 15
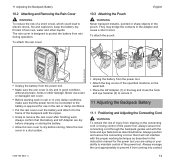
...instruction manual for use a wet or damaged rain cover. ► Before starting work . Store the rain cover in a dry location. ► Unplug the battery from the power tool. ► Attach the bag at one of the specified locations on the waist belt. ► Place the AP Adapter (1) in ... the power tool. They may bridge the contacts in the pouch. Always manage the cord appropriately to electric shock, fire and explosion, keep the battery dry. To attach the rain cover: English 10.3 Attaching the Pouch WARNING Never transport metallic, pointed or sharp objects in the adapter and cause ...
...instruction manual for use a wet or damaged rain cover. ► Before starting work . Store the rain cover in a dry location. ► Unplug the battery from the power tool. ► Attach the bag at one of the specified locations on the waist belt. ► Place the AP Adapter (1) in ... the power tool. They may bridge the contacts in the pouch. Always manage the cord appropriately to electric shock, fire and explosion, keep the battery dry. To attach the rain cover: English 10.3 Attaching the Pouch WARNING Never transport metallic, pointed or sharp objects in the adapter and cause ...

Instruction Manual
Page 16
...0000-GXX-2801-A2 0000-GXX-2828-A0 The connecting cord can be secured in different positions and adjusted to remove the backpack battery quickly in serious personal injury and property damage. B). Secure the connecting cord to the backpack frame with proper working technique or your...length of an emergency. C) or on objects, which the power tool is held and controlled. A B 1 1 1 1 1 1 11 Adjusting the Backpack Battery ► Always position and secure the connecting cord so that it fits comfortably but securely on the side of the operator. Always secure the connecting...
...0000-GXX-2801-A2 0000-GXX-2828-A0 The connecting cord can be secured in different positions and adjusted to remove the backpack battery quickly in serious personal injury and property damage. B). Secure the connecting cord to the backpack frame with proper working technique or your...length of an emergency. C) or on objects, which the power tool is held and controlled. A B 1 1 1 1 1 1 11 Adjusting the Backpack Battery ► Always position and secure the connecting cord so that it fits comfortably but securely on the side of the operator. Always secure the connecting...
Instruction Manual
Page 17
... unintended activation, never store the power tool with the connecting cord inserted into the socket with steady, even pressure until it is not fully charged, STIHL recommends that the back padding fits firmly and securely against your back. ► Thread the end of 14 °F to 122 °F (- ...15 For further information on the waist belt and chest strap and loosen the harness straps by lifting the sliding adjusters. Use and store the battery only within an ambient temperature range of the waist belt through the loop (3). ► To remove the harness, open the quick-release fasteners...
... unintended activation, never store the power tool with the connecting cord inserted into the socket with steady, even pressure until it is not fully charged, STIHL recommends that the back padding fits firmly and securely against your back. ► Thread the end of 14 °F to 122 °F (- ...15 For further information on the waist belt and chest strap and loosen the harness straps by lifting the sliding adjusters. Use and store the battery only within an ambient temperature range of the waist belt through the loop (3). ► To remove the harness, open the quick-release fasteners...
Instruction Manual
Page 18
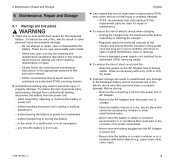
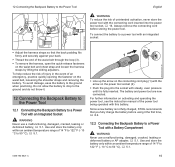
... operating the power tool, see the instruction manual of the power tool being operated with steady, even pressure. NOTICE Avoid exposing the battery to a power tool with a battery compartment: 3 3 2 1 ► Line up the arrow on the connecting cord plug (1) with the arrow on activating and ...AP Adapter socket (2) with steady, even pressure until it is not fully charged, STIHL recommends that you fully charge the battery before using it engages with the connecting cord inserted into the power tool's battery compartment (4) until it the first time, @ 8.2. 0000-GXX-2830-A0 13 After...
... operating the power tool, see the instruction manual of the power tool being operated with steady, even pressure. NOTICE Avoid exposing the battery to a power tool with a battery compartment: 3 3 2 1 ► Line up the arrow on the connecting cord plug (1) with the arrow on activating and ...AP Adapter socket (2) with steady, even pressure until it is not fully charged, STIHL recommends that you fully charge the battery before using it engages with the connecting cord inserted into the power tool's battery compartment (4) until it the first time, @ 8.2. 0000-GXX-2830-A0 13 After...
Instruction Manual
Page 19
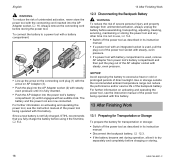
14 USB Port (AR 1000 only) 14 USB Port (AR 1000 only) 15 Transporting English 14.1 Charging a USB Device WARNING High voltage and excessive charging current at the USB port may damage the connected USB device. Never place objects on the battery or stack batteries on top of ...paper clips, nails, coins, keys), @ 5.1. When transporting an undamaged and properly functioning backpack battery: ► Disconnect the battery from the power tool and insert the AP Adapter in the pouch. 1 4 ► Unplug the battery from the power tool or charger. ► Remove the cover (1). ► Pass the ...
14 USB Port (AR 1000 only) 14 USB Port (AR 1000 only) 15 Transporting English 14.1 Charging a USB Device WARNING High voltage and excessive charging current at the USB port may damage the connected USB device. Never place objects on the battery or stack batteries on top of ...paper clips, nails, coins, keys), @ 5.1. When transporting an undamaged and properly functioning backpack battery: ► Disconnect the battery from the power tool and insert the AP Adapter in the pouch. 1 4 ► Unplug the battery from the power tool or charger. ► Remove the cover (1). ► Pass the ...
Instruction Manual
Page 20
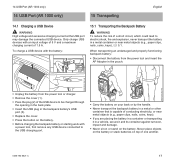
...Protect the battery from unintended activation, unplug the battery before transporting such a battery. To clean the battery: ► Clean dust and dirt off the battery with water. 18 0458-794-8621-C The backpack battery is regulated. For further information please go to your STIHL servicing dealer ...ambient temperature between 40 % and 60 % (2 green LEDs). ► Do not leave spare batteries unused. They may apply to www.stihlusa.com/battery-transportation-safety (for Canada: www.stihl.ca). 16 Storing explode, resulting in severe or fatal personal injury or property damage, @ ...
...Protect the battery from unintended activation, unplug the battery before transporting such a battery. To clean the battery: ► Clean dust and dirt off the battery with water. 18 0458-794-8621-C The backpack battery is regulated. For further information please go to your STIHL servicing dealer ...ambient temperature between 40 % and 60 % (2 green LEDs). ► Do not leave spare batteries unused. They may apply to www.stihlusa.com/battery-transportation-safety (for Canada: www.stihl.ca). 16 Storing explode, resulting in severe or fatal personal injury or property damage, @ ...

Instruction Manual
Page 21
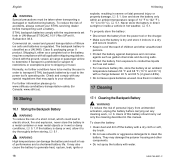
... not been serviced or maintained properly, coverage may be performed by an authorized STIHL servicing dealer. There are no user-authorized repairs. 18 Inspection and Maintenance 17.2 Clean the Contact Surfaces of the Connecting Cord ► Disconnect the backpack battery, @ 12.3. 1 1 1 ► Clean the contact surfaces (1) with a fine P 600 sand paper until...
... not been serviced or maintained properly, coverage may be performed by an authorized STIHL servicing dealer. There are no user-authorized repairs. 18 Inspection and Maintenance 17.2 Clean the Contact Surfaces of the Connecting Cord ► Disconnect the backpack battery, @ 12.3. 1 1 1 ► Clean the contact surfaces (1) with a fine P 600 sand paper until...
Instruction Manual
Page 22
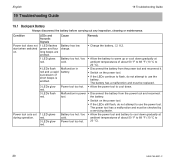
.... 20 °C). 20 0458-794-8621-C Battery too hot / too cold. Malfunction in battery. Cause Remedy Battery has low charge. ► Charge the battery, @ 8.2. Power tool too hot. ► Allow the battery to warm up or cool down gradually at cold. The battery has a malfunction and must be replaced. &#...9658; Switch on the power tool. ► If the LEDs continue to flash, do not attempt to use the battery. Battery too hot / too ► Allow the power tool and battery to cool down gradually at ambient temperatures of short beeps is emitted. 3 LEDs glow red. 3 LEDs flash red...
.... 20 °C). 20 0458-794-8621-C Battery too hot / too cold. Malfunction in battery. Cause Remedy Battery has low charge. ► Charge the battery, @ 8.2. Power tool too hot. ► Allow the battery to warm up or cool down gradually at cold. The battery has a malfunction and must be replaced. &#...9658; Switch on the power tool. ► If the LEDs continue to flash, do not attempt to use the battery. Battery too hot / too ► Allow the power tool and battery to cool down gradually at ambient temperatures of short beeps is emitted. 3 LEDs glow red. 3 LEDs flash red...
