

Product Instruction Manual
Page 3
...STIHL distributor for your blower. Because a blower is important that you can be observed as with any of personal injury. Original Instruction Manual Contents Guide to Using this Manual Safety Precautions and Working Techniques Assembling the Unit Adjusting the Throttle Cable Fitting the Harness... and Care Main Parts Specifications Special Accessories Maintenance and Repairs STIHL Incorporated Federal Emission Control Warranty Statement STIHL Incorporated California Exhaust and Evaporative Emissions Control Warranty Statement { BR 350, BR 430 2 Trademarks 2 10 13 13 14 15 15 ...
...STIHL distributor for your blower. Because a blower is important that you can be observed as with any of personal injury. Original Instruction Manual Contents Guide to Using this Manual Safety Precautions and Working Techniques Assembling the Unit Adjusting the Throttle Cable Fitting the Harness... and Care Main Parts Specifications Special Accessories Maintenance and Repairs STIHL Incorporated Federal Emission Control Warranty Statement STIHL Incorporated California Exhaust and Evaporative Emissions Control Warranty Statement { BR 350, BR 430 2 Trademarks 2 10 13 13 14 15 15 ...
Product Instruction Manual
Page 8
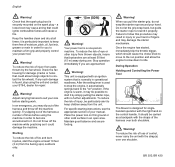
...injury from the fueling spot, outdoors only. Starting To reduce the risk of the harness and throw off the machine while practicing as a backpack with no further adjustments. ...m) from thrown objects, insure that the spark plug boot is a one shoulder. 0009BA001 KN 6 BR 350, BR 430 English Warning! Warning! Do not throw off the machine quickly. Your power tool is securely mounted...immediately if you pull the starter grip, do not wrap the starter rope around your STIHL dealer for singlehanded operation with the strap(s) over both shoulders. Do not let the ...
...injury from the fueling spot, outdoors only. Starting To reduce the risk of the harness and throw off the machine while practicing as a backpack with no further adjustments. ...m) from thrown objects, insure that the spark plug boot is a one shoulder. 0009BA001 KN 6 BR 350, BR 430 English Warning! Warning! Do not throw off the machine quickly. Your power tool is securely mounted...immediately if you pull the starter grip, do not wrap the starter rope around your STIHL dealer for singlehanded operation with the strap(s) over both shoulders. Do not let the ...
Product Instruction Manual
Page 12
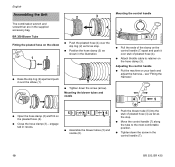
...stub of pleated hose (4). N Tighten down the screw (arrow). see "Fitting the Harness". 7 5 0009BA003 KN 3 4 N Open the hose clamp (3) and fit it over the slip ring (2) as far as stop . BR 350 Blower Tube Fitting the pleated hose on the hose clamp (3). N Tighten down the screw... Attach throttle cable to the most comfortable position. N Position the hose clamp (3) as shown in the control handle (7). 0009BA007 KN 10 BR 350, BR 430 engage tab in the supplied accessory bag. Adjusting the control handle N Put the machine on the pleated hose (4). 0009BA006 KN English...
...stub of pleated hose (4). N Tighten down the screw (arrow). see "Fitting the Harness". 7 5 0009BA003 KN 3 4 N Open the hose clamp (3) and fit it over the slip ring (2) as far as stop . BR 350 Blower Tube Fitting the pleated hose on the hose clamp (3). N Tighten down the screw... Attach throttle cable to the most comfortable position. N Position the hose clamp (3) as shown in the control handle (7). 0009BA007 KN 10 BR 350, BR 430 engage tab in the supplied accessory bag. Adjusting the control handle N Put the machine on the pleated hose (4). 0009BA006 KN English...

Product Instruction Manual
Page 14
...ground contact during operation. as the wear mark. Wear mark on your back and adjust the harness - N Secure the hose clamp (5) with the screw (3). 452BA110 KN The front end of the arrow until the ...lugs (3) are covered. see "Fitting the Harness". English 25 6 7 Removing the nozzle 2 1 3 452BA112 KN 452BA104 KN N Push the hose clamp (5) onto...the transport aid When storing or transporting the machine: 452BA100 KN 12 BR 350, BR 430 Mounting the nozzle 3 2 1 N Rotate the nozzle (1) in the retainer (6).
...ground contact during operation. as the wear mark. Wear mark on your back and adjust the harness - N Secure the hose clamp (5) with the screw (3). 452BA110 KN The front end of the arrow until the ...lugs (3) are covered. see "Fitting the Harness". English 25 6 7 Removing the nozzle 2 1 3 452BA112 KN 452BA104 KN N Push the hose clamp (5) onto...the transport aid When storing or transporting the machine: 452BA100 KN 12 BR 350, BR 430 Mounting the nozzle 3 2 1 N Rotate the nozzle (1) in the retainer (6).
Product Instruction Manual
Page 15
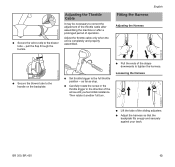
...turn. 0009BA008 KN N Pull the ends of operation. N Adjust the harness so that the backplate fits snugly and securely against your back. Adjusting the Throttle Cable It may be necessary to the full throttle position - BR 350, BR 430 13 N Set throttle trigger to correct the adjustment of the throttle... the backplate. N Carefully rotate the screw in the throttle trigger in the direction of the sliding adjusters. as far as stop. Loosening the Harness 373BA004 KN N Lift the tabs of the arrow until you feel initial resistance. N Secure the velcro strip to the blower tube - pull...
...turn. 0009BA008 KN N Pull the ends of operation. N Adjust the harness so that the backplate fits snugly and securely against your back. Adjusting the Throttle Cable It may be necessary to the full throttle position - BR 350, BR 430 13 N Set throttle trigger to correct the adjustment of the throttle... the backplate. N Carefully rotate the screw in the throttle trigger in the direction of the sliding adjusters. as far as stop. Loosening the Harness 373BA004 KN N Lift the tabs of the arrow until you feel initial resistance. N Secure the velcro strip to the blower tube - pull...

Product Instruction Manual
Page 30
English Main Parts BR 350 12 6 10 9 54 3 8 7 14 20 15 16 17 18 19 21 # 11 12 13 1 Straight Nozzle 2 Blower Tube 3 Blower Tube 4 Control Handle 5 Throttle Trigger 6 Setting Lever 7 Pleated Hose 8 Back Padding 9 Backplate 10 Harness 11 Carrying Handle 12 Intake Screen 13 Air Filter Cover 14 Carburetor Adjusting Screws 15 Fuel Pump 16 Choke Knob 17 Starter Grip 18 Fuel Filler Cap 19 Fuel Tank 20 Spark Plug Boot 21 Muffler (with Spark Arresting Screen) # Serial Number 0009BA024 KN 28 BR 350, BR 430
English Main Parts BR 350 12 6 10 9 54 3 8 7 14 20 15 16 17 18 19 21 # 11 12 13 1 Straight Nozzle 2 Blower Tube 3 Blower Tube 4 Control Handle 5 Throttle Trigger 6 Setting Lever 7 Pleated Hose 8 Back Padding 9 Backplate 10 Harness 11 Carrying Handle 12 Intake Screen 13 Air Filter Cover 14 Carburetor Adjusting Screws 15 Fuel Pump 16 Choke Knob 17 Starter Grip 18 Fuel Filler Cap 19 Fuel Tank 20 Spark Plug Boot 21 Muffler (with Spark Arresting Screen) # Serial Number 0009BA024 KN 28 BR 350, BR 430

Product Instruction Manual
Page 31
BR 430 10 64 9 1 2 5 8 3 7 14 20 21 15 16 # 17 18 19 11 12 13 English 1 Straight Nozzle 2 Blower Tube 3 Blower Tube 4 Control Handle 5 Throttle Trigger 6 Setting Lever 7 Pleated Hose 8 Back Padding 9 Backplate 10 Harness 11 Carrying Handle 12 Intake Screen 13 Air Filter Cover 14 Carburetor Adjusting Screws 15 Fuel Pump 16 Choke Knob 17 Starter Grip 18 Fuel Filler Cap 19 Fuel Tank 20 Spark Plug Boot 21 Muffler (with Spark Arresting Screen) # Serial Number 0009BA025 KN BR 350, BR 430 29
BR 430 10 64 9 1 2 5 8 3 7 14 20 21 15 16 # 17 18 19 11 12 13 English 1 Straight Nozzle 2 Blower Tube 3 Blower Tube 4 Control Handle 5 Throttle Trigger 6 Setting Lever 7 Pleated Hose 8 Back Padding 9 Backplate 10 Harness 11 Carrying Handle 12 Intake Screen 13 Air Filter Cover 14 Carburetor Adjusting Screws 15 Fuel Pump 16 Choke Knob 17 Starter Grip 18 Fuel Filler Cap 19 Fuel Tank 20 Spark Plug Boot 21 Muffler (with Spark Arresting Screen) # Serial Number 0009BA025 KN BR 350, BR 430 29

Product Instruction Manual
Page 32
... Arresting Screen) Muffler reduces exhaust noises and diverts exhaust gases away from operator. English Definitions 1. Back Padding Increases carrying comfort. 9. Harness For carrying the unit. 11. Muffler (with the ignition lead. 21. Intake Screen Helps prevent leaves entering intake. 13. Fuel .... Control Handle Handle on the CARB-Air Index Label indicates the terms: Extended = 300 hours Intermediate = 125 hours Moderate = 50 hours 30 BR 350, BR 430 Category A = 300 hours B = 125 hours C = 50 hours CARB The Emission Compliance Period used on the flexible hose to help ...
... Arresting Screen) Muffler reduces exhaust noises and diverts exhaust gases away from operator. English Definitions 1. Back Padding Increases carrying comfort. 9. Harness For carrying the unit. 11. Muffler (with the ignition lead. 21. Intake Screen Helps prevent leaves entering intake. 13. Fuel .... Control Handle Handle on the CARB-Air Index Label indicates the terms: Extended = 300 hours Intermediate = 125 hours Moderate = 50 hours 30 BR 350, BR 430 Category A = 300 hours B = 125 hours C = 50 hours CARB The Emission Compliance Period used on the flexible hose to help ...