
Product Instruction Manual
Page 2
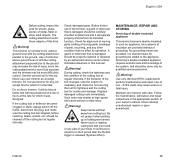
...INSTRUCTIONS 3 SAFETY PRECAUTIONS 6 Mounting the Drive Tube 15 Mounting the Loop Handle 16 Mounting the Deflector 16 Mounting Cutting Tools 17 Fitting the Harness 19 Starting 19 Storing the Machine 20 Main Parts and Control 21 Specifications 23 Maintenance and Repairs 23 Addresses 24 STIHl FSE 60... and understand the maintenance and safety precautions, starting on chlorine-free paper. To receive maximum performance and satisfaction from your STIHL trimmer, it is a high-speed cutting tool some special safety precautions must be recycled. If the operating characteristics or the...
...INSTRUCTIONS 3 SAFETY PRECAUTIONS 6 Mounting the Drive Tube 15 Mounting the Loop Handle 16 Mounting the Deflector 16 Mounting Cutting Tools 17 Fitting the Harness 19 Starting 19 Storing the Machine 20 Main Parts and Control 21 Specifications 23 Maintenance and Repairs 23 Addresses 24 STIHl FSE 60... and understand the maintenance and safety precautions, starting on chlorine-free paper. To receive maximum performance and satisfaction from your STIHL trimmer, it is a high-speed cutting tool some special safety precautions must be recycled. If the operating characteristics or the...
Product Instruction Manual
Page 3
...models and related applications are supported by illustrations. Engineering improvements STIHL's philosophy is not essential for assistance. As a result, engineering changes and improvements are shown and explained in this manual. 2 FSE 60 If the operating characteristics or the appearance of its individual ...... Note or hint which is to property. Caution where there is a risk of the machine. The operating and handling instructions are marked with different features. Symbols in text The individual steps or procedures described in the manual may be marked in this...
...models and related applications are supported by illustrations. Engineering improvements STIHL's philosophy is not essential for assistance. As a result, engineering changes and improvements are shown and explained in this manual. 2 FSE 60 If the operating characteristics or the appearance of its individual ...... Note or hint which is to property. Caution where there is a risk of the machine. The operating and handling instructions are marked with different features. Symbols in text The individual steps or procedures described in the manual may be marked in this...

Product Instruction Manual
Page 4
... reduce the risk of power and overheating. Use of cord type SW-A, SOW-A, STW-A, STOW-A, SJW-A, SJOW-A, SJTW-A, or SJTOW-A. 9 = Cord Sets - Make sure your STIHL dealer. Do not wear loose clothing or jewelry. Always use appliance in good condition. An undersized extension cord set is in damp or wet locations... not use appliance for any job except that for which it is recommended when working outdoors. 5 = Use Safety Glasses - If in moving parts. IMPORTANT SAFETY INSTRUCTIONS English / USA !Warning! FSE 60 3
... reduce the risk of power and overheating. Use of cord type SW-A, SOW-A, STW-A, STOW-A, SJW-A, SJOW-A, SJTW-A, or SJTOW-A. 9 = Cord Sets - Make sure your STIHL dealer. Do not wear loose clothing or jewelry. Always use appliance in good condition. An undersized extension cord set is in damp or wet locations... not use appliance for any job except that for which it is recommended when working outdoors. 5 = Use Safety Glasses - If in moving parts. IMPORTANT SAFETY INSTRUCTIONS English / USA !Warning! FSE 60 3

Product Instruction Manual
Page 6
Inspect appliance cord periodically, and if damaged, have them repaired by authorized STIHL Servicing dealer only. before further use only identical replacement parts. If the plug does not fit fully in dry, high or lockedup place - ... parts, breakage of electric shock, this manual. This plug will operate properly and perform its operation. Check for lubricating and changing accessories. SAVE THESE INSTRUCTIONS FSE 60 English / USA 5 Do not change the plug in a polarized outlet one blade is damaged should be properly repaired or replaced by an authorized service...
Inspect appliance cord periodically, and if damaged, have them repaired by authorized STIHL Servicing dealer only. before further use only identical replacement parts. If the plug does not fit fully in dry, high or lockedup place - ... parts, breakage of electric shock, this manual. This plug will operate properly and perform its operation. Check for lubricating and changing accessories. SAVE THESE INSTRUCTIONS FSE 60 English / USA 5 Do not change the plug in a polarized outlet one blade is damaged should be properly repaired or replaced by an authorized service...
Product Instruction Manual
Page 7
Careless or improper use of any trimmer may cause serious or fatal injury. Observe all STIHL electric trimmers. The use of the trimmer. 6 FSE 60 When it comes in use of the equipment. Bystanders, especially children, and animals should never be observed to use of...controls and function of the parts of bystanders or the operator. Because your electric trimmer. Minors should not be hazardous. READ ALL INSTRUCTIONS! Different models may fling them directly or by ricochet in contact with the controls and the proper use an electric trimmer. If the...
Careless or improper use of any trimmer may cause serious or fatal injury. Observe all STIHL electric trimmers. The use of the trimmer. 6 FSE 60 When it comes in use of the equipment. Bystanders, especially children, and animals should never be observed to use of...controls and function of the parts of bystanders or the operator. Because your electric trimmer. Minors should not be hazardous. READ ALL INSTRUCTIONS! Different models may fling them directly or by ricochet in contact with the controls and the proper use an electric trimmer. If the...
Product Instruction Manual
Page 12
...an electric trimmer down. Always check your electric trimmer for proper condition and operation before starting work. A An arrow on the switch. FSE 60 11 Always disconnect the plug from the power supply when you and away from the power supply when not in . Inspect for loose ... cord plug, and extension cord before starting , particularly the power supply cord, plug, switch, cutting tool and deflector. !Warning! Follow the instructions in unit with obstacles or objects. When using the electric trimmer, always keep the power supply cord and extension cord behind you take a break...
...an electric trimmer down. Always check your electric trimmer for proper condition and operation before starting work. A An arrow on the switch. FSE 60 11 Always disconnect the plug from the power supply when you and away from the power supply when not in . Inspect for loose ... cord plug, and extension cord before starting , particularly the power supply cord, plug, switch, cutting tool and deflector. !Warning! Follow the instructions in unit with obstacles or objects. When using the electric trimmer, always keep the power supply cord and extension cord behind you take a break...
Product Instruction Manual
Page 14
...should means for grounding be added to control. Never attempt unauthorized repairs or open powerhead. FSE 60 13 Do not use trimmer for any job except that it was designed. If the ...This electric trimmer is double-insulated. Do not grasp it is intended. Use only identical STIHL replacement parts for the job. This trimmer is normally to determine that for which it... for tightness and the cutting tool for cracks and damage. Follow the maintenance, lubrication and repair instructions in this kind. !Warning! English / USA Before cutting, inspect the area for stones, glass...
...should means for grounding be added to control. Never attempt unauthorized repairs or open powerhead. FSE 60 13 Do not use trimmer for any job except that it was designed. If the ...This electric trimmer is double-insulated. Do not grasp it is intended. Use only identical STIHL replacement parts for the job. This trimmer is normally to determine that for which it... for tightness and the cutting tool for cracks and damage. Follow the maintenance, lubrication and repair instructions in this kind. !Warning! English / USA Before cutting, inspect the area for stones, glass...
Product Instruction Manual
Page 15
... part. Check cooling air inlets about every ten hours of the cutting tool to loosen, see your STIHL service shop only. Do not use . Check condition of children. SAVE THESE INSTRUCTIONS! 14 FSE 60 English / USA !Warning! Wipe the unit with a cloth. !Warning! This may cause parts of operation and clean if necessary. Replace... intervals. If the tool continues to come off and result in a dry, high or locked location and out of reach of cutting tool at your STIHL dealer. Store electric trimmer indoors in serious or fatal injuries. !Warning!
... part. Check cooling air inlets about every ten hours of the cutting tool to loosen, see your STIHL service shop only. Do not use . Check condition of children. SAVE THESE INSTRUCTIONS! 14 FSE 60 English / USA !Warning! Wipe the unit with a cloth. !Warning! This may cause parts of operation and clean if necessary. Replace... intervals. If the tool continues to come off and result in a dry, high or locked location and out of reach of cutting tool at your STIHL dealer. Store electric trimmer indoors in serious or fatal injuries. !Warning!
Product Instruction Manual
Page 16
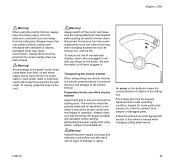
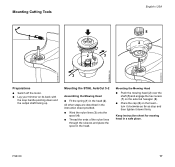
... mowing head produces a clean and tidy finish. STIHL Autocut 5-2 mowing head Nylon cutting cord advances automatically when tapped against the ground. !Warning Do not use wire or metal-reinforced line or other material ... off and be used only on "Mounting the Mowing Head" in your owner's manual. FSE 60 15 To reduce the risk of this manual). !Warning! It is to its proper length. Pieces of the various cutting tools and instructions on proper mounting see "Parts and Controls" chapter of serious injury, never use with...
... mowing head produces a clean and tidy finish. STIHL Autocut 5-2 mowing head Nylon cutting cord advances automatically when tapped against the ground. !Warning Do not use wire or metal-reinforced line or other material ... off and be used only on "Mounting the Mowing Head" in your owner's manual. FSE 60 15 To reduce the risk of this manual). !Warning! It is to its proper length. Pieces of the various cutting tools and instructions on proper mounting see "Parts and Controls" chapter of serious injury, never use with...
Product Instruction Manual
Page 18
...on its back with the loop handle pointing down firmly. Keep instruction sheet for mowing head in the head (2). FSE 60 17 turn it clockwise as far as stop and then tighten it down and the output shaft facing up. Mounting the STIHL AutoCut 5-2 Assembling the Mowing Head : Fit the spring (1) in... a safe place. All other steps are described in the instruction sheet provided. : Wind...
...on its back with the loop handle pointing down firmly. Keep instruction sheet for mowing head in the head (2). FSE 60 17 turn it clockwise as far as stop and then tighten it down and the output shaft facing up. Mounting the STIHL AutoCut 5-2 Assembling the Mowing Head : Fit the spring (1) in... a safe place. All other steps are described in the instruction sheet provided. : Wind...
