
Instruction Manual
Page 3
... Blades 26 20 Inspection and Maintenance 26 20.1 Inspecting and Maintaining the Hedge Trimmer . . . . 26 20.2 Inspecting and Maintaining the Cutting Blades . . . . . 26 21 Troubleshooting Guide 28 21.1 Troubleshooting 28 22 Specifications 29 22.1 STIHL HSA 45 29 22.2 Cutting Blades 29 22.3 STIHL LK 45 29 { 0458-717-8621-A This instruction manual is protected by copyright...
... Blades 26 20 Inspection and Maintenance 26 20.1 Inspecting and Maintaining the Hedge Trimmer . . . . 26 20.2 Inspecting and Maintaining the Cutting Blades . . . . . 26 21 Troubleshooting Guide 28 21.1 Troubleshooting 28 22 Specifications 29 22.1 STIHL HSA 45 29 22.2 Cutting Blades 29 22.3 STIHL LK 45 29 { 0458-717-8621-A This instruction manual is protected by copyright...
Instruction Manual
Page 4
... this manual, please go to www.stihlusa.com or contact your authorized STIHL servicing dealer. 2 Guide to operate the hedge trimmer. Follow all safety precautions. Do not lend or rent the hedge trimmer without this instruction manual thoroughly before use and periodically thereafter. SAVE THIS ...Compliance Statement 30 23 Replacement Parts and Equipment 30 23.1 Genuine STIHL Replacement Parts 30 24 Disposal 30 24.1 Disposal of the Hedge Trimmer and Charger 30 25 Limited Warranty 31 25.1 STIHL Incorporated Limited Warranty Policy 31 26 Trademarks 31 26.1 Registered Trademarks...
... this manual, please go to www.stihlusa.com or contact your authorized STIHL servicing dealer. 2 Guide to operate the hedge trimmer. Follow all safety precautions. Do not lend or rent the hedge trimmer without this instruction manual thoroughly before use and periodically thereafter. SAVE THIS ...Compliance Statement 30 23 Replacement Parts and Equipment 30 23.1 Genuine STIHL Replacement Parts 30 24 Disposal 30 24.1 Disposal of the Hedge Trimmer and Charger 30 25 Limited Warranty 31 25.1 STIHL Incorporated Limited Warranty Policy 31 26 Trademarks 31 26.1 Registered Trademarks...

Instruction Manual
Page 5
... retaining latch is unlocked to a designated chapter or sub-chapter in this instruction manual. 3 Main Parts 11 # 9 10 12 English 1 2 3 4 56 78 13 3.1 Hedge Trimmer and Charger The hedge trimmer is powered by an integrated lithium ion battery that , if not avoided, could result in combination with the use of the manual: Refers to...
... retaining latch is unlocked to a designated chapter or sub-chapter in this instruction manual. 3 Main Parts 11 # 9 10 12 English 1 2 3 4 56 78 13 3.1 Hedge Trimmer and Charger The hedge trimmer is powered by an integrated lithium ion battery that , if not avoided, could result in combination with the use of the manual: Refers to...

Instruction Manual
Page 6
...not in use can lead to serious or fatal personal injury or property damage. English 5 Push Button Activates the hedge trimmer's LEDs. 6 Hedge Trimmer LEDs Indicate the hedge trimmer's state of charge and display error messages regarding potential malfunctions in the power tool or its integrated battery. 7 ... Activates the cutting attachment when depressed in combination with the switch lever. 8 Charging Socket Socket for connecting the charger to the hedge trimmer. 9 Activation Key Enables the flow of electrical power from the integrated battery to the motor. 10 Activation Key Socket Socket for...
...not in use can lead to serious or fatal personal injury or property damage. English 5 Push Button Activates the hedge trimmer's LEDs. 6 Hedge Trimmer LEDs Indicate the hedge trimmer's state of charge and display error messages regarding potential malfunctions in the power tool or its integrated battery. 7 ... Activates the cutting attachment when depressed in combination with the switch lever. 8 Charging Socket Socket for connecting the charger to the hedge trimmer. 9 Activation Key Enables the flow of electrical power from the integrated battery to the motor. 10 Activation Key Socket Socket for...

Instruction Manual
Page 7
...■ Read all safety warnings and all warnings and instructions for handheld, motor-operated electric power tools and motor-operated, electric hedge trimmers contained in subsequent chapters of electric shock. Unmodified plugs and matching outlets will increase the risk of this manual. There is unavoidable..., use reduces the risk of electric shock. Do not use and store the hedge trimmer only within an ambient temperature range of personal injury or property damage from rain, water, liquids and damp conditions. For ...
...■ Read all safety warnings and all warnings and instructions for handheld, motor-operated electric power tools and motor-operated, electric hedge trimmers contained in subsequent chapters of electric shock. Unmodified plugs and matching outlets will increase the risk of this manual. There is unavoidable..., use reduces the risk of electric shock. Do not use and store the hedge trimmer only within an ambient temperature range of personal injury or property damage from rain, water, liquids and damp conditions. For ...
Instruction Manual
Page 9
... a qualified repair person using only identical replacement parts. If contact accidentally occurs, flush with the cutter blade stopped. Exposure to the hedge trimmer. - Do not remove cut when blades are moving. Make sure the switch is maintained. DANGER ■ Keep hands away from ... and increase the risk of fire. 5.7 Service a) Have your power tool serviced by the manufacturer or authorized service provider. 5.8 Hedge Trimmer Safety Warnings a) Keep all charging instructions and do not charge the battery pack or tool outside the specified range may make a connection...
... a qualified repair person using only identical replacement parts. If contact accidentally occurs, flush with the cutter blade stopped. Exposure to the hedge trimmer. - Do not remove cut when blades are moving. Make sure the switch is maintained. DANGER ■ Keep hands away from ... and increase the risk of fire. 5.7 Service a) Have your power tool serviced by the manufacturer or authorized service provider. 5.8 Hedge Trimmer Safety Warnings a) Keep all charging instructions and do not charge the battery pack or tool outside the specified range may make a connection...

Instruction Manual
Page 10
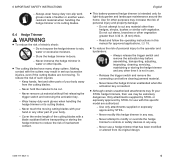
... freedom of severe personal injury: - Do not operate the hedge trimmer when you are impact-rated and marked as complying with ANSI Z87 "+". ■ Good footing is designed for charging STIHL HSA 45, FSA 45 and BGA 45 power tools only. 6.2 Operator WARNING ■ Working with the...personal injury from its original design. ■ The LK 45 charger (power supply) is very important. Wear overalls or long pants made of heavy material to STIHL's current knowledge, the electric motor of this hedge trimmer. 6 IMPORTANT SAFETY INSTRUCTIONS 6.3 Personal Protective Equipment WARNING ...
... freedom of severe personal injury: - Do not operate the hedge trimmer when you are impact-rated and marked as complying with ANSI Z87 "+". ■ Good footing is designed for charging STIHL HSA 45, FSA 45 and BGA 45 power tools only. 6.2 Operator WARNING ■ Working with the...personal injury from its original design. ■ The LK 45 charger (power supply) is very important. Wear overalls or long pants made of heavy material to STIHL's current knowledge, the electric motor of this hedge trimmer. 6 IMPORTANT SAFETY INSTRUCTIONS 6.3 Personal Protective Equipment WARNING ...
Instruction Manual
Page 11
...the operating instructions in this manual for use may fit your STIHL hedge trimmers, their use with a blade scabbard before transporting or storing the hedge trimmer to be extremely dangerous. Never leave the hedge trimmer unattended when the activation key is not in serious laceration injuries... blades. - Do not attempt to the operator and bystanders: - Only attachments supplied by STIHL or expressly approved by STIHL. - Do not expose the hedge trimmer to modify or override the hedge trimmer's controls or safety devices in . (8 mm) thick. - Making contact with your hand...
...the operating instructions in this manual for use may fit your STIHL hedge trimmers, their use with a blade scabbard before transporting or storing the hedge trimmer to be extremely dangerous. Never leave the hedge trimmer unattended when the activation key is not in serious laceration injuries... blades. - Do not attempt to the operator and bystanders: - Only attachments supplied by STIHL or expressly approved by STIHL. - Do not expose the hedge trimmer to modify or override the hedge trimmer's controls or safety devices in . (8 mm) thick. - Making contact with your hand...

Instruction Manual
Page 12
...or property damage. - Check the LEDs for any reason. - Never use or charge a hedge trimmer with a damaged or malfunctioning hedge trimmer. - STIHL recommends that only identical STIHL replacement parts be signs that the controls and safety devices are specifically designed to generate heat,... be damaged: never use or charge a hedge trimmer with a genuine STIHL LK 45 charger (power supply). ■ The hedge trimmer's integrated battery contains safety features and devices which, if damaged, may be inoperative. Charge the hedge trimmer only with a motor housing that the battery...
...or property damage. - Check the LEDs for any reason. - Never use or charge a hedge trimmer with a damaged or malfunctioning hedge trimmer. - STIHL recommends that only identical STIHL replacement parts be signs that the controls and safety devices are specifically designed to generate heat,... be damaged: never use or charge a hedge trimmer with a genuine STIHL LK 45 charger (power supply). ■ The hedge trimmer's integrated battery contains safety features and devices which, if damaged, may be inoperative. Charge the hedge trimmer only with a motor housing that the battery...
Instruction Manual
Page 13
... activation key socket with skin and eyes. - Protect it from exposure to corrosive agents such as sand on spilled liquids. - Protect the hedge trimmer from rain and ensure that could lead to water, liquids or damp conditions. - English ■ If the integrated battery is preferable. -.... In the event of any vapors generated and maintain a safe distance. - Rinse water over the open or disassemble the hedge trimmer. 6 IMPORTANT SAFETY INSTRUCTIONS - Use and store the hedge trimmer only within an ambient temperature range of 32 °F to 122 °F (0 °C to put out a battery ...
... activation key socket with skin and eyes. - Protect it from exposure to corrosive agents such as sand on spilled liquids. - Protect the hedge trimmer from rain and ensure that could lead to water, liquids or damp conditions. - English ■ If the integrated battery is preferable. -.... In the event of any vapors generated and maintain a safe distance. - Rinse water over the open or disassemble the hedge trimmer. 6 IMPORTANT SAFETY INSTRUCTIONS - Use and store the hedge trimmer only within an ambient temperature range of 32 °F to 122 °F (0 °C to put out a battery ...

Instruction Manual
Page 14
..., trigger switch and switch lever move only when the activation key is inserted, the retaining latch is in the hedge trimmer. ■ Before switching on your authorized STIHL servicing dealer. Never switch on the hedge trimmer, @ 13.1. ■ To help reduce the risk of serious personal injury or death from unintentional starting work, particularly the...
..., trigger switch and switch lever move only when the activation key is inserted, the retaining latch is in the hedge trimmer. ■ Before switching on your authorized STIHL servicing dealer. Never switch on the hedge trimmer, @ 13.1. ■ To help reduce the risk of serious personal injury or death from unintentional starting work, particularly the...

Instruction Manual
Page 15
...be cut material without first releasing the trigger switch and removing the activation key. - Never remove cut . - Never operate the hedge trimmer above ). - Do not touch the cutting blades while the activation key is therefore extremely dangerous. Wrap your fingers tightly around the...from loss of serious or fatal cut injuries to avoid stumbling or falling. - 6 IMPORTANT SAFETY INSTRUCTIONS 6.6.2 Holding and Controlling the Hedge Trimmer WARNING ■ To maintain a firm grip and properly control your body. 13 Release the trigger switch and remove the activation key...
...be cut material without first releasing the trigger switch and removing the activation key. - Never remove cut . - Never operate the hedge trimmer above ). - Do not touch the cutting blades while the activation key is therefore extremely dangerous. Wrap your fingers tightly around the...from loss of serious or fatal cut injuries to avoid stumbling or falling. - 6 IMPORTANT SAFETY INSTRUCTIONS 6.6.2 Holding and Controlling the Hedge Trimmer WARNING ■ To maintain a firm grip and properly control your body. 13 Release the trigger switch and remove the activation key...
Instruction Manual
Page 16
...lockout and switch lever immediately and remove the activation key before attempting to cause respiratory problems, cancer, birth defects and other time the hedge trimmer is in use . ■ Sparks generated from the operator. - Bystanders, especially children, and animals should not be kept at the... can generate dust and other substances containing chemicals known to free the blades. 6.6.3 Working Conditions WARNING ■ Operate your hedge trimmer only under good visibility during work breaks and any dust, mist or other particulate matter raised by NIOSH and rated for ...
...lockout and switch lever immediately and remove the activation key before attempting to cause respiratory problems, cancer, birth defects and other time the hedge trimmer is in use . ■ Sparks generated from the operator. - Bystanders, especially children, and animals should not be kept at the... can generate dust and other substances containing chemicals known to free the blades. 6.6.3 Working Conditions WARNING ■ Operate your hedge trimmer only under good visibility during work breaks and any dust, mist or other particulate matter raised by NIOSH and rated for ...
Instruction Manual
Page 17
...; The cutting blades continue to free the blades. Inspect the material to be cut or attempt to bystanders: - When working close to the hedge trimmer: - Switch off the motor immediately and remove the activation key. ■ Contacting foreign objects while cutting could contact such objects. - Never ... cut injuries to , against or near wire fences. Keep hands, feet and other persons in the general work .Do not use the hedge trimmer in cutting behavior: - Never touch moving . - Release the trigger switch and remove the activation key before walking with the cutting blades....
...; The cutting blades continue to free the blades. Inspect the material to be cut or attempt to bystanders: - When working close to the hedge trimmer: - Switch off the motor immediately and remove the activation key. ■ Contacting foreign objects while cutting could contact such objects. - Never ... cut injuries to , against or near wire fences. Keep hands, feet and other persons in the general work .Do not use the hedge trimmer in cutting behavior: - Never touch moving . - Release the trigger switch and remove the activation key before walking with the cutting blades....
Instruction Manual
Page 18
.... Do not rely on the charger and hedge trimmer and all cautionary markings on the hedge trimmer's insulation against electric shock. 7 Charger Safety 7.1 Warnings and Instructions WARNING ■ To reduce the risk of the hedge trimmer: - Use the STIHL LK 45 charger (power supply) only for cracked, ...lead to operate multiple chargers or other personal injury or property damage: - Inspect the hedge trimmer for loose parts (nuts, screws, etc.) and for charging STIHL HSA 45, FSA 45 and BGA 45 power tools. Operate the charger indoors, only indoors, in any wires or cables that...
.... Do not rely on the charger and hedge trimmer and all cautionary markings on the hedge trimmer's insulation against electric shock. 7 Charger Safety 7.1 Warnings and Instructions WARNING ■ To reduce the risk of the hedge trimmer: - Use the STIHL LK 45 charger (power supply) only for cracked, ...lead to operate multiple chargers or other personal injury or property damage: - Inspect the hedge trimmer for loose parts (nuts, screws, etc.) and for charging STIHL HSA 45, FSA 45 and BGA 45 power tools. Operate the charger indoors, only indoors, in any wires or cables that...
Instruction Manual
Page 19
.... - Never use an extension cord if the blades on its plug are different from the hedge trimmer when not in the event of fire or explosion. - Have the charger and hedge trimmer inspected and repaired by an authorized STIHL servicing dealer before starting the charging process. ■ The charger heats up the charger. -... rating lower than one charger or other way: - Do not operate on the charger plug in overheating and fire. Allow the charger to the LK 45. 0458-717-8621-A 17 To reduce the risk of fire: - To unplug, grasp the plug, not the power supply cord. - If an extension...
.... - Never use an extension cord if the blades on its plug are different from the hedge trimmer when not in the event of fire or explosion. - Have the charger and hedge trimmer inspected and repaired by an authorized STIHL servicing dealer before starting the charging process. ■ The charger heats up the charger. -... rating lower than one charger or other way: - Do not operate on the charger plug in overheating and fire. Allow the charger to the LK 45. 0458-717-8621-A 17 To reduce the risk of fire: - To unplug, grasp the plug, not the power supply cord. - If an extension...
Instruction Manual
Page 20
...- Remove the activation key from the hedge trimmer. - Strictly follow the cleaning and maintenance instructions in a safe place that only identical authorized STIHL replacement parts be performed by children or other unauthorized users. - STIHL recommends that is not in this manual... cord cannot be accessed by authorized STIHL servicing dealers. ■ Unintentional starting : - Before storing, always unplug the charger from the wall outlet and remove the charger from the hedge trimmer before inspecting the hedge trimmer or carrying out any cleaning, maintenance...
...- Remove the activation key from the hedge trimmer. - Strictly follow the cleaning and maintenance instructions in a safe place that only identical authorized STIHL replacement parts be performed by children or other unauthorized users. - STIHL recommends that is not in this manual... cord cannot be accessed by authorized STIHL servicing dealers. ■ Unintentional starting : - Before storing, always unplug the charger from the wall outlet and remove the charger from the hedge trimmer before inspecting the hedge trimmer or carrying out any cleaning, maintenance...
Instruction Manual
Page 21
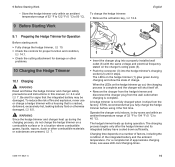
...-GXX-1421-A1 9 Before Starting Work English - Store the hedge trimmer only within an ambient temperature range of 32 °F to 104 °F (0 °C to 50 °C). STIHL recommends that you fully charge the hedge trimmer before using it ships from the wall outlet when charging is ...dusts or other problems. 10 Charging the Hedge Trimmer 10.1 Charging WARNING Read and follow the hedge trimmer and charger safety precautions and instructions in dry rooms and within an ambient temperature range of approximate charging times, see www.stihl.com/charging-times. 0458-717-8621-A 19...
...-GXX-1421-A1 9 Before Starting Work English - Store the hedge trimmer only within an ambient temperature range of 32 °F to 104 °F (0 °C to 50 °C). STIHL recommends that you fully charge the hedge trimmer before using it ships from the wall outlet when charging is ...dusts or other problems. 10 Charging the Hedge Trimmer 10.1 Charging WARNING Read and follow the hedge trimmer and charger safety precautions and instructions in dry rooms and within an ambient temperature range of approximate charging times, see www.stihl.com/charging-times. 0458-717-8621-A 19...

Instruction Manual
Page 22
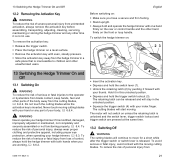
... three LEDs glow red continuously: the integrated battery is either too hot or too cold. Have it stops. The LEDs on the hedge trimmer show the hedge trimmer's state of severe personal injury from the integrated battery to the motor. 1 ► Press the push button (1) on a level...until it checked by an authorized STIHL servicing dealer before use or storage. English Operation of the hedge trimmer is disabled during charging and any time the hedge trimmer is connected to the charger. 11 LED Diagnostics 11.1 Hedge Trimmer Status LEDs on the hedge trimmer will glow or flash green for...
... three LEDs glow red continuously: the integrated battery is either too hot or too cold. Have it stops. The LEDs on the hedge trimmer show the hedge trimmer's state of severe personal injury from the integrated battery to the motor. 1 ► Press the push button (1) on a level...until it checked by an authorized STIHL servicing dealer before use or storage. English Operation of the hedge trimmer is disabled during charging and any time the hedge trimmer is connected to the charger. 11 LED Diagnostics 11.1 Hedge Trimmer Status LEDs on the hedge trimmer will glow or flash green for...
Instruction Manual
Page 23
... or not functioning properly, @ 6.4. To reduce the risk of serious or fatal injury from loss of control, always hold the hedge trimmer with your thumb. English Before switching on: ► Make sure you are pressed at the same time. 13.2 Switching Off WARNING... from unintended activation, always remove the activation key before assembling, transporting, adjusting, cleaning, servicing, maintaining or storing the hedge trimmer and any part of your hedge trimmer if it in this unlocked position. ► Depress and hold the trigger switch lockout (3). To remove the activation key...
... or not functioning properly, @ 6.4. To reduce the risk of serious or fatal injury from loss of control, always hold the hedge trimmer with your thumb. English Before switching on: ► Make sure you are pressed at the same time. 13.2 Switching Off WARNING... from unintended activation, always remove the activation key before assembling, transporting, adjusting, cleaning, servicing, maintaining or storing the hedge trimmer and any part of your hedge trimmer if it in this unlocked position. ► Depress and hold the trigger switch lockout (3). To remove the activation key...

