
Instruction Manual
Page 2
... on Handlebar 67 Stop Buffers 68 Buffers on Machines with Manual Fuel Pump 85 12.5 Carburetor 88 12.5.1 Leakage Test 89 RA_737_00_01_01 MS 231, MS 231 C, MS 251, MS 251 C q © ANDREAS STIHL AG & Co. QuickStop Super 73 10.3.1 Switch Lever QuickStop Super 74 10.3.2 Lockout ...8 3.1 Clutch 8 3.2 Chain Drive, Chain Brake, Chain Tensioner 9 3.3 Chain Lubrication 11 3.4 Rewind Starter 12 3.5 Ignition System 14 3.6 Carburetor 15 3.7 Engine 18 4. Rewind Starter 58 8.1 General 58 8.2 Fan housing 58 8.3 Pawls 59 8.4 ErgoStart 60 8.5 Rope Rotor 61 8.6 ...
... on Handlebar 67 Stop Buffers 68 Buffers on Machines with Manual Fuel Pump 85 12.5 Carburetor 88 12.5.1 Leakage Test 89 RA_737_00_01_01 MS 231, MS 231 C, MS 251, MS 251 C q © ANDREAS STIHL AG & Co. QuickStop Super 73 10.3.1 Switch Lever QuickStop Super 74 10.3.2 Lockout ...8 3.1 Clutch 8 3.2 Chain Drive, Chain Brake, Chain Tensioner 9 3.3 Chain Lubrication 11 3.4 Rewind Starter 12 3.5 Ignition System 14 3.6 Carburetor 15 3.7 Engine 18 4. Rewind Starter 58 8.1 General 58 8.2 Fan housing 58 8.3 Pawls 59 8.4 ErgoStart 60 8.5 Rope Rotor 61 8.6 ...

Instruction Manual
Page 3
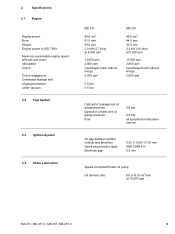
Servicing Aids 112 2 MS 231, MS 231 C, MS 251, MS 251 C Manual Fuel Pump 105 12.11.4 Manual Fuel Pump 107 12.11.5 Tank Housing 108 13. Special Servicing Tools 110 14. Contents 12.6 Servicing the Carburetor 90 12.6.1 Metering Diaphragm 90 12.6.2 Inlet Needle 90 12.6.3 Pump Diaphragm 91 12.6.4 ...Lever on Throttle Shaft 92 12.6.5 Adjusting Screws 93 12.7 Adjusting the Carburetor 95 12.7.1 Basic Setting 95 12.7.2 Standard setting 96 12.8 Carburetor Carrier 97 12.9 Intake Manifold 98 12.10 Tank Vent 99 12.10.1 Testing 99 12.10.2...
Servicing Aids 112 2 MS 231, MS 231 C, MS 251, MS 251 C Manual Fuel Pump 105 12.11.4 Manual Fuel Pump 107 12.11.5 Tank Housing 108 13. Special Servicing Tools 110 14. Contents 12.6 Servicing the Carburetor 90 12.6.1 Metering Diaphragm 90 12.6.2 Inlet Needle 90 12.6.3 Pump Diaphragm 91 12.6.4 ...Lever on Throttle Shaft 92 12.6.5 Adjusting Screws 93 12.7 Adjusting the Carburetor 95 12.7.1 Basic Setting 95 12.7.2 Standard setting 96 12.8 Carburetor Carrier 97 12.9 Intake Manifold 98 12.10 Tank Vent 99 12.10.1 Testing 99 12.10.2...
Instruction Manual
Page 6
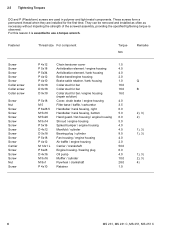
... rpm 13,000 rpm 2,800 rpm Centrifugal clutch without linings 3,500 rpm 0.5 bar 0.5 bar MS 251 45.6 cm3 44.0 mm 30.0 mm 2.2 kW (3.0 bhp) at 9,500 rpm 13,000 rpm 2,800 rpm Centrifugal clutch without linings 3,500 rpm Carburetor leakage test at gauge pressure: Operation of tank vent at gauge pressure: Fuel: 0.8 bar... (resistor type): Electrode gap: 0.30 (+ 0.05/- 0.10) mm NGK CMR 6 H 0.5 mm Speed-controlled Ematic oil pump Oil delivery rate: 8.0 (+/3.0) cm3/min at 10,000 rpm MS 231, MS 231 C, MS 251, MS 251 C 5 2.
... rpm 13,000 rpm 2,800 rpm Centrifugal clutch without linings 3,500 rpm 0.5 bar 0.5 bar MS 251 45.6 cm3 44.0 mm 30.0 mm 2.2 kW (3.0 bhp) at 9,500 rpm 13,000 rpm 2,800 rpm Centrifugal clutch without linings 3,500 rpm Carburetor leakage test at gauge pressure: Operation of tank vent at gauge pressure: Fuel: 0.8 bar... (resistor type): Electrode gap: 0.30 (+ 0.05/- 0.10) mm NGK CMR 6 H 0.5 mm Speed-controlled Ematic oil pump Oil delivery rate: 8.0 (+/3.0) cm3/min at 10,000 rpm MS 231, MS 231 C, MS 251, MS 251 C 5 2.
Instruction Manual
Page 7
... for bar / engine housing 16.0 (repair solution) P 5x18 Cover, chain brake / engine housing 4.0 M 5 Filter base / baffle / carburetor 3.5 P 6x26.5 Handlebar / tank housing, right 6.0 M 5x16 Handlebar / tank housing, bottom 5.0 M 5x20 Hand guard / fan housing /.../ cylinder 10.0 M 8x1 Flywheel / crankshaft 28.0 P 4x10 Retainer 1.0 Q B 2), 3) 2) 1), 3) 1), 3) 1), 3) 2), 3) 4) 6 MS 231, MS 231 C, MS 251, MS 251 C They can be removed and installed as often as necessary without impairing the strength of the screwed assembly, providing the specified tightening torque is...
... for bar / engine housing 16.0 (repair solution) P 5x18 Cover, chain brake / engine housing 4.0 M 5 Filter base / baffle / carburetor 3.5 P 6x26.5 Handlebar / tank housing, right 6.0 M 5x16 Handlebar / tank housing, bottom 5.0 M 5x20 Hand guard / fan housing /.../ cylinder 10.0 M 8x1 Flywheel / crankshaft 28.0 P 4x10 Retainer 1.0 Q B 2), 3) 2) 1), 3) 1), 3) 1), 3) 2), 3) 4) 6 MS 231, MS 231 C, MS 251, MS 251 C They can be removed and installed as often as necessary without impairing the strength of the screwed assembly, providing the specified tightening torque is...

Instruction Manual
Page 16
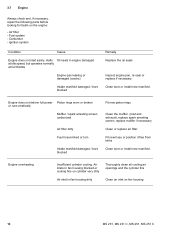
... new fuel hose Engine loses power during acceleration Sealing ring or spring in valve seat or cone Remove and clean the inlet needle, clean the carburetor Inlet needle worn Replace the inlet needle Inlet control lever sticking on fuel hose from tank to valve seat Remove inlet needle, clean and refit... diaphragm Tank vent faulty Replace tank vent Leak on spindle Check the inlet control lever and replace if necessary. foreign matter in accelerator Install new carburetor pump worn or damaged MS 231, MS 231 C, MS 251, MS 251 C 15 3.6 Carburetor Condition Carburetor floods;
... new fuel hose Engine loses power during acceleration Sealing ring or spring in valve seat or cone Remove and clean the inlet needle, clean the carburetor Inlet needle worn Replace the inlet needle Inlet control lever sticking on fuel hose from tank to valve seat Remove inlet needle, clean and refit... diaphragm Tank vent faulty Replace tank vent Leak on spindle Check the inlet control lever and replace if necessary. foreign matter in accelerator Install new carburetor pump worn or damaged MS 231, MS 231 C, MS 251, MS 251 C 15 3.6 Carburetor Condition Carburetor floods;

Instruction Manual
Page 17
... screw too rich or too lean Setting of idle speed screw LA incorrect - throttle shutter completely closed Tank vent faulty Clean the carburetor Reset low speed screw (L) correctly Reset idle speed screw (LA) correctly Replace tank vent Saw chain rotates at idle speed Leak ...to carburetor Seal connections or install new fuel hose Engine idle speed too high Readjust with idle speed screw LA (counterclockwise) Clutch springs stretched or fatigued Replace the clutch springs or install new clutch Clutch spring hooks broken Replace the clutch springs 16 MS 231, MS 231 C, MS 251, MS 251 C
... screw too rich or too lean Setting of idle speed screw LA incorrect - throttle shutter completely closed Tank vent faulty Clean the carburetor Reset low speed screw (L) correctly Reset idle speed screw (LA) correctly Replace tank vent Saw chain rotates at idle speed Leak ...to carburetor Seal connections or install new fuel hose Engine idle speed too high Readjust with idle speed screw LA (counterclockwise) Clutch springs stretched or fatigued Replace the clutch springs or install new clutch Clutch spring hooks broken Replace the clutch springs 16 MS 231, MS 231 C, MS 251, MS 251 C

Instruction Manual
Page 18
... open no power and a very low maximum speed Check carburetor and choke shaft, service or replace if necessary MS 231, MS 231 C, MS 251, MS 251 C 17 key in carburetor, replace if necessary Leak on fuel hose from tank to carburetor Seal connections or install new fuel hose Setting of high... speed screw H too Check basic carburetor setting, rich correct if necessary ...
... open no power and a very low maximum speed Check carburetor and choke shaft, service or replace if necessary MS 231, MS 231 C, MS 251, MS 251 C 17 key in carburetor, replace if necessary Leak on fuel hose from tank to carburetor Seal connections or install new fuel hose Setting of high... speed screw H too Check basic carburetor setting, rich correct if necessary ...
Instruction Manual
Page 19
... new hose or position it free from kinks Clean bore or install new manifold. Engine overheating Insufficient cylinder cooling. Clean bore or install new manifold. Carburetor - Air inlets in fan housing blocked or cooling fins on cylinder very dirty Thoroughly clean all cooling air openings and the cylinder fins Air inlet...-seal or replace if necessary. Fuel system - 3.7 Engine Always check and, if necessary, repair the following parts before looking for faults on fan housing 18 MS 231, MS 231 C, MS 251, MS 251 C Air filter -
... new hose or position it free from kinks Clean bore or install new manifold. Engine overheating Insufficient cylinder cooling. Clean bore or install new manifold. Carburetor - Air inlets in fan housing blocked or cooling fins on cylinder very dirty Thoroughly clean all cooling air openings and the cylinder fins Air inlet...-seal or replace if necessary. Fuel system - 3.7 Engine Always check and, if necessary, repair the following parts before looking for faults on fan housing 18 MS 231, MS 231 C, MS 251, MS 251 C Air filter -
Instruction Manual
Page 28
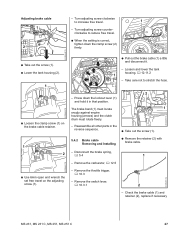
... . - The brake band (1) must locate snugly against engine housing (arrows) and the clutch drum must rotate freely. 2 1 - Remove the carburetor, b 12.5 - Check the brake cable (1) and retainer (2), replace if necessary MS 231, MS 231 C, MS 251, MS 251 C 27 Remove the switch lever, b 10.3.1 2 - Adjusting brake cable - Turn adjusting screw counter- clockwise to increase free travel on...
... . - The brake band (1) must locate snugly against engine housing (arrows) and the clutch drum must rotate freely. 2 1 - Remove the carburetor, b 12.5 - Check the brake cable (1) and retainer (2), replace if necessary MS 231, MS 231 C, MS 251, MS 251 C 27 Remove the switch lever, b 10.3.1 2 - Adjusting brake cable - Turn adjusting screw counter- clockwise to increase free travel on...
Instruction Manual
Page 33
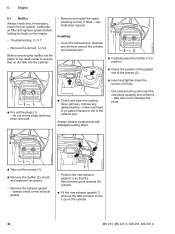
... the spark arresting screen, if fitted - Remove any gasket residue - Troubleshooting, b 3.7 - Installing - Engine 2310RA071 TG 6.1 Muffler Always check and, if necessary, repair the fuel system, carburetor, air filter and ignition system before looking for faults on the cylinder. 32 MS 231, MS 231 C, MS 251, MS 251 C see instruction manual.
... the spark arresting screen, if fitted - Remove any gasket residue - Troubleshooting, b 3.7 - Installing - Engine 2310RA071 TG 6.1 Muffler Always check and, if necessary, repair the fuel system, carburetor, air filter and ignition system before looking for faults on the cylinder. 32 MS 231, MS 231 C, MS 251, MS 251 C see instruction manual.

Instruction Manual
Page 34
... then the pressure test. Remove the muffler and gasket, b 6.1 1 2 2 : Fit the test flange (1) 5910 855 4201 on cylinder exhaust port. : Fit the screws (2) - Remove the carburetor, b 12.5 - do not tighten down firmly. - This can be checked thoroughly for leaks with the pump 0000 850 1300. 6.2.1 Preparations : Fit the spark plug (1) and... be modified as shown. 2310RA072 TG 2310RA074 TG 6.2 Leakage Test Defective oil seals and gaskets or cracks in place. 2310RA079 TG a 2710RA164 TG 2310RA073 TG MS 231, MS 231 C, MS 251, MS 251 C 33
... then the pressure test. Remove the muffler and gasket, b 6.1 1 2 2 : Fit the test flange (1) 5910 855 4201 on cylinder exhaust port. : Fit the screws (2) - Remove the carburetor, b 12.5 - do not tighten down firmly. - This can be checked thoroughly for leaks with the pump 0000 850 1300. 6.2.1 Preparations : Fit the spark plug (1) and... be modified as shown. 2310RA072 TG 2310RA074 TG 6.2 Leakage Test Defective oil seals and gaskets or cracks in place. 2310RA079 TG a 2710RA164 TG 2310RA073 TG MS 231, MS 231 C, MS 251, MS 251 C 33

Instruction Manual
Page 35
...0000 855 8106. - Remove the flange 1118 850 4200 from the crankshaft during the piston's induction stroke because there is airtight. 34 MS 231, MS 231 C, MS 251, MS 251 C If this kind of 0.5 bar. After finishing the test, push the ring to the right to push home the new plugs ... gauge (4) indicates a vacuum of pump 0000 850 1300 to the nipple (arrow). 2310RA076 TG 2310RA077 TG 1 : Push ring (1) to the left - Install the carburetor, b 12.5 - take care not to detect this pressure remains constant for the vacuum test, b 6.2.2 3 2 - If the pressure drops, the leak must...
...0000 855 8106. - Remove the flange 1118 850 4200 from the crankshaft during the piston's induction stroke because there is airtight. 34 MS 231, MS 231 C, MS 251, MS 251 C If this kind of 0.5 bar. After finishing the test, push the ring to the right to push home the new plugs ... gauge (4) indicates a vacuum of pump 0000 850 1300 to the nipple (arrow). 2310RA076 TG 2310RA077 TG 1 : Push ring (1) to the left - Install the carburetor, b 12.5 - take care not to detect this pressure remains constant for the vacuum test, b 6.2.2 3 2 - If the pressure drops, the leak must...
Instruction Manual
Page 38
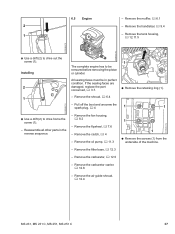
...8.2 - Remove the flywheel, b 7.6 - Remove the clutch, b 4 - Remove the handlebar, b 9.4 1 - Remove the carburetor, b 12.5 - Pull off the boot and unscrew the spark plug, b 4 1 1 2310RA090 TG : Use a drift (2) to be in the reverse ...sequence. - Remove the carburetor carrier, b 12.8 - If the sealing faces are damaged, replace the part concerned, b 3.7. : Remove the retaining ring (1). - Remove the shroud, b 6.4 - Remove the air guide shroud, b 12.4 2310RA092 TG MS 231, MS 231 C, MS 251, MS 251 C 37 Remove the muffler, b 6.1 ...
...8.2 - Remove the flywheel, b 7.6 - Remove the clutch, b 4 - Remove the handlebar, b 9.4 1 - Remove the carburetor, b 12.5 - Pull off the boot and unscrew the spark plug, b 4 1 1 2310RA090 TG : Use a drift (2) to be in the reverse ...sequence. - Remove the carburetor carrier, b 12.8 - If the sealing faces are damaged, replace the part concerned, b 3.7. : Remove the retaining ring (1). - Remove the shroud, b 6.4 - Remove the air guide shroud, b 12.4 2310RA092 TG MS 231, MS 231 C, MS 251, MS 251 C 37 Remove the muffler, b 6.1 ...

Instruction Manual
Page 51
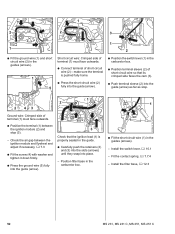
... the wiring harness, b 7.7.2. : Pull the short circuit wire (1) and ground wire (2) out of the troubleshooting chart, b 7.8 - Reassemble in the air guide shroud. 50 MS 231, MS 231 C, MS 251, MS 251 C Pull the carburetor towards the control handle - take care not to ground (3) and the short circuit wire's terminal (1). 2310RA130 TG - Set the Master Control lever to...
... the wiring harness, b 7.7.2. : Pull the short circuit wire (1) and ground wire (2) out of the troubleshooting chart, b 7.8 - Reassemble in the air guide shroud. 50 MS 231, MS 231 C, MS 251, MS 251 C Pull the carburetor towards the control handle - take care not to ground (3) and the short circuit wire's terminal (1). 2310RA130 TG - Set the Master Control lever to...
Instruction Manual
Page 53
... Crimped side of terminal (1) must face outwards. : Connect terminal of short circuit wire (2) - Position filter base in the carburetor box. 2310RA145 TG 1 : Fit the short circuit wire (1) in the guides (arrows). - make sure the terminal is ...short circuit wire (2) fully into the guide (arrow). 2310RA144 TG 1 2 : Position the switch lever (1) in the carburetor box. : Position terminal sleeve (2) of short circuit wire so that the ignition lead (1) is properly seated in the guide... into place. - Install the filter base, b 12.3 2310RA147 TG 52 MS 231, MS 231 C, MS 251, MS 251 C
... Crimped side of terminal (1) must face outwards. : Connect terminal of short circuit wire (2) - Position filter base in the carburetor box. 2310RA145 TG 1 : Fit the short circuit wire (1) in the guides (arrows). - make sure the terminal is ...short circuit wire (2) fully into the guide (arrow). 2310RA144 TG 1 2 : Position the switch lever (1) in the carburetor box. : Position terminal sleeve (2) of short circuit wire so that the ignition lead (1) is properly seated in the guide... into place. - Install the filter base, b 12.3 2310RA147 TG 52 MS 231, MS 231 C, MS 251, MS 251 C
Instruction Manual
Page 58
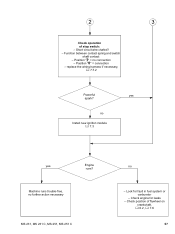
Position "0" = connection - replace the wiring harness if necessary, b 7.7.2 Powerful yes spark? MS 231, MS 231 C, MS 251, MS 251 C no further action necessary Engine runs? Check position of stop switch: - 2 3 Check operation of flywheel on crankshaft, b 6.2, b 7.6 57 Short circuit wire chafed? - Look for leaks - Check engine for fault in fuel system or carburetor - no Install new ignition module b 7.3 yes Machine runs trouble-free, no - Position "F" = no connection - Function between contact spring and switch shaft contact: -
Position "0" = connection - replace the wiring harness if necessary, b 7.7.2 Powerful yes spark? MS 231, MS 231 C, MS 251, MS 251 C no further action necessary Engine runs? Check position of stop switch: - 2 3 Check operation of flywheel on crankshaft, b 6.2, b 7.6 57 Short circuit wire chafed? - Look for leaks - Check engine for fault in fuel system or carburetor - no Install new ignition module b 7.3 yes Machine runs trouble-free, no - Position "F" = no connection - Function between contact spring and switch shaft contact: -
Instruction Manual
Page 72
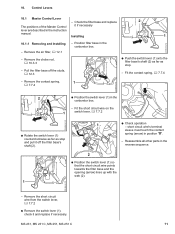
... and the opening (arrow) lines up with the web (2). 1 2310RA161 TG - Reassemble all other parts in the carburetor box. - short circuit wire's terminal sleeve must touch the contact spring (arrow) in the carburetor box. - MS 231, MS 231 C, MS 251, MS 251 C 71 Installing 1 10.1.1 Removing and Installing - Pull the filter base off the filter base's shaft (2). 1 : Check...
... and the opening (arrow) lines up with the web (2). 1 2310RA161 TG - Reassemble all other parts in the carburetor box. - short circuit wire's terminal sleeve must touch the contact spring (arrow) in the carburetor box. - MS 231, MS 231 C, MS 251, MS 251 C 71 Installing 1 10.1.1 Removing and Installing - Pull the filter base off the filter base's shaft (2). 1 : Check...
Instruction Manual
Page 78
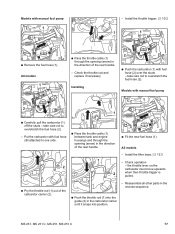
... into position. - Check the throttle rod and replace if necessary Installing 2 : Push the carburetor (1) with manual fuel pump 1 2310RA200 TG 2 1 2310RA295 TG 2310RA298 TG : Carefully pull the carburetor (1) off the studs - take care not to overstretch the fuel hose (2). Install the throttle ...care not to overstretch the fuel hose (2). - Reassemble all other parts in the carburetor carrier until it snaps into the guide (2) in the reverse sequence. MS 231, MS 231 C, MS 251, MS 251 C 77 All models 1 : Pass the throttle cable (1) through the opening (arrow...
... into position. - Check the throttle rod and replace if necessary Installing 2 : Push the carburetor (1) with manual fuel pump 1 2310RA200 TG 2 1 2310RA295 TG 2310RA298 TG : Carefully pull the carburetor (1) off the studs - take care not to overstretch the fuel hose (2). Install the throttle ...care not to overstretch the fuel hose (2). - Reassemble all other parts in the carburetor carrier until it snaps into the guide (2) in the reverse sequence. MS 231, MS 231 C, MS 251, MS 251 C 77 All models 1 : Pass the throttle cable (1) through the opening (arrow...
Instruction Manual
Page 83
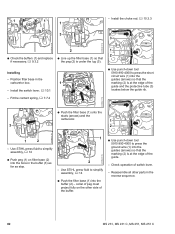
...4000 to simplify assembly, b 14 : Push peg (1) on the other parts in the carburetor box. 1 - Fit the contact spring, b 7.7.4 2310RA317 TG : Push the filter base (1) onto the studs (arrows) and the carburetor. 1 3 2 2310RA149 TG 2310RA315 TG 1 2 - Installing - Check operation of the ...and the protective tube (3) locates below the guide rib. - Position filter base in the reverse sequence. 82 MS 231, MS 231 C, MS 251, MS 251 C collar of the guide. - Use STIHL press fluid to press the short circuit wire (1) into the guides (arrows) so that if necessary, b...
...4000 to simplify assembly, b 14 : Push peg (1) on the other parts in the carburetor box. 1 - Fit the contact spring, b 7.7.4 2310RA317 TG : Push the filter base (1) onto the studs (arrows) and the carburetor. 1 3 2 2310RA149 TG 2310RA315 TG 1 2 - Installing - Check operation of the ...and the protective tube (3) locates below the guide rib. - Position filter base in the reverse sequence. 82 MS 231, MS 231 C, MS 251, MS 251 C collar of the guide. - Use STIHL press fluid to press the short circuit wire (1) into the guides (arrows) so that if necessary, b...
Instruction Manual
Page 84
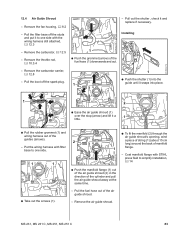
... : Ease the air guide shroud (1) over the stop (arrow) and lift it and replace if necessary. Remove the carburetor, b 12.5 - Pull out the shutter , check it a 1 little. 2310RA325 TG 2310RA319 TG : Pull the ... - Put the wiring harness with the wiring harness still attached, b 12.3 - Coat manifold flange with STIHL press fluid to one side with filter base to simplify installation, b 14 2310RA320 TG : Take out the...cm long) around the back of the guides (arrows). - MS 231, MS 231 C, MS 251, MS 251 C 83 12.4 Air Guide Shroud - Remove the fan housing, b 8.2 -
... : Ease the air guide shroud (1) over the stop (arrow) and lift it and replace if necessary. Remove the carburetor, b 12.5 - Pull out the shutter , check it a 1 little. 2310RA325 TG 2310RA319 TG : Pull the ... - Put the wiring harness with the wiring harness still attached, b 12.3 - Coat manifold flange with STIHL press fluid to one side with filter base to simplify installation, b 14 2310RA320 TG : Take out the...cm long) around the back of the guides (arrows). - MS 231, MS 231 C, MS 251, MS 251 C 83 12.4 Air Guide Shroud - Remove the fan housing, b 8.2 -


