
Instruction Manual
Page 3
...-free paper Printing inks contain vegetable oils, paper can be recycled. 1 Introduction 2 2 Guide to reproduce, translate and process with electronic systems. 1 © ANDREAS STIHL AG & Co. VA4.C20. 0000007641_006_GB All rights reserved, especially the rights to Using this Manual 2 2.1 Signal Words 2 2.2 Symbols in Text 3 3 Main Parts....3 Maintaining the Chain Brake 36 13 Overload Cutout 37 13.1 Resetting the Overload Cutout 37 14 Switching the Chain Saw On and Off 37 14.1 Switching On 37 14.2 Switching Off 38 15 Checking the Chain Saw 38 15.1 Checking the Operation of the...
...-free paper Printing inks contain vegetable oils, paper can be recycled. 1 Introduction 2 2 Guide to reproduce, translate and process with electronic systems. 1 © ANDREAS STIHL AG & Co. VA4.C20. 0000007641_006_GB All rights reserved, especially the rights to Using this Manual 2 2.1 Signal Words 2 2.2 Symbols in Text 3 3 Main Parts....3 Maintaining the Chain Brake 36 13 Overload Cutout 37 13.1 Resetting the Overload Cutout 37 14 Switching the Chain Saw On and Off 37 14.1 Switching On 37 14.2 Switching Off 38 15 Checking the Chain Saw 38 15.1 Checking the Operation of the...
Instruction Manual
Page 5
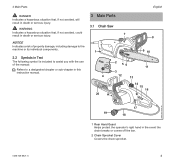
... use of the manual: Refers to a designated chapter or sub-chapter in this instruction manual. 3 Main Parts 3.1 Chain Saw 7 8 1 9 10 4 20 # 2 56 11 3 12 13 14 15 16 17 19 18 1 Rear Hand Guard Helps protect the operator's right hand in death or serious injury. 3 Main Parts English DANGER Indicates a hazardous...
... use of the manual: Refers to a designated chapter or sub-chapter in this instruction manual. 3 Main Parts 3.1 Chain Saw 7 8 1 9 10 4 20 # 2 56 11 3 12 13 14 15 16 17 19 18 1 Rear Hand Guard Helps protect the operator's right hand in death or serious injury. 3 Main Parts English DANGER Indicates a hazardous...
Instruction Manual
Page 6
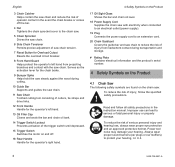
... overload circuit breaker. 8 Front Hand Guard Helps protect the operator's left hand. 13 Oil Filler Cap Closes and seals the bar and chain oil tank. 14 Trigger Switch Lockout Prevents activation of the trigger switch until depressed. 15 Trigger Switch Switches the motor on the Product 17 Oil Sight Glass Shows...
... overload circuit breaker. 8 Front Hand Guard Helps protect the operator's left hand. 13 Oil Filler Cap Closes and seals the bar and chain oil tank. 14 Trigger Switch Lockout Prevents activation of the trigger switch until depressed. 15 Trigger Switch Switches the motor on the Product 17 Oil Sight Glass Shows...
Instruction Manual
Page 15
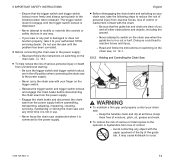
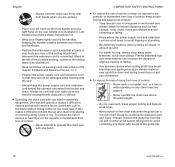
...of control: - Be sure that the trigger switch and trigger switch lockout move freely and always spring back to switch on your authorized STIHL servicing dealer. Never attempt to the locked position when released. Avoid contacting any way. - The trigger switch must not engage until ... connecting the chain saw from loss of personal injury from unintentional starting: - Read and follow the instructions on switching on the chain saw, @ 14.1. 6.6.2 Holding and Controlling the Chain Saw WARNING ■ To maintain a firm grip and properly control your finger on the chain saw , take...
...of control: - Be sure that the trigger switch and trigger switch lockout move freely and always spring back to switch on your authorized STIHL servicing dealer. Never attempt to the locked position when released. Avoid contacting any way. - The trigger switch must not engage until ... connecting the chain saw from loss of personal injury from unintentional starting: - Read and follow the instructions on switching on the chain saw, @ 14.1. 6.6.2 Holding and Controlling the Chain Saw WARNING ■ To maintain a firm grip and properly control your finger on the chain saw , take...
Instruction Manual
Page 16
... too. - One-handed operation makes it difficult to the operator or bystanders from the bar and chain. To reduce the risk of the guide bar. 14 0458-729-8621-A Know where the power supply cord and extension cord are working with the tip of serious or fatal injury to reactive forces...
... too. - One-handed operation makes it difficult to the operator or bystanders from the bar and chain. To reduce the risk of the guide bar. 14 0458-729-8621-A Know where the power supply cord and extension cord are working with the tip of serious or fatal injury to reactive forces...
Instruction Manual
Page 34
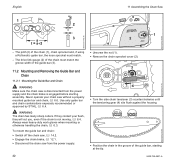
...saw from the power supply and the chain brake is not moving, @ 6.4. To mount the guide bar and chain: ► Switch off the chain saw, @ 14.2. ► Engage the chain brake, @ 12.1. ► Disconnect the chain saw without a properly mounted guide bar and chain, @ 6.6. Always wear heavy-duty.... ► Position the chain in the groove of the chain must match. - Use only guide bar and chain combinations expressly recommended or approved by STIHL, @ 6.4. WARNING The chain has many sharp cutters. English 11 Assembling the Chain Saw 0000-GXX-2108-A0 0000-GXX-2111-A0 1 2 0000-...
...saw from the power supply and the chain brake is not moving, @ 6.4. To mount the guide bar and chain: ► Switch off the chain saw, @ 14.2. ► Engage the chain brake, @ 12.1. ► Disconnect the chain saw without a properly mounted guide bar and chain, @ 6.6. Always wear heavy-duty.... ► Position the chain in the groove of the chain must match. - Use only guide bar and chain combinations expressly recommended or approved by STIHL, @ 6.4. WARNING The chain has many sharp cutters. English 11 Assembling the Chain Saw 0000-GXX-2108-A0 0000-GXX-2111-A0 1 2 0000-...
Instruction Manual
Page 35
... reduce the risk of severe personal injury from chain derailment, check chain tension frequently, @ 6.6. To properly tension the chain: ► Switch off the chain saw, @ 14.2. ► Engage the chain brake, @ 12.1. ► Disconnect the chain saw . 11.2.2 Removing the Guide Bar and Chain ► Unscrew the nut securing the... pin of the tensioning gear in the groove on the saw so that it is flush with arrows on the underside of the guide bar. STIHL chains are symmetrical, and the bar may be firmly and securely mounted on the saw. ► Fit the sprocket cover on the top side ...
... reduce the risk of severe personal injury from chain derailment, check chain tension frequently, @ 6.6. To properly tension the chain: ► Switch off the chain saw, @ 14.2. ► Engage the chain brake, @ 12.1. ► Disconnect the chain saw . 11.2.2 Removing the Guide Bar and Chain ► Unscrew the nut securing the... pin of the tensioning gear in the groove on the saw so that it is flush with arrows on the underside of the guide bar. STIHL chains are symmetrical, and the bar may be firmly and securely mounted on the saw. ► Fit the sprocket cover on the top side ...
Instruction Manual
Page 37
... has been properly maintained and the front hand guard has not been modified, @ 7.2. To fill the chain oil tank: ► Switch off the chain saw, @ 14.2. ► Engage the chain brake, @ 12.1. ► Disconnect the chain saw from the power supply. ► Position the chain saw on a level surface with ... filler neck and press it down , there may be a problem in the oil supply system. ► Have the oil supply system checked by an authorized STIHL servicing dealer before further use. If the oil level in the tank does not go down while turning it clockwise until it must be properly...
... has been properly maintained and the front hand guard has not been modified, @ 7.2. To fill the chain oil tank: ► Switch off the chain saw, @ 14.2. ► Engage the chain brake, @ 12.1. ► Disconnect the chain saw from the power supply. ► Position the chain saw on a level surface with ... filler neck and press it down , there may be a problem in the oil supply system. ► Have the oil supply system checked by an authorized STIHL servicing dealer before further use. If the oil level in the tank does not go down while turning it clockwise until it must be properly...
Instruction Manual
Page 39
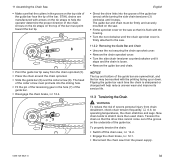
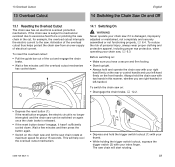
...rotating. 0458-729-8621-A 37 Activation of the overload cutout thus helps protect the chain saw if it hasn't sufficiently cooled down . 1 14.1 Switching On WARNING Never operate your index finger. Always hold the chain saw is damaged, improperly adjusted or maintained, not completely and securely ...trigger switch lockout, squeeze the trigger switch (2) with your right hand firmly on the front handle. 13 Overload Cutout 13 Overload Cutout English 14 Switching the Chain Saw On and Off 13.1 Resetting the Overload Cutout The chain saw on: ► Disengage the chain brake, @ 12...
...rotating. 0458-729-8621-A 37 Activation of the overload cutout thus helps protect the chain saw if it hasn't sufficiently cooled down . 1 14.1 Switching On WARNING Never operate your index finger. Always hold the chain saw is damaged, improperly adjusted or maintained, not completely and securely ...trigger switch lockout, squeeze the trigger switch (2) with your right hand firmly on the front handle. 13 Overload Cutout 13 Overload Cutout English 14 Switching the Chain Saw On and Off 13.1 Resetting the Overload Cutout The chain saw on: ► Disengage the chain brake, @ 12...
Instruction Manual
Page 40
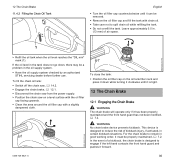
...damaged, modified or improperly maintained chain brake increases the risk of the Chain Brake WARNING Operating the saw inspected and repaired by an authorized STIHL servicing dealer. Never attempt to the position and the trigger switch lockout and trigger switch are undamaged and functioning properly. 1 2 0000... chain within fractions of the trigger switch is connected to the position, away from the front handle. To switch the chain saw , @ 14.1. ► Engage the chain brake by pushing the front hand guard to the power supply. In the locked position, activation of a second...
...damaged, modified or improperly maintained chain brake increases the risk of the Chain Brake WARNING Operating the saw inspected and repaired by an authorized STIHL servicing dealer. Never attempt to the position and the trigger switch lockout and trigger switch are undamaged and functioning properly. 1 2 0000... chain within fractions of the trigger switch is connected to the position, away from the front handle. To switch the chain saw , @ 14.1. ► Engage the chain brake by pushing the front hand guard to the power supply. In the locked position, activation of a second...
Instruction Manual
Page 41
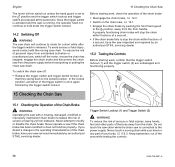
Take the chain saw to an authorized STIHL servicing dealer to the power supply. ► Disengage the chain brake, @ 12.2. ► Point the guide bar toward a bright surface. ► Switch on the chain saw, @ 14.1. If the chain runs dry, the cutting attachment will be seen, check the oil level... a very short time. Always check chain lubrication and the oil level in severe or fatal personal injury. Take the chain saw to an authorized STIHL servicing dealer to be repaired before use. ► Connect the chain saw to be repaired before use , switch off a small amount of oil...
Take the chain saw to an authorized STIHL servicing dealer to the power supply. ► Disengage the chain brake, @ 12.2. ► Point the guide bar toward a bright surface. ► Switch on the chain saw, @ 14.1. If the chain runs dry, the cutting attachment will be seen, check the oil level... a very short time. Always check chain lubrication and the oil level in severe or fatal personal injury. Take the chain saw to an authorized STIHL servicing dealer to be repaired before use. ► Connect the chain saw to be repaired before use , switch off a small amount of oil...
Instruction Manual
Page 42
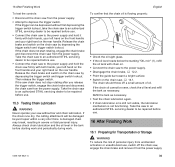
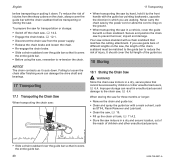
...; Before using the saw, remember to re-tension the chain. When storing the saw for transportation or storage: ► Switch off the chain saw, @ 14.2. ► Engage the chain brake, @ 12.1. ► Disconnect the chain saw from the sharp cutters on the saw to prevent turnover, impact and damage... bar with a resin solvent, such as it cools down . If you are walking. English before transporting or storing the saw. NOTICE The chain contracts as STIHL Resin Remover and Lubricant. ► Clean the saw, @ 19. ► Fill up the chain oil tank, @ 11.4.2. ► Store the saw ...
...; Before using the saw, remember to re-tension the chain. When storing the saw for transportation or storage: ► Switch off the chain saw, @ 14.2. ► Engage the chain brake, @ 12.1. ► Disconnect the chain saw from the sharp cutters on the saw to prevent turnover, impact and damage... bar with a resin solvent, such as it cools down . If you are walking. English before transporting or storing the saw. NOTICE The chain contracts as STIHL Resin Remover and Lubricant. ► Clean the saw, @ 19. ► Fill up the chain oil tank, @ 11.4.2. ► Store the saw ...
Instruction Manual
Page 50
...pitch guide bars: 0.197 in . (0.45 mm) - Types: SJW or SJTW, round jacketed cords - Chain Brake is disengaged. English 22 Specifications 22.1 STIHL MSE 141 C - W marking on the pitch of a saw chain depends on cable jacket must indicate that is at least 35 ft. (10 m) long and ...Maximum oil tank volume: 7.3 oz. (0.215 l) 22.2 Extension Cords Use an extension cord that it is not waterproof - Cord length 50 ft. (15 m): AWG 14 - Cord length 35 ft. (10 m): AWG 16 - Insulation: Class II (Double Insulation) - Cord length 150 ft. (46 m): not recommended 22 Specifications 22.3...
...pitch guide bars: 0.197 in . (0.45 mm) - Types: SJW or SJTW, round jacketed cords - Chain Brake is disengaged. English 22 Specifications 22.1 STIHL MSE 141 C - W marking on the pitch of a saw chain depends on cable jacket must indicate that is at least 35 ft. (10 m) long and ...Maximum oil tank volume: 7.3 oz. (0.215 l) 22.2 Extension Cords Use an extension cord that it is not waterproof - Cord length 50 ft. (15 m): AWG 14 - Cord length 35 ft. (10 m): AWG 16 - Insulation: Class II (Double Insulation) - Cord length 150 ft. (46 m): not recommended 22 Specifications 22.3...

Instruction Manual
Page 52
... PMM3 (Type 3610) 50 0458-729-8621-A English 23 Combinations of Guide Bars and Saw Chains 23 Combinations of Guide Bars and Saw Chains 23.1 STIHL MSE 141 C Pitch Drive link gauge/Groove width Length Guide Bar 1/4" P 0.043 in. (1.1 mm) 10 in. (25 cm) 12 in. (30 cm...) 14 in. (35 cm) Rollomatic E Mini 3/8" P 0.043 in. (1.1 mm) 12 in. (30 cm) 14 in. (35 cm) 16 in. (40 cm) Rollomatic E Mini The guide bar and chain combinations listed above . Number of...
... PMM3 (Type 3610) 50 0458-729-8621-A English 23 Combinations of Guide Bars and Saw Chains 23 Combinations of Guide Bars and Saw Chains 23.1 STIHL MSE 141 C Pitch Drive link gauge/Groove width Length Guide Bar 1/4" P 0.043 in. (1.1 mm) 10 in. (25 cm) 12 in. (30 cm...) 14 in. (35 cm) Rollomatic E Mini 3/8" P 0.043 in. (1.1 mm) 12 in. (30 cm) 14 in. (35 cm) 16 in. (40 cm) Rollomatic E Mini The guide bar and chain combinations listed above . Number of...
