
Product Instruction Manual
Page 3
...12 Maintenance and Care 14 Troubleshooting 15 Main Parts 16 Specifications 17 Special Accessories 18 Maintenance and Repairs 18 Trademarks 19 Addresses 20 { SE 122 English This manual contains operating and safety instructions for your vacuum cleaner. For further information you read and ...manual. M1.A10.FST. 0000001813_002_GB Printed on chlorine-free paper Printing inks contain vegetable oils, paper can go to operate your STIHL vacuum cleaner, it is a highspeed electric power tool, some special safety precautions must be recycled. Careless or improper use may ...
...12 Maintenance and Care 14 Troubleshooting 15 Main Parts 16 Specifications 17 Special Accessories 18 Maintenance and Repairs 18 Trademarks 19 Addresses 20 { SE 122 English This manual contains operating and safety instructions for your vacuum cleaner. For further information you read and ...manual. M1.A10.FST. 0000001813_002_GB Printed on chlorine-free paper Printing inks contain vegetable oils, paper can go to operate your STIHL vacuum cleaner, it is a highspeed electric power tool, some special safety precautions must be recycled. Careless or improper use may ...
Product Instruction Manual
Page 5
...cord. Read the instruction manual and the safety precautions periodically. Turn off all STIHL vacuum cleaners. These safety precautions and warnings apply to the use to stop the unit and disengage the controls quickly. SE 122 3 keep free of all controls before unplugging. 12. Do not handle ...plug or unit with double insulation. Warning! Keep power supply cord away from openings and moving parts. 11. Do not use of dust, lint, hair...
...cord. Read the instruction manual and the safety precautions periodically. Turn off all STIHL vacuum cleaners. These safety precautions and warnings apply to the use to stop the unit and disengage the controls quickly. SE 122 3 keep free of all controls before unplugging. 12. Do not handle ...plug or unit with double insulation. Warning! Keep power supply cord away from openings and moving parts. 11. Do not use of dust, lint, hair...

Product Instruction Manual
Page 6
... the machine and ensure adequate motor ventilation. 4 SE 122 Different models may , in an upright position. See the appropriate section of your vacuum cleaner run unattended. Working with the specific STIHL model are authorized. Warning! this vacuum cleaner. Warning! the vacuum cleaner 3. Warning! Observe all parts are working order. THE VACUUM CLEANER For illustrations and definitions of your...
... the machine and ensure adequate motor ventilation. 4 SE 122 Different models may , in an upright position. See the appropriate section of your vacuum cleaner run unattended. Working with the specific STIHL model are authorized. Warning! this vacuum cleaner. Warning! the vacuum cleaner 3. Warning! Observe all parts are working order. THE VACUUM CLEANER For illustrations and definitions of your...

Product Instruction Manual
Page 7
...the cord. Electrical Cords When using the vacuum cleaner, always keep the power supply cord behind you take a break. Warning! Improper voltage will damage the vacuum cleaner's motor and may damage parts of injury from fire and electric shock...unit into the power supply in rain. Use only extension cords that your vacuum cleaner with the voltage and frequency specified on the cord. SE 122 5 Do not clean your power supply cord does not become entangled with ... precautions for signs of electric shock, do not use your STIHL servicing dealer replace such a power supply cord.
...the cord. Electrical Cords When using the vacuum cleaner, always keep the power supply cord behind you take a break. Warning! Improper voltage will damage the vacuum cleaner's motor and may damage parts of injury from fire and electric shock...unit into the power supply in rain. Use only extension cords that your vacuum cleaner with the voltage and frequency specified on the cord. SE 122 5 Do not clean your power supply cord does not become entangled with ... precautions for signs of electric shock, do not use your STIHL servicing dealer replace such a power supply cord.

Product Instruction Manual
Page 9
... STIHL replacement parts. Do not attempt any maintenance or repair work performed at all times. Service the vacuum cleaner regularly. Clean plastic components with applicable regulations. These parts can cause severe or fatal injury, respiratory illness or cancer. The use of the system, and should a means for signs of parts manufactured by certain house-hold SE 122...
... STIHL replacement parts. Do not attempt any maintenance or repair work performed at all times. Service the vacuum cleaner regularly. Clean plastic components with applicable regulations. These parts can cause severe or fatal injury, respiratory illness or cancer. The use of the system, and should a means for signs of parts manufactured by certain house-hold SE 122...

Product Instruction Manual
Page 10
... (2) vertically up and off the unit with a cloth. ensure that the catches engage properly 8 SE 122 Lock the machine in position Assembling the Unit Various accessory parts must be mounted on the vacuum cleaner, moisture can cause an electric shock hazard. English cleaners containing aromatic oils such as pine or lemon, or by solvents...
... (2) vertically up and off the unit with a cloth. ensure that the catches engage properly 8 SE 122 Lock the machine in position Assembling the Unit Various accessory parts must be mounted on the vacuum cleaner, moisture can cause an electric shock hazard. English cleaners containing aromatic oils such as pine or lemon, or by solvents...
Product Instruction Manual
Page 13
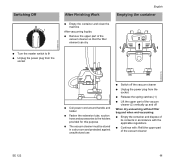
... power plug from the socket After Finishing Work English Emptying the container N Empty the container and clean the machine After vacuuming liquids: N Remove the upper part of the vacuum cleaner so that the filter element can dry 1 2 1 645BA017 KN 649BA013 KN 649BA016 KN N Coil power cord... (1) N Lift the upper part of the vacuum cleaner (2) vertically up and off When dry-vacuuming without filter bag and when wet-vacuuming N Empty the container and dispose of its contents in accordance with the applicable regulations N Continue with: Refit the upper part of the vacuum cleaner SE 122 11
... power plug from the socket After Finishing Work English Emptying the container N Empty the container and clean the machine After vacuuming liquids: N Remove the upper part of the vacuum cleaner so that the filter element can dry 1 2 1 645BA017 KN 649BA013 KN 649BA016 KN N Coil power cord... (1) N Lift the upper part of the vacuum cleaner (2) vertically up and off When dry-vacuuming without filter bag and when wet-vacuuming N Empty the container and dispose of its contents in accordance with the applicable regulations N Continue with: Refit the upper part of the vacuum cleaner SE 122 11

Product Instruction Manual
Page 14
... filter bag) N Push filter bag sleeve onto intake port as far as possible Refit the upper part of the vacuum cleaner N Clean the edge of the container N Refit the upper part of the vacuum cleaner N Clean the sleeve and intake port before fitting the suction hose 649BA011 KN N Seal the...it in accordance with the statutory regulations N Fit new filter element in the reverse sequence of steps N Check correct operation of the vacuum cleaner 12 SE 122 N Refit upper part of the float: the float must move easily when the supporting cage for filter (1) N Remove filter element (2) and dispose of ...
... filter bag) N Push filter bag sleeve onto intake port as far as possible Refit the upper part of the vacuum cleaner N Clean the edge of the container N Refit the upper part of the vacuum cleaner N Clean the sleeve and intake port before fitting the suction hose 649BA011 KN N Seal the...it in accordance with the statutory regulations N Fit new filter element in the reverse sequence of steps N Check correct operation of the vacuum cleaner 12 SE 122 N Refit upper part of the float: the float must move easily when the supporting cage for filter (1) N Remove filter element (2) and dispose of ...

Product Instruction Manual
Page 17
... Fault: Poor suction performance Cause Filter bag is full Suction hose / tool is clogged Filter element is fouled Gasket between upper part of vacuum cleaner and container is fouled or faulty Remedy See "Emptying the container" Clean suction hose / tool See "Cleaning the filter ...element" and "Replacing the filter element" Clean or replace gasket Fault: No suction performance when wet-vacuuming Cause Container full (intake port is sealed by float) Remedy See "Emptying the container" English SE 122 15 Troubleshooting Fault: Motor does not start Cause Remedy Mains circuit-
... Fault: Poor suction performance Cause Filter bag is full Suction hose / tool is clogged Filter element is fouled Gasket between upper part of vacuum cleaner and container is fouled or faulty Remedy See "Emptying the container" Clean suction hose / tool See "Cleaning the filter ...element" and "Replacing the filter element" Clean or replace gasket Fault: No suction performance when wet-vacuuming Cause Container full (intake port is sealed by float) Remedy See "Emptying the container" English SE 122 15 Troubleshooting Fault: Motor does not start Cause Remedy Mains circuit-

Product Instruction Manual
Page 18
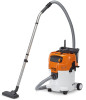
English Main Parts 1 3 4 4 5 6 2 10 9 14 12 15 11 8 12 16 7 13 1 Suction Hose 2 Handle Tube 3 Switch 4 Latch 5 Vacuum Intake Port 6 Caster with Brake 7 Container 8 Holder for Tools and Accessories 9 Filter Cleaning Button 10 Handle 11 Suction Hose Holder 12 Extension Tube 13 Floor Tool 14 Extension Tube Holder 15 Crevice Tool 16 All-purpose Tool 17 Sleeve 18 Power Supply Cord 649BA018 KN 16 SE 122
English Main Parts 1 3 4 4 5 6 2 10 9 14 12 15 11 8 12 16 7 13 1 Suction Hose 2 Handle Tube 3 Switch 4 Latch 5 Vacuum Intake Port 6 Caster with Brake 7 Container 8 Holder for Tools and Accessories 9 Filter Cleaning Button 10 Handle 11 Suction Hose Holder 12 Extension Tube 13 Floor Tool 14 Extension Tube Holder 15 Crevice Tool 16 All-purpose Tool 17 Sleeve 18 Power Supply Cord 649BA018 KN 16 SE 122
