Product Instruction Manual
Page 3
... container 12 Cleaning the filter element 13 Replacing the filter element 13 Maintenance and Care 15 Troubleshooting 16 Main Parts 17 Specifications 18 Maintenance and Repairs 19 Disposal 19 Trademarks 20 Addresses 21 English This manual contains operating and...fatal injury. To receive maximum performance and satisfaction from your STIHL vacuum cleaner, it is protected by copyright. Contact your STIHL dealer or the STIHL distributor for the STIHL vacuum cleaner. VA4.B15. 0000006586_002_GB { SE 62 This instruction manual is important that you do not understand...
... container 12 Cleaning the filter element 13 Replacing the filter element 13 Maintenance and Care 15 Troubleshooting 16 Main Parts 17 Specifications 18 Maintenance and Repairs 19 Disposal 19 Trademarks 20 Addresses 21 English This manual contains operating and...fatal injury. To receive maximum performance and satisfaction from your STIHL vacuum cleaner, it is protected by copyright. Contact your STIHL dealer or the STIHL distributor for the STIHL vacuum cleaner. VA4.B15. 0000006586_002_GB { SE 62 This instruction manual is important that you do not understand...
Product Instruction Manual
Page 5
...free of all STIHL vacuum cleaners. Regularly examine the power supply cord for "Maintenance and Repairs." 15. It is important that anyone using the vacuum cleaner. Read the instruction manual and the safety precautions periodically. These safety precautions and warnings apply to the use in this manual. SE 62 3 Do not... or use of dust, lint, hair, and anything that may be dangerous, special safety precautions must be present. 14. Turn off all parts of personal injury. Know how to assure safe operation of the equipment. Use only identical replacement...
...free of all STIHL vacuum cleaners. Regularly examine the power supply cord for "Maintenance and Repairs." 15. It is important that anyone using the vacuum cleaner. Read the instruction manual and the safety precautions periodically. These safety precautions and warnings apply to the use in this manual. SE 62 3 Do not... or use of dust, lint, hair, and anything that may be dangerous, special safety precautions must be present. 14. Turn off all parts of personal injury. Know how to assure safe operation of the equipment. Use only identical replacement...

Product Instruction Manual
Page 6
...are useable with any way - heavy impact or a fall), always check that the controls and safety devices are in place and undamaged. SE 62 Bystanders, especially children, and animals should never be allowed in particular that it is damaged or not completely and securely assembled. See the...cleaner. WARNING Minors should not be allowed to the vacuum cleaner. the use it checked by STIHL for use the vacuum cleaner for other purposes, since misuse may have different parts and controls. Do not cover the machine and ensure adequate motor ventilation. Use your vacuum ...
...are useable with any way - heavy impact or a fall), always check that the controls and safety devices are in place and undamaged. SE 62 Bystanders, especially children, and animals should never be allowed in particular that it is damaged or not completely and securely assembled. See the...cleaner. WARNING Minors should not be allowed to the vacuum cleaner. the use it checked by STIHL for use the vacuum cleaner for other purposes, since misuse may have different parts and controls. Do not cover the machine and ensure adequate motor ventilation. Use your vacuum ...
Product Instruction Manual
Page 7
... cause electrocution. Transporting the vacuum cleaner Before transporting the container, close a door on the vacuum cleaner's rating plate. When transporting your STIHL servicing dealer replace such a power supply cord. Only connect the machine to lift the vacuum cleaner. Do not expose to Power Supply."...cord does not become entangled with wet hands. Improper voltage will damage the vacuum cleaner's motor and may damage parts of this manual. Do not close all the latches. SE 62 5 Keep cord away from the power supply when you . see "Connecting to or use a crane hook...
... cause electrocution. Transporting the vacuum cleaner Before transporting the container, close a door on the vacuum cleaner's rating plate. When transporting your STIHL servicing dealer replace such a power supply cord. Only connect the machine to lift the vacuum cleaner. Do not expose to Power Supply."...cord does not become entangled with wet hands. Improper voltage will damage the vacuum cleaner's motor and may damage parts of this manual. Do not close all the latches. SE 62 5 Keep cord away from the power supply when you . see "Connecting to or use a crane hook...
Product Instruction Manual
Page 9
...of insulation are provided instead of genuine STIHL replacement parts. Replacement parts for signs of the dirt, filter bag and filter element in accordance with applicable regulations. Use only identical STIHL replacement parts for grounding be done only by others ...STIHL recommends that the fan wheel is doubleinsulated. Never attempt to the parts they replace. Never spray water on the plastic housing or handle. Wipe moisture off the motor, disconnect the plug from the power supply and make sure that you have servicing and repair work or cleaning the vacuum cleaner. SE 62...
...of insulation are provided instead of genuine STIHL replacement parts. Replacement parts for signs of the dirt, filter bag and filter element in accordance with applicable regulations. Use only identical STIHL replacement parts for grounding be done only by others ...STIHL recommends that the fan wheel is doubleinsulated. Never attempt to the parts they replace. Never spray water on the plastic housing or handle. Wipe moisture off the motor, disconnect the plug from the power supply and make sure that you have servicing and repair work or cleaning the vacuum cleaner. SE 62...
Product Instruction Manual
Page 10
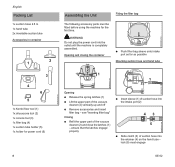
... hose and hand tube 11 1 1 0809BA031 KN 0809BA032 KN Opening N Release the spring latches (1) N Lift the upper part of the vacuum cleaner (2) and close the latches (1) - ensure that the latches engage properly N Insert sleeve (1) of ... hose into the outlet until the machine is completely assembled. see "Inserting filter bag" Closing N Refit the upper part of the vacuum cleaner (2) vertically up and off N Remove accessories and insert filter bag - WARNING Do not plug...KN Assembling the Unit Fitting the filter bag The following accessory parts must engage 0809BA033 KN SE 62
... hose and hand tube 11 1 1 0809BA031 KN 0809BA032 KN Opening N Release the spring latches (1) N Lift the upper part of the vacuum cleaner (2) and close the latches (1) - ensure that the latches engage properly N Insert sleeve (1) of ... hose into the outlet until the machine is completely assembled. see "Inserting filter bag" Closing N Refit the upper part of the vacuum cleaner (2) vertically up and off N Remove accessories and insert filter bag - WARNING Do not plug...KN Assembling the Unit Fitting the filter bag The following accessory parts must engage 0809BA033 KN SE 62

Product Instruction Manual
Page 11
...The power tool must be protected by a fuse or a circuit breaker with a minimum rating in accordance with all applicable standards and regulations. SE 62 9 The smaller the gauge number, the heavier the cord. The connection to the power supply must be sure to carry the current your ...length and nameplate ampere rating. as shown in picture. Holders for power cord N Connect holder for power cord via the support on the upper part of the vacuum cleaner Suction tube 1 2 0809BA026 KN Mount suction tube holder 1 2 A N Slide the suction tube holder (1) via a Ground ...
...The power tool must be protected by a fuse or a circuit breaker with a minimum rating in accordance with all applicable standards and regulations. SE 62 9 The smaller the gauge number, the heavier the cord. The connection to the power supply must be sure to carry the current your ...length and nameplate ampere rating. as shown in picture. Holders for power cord N Connect holder for power cord via the support on the upper part of the vacuum cleaner Suction tube 1 2 0809BA026 KN Mount suction tube holder 1 2 A N Slide the suction tube holder (1) via a Ground ...
Product Instruction Manual
Page 14
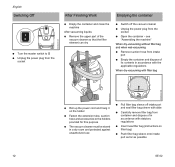
... the power plug from the socket After Finishing Work Emptying the container N Empty the container and clean the machine After vacuuming liquids: N Remove the upper part of in a dry room and protected against unauthorized use N Pull filter bag sleeve off the vacuum cleaner N Unplug the power plug from container and dispose... in accordance with statutory regulations N Insert new filter bag (instructions on filter bag) N Push filter bag sleeve onto intake port as far as possible 12 SE 62
... the power plug from the socket After Finishing Work Emptying the container N Empty the container and clean the machine After vacuuming liquids: N Remove the upper part of in a dry room and protected against unauthorized use N Pull filter bag sleeve off the vacuum cleaner N Unplug the power plug from container and dispose... in accordance with statutory regulations N Insert new filter bag (instructions on filter bag) N Push filter bag sleeve onto intake port as far as possible 12 SE 62
Product Instruction Manual
Page 15
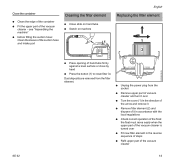
... intake port Cleaning the filter element N Close slide on hand tube N Switch on machine 1 English Replacing the filter element 1 2 0809BA037 KN 0809BA038 KN SE 62 N Press opening of hand tube firmly against a level surface or close by hand N Press the button (1) to clean filter 3x Dust deposits are removed ...from the socket N Remove upper part of vacuum cleaner and turn it over N Turn the cover (1) in the direction of the arrow and remove it N Remove filter element (2) and ...
... intake port Cleaning the filter element N Close slide on hand tube N Switch on machine 1 English Replacing the filter element 1 2 0809BA037 KN 0809BA038 KN SE 62 N Press opening of hand tube firmly against a level surface or close by hand N Press the button (1) to clean filter 3x Dust deposits are removed ...from the socket N Remove upper part of vacuum cleaner and turn it over N Turn the cover (1) in the direction of the arrow and remove it N Remove filter element (2) and ...

Product Instruction Manual
Page 18
... reset electric circuit breaker Problem: Poor suction performance Cause Filter bag is full Suction hose / tool is clogged Filter element is fouled Gasket between upper part of vacuum cleaner and container is fouled or faulty Remedy See "Emptying the container" Clean suction hose / tool See "Cleaning the filter element" and "Replacing... or replace gasket Problem: No suction performance when wet-vacuuming Cause Container full (intake port is sealed by float) Remedy See "Emptying the container" 16 SE 62
... reset electric circuit breaker Problem: Poor suction performance Cause Filter bag is full Suction hose / tool is clogged Filter element is fouled Gasket between upper part of vacuum cleaner and container is fouled or faulty Remedy See "Emptying the container" Clean suction hose / tool See "Cleaning the filter element" and "Replacing... or replace gasket Problem: No suction performance when wet-vacuuming Cause Container full (intake port is sealed by float) Remedy See "Emptying the container" 16 SE 62
Product Instruction Manual
Page 19
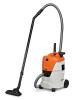
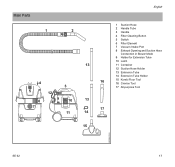
Main Parts 1 2 13 4 5 6 7 12 9 8 3 10 11 16 13 17 14 15 English 1 Suction Hose 2 Handle Tube 3 Handle 4 Filter Cleaning Button 5 Switch 6 Filter Element 7 Vacuum Intake Port 8 Exhaust Opening and Suction Hose Connection in Blower Mode 9 Holder for Extension Tube 10 Latch 11 Container 12 Suction Hose Holder 13 Extension Tube 14 Extension Tube Holder 15 Kombi Floor Tool 16 Crevice Tool 17 All-purpose Tool 0809BA039 KN SE 62 17
Main Parts 1 2 13 4 5 6 7 12 9 8 3 10 11 16 13 17 14 15 English 1 Suction Hose 2 Handle Tube 3 Handle 4 Filter Cleaning Button 5 Switch 6 Filter Element 7 Vacuum Intake Port 8 Exhaust Opening and Suction Hose Connection in Blower Mode 9 Holder for Extension Tube 10 Latch 11 Container 12 Suction Hose Holder 13 Extension Tube 14 Extension Tube Holder 15 Kombi Floor Tool 16 Crevice Tool 17 All-purpose Tool 0809BA039 KN SE 62 17
Product Instruction Manual
Page 21
... for environmentfriendly recycling. Warranty claims following repairs can be identified by the STIHL part number, the { logo and, in some cases, by an authorized STIHL servicing dealer using genuine STIHL replacement parts. The symbol may appear alone on waste disposal. 000BA073 KN SE 62 19 English Disposal Observe all country-specific waste disposal rules and regulations. Noise...
... for environmentfriendly recycling. Warranty claims following repairs can be identified by the STIHL part number, the { logo and, in some cases, by an authorized STIHL servicing dealer using genuine STIHL replacement parts. The symbol may appear alone on waste disposal. 000BA073 KN SE 62 19 English Disposal Observe all country-specific waste disposal rules and regulations. Noise...