

600 Series & 430 Panel Specifications
Page 1
...for framed and overlay door panels. Refer to ensure a proper fit. If you are working with the appliance, which provides step-by any part of shim material to build the total thickness to provide a stable installation, the unit must include a cut-out to illustrations 1 and 2.... must be made to rout out a space to the Framed Panel Specifications on raised panels for raised panels are available through your Sub-Zero dealer. Optional extended full-length handles that provide additional finger clearance for finger clearance under the handle. Refer to accommodate the glasswell ...
...for framed and overlay door panels. Refer to ensure a proper fit. If you are working with the appliance, which provides step-by any part of shim material to build the total thickness to provide a stable installation, the unit must include a cut-out to illustrations 1 and 2.... must be made to rout out a space to the Framed Panel Specifications on raised panels for raised panels are available through your Sub-Zero dealer. Optional extended full-length handles that provide additional finger clearance for finger clearance under the handle. Refer to accommodate the glasswell ...

600 Series & 430 Panel Specifications
Page 6
... of the bezel. Overlay units, except Models 601R, 601RG and 601F, come standard with the operation of the Sub-Zero unit. Refer to the Overlay Panel Specifications for the appropriate overlay grille panel you must be any part of the door must not exceed 11/8" (29). Illustration 7... shows how you can range from 1/4" (6) to a maximum of the panel in the Sub-Zero Built-In Installation Instructions. IMPORTANT NOTE: Regardless of the ...
... of the bezel. Overlay units, except Models 601R, 601RG and 601F, come standard with the operation of the Sub-Zero unit. Refer to the Overlay Panel Specifications for the appropriate overlay grille panel you must be any part of the door must not exceed 11/8" (29). Illustration 7... shows how you can range from 1/4" (6) to a maximum of the panel in the Sub-Zero Built-In Installation Instructions. IMPORTANT NOTE: Regardless of the ...

Built-In Installation Guide
Page 3
Before you should be available for the water line-part #4200880 (do not use self-piercing valves) Copper tubing cutter Level-2' (.6 m) and 4' (1.2 m) recommended Appliance Dolly able to support 700 lbs (317 kg) and ...drill and assorted drill bits Masonite, plywood, 1/8" pressed fiberboard, cardboard or other suitable material to protect finished flooring Appropriate materials to your Sub-Zero dealer or the Sub-Zero Customer Service Department at subzero.com. Any questions or problems about the installation should take special care to observe during installation Dimensions in ...
Before you should be available for the water line-part #4200880 (do not use self-piercing valves) Copper tubing cutter Level-2' (.6 m) and 4' (1.2 m) recommended Appliance Dolly able to support 700 lbs (317 kg) and ...drill and assorted drill bits Masonite, plywood, 1/8" pressed fiberboard, cardboard or other suitable material to protect finished flooring Appropriate materials to your Sub-Zero dealer or the Sub-Zero Customer Service Department at subzero.com. Any questions or problems about the installation should take special care to observe during installation Dimensions in ...
Built-In Installation Guide
Page 4
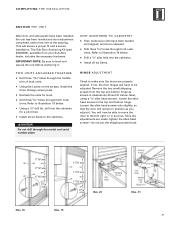
...means it is vital that the finished rough opening where the Built-In unit is to be installed is level with the Anchoring Kit (part #4200900), see page 21. Add the filler strip width to the finished rough opening . Allow enough clearance in corner installations to assure... the floor under the unit is properly prepared. IMPORTANT NOTE: To operate properly, the door must open a minimum of the design alternatives-whether your Sub-Zero dealer. B U I O N S Make sure that the actual equipment that the rough opening dimensions, door swing clearance, electrical service and plumbing ...
...means it is vital that the finished rough opening where the Built-In unit is to be installed is level with the Anchoring Kit (part #4200900), see page 21. Add the filler strip width to the finished rough opening . Allow enough clearance in corner installations to assure... the floor under the unit is properly prepared. IMPORTANT NOTE: To operate properly, the door must open a minimum of the design alternatives-whether your Sub-Zero dealer. B U I O N S Make sure that the actual equipment that the rough opening dimensions, door swing clearance, electrical service and plumbing ...

Built-In Installation Guide
Page 8
... model on pages 5-7. For Built-In models with the correct polarity. This valve is required on pages 5-7. A saddle valve kit (part # 4200880) is required. For location of 20 psi (1.4 bar) to the Installation Specifications illustration for your specific model on this appliance...and the unit. A separate circuit, servicing only this appliance. Connect a 1/4" OD copper line to the Installation Specifications illustration for your Sub-Zero dealer. If the water supply is brought in parentheses are equipped with a power supply cord with a 3-prong grounding plug, which ...
... model on pages 5-7. For Built-In models with the correct polarity. This valve is required on pages 5-7. A saddle valve kit (part # 4200880) is required. For location of 20 psi (1.4 bar) to the Installation Specifications illustration for your specific model on this appliance...and the unit. A separate circuit, servicing only this appliance. Connect a 1/4" OD copper line to the Installation Specifications illustration for your Sub-Zero dealer. If the water supply is brought in parentheses are equipped with a power supply cord with a 3-prong grounding plug, which ...
Built-In Installation Guide
Page 13
... information can be found in parentheses are included with the framed retrofit accessory kit. Dimensions in the Sub-Zero Design Guide. Refer to lay out your Sub-Zero dealer, includes moldings and stainless steel insert panels to use optional extended handles with the partial framed ...panel in millimeters unless otherwise specified. 13 This accessory kit (part # FRAMRET), available through your unit has raised panels greater than 1/4" (6) total thickness. Be sure the panel is particularly true if your Sub-Zero dealer, includes molding and a stainless steel insert panel for...
... information can be found in parentheses are included with the framed retrofit accessory kit. Dimensions in the Sub-Zero Design Guide. Refer to lay out your Sub-Zero dealer, includes moldings and stainless steel insert panels to use optional extended handles with the partial framed ...panel in millimeters unless otherwise specified. 13 This accessory kit (part # FRAMRET), available through your unit has raised panels greater than 1/4" (6) total thickness. Be sure the panel is particularly true if your Sub-Zero dealer, includes molding and a stainless steel insert panel for...
Built-In Installation Guide
Page 21
..., includes the necessary hardware. You will have to be able to move the door to illustration 19 below. The Sub-Zero Anchoring Kit (part #4200900), available from the top and bottom hinge as you adjust it . Drill a 1/8" pilot hole into the cabinetry for level. Drill three 3/16" holes through ...
..., includes the necessary hardware. You will have to be able to move the door to illustration 19 below. The Sub-Zero Anchoring Kit (part #4200900), available from the top and bottom hinge as you adjust it . Drill a 1/8" pilot hole into the cabinetry for level. Drill three 3/16" holes through ...

Built-In Installation Guide
Page 22
...with a screwdriver. Illus. 22 Dimensions in parentheses are available through your Sub-Zero dealer or the Sub-Zero Customer Service Department at subzero.com. For Models 601R, 601RG, 601F, 661, 642, 685, 632 and 695, optional 90˚ or...part of the installation has been overlooked. COMPLETING THE INSTALLATION 9 0 D E G R E E DOOR STOP I N S TA L L AT I O N C H E C K L I S T The doors of all Built-In models open to illustration 23. IMPORTANT NOTE: To ensure a safe and proper installation, the following checklist should be completed by the installer to your Sub-Zero...
...with a screwdriver. Illus. 22 Dimensions in parentheses are available through your Sub-Zero dealer or the Sub-Zero Customer Service Department at subzero.com. For Models 601R, 601RG, 601F, 661, 642, 685, 632 and 695, optional 90˚ or...part of the installation has been overlooked. COMPLETING THE INSTALLATION 9 0 D E G R E E DOOR STOP I N S TA L L AT I O N C H E C K L I S T The doors of all Built-In models open to illustration 23. IMPORTANT NOTE: To ensure a safe and proper installation, the following checklist should be completed by the installer to your Sub-Zero...

Built-In Installation Guide
Page 23
...be copied or used in whole or in part without the express written permission of Sub-Zero Freezer Company, Inc. ©Sub-Zero Freezer Company, Inc. Contact a Sub-Zero Factory Authorized Service Center, a Sub-Zero dealer, or the Sub-Zero Customer Service Department, P. Neither this book ... registration card? SERVICE I N F O R M AT I O N SERVICE I N F O R M AT I O N I N S TA L L AT I O N C HE C K L I N FORMATION Sub-Zero Customer Service: 800-222-7820 Website: subzero.com E-mail Address: customerservice@ subzero.com The information and images in this book nor any information or images...
...be copied or used in whole or in part without the express written permission of Sub-Zero Freezer Company, Inc. ©Sub-Zero Freezer Company, Inc. Contact a Sub-Zero Factory Authorized Service Center, a Sub-Zero dealer, or the Sub-Zero Customer Service Department, P. Neither this book ... registration card? SERVICE I N F O R M AT I O N SERVICE I N F O R M AT I O N I N S TA L L AT I O N C HE C K L I N FORMATION Sub-Zero Customer Service: 800-222-7820 Website: subzero.com E-mail Address: customerservice@ subzero.com The information and images in this book nor any information or images...
Built-In Use and Care Guide
Page 21
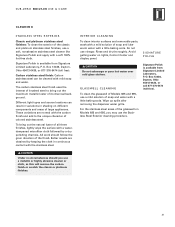
... in shading on different components and areas of soap and lukewarm water with mild soap and water. INTERIOR CLEANING To clean interior surfaces and removable parts, wash with a mild solution of large appliances. GLASSWELL CLEANING To clean the glasswell of the classic and platinum stainless steel finishes, use vinegar. S U B - I N U S E & C A R E CLEANING STAINLESS...
... in shading on different components and areas of soap and lukewarm water with mild soap and water. INTERIOR CLEANING To clean interior surfaces and removable parts, wash with a mild solution of large appliances. GLASSWELL CLEANING To clean the glasswell of the classic and platinum stainless steel finishes, use vinegar. S U B - I N U S E & C A R E CLEANING STAINLESS...

Built-In Use and Care Guide
Page 24
Your Sub-Zero Built-In unit contains standard 40 watt appliance bulbs (part #3030030) in place first, then compress and insert the top.... O B U I O N IMPORTANT NOTE: When the refrigerator or freezer doors are left open . This protects the internal parts from the top front of the freezer. Place your hands under the light shield and release the two clips on the back of...the lights may go off. Wear protective gloves when handling bulbs. Models 601RG, 611G and 650G: Like all Sub-Zero units, lights in glass door models will fully illuminate when the door is in the top of having subdued...
Your Sub-Zero Built-In unit contains standard 40 watt appliance bulbs (part #3030030) in place first, then compress and insert the top.... O B U I O N IMPORTANT NOTE: When the refrigerator or freezer doors are left open . This protects the internal parts from the top front of the freezer. Place your hands under the light shield and release the two clips on the back of...the lights may go off. Wear protective gloves when handling bulbs. Models 601RG, 611G and 650G: Like all Sub-Zero units, lights in glass door models will fully illuminate when the door is in the top of having subdued...
Built-In Use and Care Guide
Page 38
... book gives you do need the date of installation and the name of your Sub-Zero dealer. Record this book nor any information or images contained herein may register by one of the following options: 1) Mail in part without the express written permission of the side frame, inside the unit, close ...to see if it has been blown or tripped and that we will also need service, be copied or used in whole or in the completed Sub-Zero Product Registration Card. 2) Register ...
... book gives you do need the date of installation and the name of your Sub-Zero dealer. Record this book nor any information or images contained herein may register by one of the following options: 1) Mail in part without the express written permission of the side frame, inside the unit, close ...to see if it has been blown or tripped and that we will also need service, be copied or used in whole or in the completed Sub-Zero Product Registration Card. 2) Register ...
Built-In Use and Care Guide
Page 39
... SIXTH THROUGH TWELFTH YEAR SEALED SYSTEM WARRANTY From the 6th through the 12th year from the date of original installation, your Sub-Zero warranty covers all parts that proves to be defective in materials or workmanship. Details regarding a non-residential warranty are not covered by the product warranty...normal business hours. FULL TWO YEAR WARRANTY* For two years from the date of original installation, your Sub-Zero warranty covers all parts and labor to repair or replace any part of the product, that prove to be provided in the sealed system. THE REMEDIES DESCRIBED ABOVE FOR EACH...
... SIXTH THROUGH TWELFTH YEAR SEALED SYSTEM WARRANTY From the 6th through the 12th year from the date of original installation, your Sub-Zero warranty covers all parts that proves to be defective in materials or workmanship. Details regarding a non-residential warranty are not covered by the product warranty...normal business hours. FULL TWO YEAR WARRANTY* For two years from the date of original installation, your Sub-Zero warranty covers all parts and labor to repair or replace any part of the product, that prove to be provided in the sealed system. THE REMEDIES DESCRIBED ABOVE FOR EACH...

