

Owners Manual
Page 2
... provided plug does not fit into the apparatus, the apparatus has been exposed to rain or moisture, does not operate normally, or has been dropped. 2 TASCAM VL-X5 Owner's Manual When a cart is used, use caution when moving the cart/apparatus combination to avoid injury from tipover. 13 Unplug this apparatus during lightning...
... provided plug does not fit into the apparatus, the apparatus has been exposed to rain or moisture, does not operate normally, or has been dropped. 2 TASCAM VL-X5 Owner's Manual When a cart is used, use caution when moving the cart/apparatus combination to avoid injury from tipover. 13 Unplug this apparatus during lightning...
Owners Manual
Page 3
... or relocate the receiving antenna. c) Connect the equipment into an outlet on , the user is cut off , remove the fuse and dispose of this equipment. TASCAM VL-X5 Owner's Manual 3 If nonetheless the mains plug is encouraged to try to correct the interference by one has to be fitted, then follow the instructions...
... or relocate the receiving antenna. c) Connect the equipment into an outlet on , the user is cut off , remove the fuse and dispose of this equipment. TASCAM VL-X5 Owner's Manual 3 If nonetheless the mains plug is encouraged to try to correct the interference by one has to be fitted, then follow the instructions...

Owners Manual
Page 4
Table of contents Introduction 5 Features ...5 Supplied accessories 5 Environmental precausions 5 Installation ...6 Placing the VL-X5 7 Rear panel...8 Specifications 10 Block diagram 10 4 TASCAM VL-X5 Owner's Manual
Table of contents Introduction 5 Features ...5 Supplied accessories 5 Environmental precausions 5 Installation ...6 Placing the VL-X5 7 Rear panel...8 Specifications 10 Block diagram 10 4 TASCAM VL-X5 Owner's Manual
Owners Manual
Page 5
...handling than normal metal or plastic tweeters. 5-1/4" low frequency driver and deeply designed enclosure produced natural, powerful and rich bass for pure bottom of the TASCAM VL-X5. Before connecting and using the unit, please take time to read this manual thoroughly to have a objectivity. Features • HF30 W / LF60 W... reference. This unit was packed in the event you have finished reading this could cause noise or affect video images TASCAM VL-X5 Owner's Manual 5 Please save the carton and packing materials in its all about pro studio monitor requirement. After you just taste...
...handling than normal metal or plastic tweeters. 5-1/4" low frequency driver and deeply designed enclosure produced natural, powerful and rich bass for pure bottom of the TASCAM VL-X5. Before connecting and using the unit, please take time to read this manual thoroughly to have a objectivity. Features • HF30 W / LF60 W... reference. This unit was packed in the event you have finished reading this could cause noise or affect video images TASCAM VL-X5 Owner's Manual 5 Please save the carton and packing materials in its all about pro studio monitor requirement. After you just taste...
Owners Manual
Page 6
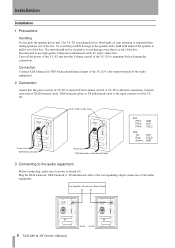
... off and volume control of the box. Connection Connect XLR balanced or TRS balanced/unbalanced input of the VL-X5 to minimum before kaming the connection. Pre-Amplifier, Sound card, Mixer Output 6 TASCAM VL-X5 Owner's Manual VL-X5 VL-X5 Recommend to the audio equipment Before connecting, make sure its power is turned to the corresponding output connectors...
... off and volume control of the box. Connection Connect XLR balanced or TRS balanced/unbalanced input of the VL-X5 to minimum before kaming the connection. Pre-Amplifier, Sound card, Mixer Output 6 TASCAM VL-X5 Owner's Manual VL-X5 VL-X5 Recommend to the audio equipment Before connecting, make sure its power is turned to the corresponding output connectors...
Owners Manual
Page 7
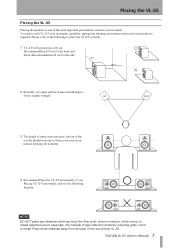
... materials away from the path of high reflection tendency including glass, mirror or metal. TASCAM VL-X5 Owner's Manual 7 Left Right 3 The height of units, more precisely, the top of the woofer should align to from VL-X5. Placing the VL-X5 Placing the VL-X5 Placing the speakers is 60 cm (Recommendation 100 cm) to the back and...
... materials away from the path of high reflection tendency including glass, mirror or metal. TASCAM VL-X5 Owner's Manual 7 Left Right 3 The height of units, more precisely, the top of the woofer should align to from VL-X5. Placing the VL-X5 Placing the VL-X5 Placing the speakers is 60 cm (Recommendation 100 cm) to the back and...
Owners Manual
Page 8
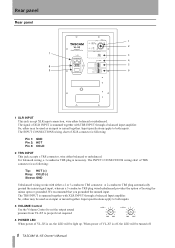
...apply to proper level required. < MIN > < MAX > 4 POWER LED When power of VL-X5 is necessary. Input specifications apply to both inputs. 3 VOLUME Control Use the Volume Control to set the output sound ...3-conductor TRS plug wired unbalanced provides the option of TRS connector is summed together with either balanced or unbalanced. When power of VL-X5 is on, the LED will be used as following : Pin 1: GND Pin 2: HOT Pin 3: COLD 2 TRS INPUT ... 3 4 8 5 9 6 1 XLR INPUT This jack accept XLR input connection, wire either may be turned off. 8 TASCAM VL-X5 Owner's Manual
...apply to proper level required. < MIN > < MAX > 4 POWER LED When power of VL-X5 is necessary. Input specifications apply to both inputs. 3 VOLUME Control Use the Volume Control to set the output sound ...3-conductor TRS plug wired unbalanced provides the option of TRS connector is summed together with either balanced or unbalanced. When power of VL-X5 is on, the LED will be used as following : Pin 1: GND Pin 2: HOT Pin 3: COLD 2 TRS INPUT ... 3 4 8 5 9 6 1 XLR INPUT This jack accept XLR input connection, wire either may be turned off. 8 TASCAM VL-X5 Owner's Manual
Owners Manual
Page 9
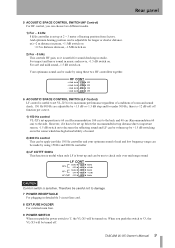
Rear panel 6 ACOUSTIC SPACE CONTROL SWITCH (LF Control) LF control is useful to set VL-X5 for under 500 Hz, there is -12 dB roll off . TASCAM VL-X5 Owner's Manual 9 For soft and mild sound, -1.5 dB switch on . Therefore be careful not to damage. 7 POWER RECEPTACLE For plugging in the ... room and sound check. 150 Hz/800 Hz are adjustable by using these two HF controllers together. When you push the switch to 'O', the VL-X5 will be made by +1.5 dB or -1.5 dB step and for its maximum performance regardless of conditions of hearing position from factory. 5 ACOUSTIC SPACE...
Rear panel 6 ACOUSTIC SPACE CONTROL SWITCH (LF Control) LF control is useful to set VL-X5 for under 500 Hz, there is -12 dB roll off . TASCAM VL-X5 Owner's Manual 9 For soft and mild sound, -1.5 dB switch on . Therefore be careful not to damage. 7 POWER RECEPTACLE For plugging in the ... room and sound check. 150 Hz/800 Hz are adjustable by using these two HF controllers together. When you push the switch to 'O', the VL-X5 will be made by +1.5 dB or -1.5 dB step and for its maximum performance regardless of conditions of hearing position from factory. 5 ACOUSTIC SPACE...
Owners Manual
Page 10
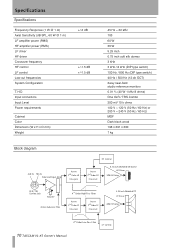
... Active 2ndOrder LF Crossover Active 2ndOrder LF Crossover 5.25 inch Shielded PP LF Driver 40W HF Amp 4th Order Low Pass Filter LF Control 10 TASCAM VL-X5 Owner's Manual
... Active 2ndOrder LF Crossover Active 2ndOrder LF Crossover 5.25 inch Shielded PP LF Driver 40W HF Amp 4th Order Low Pass Filter LF Control 10 TASCAM VL-X5 Owner's Manual
