

User Guide
Page 2
Trademark recognition All product names used in a residential installation. This device complies with all rights reserved. Operation is subject to provide reasonable protection against harmful interference in accordance with the instructions, may not cause harmful interference, and (2) this equipment. These limits are acknowledged. FCC Caution: Any changes or modifications not expressly approved by one of the following two conditions: (1) This device may cause harmful interference to notify any person of such revision or changes. Copyright 2005 Version 1.0 (July, ...
Trademark recognition All product names used in a residential installation. This device complies with all rights reserved. Operation is subject to provide reasonable protection against harmful interference in accordance with the instructions, may not cause harmful interference, and (2) this equipment. These limits are acknowledged. FCC Caution: Any changes or modifications not expressly approved by one of the following two conditions: (1) This device may cause harmful interference to notify any person of such revision or changes. Copyright 2005 Version 1.0 (July, ...

User Guide
Page 3
... must not be co-located or operated in conjunction with any other antenna or transmitter. This device was tested for typical by stander conditions that TEW-429UB, ( FCC ID: SI5WHF430X ) is limited in CH1~CH11 for 2.4 GHz by specified firmware controlled in conjunction with any other antenna or transmitter. This transmitter must...
... must not be co-located or operated in conjunction with any other antenna or transmitter. This device was tested for typical by stander conditions that TEW-429UB, ( FCC ID: SI5WHF430X ) is limited in CH1~CH11 for 2.4 GHz by specified firmware controlled in conjunction with any other antenna or transmitter. This transmitter must...
User Guide
Page 4
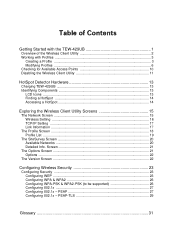
... Utility 2 Working with Profiles ...3 Creating a Profile ...3 Modifying Profiles ...6 Checking for Available Access Points 10 Disabling the Wireless Client Utility 11 HotSpot Detector Hardware 13 Charging TEW-429UB 13 Identifying Components 13 LCD Icons ...13 Finding a HotSpot 14 Accessing a HotSpot 14 Exploring the Wireless Client Utility Screens 15 The Network Screen 15 Wireless...
... Utility 2 Working with Profiles ...3 Creating a Profile ...3 Modifying Profiles ...6 Checking for Available Access Points 10 Disabling the Wireless Client Utility 11 HotSpot Detector Hardware 13 Charging TEW-429UB 13 Identifying Components 13 LCD Icons ...13 Finding a HotSpot 14 Accessing a HotSpot 14 Exploring the Wireless Client Utility Screens 15 The Network Screen 15 Wireless...

User Guide
Page 5
Appendix ...33 Maintenance ...33 Checking the Wireless Client Utility Version 33 Uninstalling the Wireless Client Utility 34 Upgrading the Wireless Client Utility 34 Troubleshooting ...35 Problems Starting the 802.11g Wireless Client Utility Program Problems with the Link Status 35 Problems with Security Settings Specifications ...36 Wi-Fi Radio: ...36 iv --
Appendix ...33 Maintenance ...33 Checking the Wireless Client Utility Version 33 Uninstalling the Wireless Client Utility 34 Upgrading the Wireless Client Utility 34 Troubleshooting ...35 Problems Starting the 802.11g Wireless Client Utility Program Problems with the Link Status 35 Problems with Security Settings Specifications ...36 Wi-Fi Radio: ...36 iv --
User Guide
Page 7
... SYMBOL INDICATES INFORMATION THAT CAN IMPROVE NETWORKING. The quick start guide included with the TEW-429UB Congratulations on purchasing the TEW-429UB! This manual is intended for setting up and configuring the TEW-429UB. THE CAUTION SYMBOL ALERTS YOU TO SITUATIONS THAT MAY DEGRADE YOUR NETWORKING EXPERIENCE OR...and how to operate the Hotspot Detector features of the more technical information in this manual to read some of the TEW-429UB. THE TIP SYMBOL INDICATES HELPFULL INFORMATION AND TIPS TO IMPROVE YOUR NETWORK EXPERIENCE. This manual provides information for both home ...
... SYMBOL INDICATES INFORMATION THAT CAN IMPROVE NETWORKING. The quick start guide included with the TEW-429UB Congratulations on purchasing the TEW-429UB! This manual is intended for setting up and configuring the TEW-429UB. THE CAUTION SYMBOL ALERTS YOU TO SITUATIONS THAT MAY DEGRADE YOUR NETWORKING EXPERIENCE OR...and how to operate the Hotspot Detector features of the more technical information in this manual to read some of the TEW-429UB. THE TIP SYMBOL INDICATES HELPFULL INFORMATION AND TIPS TO IMPROVE YOUR NETWORK EXPERIENCE. This manual provides information for both home ...

User Guide
Page 8
...UTILITY IS INSTALLED COULD CAUSE THE INSTALLATION TO FAIL. Overview of your computer. When the TEW-429UB is installed, it is included on the CD that shipped with the TEW-429UB. Double-click the TEW-429UB icon in the system tray at the bottom-right corner of the Wireless Client Utility ...The Wireless Client Utility is configured to your computer. IMPORTANT BE SURE TO INSTALL THE WIRELESS CLIENT UTILITY BEFORE YOU ATTACH THE TEW-429UB TO YOUR COMPUTER. The utility icon displays in the system tray, the following Network screen opens: 2 Install the utility as described in...
...UTILITY IS INSTALLED COULD CAUSE THE INSTALLATION TO FAIL. Overview of your computer. When the TEW-429UB is installed, it is included on the CD that shipped with the TEW-429UB. Double-click the TEW-429UB icon in the system tray at the bottom-right corner of the Wireless Client Utility ...The Wireless Client Utility is configured to your computer. IMPORTANT BE SURE TO INSTALL THE WIRELESS CLIENT UTILITY BEFORE YOU ATTACH THE TEW-429UB TO YOUR COMPUTER. The utility icon displays in the system tray, the following Network screen opens: 2 Install the utility as described in...
User Guide
Page 9
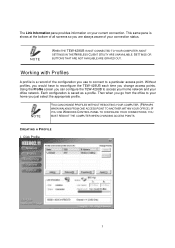
... NOT AVAILABLE ARE GRAYED OUT. Then when you just select the appropriate profile. CREATING A PROFILE 1. Click Profile 3 NOTE WHEN THE TEW-429UB IS NOT CONNECTED TO YOUR COMPUTER, MOST SETTINGS IN THE WIRELESS CLIENT UTILITY ARE UNAVAILABLE. NOTE YOU CAN CHANGE PROFILES WITHOUT REBOOTING YOUR COMPUTER...TO CONFIGURE YOUR CONNECTIONS, YOU MUST REBOOT THE COMPUTER WHEN CHANGING ACCESS POINTS. Using the Profile screen you can configure the TEW-429UB to your home you go from the office to access your home network and your current connection. The Link Information pane provides...
... NOT AVAILABLE ARE GRAYED OUT. Then when you just select the appropriate profile. CREATING A PROFILE 1. Click Profile 3 NOTE WHEN THE TEW-429UB IS NOT CONNECTED TO YOUR COMPUTER, MOST SETTINGS IN THE WIRELESS CLIENT UTILITY ARE UNAVAILABLE. NOTE YOU CAN CHANGE PROFILES WITHOUT REBOOTING YOUR COMPUTER...TO CONFIGURE YOUR CONNECTIONS, YOU MUST REBOOT THE COMPUTER WHEN CHANGING ACCESS POINTS. Using the Profile screen you can configure the TEW-429UB to your home you go from the office to access your home network and your current connection. The Link Information pane provides...
User Guide
Page 10
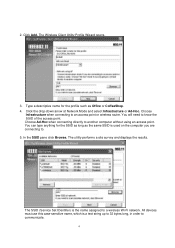
Type a descriptive name for the SSID as long as Office or CoffeeShop. 4. Choose Infrastructure when connecting to know the SSID of the access point. The utility performs a site survey and displays the results. Click the drop-down arrow at Network Mode and select Infrastructure or Ad-Hoc. You will need to an access point or wireless router. The SSID (Service Set IDentifier) is a text string up to 32 bytes long, in order to . 5. All devices must use this case-sensitive name, which is the name assigned to another computer without using an access point. Choose Ad-Hoc when ...
Type a descriptive name for the SSID as long as Office or CoffeeShop. 4. Choose Infrastructure when connecting to know the SSID of the access point. The utility performs a site survey and displays the results. Click the drop-down arrow at Network Mode and select Infrastructure or Ad-Hoc. You will need to an access point or wireless router. The SSID (Service Set IDentifier) is a text string up to 32 bytes long, in order to . 5. All devices must use this case-sensitive name, which is the name assigned to another computer without using an access point. Choose Ad-Hoc when ...
User Guide
Page 11
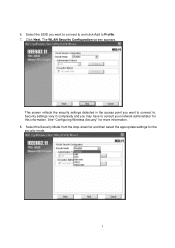
Select the SSID you want to connect to and click Add to Profile. 7. This screen reflects the security settings detected in complexity and you may have to . The WLAN Security Configuration screen appears. Click Next. Select the Security Mode from the drop-down list and then select the appropriate settings for more information. 8. See "Configuring Wireless Security" for the security mode. 5 6. Security settings vary in the access point you want to connect to consult your network administrator for this information.
Select the SSID you want to connect to and click Add to Profile. 7. This screen reflects the security settings detected in complexity and you may have to . The WLAN Security Configuration screen appears. Click Next. Select the Security Mode from the drop-down list and then select the appropriate settings for more information. 8. See "Configuring Wireless Security" for the security mode. 5 6. Security settings vary in the access point you want to connect to consult your network administrator for this information.

User Guide
Page 12
9. Click Save to complete the wizard and save the new profile. (If you with new security settings. Refer to the following to modify settings for a profile. Open the Wireless Client Utility and click Profile. 6 For example, if you purchase a new router, or if your office administrator provides you do not want to activate the profile, uncheck the Apply this profile now checkbox.) MODIFYING PROFILES You may need to modify a profile. 1. Click Next 10.
9. Click Save to complete the wizard and save the new profile. (If you with new security settings. Refer to the following to modify settings for a profile. Open the Wireless Client Utility and click Profile. 6 For example, if you purchase a new router, or if your office administrator provides you do not want to activate the profile, uncheck the Apply this profile now checkbox.) MODIFYING PROFILES You may need to modify a profile. 1. Click Next 10.

User Guide
Page 13
Unless you have a thorough understanding of wireless networking, it is recommended that you want to the Basic Settings and click Advanced Settings. 2. Select the profile you want to modify and click Properties, the following window appears 3. Make the changes you leave these settings at the defaults. 7
Unless you have a thorough understanding of wireless networking, it is recommended that you want to the Basic Settings and click Advanced Settings. 2. Select the profile you want to modify and click Properties, the following window appears 3. Make the changes you leave these settings at the defaults. 7
User Guide
Page 14
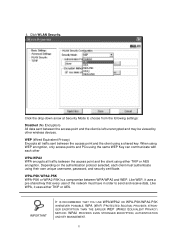
When using WEP encryption, only access points and PCs using the same WEP Key can communicate with each client must have in order to choose from the following settings: Disabled (No Encryption) All data sent between the access point and the client is a compromise between the access point and the client using a shared key. WPA-PSK/WPA2-PSK WPA-PSK or WPA2-PSK is left unencrypted and may be viewed by other WPA/WPA2 WPA encrypts all traffic sent between WPA/WPA2 and WEP. WPA (WI-FI PROTECTED ACCESS) PROVIDES STRONGER ENCRYPTION THAN THE EARLIER WEP (WIRED EQUIVALENT PRIVACY) METHOD...
When using WEP encryption, only access points and PCs using the same WEP Key can communicate with each client must have in order to choose from the following settings: Disabled (No Encryption) All data sent between the access point and the client is a compromise between the access point and the client using a shared key. WPA-PSK/WPA2-PSK WPA-PSK or WPA2-PSK is left unencrypted and may be viewed by other WPA/WPA2 WPA encrypts all traffic sent between WPA/WPA2 and WEP. WPA (WI-FI PROTECTED ACCESS) PROVIDES STRONGER ENCRYPTION THAN THE EARLIER WEP (WIRED EQUIVALENT PRIVACY) METHOD...

User Guide
Page 15
Check this radio button if you have to enter a static IP address. 9 Select the Use IP Changer checkbox. Use DHCP DHCP (Dynamic Host Configuration Protocol) automatically assign IP addresses. This allows you want and click TCP/IP Config. Use static IP below Check this radio button if your router is set to bypass your existing wireless TCP/ IP settings and configure TCP/IP settings for each profile. 5. Make the changes you to DHCP.
Check this radio button if you have to enter a static IP address. 9 Select the Use IP Changer checkbox. Use DHCP DHCP (Dynamic Host Configuration Protocol) automatically assign IP addresses. This allows you want and click TCP/IP Config. Use static IP below Check this radio button if your router is set to bypass your existing wireless TCP/ IP settings and configure TCP/IP settings for each profile. 5. Make the changes you to DHCP.
User Guide
Page 16
... the hot spot finder functionality of the WHF-432/230 to find access points. Remember, you are listed. To scan for access points using the TEW-429UB, refer to the following Web sites for updated information for details.
... the hot spot finder functionality of the WHF-432/230 to find access points. Remember, you are listed. To scan for access points using the TEW-429UB, refer to the following Web sites for updated information for details.

User Guide
Page 17
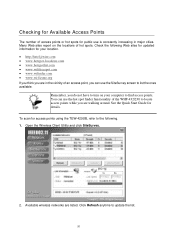
To disable the Wireless Client Utility refer to view the Detailed Info screen. For details about any of the listed access points, select it from the list and click Detailed Info to see the following screen. (You can also double-click an access point to the following. 1. Open the Wireless Client Utility and click Options. 11 Select the network you want to have Windows manage your wireless network settings. In that case, you want and click Connect. Disabling the Wireless Client Utility You may need to connect later. Or click Add To Profile if you should disable the Wireless...
To disable the Wireless Client Utility refer to view the Detailed Info screen. For details about any of the listed access points, select it from the list and click Detailed Info to see the following screen. (You can also double-click an access point to the following. 1. Open the Wireless Client Utility and click Options. 11 Select the network you want to have Windows manage your wireless network settings. In that case, you want and click Connect. Disabling the Wireless Client Utility You may need to connect later. Or click Add To Profile if you should disable the Wireless...

User Guide
Page 18
Select the Let Windows manage this wireless adapter check box and click Apply Now. 12 2.
Select the Let Windows manage this wireless adapter check box and click Apply Now. 12 2.

User Guide
Page 19
HotSpot Detector This section explains the hardware section of the TEW-429UB. Remove the cap from the TEW-429UB. 2. The icon on your computer is vertical, connect the TEW-429UB carefully to avoid damaging the connectors. 1. The TEW-429UB should be charged before first use as follows. Seek Next Seek LED Power... notebook computer USB connectors are horizontal. The battery must be connected with the display facing up , insert the TEW-429UB into a USB connector on the LCD screen indicating the battery is powered by a rechargeable battery. If the USB connector on the...
HotSpot Detector This section explains the hardware section of the TEW-429UB. Remove the cap from the TEW-429UB. 2. The icon on your computer is vertical, connect the TEW-429UB carefully to avoid damaging the connectors. 1. The TEW-429UB should be charged before first use as follows. Seek Next Seek LED Power... notebook computer USB connectors are horizontal. The battery must be connected with the display facing up , insert the TEW-429UB into a USB connector on the LCD screen indicating the battery is powered by a rechargeable battery. If the USB connector on the...
User Guide
Page 20
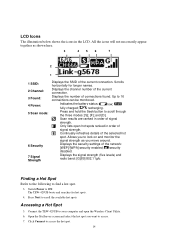
...computer and open hot spots ranked in order of the current connection. Displays the signal strength (five levels) and radio band: [G]/[B] 802.11g/b. Connect the TEW-429UB to lock on and monitor the signal strength as shown here. 3 4 5 6 7 2 1 1 SSID: 2 Channel: 3 Found: 4 Power...horizontally for hot spots. 4. Click Connect to 16 connections can be monitored. Displays the security settings of connections found. The TEW-429UB boots and searches for longer names. and [D]. Continually refreshes details of the current connection. Accessing a Hot Spot 5. Up ...
...computer and open hot spots ranked in order of the current connection. Displays the signal strength (five levels) and radio band: [G]/[B] 802.11g/b. Connect the TEW-429UB to lock on and monitor the signal strength as shown here. 3 4 5 6 7 2 1 1 SSID: 2 Channel: 3 Found: 4 Power...horizontally for hot spots. 4. Click Connect to 16 connections can be monitored. Displays the security settings of connections found. The TEW-429UB boots and searches for longer names. and [D]. Continually refreshes details of the current connection. Accessing a Hot Spot 5. Up ...

User Guide
Page 21
...WIRELESS CLIENT UTILITY BEFORE YOU ATTACH THE TEW-429UB TO YOUR COMPUTER. Double-click the TEW-429UB icon in the system tray at the bottom-right corner of your screen. When the TEW-429UB is installed, it is included on the CD that shipped with the TEW-429UB. Install the utility as described in ...the Quick Start Guide before attaching the TEW-429UB to automatically load when you start your computer. Exploring the ...
...WIRELESS CLIENT UTILITY BEFORE YOU ATTACH THE TEW-429UB TO YOUR COMPUTER. Double-click the TEW-429UB icon in the system tray at the bottom-right corner of your screen. When the TEW-429UB is installed, it is included on the CD that shipped with the TEW-429UB. Install the utility as described in ...the Quick Start Guide before attaching the TEW-429UB to automatically load when you start your computer. Exploring the ...

User Guide
Page 22
Infrastructure or ad-hoc mode. (See Note below Current Profile Shows the current profile you have selected. No authentication is required if this field is blank. 16 The settings shown in the Network screen are described below for the current profile. Reconnect (button) Press to reconnect to select another profile. WIRELESS SETTING The Wireless Setting pane settings are for more information.) Security Shows the security status. Authentication Shows the authentication required. Click the dropdown arrow to the current access point. Network Mode Shows the current ...
Infrastructure or ad-hoc mode. (See Note below Current Profile Shows the current profile you have selected. No authentication is required if this field is blank. 16 The settings shown in the Network screen are described below for the current profile. Reconnect (button) Press to reconnect to select another profile. WIRELESS SETTING The Wireless Setting pane settings are for more information.) Security Shows the security status. Authentication Shows the authentication required. Click the dropdown arrow to the current access point. Network Mode Shows the current ...