
Data Sheet
Page 1
TRENDnet TRENDware, USA What's Next in Networking MIMO g TECHNOLOGY 108 EXTENDED RANGE Mbps TEW-603PI 108Mbps 802.11g MIMO Wireless PCI Adapter Designed...Maximum Reliability, Throughput and Connectivity with Automatic Data Rate Switching (This is the data rate) • Compatible with Windows 2000/XP (SP1/SP2)/2003 Server • Supports 64/128/152-bit WEP, WPA(AES/TKIP) and WPA...any IEEE 802.11b/g wireless network Performance: 108Mbps High Speed Wireless Connection and 800% More Coverage TEW-603PI (9-16-2005) WIRELESS Compare with 802.11b or 802.11g networks, reaches speeds of up to...
TRENDnet TRENDware, USA What's Next in Networking MIMO g TECHNOLOGY 108 EXTENDED RANGE Mbps TEW-603PI 108Mbps 802.11g MIMO Wireless PCI Adapter Designed...Maximum Reliability, Throughput and Connectivity with Automatic Data Rate Switching (This is the data rate) • Compatible with Windows 2000/XP (SP1/SP2)/2003 Server • Supports 64/128/152-bit WEP, WPA(AES/TKIP) and WPA...any IEEE 802.11b/g wireless network Performance: 108Mbps High Speed Wireless Connection and 800% More Coverage TEW-603PI (9-16-2005) WIRELESS Compare with 802.11b or 802.11g networks, reaches speeds of up to...

Data Sheet
Page 2
...trendware.com To Order Please Call: 1-888-326-6061 TRENDnet is subject to change at any time, without notice. For the most recent product information please visit _h_tt_p:_//_w_w__w_.T_R__E_N_D_N_E__T_.c_om. TEW-603PI 108Mbps 802.11g MIMO Wireless PCI Adapter SPECIFICATIONS Hardware Interface... and IEEE 802.11g • Power, Link • Receive Mode: 11g/b 586~627mA • Transmit Mode: 11g 569~620mA (16dBm) , 11b 605~660mA (18dBm) • Windows 2000/XP (SP1/SP2), 2003 Server • 122 x 64 x 6mm (4.8 x 2.5 x 0.2 inches) • 50g (1.8oz) • Operating: 0° ~ 50° ...
...trendware.com To Order Please Call: 1-888-326-6061 TRENDnet is subject to change at any time, without notice. For the most recent product information please visit _h_tt_p:_//_w_w__w_.T_R__E_N_D_N_E__T_.c_om. TEW-603PI 108Mbps 802.11g MIMO Wireless PCI Adapter SPECIFICATIONS Hardware Interface... and IEEE 802.11g • Power, Link • Receive Mode: 11g/b 586~627mA • Transmit Mode: 11g 569~620mA (16dBm) , 11b 605~660mA (18dBm) • Windows 2000/XP (SP1/SP2), 2003 Server • 122 x 64 x 6mm (4.8 x 2.5 x 0.2 inches) • 50g (1.8oz) • Operating: 0° ~ 50° ...

Quick Installation Guide
Page 3
...Windows 2000 or XP 3. Your new wireless network adapter will help you run into your wireless card. Verify Package Contents Please make sure you should be quick and easy. Following the installation instructions should have everything in the box: TEW-603PI TEW-603PI Quick Installation Guide Version 09.15.2005 User's Guide CD-ROM TRENDnet..., please visit www.TRENDNET.com or call by connecting you to do so. Pentium class desktop computers with at least one available PCI slot 2. CD-ROM drive Important! English QIG 1. If you for purchasing the TEW-603PI. If you setup ...
...Windows 2000 or XP 3. Your new wireless network adapter will help you run into your wireless card. Verify Package Contents Please make sure you should be quick and easy. Following the installation instructions should have everything in the box: TEW-603PI TEW-603PI Quick Installation Guide Version 09.15.2005 User's Guide CD-ROM TRENDnet..., please visit www.TRENDNET.com or call by connecting you to do so. Pentium class desktop computers with at least one available PCI slot 2. CD-ROM drive Important! English QIG 1. If you for purchasing the TEW-603PI. If you setup ...
Quick Installation Guide
Page 4
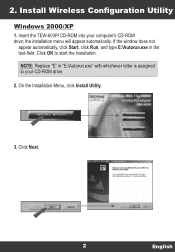
2. On the Installation Menu, click Install Utility. 3. the installation menu will appear automatically. Click Next. 2 English If the window does not appear automatically, click Start, click Run, and type E:\Autorun.exe in "E:\Autorun.exe" with whichever letter is assigned to start the installation. Click OK to your computer's CD-ROM drive; NOTE: Replace "E" in the text-field. Install Wireless Configuration Utility Windows 2000/XP 1. Insert the TEW-603PI CD-ROM into your CD-ROM drive. 2.
2. On the Installation Menu, click Install Utility. 3. the installation menu will appear automatically. Click Next. 2 English If the window does not appear automatically, click Start, click Run, and type E:\Autorun.exe in "E:\Autorun.exe" with whichever letter is assigned to start the installation. Click OK to your computer's CD-ROM drive; NOTE: Replace "E" in the text-field. Install Wireless Configuration Utility Windows 2000/XP 1. Insert the TEW-603PI CD-ROM into your CD-ROM drive. 2.
Quick Installation Guide
Page 6
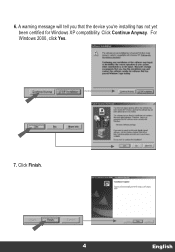
A warning message will tell you that the device you're installing has not yet been certified for Windows XP compatibility. Click Continue Anyway. For Windows 2000, click Yes. 7. Click Finish. 4 English 6.
A warning message will tell you that the device you're installing has not yet been certified for Windows XP compatibility. Click Continue Anyway. For Windows 2000, click Yes. 7. Click Finish. 4 English 6.
Quick Installation Guide
Page 8
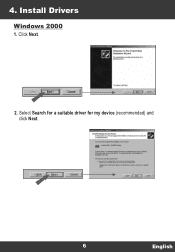
4. Click Next. 2. Install Drivers Windows 2000 1. Select Search for a suitable driver for my device (recommended) and click Next. 6 English
4. Click Next. 2. Install Drivers Windows 2000 1. Select Search for a suitable driver for my device (recommended) and click Next. 6 English
Quick Installation Guide
Page 11
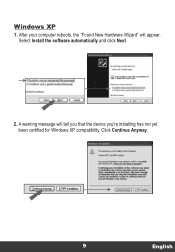
Windows XP 1. A warning message will appear. Select Install the software automatically and click Next. 2. After your computer reboots, the "Found New Hardware Wizard" will tell you that the device you're installing has not yet been certified for Windows XP compatibility. Click Continue Anyway. 9 English
Windows XP 1. A warning message will appear. Select Install the software automatically and click Next. 2. After your computer reboots, the "Found New Hardware Wizard" will tell you that the device you're installing has not yet been certified for Windows XP compatibility. Click Continue Anyway. 9 English

Quick Installation Guide
Page 14
... device must install the wireless configuration utility (as specified in the quick installation guide, but my card isn't connecting to your Windows User's Manual if you physically install your wireless router or access point's SSID. Certifications This equipment has been tested and found ...I completed all the steps in Section 1 of this quick installation guide. Troubleshooting Q1: I cannot open the wireless configuration utility. Q2: Windows is selected. If you see a networking device with FCC and CE Rules. SUCH MODIFICATIONS COULD VOID THE USER'S AUTHORITY TO OPERATE THE ...
... device must install the wireless configuration utility (as specified in the quick installation guide, but my card isn't connecting to your Windows User's Manual if you physically install your wireless router or access point's SSID. Certifications This equipment has been tested and found ...I completed all the steps in Section 1 of this quick installation guide. Troubleshooting Q1: I cannot open the wireless configuration utility. Q2: Windows is selected. If you see a networking device with FCC and CE Rules. SUCH MODIFICATIONS COULD VOID THE USER'S AUTHORITY TO OPERATE THE ...
User Guide
Page 6
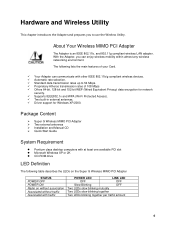
...encryption for network security. 9 Supports IEEE802.1x and WPA (Wi-Fi Protected Access). 9 Two built-in external antennas. 9 Driver support for Windows XP/2000. The following table describes the LEDs on the Super G Wireless MIMO PCI Adapter STATUS POWER OFF POWER ON Radio on without association ... Installation and Manual CD ¾ Quick Start Guide System Requirement z Pentium class desktop computers with at least one available PCI slot z Microsoft Windows XP or 2K z CD-ROM drive LED Definition The following lists the main features of your Card. 9 Your Adapter can enjoy wireless mobility...
...encryption for network security. 9 Supports IEEE802.1x and WPA (Wi-Fi Protected Access). 9 Two built-in external antennas. 9 Driver support for Windows XP/2000. The following table describes the LEDs on the Super G Wireless MIMO PCI Adapter STATUS POWER OFF POWER ON Radio on without association ... Installation and Manual CD ¾ Quick Start Guide System Requirement z Pentium class desktop computers with at least one available PCI slot z Microsoft Windows XP or 2K z CD-ROM drive LED Definition The following lists the main features of your Card. 9 Your Adapter can enjoy wireless mobility...
User Guide
Page 17
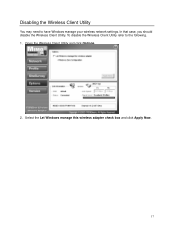
In that case, you should disable the Wireless Client Utility. Select the Let Windows manage this wireless adapter check box and click Apply Now. 17 Open the Wireless Client Utility and click Options. 2. To disable the Wireless Client Utility refer to have Windows manage your wireless network settings. Disabling the Wireless Client Utility You may need to the following. 1.
In that case, you should disable the Wireless Client Utility. Select the Let Windows manage this wireless adapter check box and click Apply Now. 17 Open the Wireless Client Utility and click Options. 2. To disable the Wireless Client Utility refer to have Windows manage your wireless network settings. Disabling the Wireless Client Utility You may need to the following. 1.
User Guide
Page 25
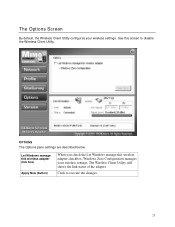
The Wireless Client Utility still shows the link status of the adapter. Click to disable the Wireless Client Utility. OPTIONS The Options pane settings are described below. The Options Screen By default, the Wireless Client Utility configures your wireless settings. Let Windows manage this wireless adapter (tick box) Apply Now (button) When you check the Let Windows manage this screen to execute the changes. 25 Use this wireless adapter checkbox, Windows Zero Configuration manages your wireless settings.
The Wireless Client Utility still shows the link status of the adapter. Click to disable the Wireless Client Utility. OPTIONS The Options pane settings are described below. The Options Screen By default, the Wireless Client Utility configures your wireless settings. Let Windows manage this wireless adapter (tick box) Apply Now (button) When you check the Let Windows manage this screen to execute the changes. 25 Use this wireless adapter checkbox, Windows Zero Configuration manages your wireless settings.
User Guide
Page 28
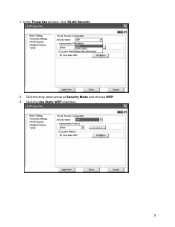
In the Properties window, click WLAN Security. 2. Click the drop-down arrow at Security Mode and choose WEP. 3. Click the Use Static WEP checkbox. 28 1.
In the Properties window, click WLAN Security. 2. Click the drop-down arrow at Security Mode and choose WEP. 3. Click the Use Static WEP checkbox. 28 1.
User Guide
Page 32
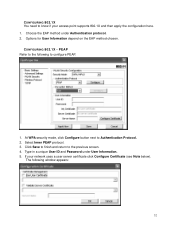
... protocol. 3. Type in a unique User ID and Password under Authentication protocol. 2. Click Save to finish and return to Authentication Protocol. 2. PEAP Refer to the following window appears: 32 If your access point supports 802.1X and then apply the configuration here. 1. Choose the EAP method under User Information. 5. CONFIGURING 802.1X...
... protocol. 3. Type in a unique User ID and Password under Authentication protocol. 2. Click Save to finish and return to Authentication Protocol. 2. PEAP Refer to the following window appears: 32 If your access point supports 802.1X and then apply the configuration here. 1. Choose the EAP method under User Information. 5. CONFIGURING 802.1X...
User Guide
Page 34
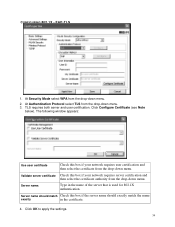
... user certification. Server name should exactly match the name exactly in the name of the server that is used for 802.1X authentication. The following window appears: Use user certificate Check this box if the server name should match Check this box if your network requires server certification and then select...
... user certification. Server name should exactly match the name exactly in the name of the server that is used for 802.1X authentication. The following window appears: Use user certificate Check this box if the server name should match Check this box if your network requires server certification and then select...

User Guide
Page 38
... wizard and complete the installation. 38 Click Finish to begin the installation. 5. Double-click the Setup.exe file that you downloaded. Click Start -> All Programs (Windows 2000 Programs) -> 802.11 Wireless Network Adapter -> Uninstall. 2. When prompted, click Yes to upgrade the Wireless Client Utility. 1. Click Next in the Choose Destination Location...
... wizard and complete the installation. 38 Click Finish to begin the installation. 5. Double-click the Setup.exe file that you downloaded. Click Start -> All Programs (Windows 2000 Programs) -> 802.11 Wireless Network Adapter -> Uninstall. 2. When prompted, click Yes to upgrade the Wireless Client Utility. 1. Click Next in the Choose Destination Location...

User Guide
Page 39
... all the time from the status bar. Install the TEW-603PI in the Status Bar LED PWR and LINK are on Windows version). Troubleshooting PROBLEMS STARTING THE 802.11g WIRELESS CLIENT UTILITY PROGRAM PROBLEM Windows does not auto-detect the TEW-603PI. Verify the status of the TEW-603PI (Wireless 802.11 USB Network Adapter) under Network Adapter...
... all the time from the status bar. Install the TEW-603PI in the Status Bar LED PWR and LINK are on Windows version). Troubleshooting PROBLEMS STARTING THE 802.11g WIRELESS CLIENT UTILITY PROGRAM PROBLEM Windows does not auto-detect the TEW-603PI. Verify the status of the TEW-603PI (Wireless 802.11 USB Network Adapter) under Network Adapter...


