
User Guide
Page 5
.../IP SETTING 9 Windows 95/98/ME...9 Windows 2000 ...10 Windows XP / Vista ...11 CONFIGURATION 12 Login to the WLAN Router through Wireless LAN ...12 Login to the WLAN Router...12 Using the Web Browser...12 Setup Wizard...13 Advanced configuration...25 Main ...25 LAN & DHCP Server...25 WAN ...26 Password... ...27 Time ...28 Dynamic DNS...29 Wireless ...30 Basic ...30 Security ...31 Advanced ...33 Wi-Fi Protected Setup ...34 Status ...35 ...
.../IP SETTING 9 Windows 95/98/ME...9 Windows 2000 ...10 Windows XP / Vista ...11 CONFIGURATION 12 Login to the WLAN Router through Wireless LAN ...12 Login to the WLAN Router...12 Using the Web Browser...12 Setup Wizard...13 Advanced configuration...25 Main ...25 LAN & DHCP Server...25 WAN ...26 Password... ...27 Time ...28 Dynamic DNS...29 Wireless ...30 Basic ...30 Security ...31 Advanced ...33 Wi-Fi Protected Setup ...34 Status ...35 ...

User Guide
Page 7
... sharing, and it is easy to install the IEEE 802.11b/g/n Wireless Home Router. Connecting the WLAN Router. Describes the front panel, rear panel and LED indicators of the IEEE 802.11b/g/n Wireless Home Router. ABOUT THIS GUIDE Congratulations on your IEEE 802.11b/g/n Wireless Home Router. Unpacking and Setup. Helps you can connect the IEEE 802...
... sharing, and it is easy to install the IEEE 802.11b/g/n Wireless Home Router. Connecting the WLAN Router. Describes the front panel, rear panel and LED indicators of the IEEE 802.11b/g/n Wireless Home Router. ABOUT THIS GUIDE Congratulations on your IEEE 802.11b/g/n Wireless Home Router. Unpacking and Setup. Helps you can connect the IEEE 802...
User Guide
Page 10
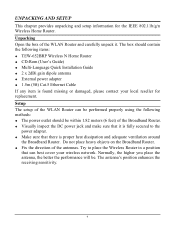
...place heavy objects on the Broadband Router. ‹ Fix the direction of the WLAN Router and carefully unpack it is fully secured to place the Wireless Router in a position that there is found missing or damaged, please contact your wireless network. Unpacking Open the box ... ‹ Make sure that can be performed properly using the following methods: ‹ The power outlet should contain the following items: ‹ TEW-652BRP Wireless N Home Router ‹ CD-Rom (User's Guide) ‹ Multi-Language Quick Installation Guide ‹ 2 x 2dBi gain dipole antenna ‹ External power ...
...place heavy objects on the Broadband Router. ‹ Fix the direction of the WLAN Router and carefully unpack it is fully secured to place the Wireless Router in a position that there is found missing or damaged, please contact your wireless network. Unpacking Open the box ... ‹ Make sure that can be performed properly using the following methods: ‹ The power outlet should contain the following items: ‹ TEW-652BRP Wireless N Home Router ‹ CD-Rom (User's Guide) ‹ Multi-Language Quick Installation Guide ‹ 2 x 2dBi gain dipole antenna ‹ External power ...
User Guide
Page 11
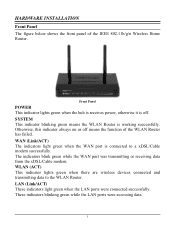
... a xDSL/Cable modem successfully. Otherwise, this indicator always on or off . SYSTEM This indicator blinking green means the WLAN Router is off means the function of the IEEE 802.11b/g/n Wireless Home Router. The indicators blink green while the WAN port was transmitting or receiving data from the xDSL/Cable modem. These indicators...
... a xDSL/Cable modem successfully. Otherwise, this indicator always on or off . SYSTEM This indicator blinking green means the WLAN Router is off means the function of the IEEE 802.11b/g/n Wireless Home Router. The indicators blink green while the WAN port was transmitting or receiving data from the xDSL/Cable modem. These indicators...

User Guide
Page 12
... item to push to reset this device to default settings. 6 Rear Panel The figure below shows the rear panel of the IEEE 802.11b/g/n Wireless Home Router. Rear Panel Antenna There are two 2dBi gain antennas on the rear panel for the WAN that connects to either 10Mbps or 100Mbps Ethernet connections.... LAN (1-4) Four RJ-45 10/100Mbps Auto-MDIX ports for connecting to the xDSL/Cable modem for Internet connectivity. WAN In the four port broadband Router, there is an RJ-45 10/100Mbps Auto-MDIX port for...
... item to push to reset this device to default settings. 6 Rear Panel The figure below shows the rear panel of the IEEE 802.11b/g/n Wireless Home Router. Rear Panel Antenna There are two 2dBi gain antennas on the rear panel for the WAN that connects to either 10Mbps or 100Mbps Ethernet connections.... LAN (1-4) Four RJ-45 10/100Mbps Auto-MDIX ports for connecting to the xDSL/Cable modem for Internet connectivity. WAN In the four port broadband Router, there is an RJ-45 10/100Mbps Auto-MDIX port for...

User Guide
Page 13
WPS (side panel) Push this button to execute the Wi-Fi Protected Setup process. 7 Side Panel The figure below shows the side panel of the IEEE 802.11b/g/n Wireless Home Router.
WPS (side panel) Push this button to execute the Wi-Fi Protected Setup process. 7 Side Panel The figure below shows the side panel of the IEEE 802.11b/g/n Wireless Home Router.

User Guide
Page 14
... the ADSL/Cable modem, the WAN LED will light up. 8 When the WAN Port is connected to the unit. Since the IEEE 802.11b/g/n Wireless Home Router has four ports, you do not have to buy a switch to connect these computers since one end of the network cable to the broadband modem..., the Power, System, LAN, WLAN and WAN port LEDs of the WLAN Router. 2. Then you can be seen instantly: 1. Hardware connections Connecting the WLAN Router 1. When the LAN Port is connected to the WAN port of the WLAN Router will light up . 3. the other end of the xDSL or Cable modem. 3. With...
... the ADSL/Cable modem, the WAN LED will light up. 8 When the WAN Port is connected to the unit. Since the IEEE 802.11b/g/n Wireless Home Router has four ports, you do not have to buy a switch to connect these computers since one end of the network cable to the broadband modem..., the Power, System, LAN, WLAN and WAN port LEDs of the WLAN Router. 2. Then you can be seen instantly: 1. Hardware connections Connecting the WLAN Router 1. When the LAN Port is connected to the WAN port of the WLAN Router will light up . 3. the other end of the xDSL or Cable modem. 3. With...
User Guide
Page 18
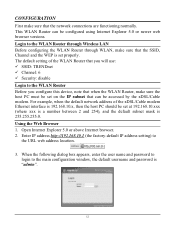
... the xDSL/Cable modem. For example, when the default network address of the WLAN Router that you will use: 9 SSID: TRENDnet 9 Channel: 6 9 Security: disable Login to the WLAN Router through Wireless LAN Before configuring the WLAN Router through WLAN, make sure that the network connections are functioning normally. Open Internet Explorer... number between 2 and 254), and the default subnet mask is 255.255.255.0. Login to the WLAN Router Before you configure this device, note that when the WLAN Router, make sure the host PC must be set on the IP subnet that can be set properly. When the...
... the xDSL/Cable modem. For example, when the default network address of the WLAN Router that you will use: 9 SSID: TRENDnet 9 Channel: 6 9 Security: disable Login to the WLAN Router through Wireless LAN Before configuring the WLAN Router through WLAN, make sure that the network connections are functioning normally. Open Internet Explorer... number between 2 and 254), and the default subnet mask is 255.255.255.0. Login to the WLAN Router Before you configure this device, note that when the WLAN Router, make sure the host PC must be set on the IP subnet that can be set properly. When the...

User Guide
Page 19
User can simply follow the step-by-step process to get the wireless Router configuration ready to continue. Step 1: Set your new password Setting the new admin password of the web configuration utility. Setup Wizard Setup wizard is provided as part of the WLAN Router. Please click "Next" to run in 6 easy steps by clicking on` the "Wizard" button on the function menu. The following screen will appear. Please click "Next" to continue. 13 Please click "Next" to continue. Step 2: Choose time zone Select the time zone from the drop down list.
User can simply follow the step-by-step process to get the wireless Router configuration ready to continue. Step 1: Set your new password Setting the new admin password of the web configuration utility. Setup Wizard Setup wizard is provided as part of the WLAN Router. Please click "Next" to run in 6 easy steps by clicking on` the "Wizard" button on the function menu. The following screen will appear. Please click "Next" to continue. 13 Please click "Next" to continue. Step 2: Choose time zone Select the time zone from the drop down list.
User Guide
Page 20
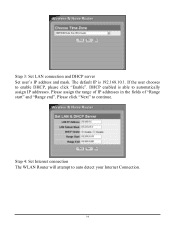
Please click "Next" to enable DHCP, please click "Enable". If the user chooses to continue. Please assign the range of IP addresses in the fields of "Range start" and "Range end". Step 4: Set Internet connection The WLAN Router will attempt to automatically assign IP addresses. DHCP enabled is 192.168.10.1. Step 3: Set LAN connection and DHCP server Set user's IP address and mask. The default IP is able to auto detect your Internet Connection. 14
Please click "Next" to enable DHCP, please click "Enable". If the user chooses to continue. Please assign the range of IP addresses in the fields of "Range start" and "Range end". Step 4: Set Internet connection The WLAN Router will attempt to automatically assign IP addresses. DHCP enabled is 192.168.10.1. Step 3: Set LAN connection and DHCP server Set user's IP address and mask. The default IP is able to auto detect your Internet Connection. 14

User Guide
Page 21
Obtain IP automatically (DHCP client): If the user has enabled DHCP server, choose "Obtain IP automatically (DHCP client)" to have the WLAN Router assign IP addresses automatically. 15
Obtain IP automatically (DHCP client): If the user has enabled DHCP server, choose "Obtain IP automatically (DHCP client)" to have the WLAN Router assign IP addresses automatically. 15

User Guide
Page 22
Fixed IP Address: If the Internet Service Provider (ISP) assigns a fixed IP address, choose this option and enter the assigned WAN IP Address, WAN Subnet Mask, WAN Gateway Address and DNS Server Addresses for the WLAN Router. 16
Fixed IP Address: If the Internet Service Provider (ISP) assigns a fixed IP address, choose this option and enter the assigned WAN IP Address, WAN Subnet Mask, WAN Gateway Address and DNS Server Addresses for the WLAN Router. 16

User Guide
Page 30
The SSID and channel must be effective after the WLAN Router restarts. The new settings will be the same as wireless devices attempting to connect to the WLAN Router. Please click "Restart" to modify the setting by clicking "Back". 24 Step 6: Setup completed The Setup wizard is now completed.... User also can go back to reboot the WLAN Router. If user does not want to make any changes, please click "Exit" to enable Wireless LAN. Step 5: Set Wireless LAN connection Click "Enable" to quit without any changes. If user enables the...
The SSID and channel must be effective after the WLAN Router restarts. The new settings will be the same as wireless devices attempting to connect to the WLAN Router. Please click "Restart" to modify the setting by clicking "Back". 24 Step 6: Setup completed The Setup wizard is now completed.... User also can go back to reboot the WLAN Router. If user does not want to make any changes, please click "Exit" to enable Wireless LAN. Step 5: Set Wireless LAN connection Click "Enable" to quit without any changes. If user enables the...
User Guide
Page 31
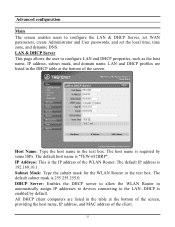
..., time zone, and dynamic DNS. Advanced configuration Main The screen enables users to the LAN. DHCP is "TEW-652BRP". All DHCP client computers are listed in the table at the bottom of the WLAN Router. The default host name is enabled by some ISPs. Subnet Mask: Type the subnet mask for the WLAN...
..., time zone, and dynamic DNS. Advanced configuration Main The screen enables users to the LAN. DHCP is "TEW-652BRP". All DHCP client computers are listed in the table at the bottom of the WLAN Router. The default host name is enabled by some ISPs. Subnet Mask: Type the subnet mask for the WLAN...

User Guide
Page 32
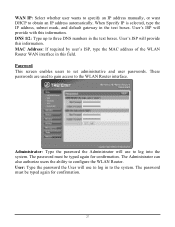
... the amount of the network in the text box. WAN This screen enables users to set up the WLAN Router WAN connection, specify the IP address for the WAN, add DNS numbers, and enter the MAC address. End... IP range that DHCP will use to assign IP addresses to all LAN devices connected to the WLAN Router. Start IP: Type an IP address to serve as the end of the IP range that DHCP ...will use to assign IP addresses to all LAN devices connected to the WLAN Router. Connection Type: Select the connection type, either DHCP client, Fixed IP, PPPoE, PPTP, L2TP or BigPond ...
... the amount of the network in the text box. WAN This screen enables users to set up the WLAN Router WAN connection, specify the IP address for the WAN, add DNS numbers, and enter the MAC address. End... IP range that DHCP will use to assign IP addresses to all LAN devices connected to the WLAN Router. Start IP: Type an IP address to serve as the end of the IP range that DHCP ...will use to assign IP addresses to all LAN devices connected to the WLAN Router. Connection Type: Select the connection type, either DHCP client, Fixed IP, PPPoE, PPTP, L2TP or BigPond ...
User Guide
Page 33
.... The Administrator can also authorize users the ability to three DNS numbers in the text boxes. DNS 1/2: Type up to configure the WLAN Router. These passwords are used to gain access to log into the system. Administrator: Type the password the Administrator will provide with this information.... The password must be typed again for confirmation. MAC Address: If required by user's ISP, type the MAC address of the WLAN Router WAN interface in to the system. User: Type the password the User will provide this information. The password must be typed again for confirmation...
.... The Administrator can also authorize users the ability to three DNS numbers in the text boxes. DNS 1/2: Type up to configure the WLAN Router. These passwords are used to gain access to log into the system. Administrator: Type the password the Administrator will provide with this information.... The password must be typed again for confirmation. MAC Address: If required by user's ISP, type the MAC address of the WLAN Router WAN interface in to the system. User: Type the password the User will provide this information. The password must be typed again for confirmation...
User Guide
Page 34
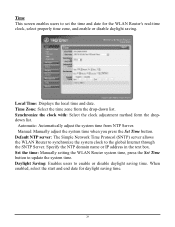
... Daylight Saving: Enables users to the global Internet through the SNTP Server. Default NTP server: The Simple Network Time Protocol (SNTP) server allows the WLAN Router to synchronize the system clock to enable or disable daylight saving time. Local Time: Displays the local time and date. Time Zone: Select the time.... Manual: Manually adjust the system time when you press the Set Time button. When enabled, select the start and end date for the WLAN Router's real-time clock, select properly time zone, and enable or disable daylight saving. Set the time: Manually setting the WLAN...
... Daylight Saving: Enables users to the global Internet through the SNTP Server. Default NTP server: The Simple Network Time Protocol (SNTP) server allows the WLAN Router to synchronize the system clock to enable or disable daylight saving time. Local Time: Displays the local time and date. Time Zone: Select the time.... Manual: Manually adjust the system time when you press the Set Time button. When enabled, select the start and end date for the WLAN Router's real-time clock, select properly time zone, and enable or disable daylight saving. Set the time: Manually setting the WLAN...

User Guide
Page 36
...allow user to configuration the wireless communications parameters for the WLAN Router. z802.11g only - Channel: Select a transmission channel for wireless communications. The channel of 802.11n, 11g, and 11b wireless clients. Select if you are using a mix of any wireless device must match the ...and WAN via the WLAN Router. z802.11n only - Wireless This section enables users to enable and disable the wireless LAN function, create a SSID, and select the channel for wireless communications. Enable/Disable: Enables or disables wireless LAN via the WLAN Router. Select if you are...
...allow user to configuration the wireless communications parameters for the WLAN Router. z802.11g only - Channel: Select a transmission channel for wireless communications. The channel of 802.11n, 11g, and 11b wireless clients. Select if you are using a mix of any wireless device must match the ...and WAN via the WLAN Router. z802.11n only - Wireless This section enables users to enable and disable the wireless LAN function, create a SSID, and select the channel for wireless communications. Enable/Disable: Enables or disables wireless LAN via the WLAN Router. Select if you are...

User Guide
Page 37
.... WMM: Enable the Wi-Fi Multi-Media will be able to view the WLAN Router's SSID. Select this option if you are four options: Disabled, WEP, WPA, WPA2 and WPA-Auto. 31 z20MHz - This is enabled, all wireless clients will offer Wi-Fi networks stable that improve the user experience for audio... security purposes, users may want to disable SSID Broadcast to open system. zAuto 20/40 - There are not using both 802.11n and non802.11n wireless devices. Select this option if you are using any 802.11n wireless clients. SSID Broadcast: While SSID Broadcast is the default setting.
.... WMM: Enable the Wi-Fi Multi-Media will be able to view the WLAN Router's SSID. Select this option if you are four options: Disabled, WEP, WPA, WPA2 and WPA-Auto. 31 z20MHz - This is enabled, all wireless clients will offer Wi-Fi networks stable that improve the user experience for audio... security purposes, users may want to disable SSID Broadcast to open system. zAuto 20/40 - There are not using both 802.11n and non802.11n wireless devices. Select this option if you are using any 802.11n wireless clients. SSID Broadcast: While SSID Broadcast is the default setting.

User Guide
Page 38
...: Select the key type: ASCII or HEX WEP Key: Select the level of the encryption key and the parameters for the RADIUS server. The WLAN Router supports, 64 and 128-bit encryption. WPA/WPA2/WPA-Auto Security If WPA, WPA2 or WPA-Auto EAP is selected, the above screen is shown...: Open System and Shared Key requires the user to set of values for each key. Manually enter a set a WEP key to exchange data with other wireless clients that have the same WEP key.. Key 1 ~ Key 4: Enables users to create up to the key. Select a key to use by clicking the radio...
...: Select the key type: ASCII or HEX WEP Key: Select the level of the encryption key and the parameters for the RADIUS server. The WLAN Router supports, 64 and 128-bit encryption. WPA/WPA2/WPA-Auto Security If WPA, WPA2 or WPA-Auto EAP is selected, the above screen is shown...: Open System and Shared Key requires the user to set of values for each key. Manually enter a set a WEP key to exchange data with other wireless clients that have the same WEP key.. Key 1 ~ Key 4: Enables users to create up to the key. Select a key to use by clicking the radio...


