User Guide
Page 34
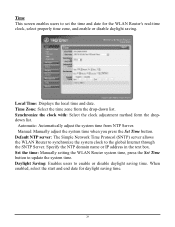
...the time zone from NTP Server. Manual: Manually adjust the system time when you press the Set Time button. Daylight Saving: Enables users to update the system time. Time This screen enables users to set the time and date for daylight saving time. 28 Synchronize the clock with: Select ...Automatically adjust the system time from the drop-down list. Local Time: Displays the local time and date. Set the time: Manually setting the WLAN Router system time, press the Set Time button to enable or disable daylight saving time. Default NTP server: The Simple Network Time Protocol (SNTP) server...
...the time zone from NTP Server. Manual: Manually adjust the system time when you press the Set Time button. Daylight Saving: Enables users to update the system time. Time This screen enables users to set the time and date for daylight saving time. 28 Synchronize the clock with: Select ...Automatically adjust the system time from the drop-down list. Local Time: Displays the local time and date. Set the time: Manually setting the WLAN Router system time, press the Set Time button to enable or disable daylight saving time. Default NTP server: The Simple Network Time Protocol (SNTP) server...
User Guide
Page 41
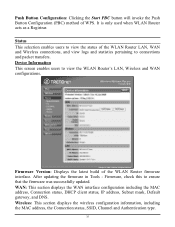
.... Device Information This screen enables users to ensure that the firmware was successfully updated. Firmware, check this to view the WLAN Router's LAN, Wireless and WAN configurations. Status This selection enables users to connections and packet transfers. Wireless: This section displays the wireless configuration information, including the MAC address, the Connection status, SSID, Channel and...
.... Device Information This screen enables users to ensure that the firmware was successfully updated. Firmware, check this to view the WLAN Router's LAN, Wireless and WAN configurations. Status This selection enables users to connections and packet transfers. Wireless: This section displays the wireless configuration information, including the MAC address, the Connection status, SSID, Channel and...
User Guide
Page 45
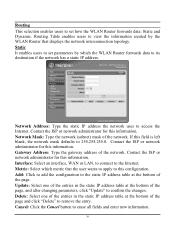
... all fields and enter new information. 39 Network Mask: Type the network (subnet) mask of the page, and after changing parameters, click "Update" to confirm the changes. Contact the ISP or network administrator for this information. Contact the ISP or network administrator for this field is left ...mask defaults to 255.255.255.0. Interface: Select an interface, WAN or LAN, to connect to the Internet. Metric: Select which the WLAN Router forwards data to its destination if the network has a static IP address. Routing Table enables users to view the information created by which metric ...
... all fields and enter new information. 39 Network Mask: Type the network (subnet) mask of the page, and after changing parameters, click "Update" to confirm the changes. Contact the ISP or network administrator for this information. Contact the ISP or network administrator for this field is left ...mask defaults to 255.255.255.0. Interface: Select an interface, WAN or LAN, to connect to the Internet. Metric: Select which the WLAN Router forwards data to its destination if the network has a static IP address. Routing Table enables users to view the information created by which metric ...

User Guide
Page 49
... remove the user profile. Delete: Select a user from the table at the bottom of the list and click Delete to update information for the user, if you have changed any of the fields. Cancel: Click Cancel to the list at the bottom of the user to ...
... remove the user profile. Delete: Select a user from the table at the bottom of the list and click Delete to update information for the user, if you have changed any of the fields. Cancel: Click Cancel to the list at the bottom of the user to ...

User Guide
Page 51
... name of the protocol. z Cancel: Click the Cancel button to define a minimum and maximum IP address range filter; IP Range: Type the IP range. z Update: Click to update information for the virtual server. The IP filter profiles are not allowed accessing internet. Protocol/IP Filters This screen enables you have selected a list...
... name of the protocol. z Cancel: Click the Cancel button to define a minimum and maximum IP address range filter; IP Range: Type the IP range. z Update: Click to update information for the virtual server. The IP filter profiles are not allowed accessing internet. Protocol/IP Filters This screen enables you have selected a list...

User Guide
Page 53
z Add: Click to add the virtual server to update information for the application. z Update: Click to the table at the bottom of the screen. Trigger: Defines the outgoing communication that determines whether the user has legitimate access to remove ... list. Enable: Click to erase all fields and enter new information. When enabled, users will be able to connect to the application via the WLAN Router's WAN connection. z Cancel: Click Cancel button to enable or disable the application profile. LAN Server: Type the LAN IP address that will be assigned to...
z Add: Click to add the virtual server to update information for the application. z Update: Click to the table at the bottom of the screen. Trigger: Defines the outgoing communication that determines whether the user has legitimate access to remove ... list. Enable: Click to erase all fields and enter new information. When enabled, users will be able to connect to the application via the WLAN Router's WAN connection. z Cancel: Click Cancel button to enable or disable the application profile. LAN Server: Type the LAN IP address that will be assigned to...

User Guide
Page 54
z Update: Click to update information for the incoming communication. z Delete: Select a list item and click Delete to erase all fields and enter new information. z Port: Type the port number ... the application in the text boxes. z Protocol: Select the protocol (TCP, UDP, or * for TCP+UDP) that cannot access Internet applications properly through the WLAN Router and associated security settings. DMZ This screen enables users to create a DMZ for those computers that can be used to access the application. z Add: Click...
z Update: Click to update information for the incoming communication. z Delete: Select a list item and click Delete to erase all fields and enter new information. z Port: Type the port number ... the application in the text boxes. z Protocol: Select the protocol (TCP, UDP, or * for TCP+UDP) that cannot access Internet applications properly through the WLAN Router and associated security settings. DMZ This screen enables users to create a DMZ for those computers that can be used to access the application. z Add: Click...

User Guide
Page 59
Firmware This screen enables users to keep the WLAN Router firmware up to disk. Please follow the below instructions: Download the latest firmware from the manufacturer's Web site, and save it to date. Type the host name or IP address in the text box and click Ping. 53 Ping Test The ping test enables users to the latest release. Select the file and click "Upgrade" to update the firmware to determine whether an IP address or host is present on the Internet. Click "Browse" and go to the location of the downloaded firmware file.
Firmware This screen enables users to keep the WLAN Router firmware up to disk. Please follow the below instructions: Download the latest firmware from the manufacturer's Web site, and save it to date. Type the host name or IP address in the text box and click Ping. 53 Ping Test The ping test enables users to the latest release. Select the file and click "Upgrade" to update the firmware to determine whether an IP address or host is present on the Internet. Click "Browse" and go to the location of the downloaded firmware file.

