
User Guide
Page 8
...Share resources such as printers, scanners and other peripherals. Online gaming: Through the local area network, online gaming and e-commerce services can share one public IP address over such a device. Firewall: A built-in firewall function - INTRODUCTION With the explosive growth of the Internet, accessing information and services at any of... of the exclusive domain of features, but also can solve high network access costs. All linked computers can make full use of IP addresses and using a shared Internet connection through wireless or wired (WLAN, LAN and WAN-Internet).
...Share resources such as printers, scanners and other peripherals. Online gaming: Through the local area network, online gaming and e-commerce services can share one public IP address over such a device. Firewall: A built-in firewall function - INTRODUCTION With the explosive growth of the Internet, accessing information and services at any of... of the exclusive domain of features, but also can solve high network access costs. All linked computers can make full use of IP addresses and using a shared Internet connection through wireless or wired (WLAN, LAN and WAN-Internet).

User Guide
Page 15
Select "Disable DNS" in the "DNS" field. 9 Select "Obtain an IP address automatically" on the desktop. 2. Click the right mouse button and a context menu will be show. 3. Click on the "Network neighborhood" icon found on the "IP address" field. 5. PC NETWORK TCP/IP SETTING The network TCP/IP settings differ based on the computer's operating system (Win95/98/ME/NT/2000/XP/Vista) and are as follows. Windows 95/98/ME 1. Select "Properties" to enter the TCP/IP setting screen. 4.
Select "Disable DNS" in the "DNS" field. 9 Select "Obtain an IP address automatically" on the desktop. 2. Click the right mouse button and a context menu will be show. 3. Click on the "Network neighborhood" icon found on the "IP address" field. 5. PC NETWORK TCP/IP SETTING The network TCP/IP settings differ based on the computer's operating system (Win95/98/ME/NT/2000/XP/Vista) and are as follows. Windows 95/98/ME 1. Select "Properties" to enter the TCP/IP setting screen. 4.

User Guide
Page 16
... open the "Network dialup connection" applet. In the "Local area network connection" window, first select TCP/IP setting and then select "Properties." 3. Select "None" for the "Gateway address" field. 6. Set both "IP address" and "DNS" to enter the TCP/IP setting window. 1. Double click on "Properties." 2. Select "Properties" to Automatic configuration. 10 In the "Local...
... open the "Network dialup connection" applet. In the "Local area network connection" window, first select TCP/IP setting and then select "Properties." 3. Select "None" for the "Gateway address" field. 6. Set both "IP address" and "DNS" to enter the TCP/IP setting window. 1. Double click on "Properties." 2. Select "Properties" to Automatic configuration. 10 In the "Local...

User Guide
Page 17
Select "properties" to "Obtain DNS server address automatically." 11 Set "DNS" to enter the TCP/IP setting window. 1. Windows XP / Vista Point the cursor and click the right button on the "My Network Place" icon. Set "IP address" to "Obtain an IP address automatically." 2.
Select "properties" to "Obtain DNS server address automatically." 11 Set "DNS" to enter the TCP/IP setting window. 1. Windows XP / Vista Point the cursor and click the right button on the "My Network Place" icon. Set "IP address" to "Obtain an IP address automatically." 2.
User Guide
Page 18
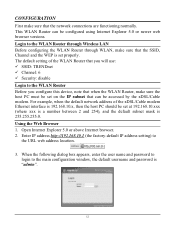
...can be set properly. Using the Web Browser 1. Enter IP address http://192.168.10.1 (the factory-default IP address setting) to the WLAN Router Before you will use: 9 SSID: TRENDnet 9 Channel: 6 9 Security: disable Login to the URL web address location. 3. CONFIGURATION First make sure that the SSID, ... When the following dialog box appears, enter the user name and password to login to the WLAN Router through Wireless LAN Before configuring the WLAN Router through WLAN, make sure that the network connections are functioning normally. Login to the main configuration window,...
...can be set properly. Using the Web Browser 1. Enter IP address http://192.168.10.1 (the factory-default IP address setting) to the WLAN Router Before you will use: 9 SSID: TRENDnet 9 Channel: 6 9 Security: disable Login to the URL web address location. 3. CONFIGURATION First make sure that the SSID, ... When the following dialog box appears, enter the user name and password to login to the WLAN Router through Wireless LAN Before configuring the WLAN Router through WLAN, make sure that the network connections are functioning normally. Login to the main configuration window,...
User Guide
Page 20
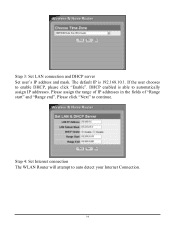
If the user chooses to continue. Please assign the range of IP addresses in the fields of "Range start" and "Range end". The default IP is able to auto detect your Internet Connection. 14 DHCP enabled is 192.168.10.1. Step 3: Set LAN connection and DHCP server Set user's IP address and mask. Please click "Next" to enable DHCP, please click "Enable". Step 4: Set Internet connection The WLAN Router will attempt to automatically assign IP addresses.
If the user chooses to continue. Please assign the range of IP addresses in the fields of "Range start" and "Range end". The default IP is able to auto detect your Internet Connection. 14 DHCP enabled is 192.168.10.1. Step 3: Set LAN connection and DHCP server Set user's IP address and mask. Please click "Next" to enable DHCP, please click "Enable". Step 4: Set Internet connection The WLAN Router will attempt to automatically assign IP addresses.

User Guide
Page 21
Obtain IP automatically (DHCP client): If the user has enabled DHCP server, choose "Obtain IP automatically (DHCP client)" to have the WLAN Router assign IP addresses automatically. 15
Obtain IP automatically (DHCP client): If the user has enabled DHCP server, choose "Obtain IP automatically (DHCP client)" to have the WLAN Router assign IP addresses automatically. 15

User Guide
Page 22
Fixed IP Address: If the Internet Service Provider (ISP) assigns a fixed IP address, choose this option and enter the assigned WAN IP Address, WAN Subnet Mask, WAN Gateway Address and DNS Server Addresses for the WLAN Router. 16
Fixed IP Address: If the Internet Service Provider (ISP) assigns a fixed IP address, choose this option and enter the assigned WAN IP Address, WAN Subnet Mask, WAN Gateway Address and DNS Server Addresses for the WLAN Router. 16

User Guide
Page 24
PPPoE with a fixed IP address: If connected to the Internet using a PPPoE (Dial-up xDSL) connection and the ISP provides a User Name, Password and a Fixed IP Address, choose this option and enter the required information. 18
PPPoE with a fixed IP address: If connected to the Internet using a PPPoE (Dial-up xDSL) connection and the ISP provides a User Name, Password and a Fixed IP Address, choose this option and enter the required information. 18
User Guide
Page 31
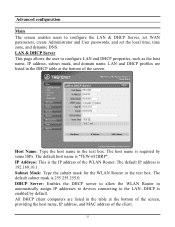
The default IP address is "TEW-652BRP". DHCP Server: Enables the DHCP server to allow the WLAN Router to automatically assign IP addresses to devices connecting to configure the LAN & DHCP Server, set WAN parameters, create Administrator and User passwords, and set the local time, time zone, and ...dynamic DNS. LAN and DHCP profiles are listed in the DHCP table at the bottom of the screen, providing the host name, IP address, and MAC address of the WLAN Router. Host Name: Type the host name in the text box. The default host name is 192.168.10.1. DHCP is required by...
The default IP address is "TEW-652BRP". DHCP Server: Enables the DHCP server to allow the WLAN Router to automatically assign IP addresses to devices connecting to configure the LAN & DHCP Server, set WAN parameters, create Administrator and User passwords, and set the local time, time zone, and ...dynamic DNS. LAN and DHCP profiles are listed in the DHCP table at the bottom of the screen, providing the host name, IP address, and MAC address of the WLAN Router. Host Name: Type the host name in the text box. The default host name is 192.168.10.1. DHCP is required by...

User Guide
Page 32
...a network user be allowed with their current dynamic IP address. This item is optional. Start IP: Type an IP address to serve as the end of the IP range that DHCP will use to assign IP addresses to all LAN devices connected to the WLAN Router. Connection Type: Select the connection type, either ...DHCP client, Fixed IP, PPPoE, PPTP, L2TP or BigPond ...
...a network user be allowed with their current dynamic IP address. This item is optional. Start IP: Type an IP address to serve as the end of the IP range that DHCP will use to assign IP addresses to all LAN devices connected to the WLAN Router. Connection Type: Select the connection type, either ...DHCP client, Fixed IP, PPPoE, PPTP, L2TP or BigPond ...
User Guide
Page 33
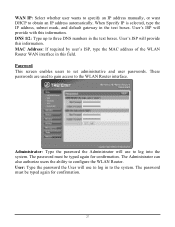
... field. The password must be typed again for confirmation. 27 WAN IP: Select whether user wants to specify an IP address manually, or want DHCP to the WLAN Router interface. MAC Address: If required by user's ISP, type the MAC address of the WLAN Router WAN interface in to log into the system. These passwords are used...
... field. The password must be typed again for confirmation. 27 WAN IP: Select whether user wants to specify an IP address manually, or want DHCP to the WLAN Router interface. MAC Address: If required by user's ISP, type the MAC address of the WLAN Router WAN interface in to log into the system. These passwords are used...
User Guide
Page 34
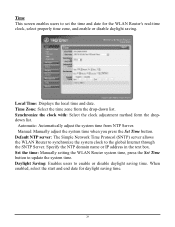
... the drop-down list. Manual: Manually adjust the system time when you press the Set Time button. Set the time: Manually setting the WLAN Router system time, press the Set Time button to enable or disable daylight saving time. Daylight Saving: Enables users to update the system time. When...saving. Default NTP server: The Simple Network Time Protocol (SNTP) server allows the WLAN Router to synchronize the system clock to the global Internet through the SNTP Server. Specify the NTP domain name or IP address in the text box. Time This screen enables users to set the time and date ...
... the drop-down list. Manual: Manually adjust the system time when you press the Set Time button. Set the time: Manually setting the WLAN Router system time, press the Set Time button to enable or disable daylight saving time. Daylight Saving: Enables users to update the system time. When...saving. Default NTP server: The Simple Network Time Protocol (SNTP) server allows the WLAN Router to synchronize the system clock to the global Internet through the SNTP Server. Specify the NTP domain name or IP address in the text box. Time This screen enables users to set the time and date ...

User Guide
Page 35
First, you need to register your preferred DNS with your current Public IP address when you are online. Then, please select the DDNS address in the Server Address and fill the related information in the below fields: Host Name, User Name and Password. 29 Dynamic DNS This synchronizes the DDNS server with the DDNS provider.
First, you need to register your preferred DNS with your current Public IP address when you are online. Then, please select the DDNS address in the Server Address and fill the related information in the below fields: Host Name, User Name and Password. 29 Dynamic DNS This synchronizes the DDNS server with the DDNS provider.

User Guide
Page 39
RADIUS Server: 1. Enter the IP address, Port used and Shared Secret by the Secondary Radius Server. (optional) WPA-PSK/WPA2-PSK Security If WPA, WPA2 or WPA-Auto PSK is selected. Advanced This screen enables users to configure advanced wireless functions. 33 Cipher Type: Select the cipher type for TKIP or AES encryption, Selected Auto for auto detects the cipher type. Enter the IP address, Port used and Shared Secret by the Primary Radius Server. 2. Passphrase: The length should be 8 characters at least.
RADIUS Server: 1. Enter the IP address, Port used and Shared Secret by the Secondary Radius Server. (optional) WPA-PSK/WPA2-PSK Security If WPA, WPA2 or WPA-Auto PSK is selected. Advanced This screen enables users to configure advanced wireless functions. 33 Cipher Type: Select the cipher type for TKIP or AES encryption, Selected Auto for auto detects the cipher type. Enter the IP address, Port used and Shared Secret by the Primary Radius Server. 2. Passphrase: The length should be 8 characters at least.
User Guide
Page 41
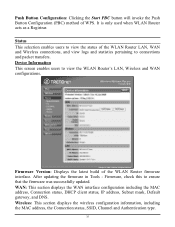
... interface configuration including the MAC address, Connection status, DHCP client status, IP address, Subnet mask, Default gateway, and DNS. Push Button Configuration: Clicking the Start PBC button will invoke the Push Button Configuration (PBC) method of the WLAN Router firmware interface. Wireless: This section displays the wireless configuration information, including the MAC address, the Connection status, SSID...
... interface configuration including the MAC address, Connection status, DHCP client status, IP address, Subnet mask, Default gateway, and DNS. Push Button Configuration: Clicking the Start PBC button will invoke the Push Button Configuration (PBC) method of the WLAN Router firmware interface. Wireless: This section displays the wireless configuration information, including the MAC address, the Connection status, SSID...

User Guide
Page 42
...the log entry. 36 Click "DHCP Renew" to reassign IP addresses to client stations connected to 200 entries. Click "DHCP Table" to the WLAN Router LAN interface. LAN: This section displays the LAN interface configuration including the MAC address, IP Address, Subnet Mask, and DHCP Server Status. The log ...to delete the contents of the log and begin a new log Click "Refresh" to the WAN via the WLAN Router. Click "DHCP Release" to release all IP addresses assigned to client stations connected to renew log statistics Time: Displays the time and date that the log entry was created...
...the log entry. 36 Click "DHCP Renew" to reassign IP addresses to client stations connected to 200 entries. Click "DHCP Table" to the WLAN Router LAN interface. LAN: This section displays the LAN interface configuration including the MAC address, IP Address, Subnet Mask, and DHCP Server Status. The log ...to delete the contents of the log and begin a new log Click "Refresh" to the WAN via the WLAN Router. Click "DHCP Release" to release all IP addresses assigned to client stations connected to renew log statistics Time: Displays the time and date that the log entry was created...
User Guide
Page 45
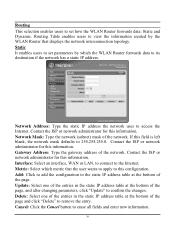
...ISP or network administrator for this information. Metric: Select which the WLAN Router forwards data to its destination if the network has a static IP address. Routing This selection enables users to set parameters by the WLAN Router that the user wants to apply to this information. Update: Select one... of the entries in the static IP address table at the bottom of the page. Static It enables users to set how the WLAN Router forwards data: Static and Dynamic. Network Address: Type the static IP address the network uses to erase all fields and enter new ...
...ISP or network administrator for this information. Metric: Select which the WLAN Router forwards data to its destination if the network has a static IP address. Routing This selection enables users to set parameters by the WLAN Router that the user wants to apply to this information. Update: Select one... of the entries in the static IP address table at the bottom of the page. Static It enables users to set how the WLAN Router forwards data: Static and Dynamic. Network Address: Type the static IP address the network uses to erase all fields and enter new ...

User Guide
Page 47
... the metric of the WLAN Router. Routing Table This screen enables users to view the routing table of the connected node. Gateway Address: Displays the gateway address of the connected node. Type: Displays whether the node has a static or dynamic IP address 41 Network Mask: Displays the... network (subnet) mask of the connected node. Interface: Displays whether the node is a database created by the WLAN Router that displays the network interconnection topology. The routing table is...
... the metric of the WLAN Router. Routing Table This screen enables users to view the routing table of the connected node. Gateway Address: Displays the gateway address of the connected node. Type: Displays whether the node has a static or dynamic IP address 41 Network Mask: Displays the... network (subnet) mask of the connected node. Interface: Displays whether the node is a database created by the WLAN Router that displays the network interconnection topology. The routing table is...

User Guide
Page 51
... at the bottom of the page. (Note: Click anywhere in the table at the bottom of the screen. Protocol/IP Filters This screen enables you to enable or disable the IP address filter. IP addresses falling between this value and the Range End are listed in the item. z Cancel: Click the Cancel button to... erase all IP addresses falling within the range are not allowed accessing internet. Once the line is selected, the fields automatically load the item's parameters, which you have selected ...
... at the bottom of the page. (Note: Click anywhere in the table at the bottom of the screen. Protocol/IP Filters This screen enables you to enable or disable the IP address filter. IP addresses falling between this value and the Range End are listed in the item. z Cancel: Click the Cancel button to... erase all IP addresses falling within the range are not allowed accessing internet. Once the line is selected, the fields automatically load the item's parameters, which you have selected ...

