
Data Sheet
Page 1
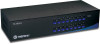
...Key operations. Cost Effective: Manage multiple PCs with just one keyboard, monitor, and mouse. 16-Port Rack Mount KVM Switch TK-1601R TRENDnet TK-1601R 16-Port KVM Switch allows you to manage up to 16 PC's with single keyboard, monitor, and mouse. Switches between PCs with the... TK1601R. TRENDnet TK-1601R is saved for monitoring PCs; Performance: Support very High Video Quality up to 1920 x 1440 resolution and 200Mhz ...
...Key operations. Cost Effective: Manage multiple PCs with just one keyboard, monitor, and mouse. 16-Port Rack Mount KVM Switch TK-1601R TRENDnet TK-1601R 16-Port KVM Switch allows you to manage up to 16 PC's with single keyboard, monitor, and mouse. Switches between PCs with the... TK1601R. TRENDnet TK-1601R is saved for monitoring PCs; Performance: Support very High Video Quality up to 1920 x 1440 resolution and 200Mhz ...
Data Sheet
Page 2
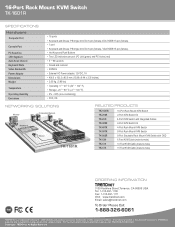
... Computers/Servers Keyboard Mouse TTKKKVKV-M08-MS11wR6iStc0hw1itRch TRENDnet TRENDware, USA TRENDnet TRENDware, USA TK-1601R RELATED PRODUCTS TK-1601R TK-200K TK-205i TK-400K TK-401K TK-801R TK-802R TK-C06 TK-C10 TK-C15 16-Port Rack Mount KVM Switch 2-Port KVM Switch Kit 2-Port KVM Switch with Integrated Cables 4-Port KVM Switch Kit 4-Port Rack Mount KVM Switch 8-Port Rack Mount KVM Switch 8-Port Stackable Rack Mount...
... Computers/Servers Keyboard Mouse TTKKKVKV-M08-MS11wR6iStc0hw1itRch TRENDnet TRENDware, USA TRENDnet TRENDware, USA TK-1601R RELATED PRODUCTS TK-1601R TK-200K TK-205i TK-400K TK-401K TK-801R TK-802R TK-C06 TK-C10 TK-C15 16-Port Rack Mount KVM Switch 2-Port KVM Switch Kit 2-Port KVM Switch with Integrated Cables 4-Port KVM Switch Kit 4-Port Rack Mount KVM Switch 8-Port Rack Mount KVM Switch 8-Port Stackable Rack Mount...

Quick Installation Guide
Page 4
... shared PS/2 keyboard, monitor, and PS/2 mouse to a power outlet (TK-801R /TK-1601R only). 4. PC 1, 2, 3, 4 (TK-401R) PC 1, 2, 3, 4, 5, 6, 7, 8 (TK-801R) PC 1, 2, 3, 4, 5, 6, 7, 8, 9, 10, 11, 12, 13, 14, 15, 16 (TK-1601R) 2 ESPAÑOL Turn ON the connected computers one-by-one and ...wait until each computer's desktop appears. Turn OFF all computers and their peripherals, and then disconnect all power cords. 2. Connect the included AC Power Adapter to the KVM switch and then to the KVM switch's Console Port. (TK...
... shared PS/2 keyboard, monitor, and PS/2 mouse to a power outlet (TK-801R /TK-1601R only). 4. PC 1, 2, 3, 4 (TK-401R) PC 1, 2, 3, 4, 5, 6, 7, 8 (TK-801R) PC 1, 2, 3, 4, 5, 6, 7, 8, 9, 10, 11, 12, 13, 14, 15, 16 (TK-1601R) 2 ESPAÑOL Turn ON the connected computers one-by-one and ...wait until each computer's desktop appears. Turn OFF all computers and their peripherals, and then disconnect all power cords. 2. Connect the included AC Power Adapter to the KVM switch and then to the KVM switch's Console Port. (TK...

Quick Installation Guide
Page 5
...use the screws provided with the equipment rack to the equipment rack with the provided screws. 2. Note: If you would like to mount the KVM switch to a EIA 19" equipment rack, install the included mounting brackets to the sides of customer service and support, please take a moment ...to register your product Online at: www.trendnet.com/register Thank you for choosing TRENDnet. 3 Your installation is now complete. Carefully position the KVM switch onto the rack. Attach the mounting brackets to both sides of the...
...use the screws provided with the equipment rack to the equipment rack with the provided screws. 2. Note: If you would like to mount the KVM switch to a EIA 19" equipment rack, install the included mounting brackets to the sides of customer service and support, please take a moment ...to register your product Online at: www.trendnet.com/register Thank you for choosing TRENDnet. 3 Your installation is now complete. Carefully position the KVM switch onto the rack. Attach the mounting brackets to both sides of the...

Quick Installation Guide
Page 6
Operation Note: To switch between computers. 4 ESPAÑOL LED Indicators Red LED light: KVM cable is connected and PC is turned on or off. Green LED flash: The selected PC port is in scan mode or is not powered by the PC Push Buttons Press the push buttons to switch between computers, you can use the front-panel push buttons or the Hot Key commands. Green LED light: Indicates the selected PC port is active, whether the computer is powering the KVM switch. ENGLISH FRANÇAIS DEUTSCH 3.
Operation Note: To switch between computers. 4 ESPAÑOL LED Indicators Red LED light: KVM cable is connected and PC is turned on or off. Green LED flash: The selected PC port is in scan mode or is not powered by the PC Push Buttons Press the push buttons to switch between computers, you can use the front-panel push buttons or the Hot Key commands. Green LED light: Indicates the selected PC port is active, whether the computer is powering the KVM switch. ENGLISH FRANÇAIS DEUTSCH 3.

Quick Installation Guide
Page 7
...to press the Scroll Lock key again. A beep confirms that the KVM switch is in "Hot Key" mode. To select a specific PC port: For TK-401R Y = Port number 1-4 Scroll Lock + Scroll Lock + Y For example, to Select Port 1 on the KVM switch you hit the following key sequence Select Port 1 = Scroll ... hit the following key sequence Scroll Lock + Scroll Lock + 1 For TK-801R/TK-1601R Scroll Lock + Scroll Lock + Y + Z Y Z = Port number 01-08 (TK-801R) or Port number 01-16 (TK-160R) For example, to select Port 1 or Port 10 on the KVM Switch, you do not press a key within 2 seconds, the switch ...
...to press the Scroll Lock key again. A beep confirms that the KVM switch is in "Hot Key" mode. To select a specific PC port: For TK-401R Y = Port number 1-4 Scroll Lock + Scroll Lock + Y For example, to Select Port 1 on the KVM switch you hit the following key sequence Select Port 1 = Scroll ... hit the following key sequence Scroll Lock + Scroll Lock + 1 For TK-801R/TK-1601R Scroll Lock + Scroll Lock + Y + Z Y Z = Port number 01-08 (TK-801R) or Port number 01-16 (TK-160R) For example, to select Port 1 or Port 10 on the KVM Switch, you do not press a key within 2 seconds, the switch ...

Quick Installation Guide
Page 8
Select the next higher PC channel Toggle On/Off beep sound during Autoscan mode Reset KVM Autoscan through every connected channel for quick screen browsing of each channel Autoscan through every connected channel for a specific port to switch to ... PC Next lower channel Next higher channel Autoscan Beep Sound On/Off Reset KVM Autoscan Autoscan with Programmable Delay Time Stop Autoscan Quick Reference Sheet for TK-401R/801R/1601R Hot Keys TK-401R Scroll Lock + Scroll Lock + Y (Y)= 1-digit port number (1-4) TK-801R/TK-1601R Scroll Lock + Scroll Lock + Y + Z (YZ)= 2-digit port number (01-16) ...
Select the next higher PC channel Toggle On/Off beep sound during Autoscan mode Reset KVM Autoscan through every connected channel for quick screen browsing of each channel Autoscan through every connected channel for a specific port to switch to ... PC Next lower channel Next higher channel Autoscan Beep Sound On/Off Reset KVM Autoscan Autoscan with Programmable Delay Time Stop Autoscan Quick Reference Sheet for TK-401R/801R/1601R Hot Keys TK-401R Scroll Lock + Scroll Lock + Y (Y)= 1-digit port number (1-4) TK-801R/TK-1601R Scroll Lock + Scroll Lock + Y + Z (YZ)= 2-digit port number (01-16) ...

Quick Installation Guide
Page 10
...? Yes, you can switch computers by testing it with the TK-801R/ TK-1601R KVM switch. Yes, the KVM switch will restore the keyboard settings when switching between computers? Troubleshooting Do I have any questions regarding the TK-401R/TK-801R/TK-1601R, please contact Trendnet's Technical Support Department. 8 It is recommended that the PS/2 ports are turned on, because the...
...? Yes, you can switch computers by testing it with the TK-801R/ TK-1601R KVM switch. Yes, the KVM switch will restore the keyboard settings when switching between computers? Troubleshooting Do I have any questions regarding the TK-401R/TK-801R/TK-1601R, please contact Trendnet's Technical Support Department. 8 It is recommended that the PS/2 ports are turned on, because the...
