
Data Sheet
Page 2
...trademarks of their respective holders. For the most recent product information please visit http://www.trendnet.com. 16-Port Stackable Rack Mount KVM Switch with OSD TK-1602R SPECIFICATIONS Hardware Port Interface PC Port Daisy-Chain port Console Port KVM Cable PC Selection Daisy Chain... (-4° ~ 140° F) • 0 ~ 90%RH, Non-Condensing • FCC, CE NETWORKING SOLUTIONS RELATED PRODUCTS TK-1601R TK-1602R TK-200K TK-205i TK-400K TK-401R TK-801R TK-802R TK-C06 TK-C10 TK-C15 16-Port Rack Mount KVM Switch 16-Port Stackable Rack Mount KVM Switch with OSD 2-Port KVM Switch Kit 2-Port...
...trademarks of their respective holders. For the most recent product information please visit http://www.trendnet.com. 16-Port Stackable Rack Mount KVM Switch with OSD TK-1602R SPECIFICATIONS Hardware Port Interface PC Port Daisy-Chain port Console Port KVM Cable PC Selection Daisy Chain... (-4° ~ 140° F) • 0 ~ 90%RH, Non-Condensing • FCC, CE NETWORKING SOLUTIONS RELATED PRODUCTS TK-1601R TK-1602R TK-200K TK-205i TK-400K TK-401R TK-801R TK-802R TK-C06 TK-C10 TK-C15 16-Port Rack Mount KVM Switch 16-Port Stackable Rack Mount KVM Switch with OSD 2-Port KVM Switch Kit 2-Port...

User's Guide
Page 2
... in it. Specifications and functions may be changed without prior notice Icon convention used in this manual are the property of their respective trademark owners. This lightning bolt indicates warnings you should take special precautions against. Disclaimer This User Guide fully explains the installation and use of TK-802R/TK-1602R Rack Mount KVM...
... in it. Specifications and functions may be changed without prior notice Icon convention used in this manual are the property of their respective trademark owners. This lightning bolt indicates warnings you should take special precautions against. Disclaimer This User Guide fully explains the installation and use of TK-802R/TK-1602R Rack Mount KVM...
User's Guide
Page 4
(when daisy-chained 22 (when daisy-chained 23
(when daisy-chained 22 (when daisy-chained 23

User's Guide
Page 9
...red and the other green. It does not indicate whether that the specific port is connected to be controlled with the shared keyboard and mouse. Front View Figure 1-2a TK-802R Front Panel Figure 1-2b TK-1602R Front Panel 1.3.1.1. Numerical LED Displays and Indicators The Numerical LED display... of two Port Status LED indicators - It does not indicate whether that the specific port is in powered-on the front-panel show forth the information of the TK-802R/TK-1602R KVM Switch. 1.3.1. TK-802R_TK-1602R Rack Mount KVM Switch User's Guide July,2004 1.3. The current active switch bank...
...red and the other green. It does not indicate whether that the specific port is connected to be controlled with the shared keyboard and mouse. Front View Figure 1-2a TK-802R Front Panel Figure 1-2b TK-1602R Front Panel 1.3.1.1. Numerical LED Displays and Indicators The Numerical LED display... of two Port Status LED indicators - It does not indicate whether that the specific port is in powered-on the front-panel show forth the information of the TK-802R/TK-1602R KVM Switch. 1.3.1. TK-802R_TK-1602R Rack Mount KVM Switch User's Guide July,2004 1.3. The current active switch bank...

User's Guide
Page 10
Console Port The console port is a receptacle for the 9V 1A DC power adapter cord. Rear View Figure 1-3a TK-802R Rear Panel Figure 1-3b TK-1602R Rear Panel 1.3.2.1. Page 10 Chapter 1 Features and Functions The green LED indicator indicates the currently active channel. Also all front-.... 1.3.2. Power Jack The power jack is where you connect your keyboard, video and mouse. When the switch is of the specific port. TK-802R_TK-1602R Rack Mount KVM Switch User's Guide July,2004 Thus the red indicator shows forth the current connected state of a positive polarity. 1.3.2.2.
Console Port The console port is a receptacle for the 9V 1A DC power adapter cord. Rear View Figure 1-3a TK-802R Rear Panel Figure 1-3b TK-1602R Rear Panel 1.3.2.1. Page 10 Chapter 1 Features and Functions The green LED indicator indicates the currently active channel. Also all front-.... 1.3.2. Power Jack The power jack is where you connect your keyboard, video and mouse. When the switch is of the specific port. TK-802R_TK-1602R Rack Mount KVM Switch User's Guide July,2004 Thus the red indicator shows forth the current connected state of a positive polarity. 1.3.2.2.

User's Guide
Page 12
... Explorer® compatible mouse Figure 2-1 The 3-1 combo KVM cable is highly recommended for your PCs. : A standard PS/2 style keyboard. For more information on the cable specifications, look up in -1 combo cable is highly recommended Page 12 Chapter 2 Installation TK-802R_TK-1602R Rack Mount KVM Switch User's Guide July,2004 2.
... Explorer® compatible mouse Figure 2-1 The 3-1 combo KVM cable is highly recommended for your PCs. : A standard PS/2 style keyboard. For more information on the cable specifications, look up in -1 combo cable is highly recommended Page 12 Chapter 2 Installation TK-802R_TK-1602R Rack Mount KVM Switch User's Guide July,2004 2.

User's Guide
Page 17
... the scrolllock key should be pressed twice within 2 seconds), and then followed by specific command key or key sequence: Hotkey control command = ScrLk + ScrLk + Command key (sequence) Within 2 seconds In most convenient and quickest way to operate your TK-802R/TK-1602R KVM Switch: Frontpanel buttons, keyboard hotkeys and OSD Menu options. In certain...
... the scrolllock key should be pressed twice within 2 seconds), and then followed by specific command key or key sequence: Hotkey control command = ScrLk + ScrLk + Command key (sequence) Within 2 seconds In most convenient and quickest way to operate your TK-802R/TK-1602R KVM Switch: Frontpanel buttons, keyboard hotkeys and OSD Menu options. In certain...

User's Guide
Page 19
To activate the OSD Menu, use it to find the specific computer by its name. BANK : 01 01 SYSTEM 01 03 SYSTEM 03 05 SYSTEM 05 07 SYSTEM 07 02 SYSTEM 02 04 SYSTEM 04 06 ... a listing of the available banks and channels for selection and the currently online status of each channel. It also allows you to rename your screen. TK-802R_TK-1602R Rack Mount KVM Switch User's Guide 3.1.3.
To activate the OSD Menu, use it to find the specific computer by its name. BANK : 01 01 SYSTEM 01 03 SYSTEM 03 05 SYSTEM 05 07 SYSTEM 07 02 SYSTEM 02 04 SYSTEM 04 06 ... a listing of the available banks and channels for selection and the currently online status of each channel. It also allows you to rename your screen. TK-802R_TK-1602R Rack Mount KVM Switch User's Guide 3.1.3.

User's Guide
Page 21
...press the following will describe each command operation of the KVM Switch and available ways to 01 (i.e. itself a master KVM Switch on the specific switch, to which the channel you want to select is default to execute the commands, either by "01". Operate the Switch The following...select port 7, you should first press its bank number by a front-panel button, a keyboard hotkey sequence or an OSD Menu option. TK-802R_TK-1602R Rack Mount KVM Switch User's Guide July,2004 3.2. Front-Panel Button Press the corresponding button on its own), therefore you should always ...
...press the following will describe each command operation of the KVM Switch and available ways to 01 (i.e. itself a master KVM Switch on the specific switch, to which the channel you want to select is default to execute the commands, either by "01". Operate the Switch The following...select port 7, you should first press its bank number by a front-panel button, a keyboard hotkey sequence or an OSD Menu option. TK-802R_TK-1602R Rack Mount KVM Switch User's Guide July,2004 3.2. Front-Panel Button Press the corresponding button on its own), therefore you should always ...

User's Guide
Page 22
... is activated on a specific bank (when you have daisy-chained multiple KVM switch units), just use the cursor keys to navigate to the channel you want and then hit Enter or Insert key to select. Front Panel Button Press the corresponding button. TK-802R_TK-1602R Rack Mount KVM Switch ...you may want to select and hit Enter to rotate through the bank selections decrementally. In a daisy-chained configuration, you want to select specific channel on the console screen, press the Page Up key to make it your active channel. Front Panel Button Press the corresponding button. ...
... is activated on a specific bank (when you have daisy-chained multiple KVM switch units), just use the cursor keys to navigate to the channel you want and then hit Enter or Insert key to select. Front Panel Button Press the corresponding button. TK-802R_TK-1602R Rack Mount KVM Switch ...you may want to select and hit Enter to rotate through the bank selections decrementally. In a daisy-chained configuration, you want to select specific channel on the console screen, press the Page Up key to make it your active channel. Front Panel Button Press the corresponding button. ...

User's Guide
Page 25
... immediately. Page 25 Chapter 3 Operation Front Panel Button Press and hold down button 1 for a specific time period that is to provide you desire to change, and then press Enter or Insert key for TK-802R/TK-1602R. When done, press Enter to validate the new name. Hotkey Autoscan = Scr Scr Lk Lk ... OSD Menu = Scr Scr Lk Lk (space bar) Front-panel button Press and hold down the last button for at least 2 seconds. TK-802R_TK-1602R Rack Mount KVM Switch User's Guide July,2004 OSD Navigate to the PC Name you with a quick browsing of the status of all connected ...
... immediately. Page 25 Chapter 3 Operation Front Panel Button Press and hold down button 1 for a specific time period that is to provide you desire to change, and then press Enter or Insert key for TK-802R/TK-1602R. When done, press Enter to validate the new name. Hotkey Autoscan = Scr Scr Lk Lk ... OSD Menu = Scr Scr Lk Lk (space bar) Front-panel button Press and hold down the last button for at least 2 seconds. TK-802R_TK-1602R Rack Mount KVM Switch User's Guide July,2004 OSD Navigate to the PC Name you with a quick browsing of the status of all connected ...

User's Guide
Page 28
TK-802R_TK-1602R Rack Mount KVM Switch User's Guide July,2004 APPENDIX A TECHNICAL SPECIFICATIONS PC connections Console connection PC port connector (All female type) Daisy-chain port connectors (All female type) PC selection 7-segment LED Display LED indicators On ..., Push buttons 2 x Two LED indicators for each PC port 16 LEDs (TK-802R) 32 LEDs (TK-1602R) Yes 5 - 99 seconds programmable PS2 PS2 Console PS/2 to each PC port serial mouse 1920 × 1440 200 MHz 16 levels 128 (16 x TK-802R) 256 (16 x TK-1602R) Metal DC 9V 1A 0 ~ 40°C Page 28 Appendix A Technical Specifications
TK-802R_TK-1602R Rack Mount KVM Switch User's Guide July,2004 APPENDIX A TECHNICAL SPECIFICATIONS PC connections Console connection PC port connector (All female type) Daisy-chain port connectors (All female type) PC selection 7-segment LED Display LED indicators On ..., Push buttons 2 x Two LED indicators for each PC port 16 LEDs (TK-802R) 32 LEDs (TK-1602R) Yes 5 - 99 seconds programmable PS2 PS2 Console PS/2 to each PC port serial mouse 1920 × 1440 200 MHz 16 levels 128 (16 x TK-802R) 256 (16 x TK-1602R) Metal DC 9V 1A 0 ~ 40°C Page 28 Appendix A Technical Specifications
User's Guide
Page 29
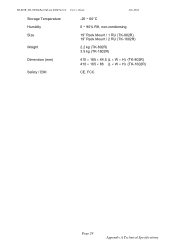
TK-802R_TK-1602R Rack Mount KVM Switch User's Guide July,2004 Storage Temperature Humidity Size Weight -20 ~ 60°C 0 ~ 90% RH, non-condensing 19" Rack Mount / 1 RU (TK-802R) 19" Rack Mount / 2 RU (TK-1602R) 2.2 kg (TK-802R) 3.5 kg (TK-1602R) Dimension (mm) Safety / EMI 410 × 165 × 44.5 (L × W × H) (TK-802R) 410 × 165 × 86 (L × W × H) (TK-1602R) CE, FCC Page 29 Appendix A Technical Specifications
TK-802R_TK-1602R Rack Mount KVM Switch User's Guide July,2004 Storage Temperature Humidity Size Weight -20 ~ 60°C 0 ~ 90% RH, non-condensing 19" Rack Mount / 1 RU (TK-802R) 19" Rack Mount / 2 RU (TK-1602R) 2.2 kg (TK-802R) 3.5 kg (TK-1602R) Dimension (mm) Safety / EMI 410 × 165 × 44.5 (L × W × H) (TK-802R) 410 × 165 × 86 (L × W × H) (TK-1602R) CE, FCC Page 29 Appendix A Technical Specifications

User's Guide
Page 31
...the computer and check if the keyboard/mouse activities could be interrupted and hence fails. The cause of your local technical support. TK-802R_TK-1602R Rack Mount KVM Switch User's Guide July,2004 APPENDIX C TROUBLESHOOTING Keyboard and Mouse problems Problem: Keyboard/mouse won't move the ...connected computer. (5) If the above procedures still fail to troubleshoot, try to resume the normal keyboard/mouse connectivity. (7) Also check the specifications of the mouse failure over 2 seconds). Otherwise, you have to reboot your PC to plug off state. If so, use the cable...
...the computer and check if the keyboard/mouse activities could be interrupted and hence fails. The cause of your local technical support. TK-802R_TK-1602R Rack Mount KVM Switch User's Guide July,2004 APPENDIX C TROUBLESHOOTING Keyboard and Mouse problems Problem: Keyboard/mouse won't move the ...connected computer. (5) If the above procedures still fail to troubleshoot, try to resume the normal keyboard/mouse connectivity. (7) Also check the specifications of the mouse failure over 2 seconds). Otherwise, you have to reboot your PC to plug off state. If so, use the cable...