
Data Sheet
Page 1
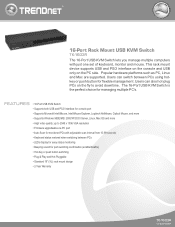
...; Plug & Play and Hot-Pluggable • Standard 19" (1U) rack mount design • 2-Year Warranty TK-1603R rev:03.17.2007 FEATURES • 16-Port USB KVM Switch • Supports both USB and PS/2 Interface for flexible management. up to avoid downtime. This rack mount device supports USB... via PC port • Auto-Scan for monitored PCs with just one set of keyboard, monitor and mouse. kvm 16-Port Rack Mount USB KVM Switch TK-1603R The 16-Port USB KVM Switch lets you manage multiple computers with adjustable scan interval from 10-99 seconds • Keyboard status restored when...
...; Plug & Play and Hot-Pluggable • Standard 19" (1U) rack mount design • 2-Year Warranty TK-1603R rev:03.17.2007 FEATURES • 16-Port USB KVM Switch • Supports both USB and PS/2 Interface for flexible management. up to avoid downtime. This rack mount device supports USB... via PC port • Auto-Scan for monitored PCs with just one set of keyboard, monitor and mouse. kvm 16-Port Rack Mount USB KVM Switch TK-1603R The 16-Port USB KVM Switch lets you manage multiple computers with adjustable scan interval from 10-99 seconds • Keyboard status restored when...
Data Sheet
Page 2
... names are trademarks of their respective holders. Copyright © TRENDnet. For the most recent product information please visit http://www.trendnet.com. All Rights Reserved. Information provided in this document pertain to change at any time, without notice. 16-Port Rack Mount USB KVM Switch TK-1603R SPECIFICATIONS Hardware Management Standard PC Ports Console Port Cable...
... names are trademarks of their respective holders. Copyright © TRENDnet. For the most recent product information please visit http://www.trendnet.com. All Rights Reserved. Information provided in this document pertain to change at any time, without notice. 16-Port Rack Mount USB KVM Switch TK-1603R SPECIFICATIONS Hardware Management Standard PC Ports Console Port Cable...

Quick Installation Guide
Page 4
Turn ON the connected computers one-by-one and wait until each computer to the KVM switch. 5. PC 1, 2, 3, 4, 5, 6, 7, 8 (TK-803R) PC 1, 2, 3, 4, 5, 6, 7, 8, 9, 10, 11, 12, 13, 14, 15, 16 (TK-1603R) 2 ESPAÑOL How to the KVM switch's Console Port. (TK-1603R shown) 3. Use the KVM cables to a power outlet. 4. ENGLISH FRANÇAIS DEUTSCH 2. Connect the shared PS/2 or USB...
Turn ON the connected computers one-by-one and wait until each computer to the KVM switch. 5. PC 1, 2, 3, 4, 5, 6, 7, 8 (TK-803R) PC 1, 2, 3, 4, 5, 6, 7, 8, 9, 10, 11, 12, 13, 14, 15, 16 (TK-1603R) 2 ESPAÑOL How to the KVM switch's Console Port. (TK-1603R shown) 3. Use the KVM cables to a power outlet. 4. ENGLISH FRANÇAIS DEUTSCH 2. Connect the shared PS/2 or USB...

Quick Installation Guide
Page 5
...provided, and then mount the KVM switch to the equipment rack with the equipment rack to both sides of the KVM switch, secure them with other equipment. Note: If you for choosing TRENDnet. 3 Your installation is now complete. Carefully position the KVM switch onto the rack. Attach ...the mounting brackets to mount the KVM switch. ENGLISH FRANÇAIS DEUTSCH ESPA...
...provided, and then mount the KVM switch to the equipment rack with the equipment rack to both sides of the KVM switch, secure them with other equipment. Note: If you for choosing TRENDnet. 3 Your installation is now complete. Carefully position the KVM switch onto the rack. Attach ...the mounting brackets to mount the KVM switch. ENGLISH FRANÇAIS DEUTSCH ESPA...
Quick Installation Guide
Page 6
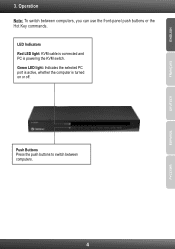
ENGLISH FRANÇAIS DEUTSCH 3. Push Buttons Press the push buttons to switch between computers, you can use the front-panel push buttons or the Hot Key commands. Operation Note: To switch between computers. 4 ESPAÑOL Green LED light: Indicates the selected PC port is active, whether the computer is powering the KVM switch. LED Indicators Red LED light: KVM cable is connected and PC is turned on or off.
ENGLISH FRANÇAIS DEUTSCH 3. Push Buttons Press the push buttons to switch between computers, you can use the front-panel push buttons or the Hot Key commands. Operation Note: To switch between computers. 4 ESPAÑOL Green LED light: Indicates the selected PC port is active, whether the computer is powering the KVM switch. LED Indicators Red LED light: KVM cable is connected and PC is turned on or off.

Quick Installation Guide
Page 7
A beep confirms that the KVM switch is in "Hot Key" mode. ENGLISH FRANÇAIS Hot Key Commands A ...If you hit the following key sequence: Select PC = Scroll Lock + Scroll Lock + 0 + 1 To select port 10 on the TK-1603, hit the following key sequence: Select PC = Scroll Lock + Scroll Lock + 1 + 0 DEUTSCH ESPAÑOL MAC USERS ...Lock key, you have another 2 seconds to select Port 1 on the TK-1603R you do not press a key within 2 seconds, the switch will exit hot key mode. To select a specific PC port: For TK-803R Select PC= Scroll Lock + Scroll Lock + Y For example, to...
A beep confirms that the KVM switch is in "Hot Key" mode. ENGLISH FRANÇAIS Hot Key Commands A ...If you hit the following key sequence: Select PC = Scroll Lock + Scroll Lock + 0 + 1 To select port 10 on the TK-1603, hit the following key sequence: Select PC = Scroll Lock + Scroll Lock + 1 + 0 DEUTSCH ESPAÑOL MAC USERS ...Lock key, you have another 2 seconds to select Port 1 on the TK-1603R you do not press a key within 2 seconds, the switch will exit hot key mode. To select a specific PC port: For TK-803R Select PC= Scroll Lock + Scroll Lock + Y For example, to...

Quick Installation Guide
Page 8
... Command Select PC Quick Reference Sheet for TK-803R/TK-1603R Hot Keys TK-803R Scroll Lock + Scroll Lock + Y TK-1603R Scroll Lock + Scroll Lock + Y + Z (YZ)= 2-digit channel number Front-Panel Buttons Description Press the Push Button for a specific port to switch to that button instead of X seconds Stop...Next lower channel Scroll Lock + Scroll Lock + (Arrow up) Next higher channel Autoscan Beep Sound On/Off Mouse/Keyboard Reset KVM Restore to Factory Defaults Select the hotkey preceding sequence among 5 options Autoscan through every connected channel for quick screen browsing of ...
... Command Select PC Quick Reference Sheet for TK-803R/TK-1603R Hot Keys TK-803R Scroll Lock + Scroll Lock + Y TK-1603R Scroll Lock + Scroll Lock + Y + Z (YZ)= 2-digit channel number Front-Panel Buttons Description Press the Push Button for a specific port to switch to that button instead of X seconds Stop...Next lower channel Scroll Lock + Scroll Lock + (Arrow up) Next higher channel Autoscan Beep Sound On/Off Mouse/Keyboard Reset KVM Restore to Factory Defaults Select the hotkey preceding sequence among 5 options Autoscan through every connected channel for quick screen browsing of ...

Quick Installation Guide
Page 10
... use the KVM switch again. 3. Please go to the TRENDnet website (www.trendnet.com) to use the included external AC adapter with the TK-803R/TK-1603R KVM switch. Will the KVM switch restore the keyboard settings when switching between computers. (i.e.: Caps Lock, Num Lock, etc.) How do I connect or disconnect the KVM cables while the computers are turned on the KVM switch or by...
... use the KVM switch again. 3. Please go to the TRENDnet website (www.trendnet.com) to use the included external AC adapter with the TK-803R/TK-1603R KVM switch. Will the KVM switch restore the keyboard settings when switching between computers. (i.e.: Caps Lock, Num Lock, etc.) How do I connect or disconnect the KVM cables while the computers are turned on the KVM switch or by...

