Quick Installation Guide
Page 3
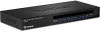
.../XP/2003 Server/Vista, Linux, and Netware Application Stand Alone Monitor PC 6 PC 4 PC 2 8/16 Ports Stackable Rack Mount USB KVM Switch with OSD (TK-804R/TK-1604R) USB or PS/2 USB or PS/2 Keyboard Mouse Daisy-Chain Monitor USB or PS/2 USB or PS/2 Keyboard Mouse Daisy-Chain...PC 5 PC 3 PC 1 Master 8/16 Ports Stackable Rack Mount USB KVM Switch with OSD (TK-804R/TK-1604R) PC 5 PC 3 PC 1 SlaveSlave PC 6 PC 4 PC 2 1 English Daisy-Chain Terminator (HDB 15-Pin male) ? VGA Compatible Monitor ? TK-CU06/TK-CU10/TK-CU15) ? Firmware Cable (HDB 15-pin female to female) ? PS/2...
.../XP/2003 Server/Vista, Linux, and Netware Application Stand Alone Monitor PC 6 PC 4 PC 2 8/16 Ports Stackable Rack Mount USB KVM Switch with OSD (TK-804R/TK-1604R) USB or PS/2 USB or PS/2 Keyboard Mouse Daisy-Chain Monitor USB or PS/2 USB or PS/2 Keyboard Mouse Daisy-Chain...PC 5 PC 3 PC 1 Master 8/16 Ports Stackable Rack Mount USB KVM Switch with OSD (TK-804R/TK-1604R) PC 5 PC 3 PC 1 SlaveSlave PC 6 PC 4 PC 2 1 English Daisy-Chain Terminator (HDB 15-Pin male) ? VGA Compatible Monitor ? TK-CU06/TK-CU10/TK-CU15) ? Firmware Cable (HDB 15-pin female to female) ? PS/2...
Quick Installation Guide
Page 4
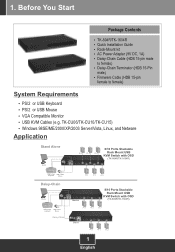
Turn OFF all computers and their peripherals, and then disconnect all power cords. 2. To KVM 4. Use the USB KVM cables to connect your PC to the KVM switch's Console Port. (TK-804R shown) 3. To Computer 2 English Connect the shared PS/2 or USB keyboard, monitor, and PS/2 or USB mouse to the KVM switch. 5. Connect the included AC Power Adapter to the KVM switch and then to Install 1. Turn ON the connected computers one-by-one and wait until each computer's desktop appears. How to a power outlet. 2.
Turn OFF all computers and their peripherals, and then disconnect all power cords. 2. To KVM 4. Use the USB KVM cables to connect your PC to the KVM switch's Console Port. (TK-804R shown) 3. To Computer 2 English Connect the shared PS/2 or USB keyboard, monitor, and PS/2 or USB mouse to the KVM switch. 5. Connect the included AC Power Adapter to the KVM switch and then to Install 1. Turn ON the connected computers one-by-one and wait until each computer's desktop appears. How to a power outlet. 2.
Quick Installation Guide
Page 5
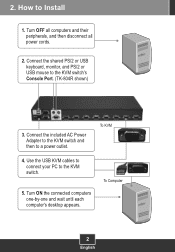
You can only daisy-chain the KVM switch with the KVM switch 2. Connect one end of the provided daisy-chain cable to the DaisyChain OUT port on the second (slave) KVM switch. 3 English Slave Master 2. Connect the opposite end of 64 (TK-804R) or 128 (TK-1604R) computer connections. 1. Daisy-Chain Note: 1. You can daisy-chain up to the DaisyChain IN port on the first (master) KVM switch. There is a maximum of the daisy-chain cable to 8 TK-804 or TK-1604 KVM switches. You must use the daisy-chain cable provided with another TK-804R or TK-1604R. 3.
You can only daisy-chain the KVM switch with the KVM switch 2. Connect one end of the provided daisy-chain cable to the DaisyChain OUT port on the second (slave) KVM switch. 3 English Slave Master 2. Connect the opposite end of 64 (TK-804R) or 128 (TK-1604R) computer connections. 1. Daisy-Chain Note: 1. You can daisy-chain up to the DaisyChain IN port on the first (master) KVM switch. There is a maximum of the daisy-chain cable to 8 TK-804 or TK-1604 KVM switches. You must use the daisy-chain cable provided with another TK-804R or TK-1604R. 3.
Quick Installation Guide
Page 6
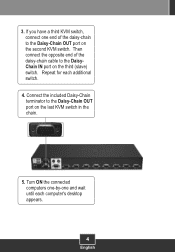
Then connect the opposite end of the daisy-chain to the Daisy-Chain OUT port on the second KVM switch. Connect the included Daisy-Chain terminator to the DaisyChain IN port on the last KVM switch in the chain. 5. Turn ON the connected computers one-by-one end of the daisy-chain cable to the Daisy-Chain OUT port on the third (slave) switch. Repeat for each computer's desktop appears. 4 English 3. If you have a third KVM switch, connect one and wait until each additional switch. 4.
Then connect the opposite end of the daisy-chain to the Daisy-Chain OUT port on the second KVM switch. Connect the included Daisy-Chain terminator to the DaisyChain IN port on the last KVM switch in the chain. 5. Turn ON the connected computers one-by-one end of the daisy-chain cable to the Daisy-Chain OUT port on the third (slave) switch. Repeat for each computer's desktop appears. 4 English 3. If you have a third KVM switch, connect one and wait until each additional switch. 4.

Quick Installation Guide
Page 7
... the rack. Register Your Product To ensure the highest level of customer service and support, please take a moment to register your product Online at: www.TRENDnet.com/register Thank you would like to mount the KVM switch to a EIA 19" equipment rack, install the included mounting brackets to the sides of the... screw holes on the rack, then use the screws provided with the equipment rack to the equipment rack with the provided screws. 2. Rack Mount The KVM Switch can be mounted in an EIA standard-size 19-inch rack, which can be placed in a wiring closet with the screws provided, and then...
... the rack. Register Your Product To ensure the highest level of customer service and support, please take a moment to register your product Online at: www.TRENDnet.com/register Thank you would like to mount the KVM switch to a EIA 19" equipment rack, install the included mounting brackets to the sides of the... screw holes on the rack, then use the screws provided with the equipment rack to the equipment rack with the provided screws. 2. Rack Mount The KVM Switch can be mounted in an EIA standard-size 19-inch rack, which can be placed in a wiring closet with the screws provided, and then...
Quick Installation Guide
Page 8
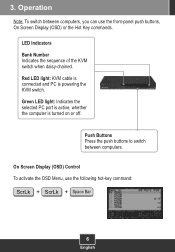
LED Indicators Bank Number Indicates the sequence of the KVM switch when daisy-chained. Push Buttons Press the push buttons to switch between computers, you can use the following hot-key command: ScrLk + ScrLk + Space ... Menu, use the front-panel push buttons, On Screen Display (OSD) or the Hot Key commands. Operation Note: To switch between computers. Red LED light: KVM cable is connected and PC is turned on or off. 3. Green LED light: Indicates the selected PC port is active, whether the computer is powering...
LED Indicators Bank Number Indicates the sequence of the KVM switch when daisy-chained. Push Buttons Press the push buttons to switch between computers, you can use the following hot-key command: ScrLk + ScrLk + Space ... Menu, use the front-panel push buttons, On Screen Display (OSD) or the Hot Key commands. Operation Note: To switch between computers. Red LED light: KVM cable is connected and PC is turned on or off. 3. Green LED light: Indicates the selected PC port is active, whether the computer is powering...
Quick Installation Guide
Page 9
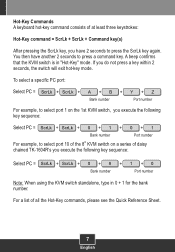
...specific PC port: Select PC = ScrLk + ScrLk + A + B + Y + Z Bank number Port number For example, to select port 10 of the 8th KVM switch on a series of daisy chained TK-1604R's you do not press a key within 2 seconds, the switch will exit hot-key mode. If you execute the following key sequence...: Select PC = ScrLk + ScrLk + 0 + 1 + 0 + 1 Bank number Port number For example, to select port 1 on the 1st KVM switch, you execute the ...
...specific PC port: Select PC = ScrLk + ScrLk + A + B + Y + Z Bank number Port number For example, to select port 10 of the 8th KVM switch on a series of daisy chained TK-1604R's you do not press a key within 2 seconds, the switch will exit hot-key mode. If you execute the following key sequence...: Select PC = ScrLk + ScrLk + 0 + 1 + 0 + 1 Bank number Port number For example, to select port 1 on the 1st KVM switch, you execute the ...

Quick Installation Guide
Page 14
... mouse and keyboard directly to use the KVM cables that come with the TK-207K/TK-407K with the TK-804R/TK-1604R KVM switch. A3: Yes, you may need to Section 3 Operation for more information. What should I switch from the TK-207K/TK-407K. The pin layout for download and... installation instructions: http://support.microsoft.com/kb/q240075. A1: It is Hot-Pluggable. Go to use the TK-CU06/TK-CU10/TK-CU15. Q7: Does the keyboard and mouse have any questions regarding the TK-804R/TK-1604R, please contact TRENDnet's Technical...
... mouse and keyboard directly to use the KVM cables that come with the TK-207K/TK-407K with the TK-804R/TK-1604R KVM switch. A3: Yes, you may need to Section 3 Operation for more information. What should I switch from the TK-207K/TK-407K. The pin layout for download and... installation instructions: http://support.microsoft.com/kb/q240075. A1: It is Hot-Pluggable. Go to use the TK-CU06/TK-CU10/TK-CU15. Q7: Does the keyboard and mouse have any questions regarding the TK-804R/TK-1604R, please contact TRENDnet's Technical...
