Quick Installation Guide
Page 3
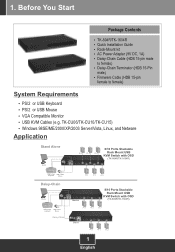
... Linux, and Netware Application Stand Alone Monitor PC 6 PC 4 PC 2 8/16 Ports Stackable Rack Mount USB KVM Switch with OSD (TK-804R/TK-1604R) USB or PS/2 USB or PS/2 Keyboard Mouse Daisy-Chain Monitor USB or PS/2 USB or PS/2 Keyboard Mouse Daisy-Chain ... SlaveSlave PC 6 PC 4 PC 2 1 English 1. AC Power Adapter (9V DC, 1A) ? Firmware Cable (HDB 15-pin female to female) ? Quick Installation Guide ? Rack-Mount kit ? USB KVM Cables (e.g. VGA Compatible Monitor ? TK-804R/TK-1604R ? Daisy-Chain Terminator (HDB 15-Pin male) ? PS/2 or USB Keyboard ? Before You Start ...
... Linux, and Netware Application Stand Alone Monitor PC 6 PC 4 PC 2 8/16 Ports Stackable Rack Mount USB KVM Switch with OSD (TK-804R/TK-1604R) USB or PS/2 USB or PS/2 Keyboard Mouse Daisy-Chain Monitor USB or PS/2 USB or PS/2 Keyboard Mouse Daisy-Chain ... SlaveSlave PC 6 PC 4 PC 2 1 English 1. AC Power Adapter (9V DC, 1A) ? Firmware Cable (HDB 15-pin female to female) ? Quick Installation Guide ? Rack-Mount kit ? USB KVM Cables (e.g. VGA Compatible Monitor ? TK-804R/TK-1604R ? Daisy-Chain Terminator (HDB 15-Pin male) ? PS/2 or USB Keyboard ? Before You Start ...
Quick Installation Guide
Page 4
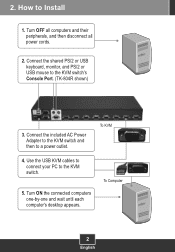
How to the KVM switch's Console Port. (TK-804R shown) 3. Connect the shared PS/2 or USB keyboard, monitor, and PS/2 or USB mouse to Install 1. To KVM 4. Use the USB KVM cables to connect your PC to a power outlet. To Computer 2 English 2. Connect the included AC Power Adapter to the KVM switch and then to the KVM switch. 5. Turn OFF all computers and their peripherals, and then disconnect all power cords. 2. Turn ON the connected computers one-by-one and wait until each computer's desktop appears.
How to the KVM switch's Console Port. (TK-804R shown) 3. Connect the shared PS/2 or USB keyboard, monitor, and PS/2 or USB mouse to Install 1. To KVM 4. Use the USB KVM cables to connect your PC to a power outlet. To Computer 2 English 2. Connect the included AC Power Adapter to the KVM switch and then to the KVM switch. 5. Turn OFF all computers and their peripherals, and then disconnect all power cords. 2. Turn ON the connected computers one-by-one and wait until each computer's desktop appears.
Quick Installation Guide
Page 5
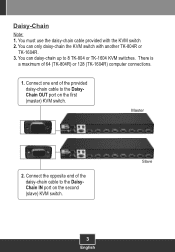
You can only daisy-chain the KVM switch with the KVM switch 2. Connect one end of the provided daisy-chain cable to the DaisyChain OUT port on the second (slave) KVM switch. 3 English Slave You can daisy-chain up to the DaisyChain IN port on the first (master) KVM switch. There is a maximum of the daisy-chain cable to 8 TK-804 or TK-1604 KVM switches. Master 2. Daisy-Chain Note: 1. You must use the daisy-chain cable provided with another TK-804R or TK-1604R. 3. Connect the opposite end of 64 (TK-804R) or 128 (TK-1604R) computer connections. 1.
You can only daisy-chain the KVM switch with the KVM switch 2. Connect one end of the provided daisy-chain cable to the DaisyChain OUT port on the second (slave) KVM switch. 3 English Slave You can daisy-chain up to the DaisyChain IN port on the first (master) KVM switch. There is a maximum of the daisy-chain cable to 8 TK-804 or TK-1604 KVM switches. Master 2. Daisy-Chain Note: 1. You must use the daisy-chain cable provided with another TK-804R or TK-1604R. 3. Connect the opposite end of 64 (TK-804R) or 128 (TK-1604R) computer connections. 1.
Quick Installation Guide
Page 6
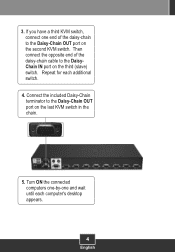
Connect the included Daisy-Chain terminator to the Daisy-Chain OUT port on the second KVM switch. If you have a third KVM switch, connect one and wait until each additional switch. 4. Repeat for each computer's desktop appears. 4 English Turn ON the connected computers one-by-one end of the daisy-chain cable to the DaisyChain IN port on the last KVM switch in the chain. 5. 3. Then connect the opposite end of the daisy-chain to the Daisy-Chain OUT port on the third (slave) switch.
Connect the included Daisy-Chain terminator to the Daisy-Chain OUT port on the second KVM switch. If you have a third KVM switch, connect one and wait until each additional switch. 4. Repeat for each computer's desktop appears. 4 English Turn ON the connected computers one-by-one end of the daisy-chain cable to the DaisyChain IN port on the last KVM switch in the chain. 5. 3. Then connect the opposite end of the daisy-chain to the Daisy-Chain OUT port on the third (slave) switch.
Quick Installation Guide
Page 8
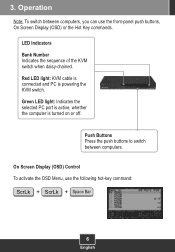
...) Control To activate the OSD Menu, use the front-panel push buttons, On Screen Display (OSD) or the Hot Key commands. Red LED light: KVM cable is connected and PC is turned on or off. 3. Push Buttons Press the push buttons to switch between computers, you can use the following hot...
...) Control To activate the OSD Menu, use the front-panel push buttons, On Screen Display (OSD) or the Hot Key commands. Red LED light: KVM cable is connected and PC is turned on or off. 3. Push Buttons Press the push buttons to switch between computers, you can use the following hot...

Quick Installation Guide
Page 14
...TK-207K/TK-407K. Can I use the KVM cables that the PS/2 or USB ports are turned on , because the interface is PS/2. A6: You can switch computers by connecting your computers, and try to the PS/2 or USB port computer. Q6: I already have any questions regarding the TK-804R/TK-1604R, please contact TRENDnet...'s Technical Support Department. 12 If you use the included external AC adapter with the TK-804R/TK-1604R? Q4: Will the KVM switch restore the keyboard settings ...
...TK-207K/TK-407K. Can I use the KVM cables that the PS/2 or USB ports are turned on , because the interface is PS/2. A6: You can switch computers by connecting your computers, and try to the PS/2 or USB port computer. Q6: I already have any questions regarding the TK-804R/TK-1604R, please contact TRENDnet...'s Technical Support Department. 12 If you use the included external AC adapter with the TK-804R/TK-1604R? Q4: Will the KVM switch restore the keyboard settings ...

Quick Installation Guide
Page 16
... PROVIDED HEREIN SHALL FAIL OF ITS ESSENTIAL PURPOSE. LIMITATION OF LIABILITY: TO THE FULL EXTENT ALLOWED BY LAW TRENDnet ALSO EXCLUDES FOR ITSELF AND ITS SUPPLIERS ANY LIABILITY, WHETHER BASED IN CONTRACT OR TORT (INCLUDING NEGLIGENCE), FOR...OF SUCH DAMAGES, AND LIMITS ITS LIABILITY TO REPAIR, REPLACEMENT, OR REFUND OF THE PURCHASE PRICE PAID, AT TRENDnet'S OPTION. THE FOREGOING WARRANTIES AND REMEDIES ARE EXCLUSIVE AND ARE IN LIEU OF ALL OTHER WARRANTIES, EXPRESSED OR ... of the state of California. AC/DC Power Adapter, Cooling Fan, Cables and Power Supply carry a 1 Year Warranty 14
... PROVIDED HEREIN SHALL FAIL OF ITS ESSENTIAL PURPOSE. LIMITATION OF LIABILITY: TO THE FULL EXTENT ALLOWED BY LAW TRENDnet ALSO EXCLUDES FOR ITSELF AND ITS SUPPLIERS ANY LIABILITY, WHETHER BASED IN CONTRACT OR TORT (INCLUDING NEGLIGENCE), FOR...OF SUCH DAMAGES, AND LIMITS ITS LIABILITY TO REPAIR, REPLACEMENT, OR REFUND OF THE PURCHASE PRICE PAID, AT TRENDnet'S OPTION. THE FOREGOING WARRANTIES AND REMEDIES ARE EXCLUSIVE AND ARE IN LIEU OF ALL OTHER WARRANTIES, EXPRESSED OR ... of the state of California. AC/DC Power Adapter, Cooling Fan, Cables and Power Supply carry a 1 Year Warranty 14
