
User's Guide
Page 2
CE Mark Warning This is operated in which case the user will be required to take adequate measures. Dispose of the FCC Rules. These limits are subject to changes without prior notice. In a domestic environment, this product may cause radio interference, in a commercial environment. Disclaimer Contents in which case the user may cause harmful interference to radio communications. Operation of Explosion if battery is likely to cause interference to household appliances, in this User Guide are designed to provide reasonable protection against harmful interference when ...
CE Mark Warning This is operated in which case the user will be required to take adequate measures. Dispose of the FCC Rules. These limits are subject to changes without prior notice. In a domestic environment, this product may cause radio interference, in a commercial environment. Disclaimer Contents in which case the user may cause harmful interference to radio communications. Operation of Explosion if battery is likely to cause interference to household appliances, in this User Guide are designed to provide reasonable protection against harmful interference when ...

User's Guide
Page 3
Table of Contents Table of Contents...iii Quick Installation ...1 Flash Upgrade Operation Guide (Using Windows HyperTerminal 7 Serial Command Set ...10 iii
Table of Contents Table of Contents...iii Quick Installation ...1 Flash Upgrade Operation Guide (Using Windows HyperTerminal 7 Serial Command Set ...10 iii
User's Guide
Page 4
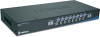
... PC serial port to the serial port on duration/specific time point/daily-weekly recurrence timer settings Before you install Before you for purchasing TK-RP08. Features Hardware ▪ Can be in multiple cascaded application ▪ Numerical display to monitor total current loads (showing 0.0 ~ 15A)...▪ Internal battery to retain unit configuration and port status/timer settings. ▪ 19" rack-mountable design with metal case TK-RP08 Management Software ▪ Intuitive user interface with virtual front-panel, power buttons and LED indicators ▪ Current loads (per port...
... PC serial port to the serial port on duration/specific time point/daily-weekly recurrence timer settings Before you install Before you for purchasing TK-RP08. Features Hardware ▪ Can be in multiple cascaded application ▪ Numerical display to monitor total current loads (showing 0.0 ~ 15A)...▪ Internal battery to retain unit configuration and port status/timer settings. ▪ 19" rack-mountable design with metal case TK-RP08 Management Software ▪ Intuitive user interface with virtual front-panel, power buttons and LED indicators ▪ Current loads (per port...

User's Guide
Page 5
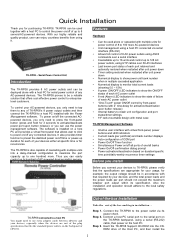
...on the back panel of your device On and Off upon button release mechanism to control the power on the host PC. Desktop Icon (TK-RP08 Management Software) 2 Press and hold a front-panel button by optional purchase. Install ioPower Management Software Step 1. Step 4. Stack-out (...UL-498 5-15R) Rear panel - Stack-in (upper) - Select Setting/Connect to connect to finish installation. IP Management Software on /off of TK-RP08. Step 4. Front-panel Current Loads Display Alarm LED: (Red) Power Button Power ON LED: (Green) Bank Number Display Rear panel - Run ...
...on the back panel of your device On and Off upon button release mechanism to control the power on the host PC. Desktop Icon (TK-RP08 Management Software) 2 Press and hold a front-panel button by optional purchase. Install ioPower Management Software Step 1. Step 4. Stack-out (...UL-498 5-15R) Rear panel - Stack-in (upper) - Select Setting/Connect to connect to finish installation. IP Management Software on /off of TK-RP08. Step 4. Front-panel Current Loads Display Alarm LED: (Red) Power Button Power ON LED: (Green) Bank Number Display Rear panel - Run ...
User's Guide
Page 6
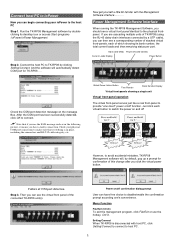
...click each of which showing its desktop icon or access Start /programs /ioPower/ioPower Management. Run the TK-RP08 Management software by default, pop up a prompt for TK-RP08 .... Step 2. Then you can begin connecting your physical COM port connection to make sure that if you...Power Button Check the COM port detection message on and off Press and hold for 2 " .... However, to avoid accidental mistakes, TK-RP08 Management software will automatically detect COM port for confirmation of this change after you click the virtual power button. Power on/off function...
...click each of which showing its desktop icon or access Start /programs /ioPower/ioPower Management. Run the TK-RP08 Management software by default, pop up a prompt for TK-RP08 .... Step 2. Then you can begin connecting your physical COM port connection to make sure that if you...Power Button Check the COM port detection message on and off Press and hold for 2 " .... However, to avoid accidental mistakes, TK-RP08 Management software will automatically detect COM port for confirmation of this change after you click the virtual power button. Power on/off function...

User's Guide
Page 7
... the Power ON/OFF change with your COM port setting, Auto-connection and Power ON/OFF confirmation prompt setting. Normally, your TK-RP08 unit is loaded with PC system time every time when you want to your firmware is restarted. Tools/Check Version To check the... ioPower Management Software. : Check this dialog box to show the firmware version information in a small message box. TK-RP08 _V.x.x.x_dddddd.x Then click Open to access the TK-RP08 Configuration interface. You can either get it from your local dealer or download it from available network resources. Time/...
... the Power ON/OFF change with your COM port setting, Auto-connection and Power ON/OFF confirmation prompt setting. Normally, your TK-RP08 unit is loaded with PC system time every time when you want to your firmware is restarted. Tools/Check Version To check the... ioPower Management Software. : Check this dialog box to show the firmware version information in a small message box. TK-RP08 _V.x.x.x_dddddd.x Then click Open to access the TK-RP08 Configuration interface. You can either get it from your local dealer or download it from available network resources. Time/...

User's Guide
Page 8
... go for a Power-On on all its last known status when ioPower is due. To set timer settings on the virtual front-panel of your TK-RP08 Management Software interface, and the alarm LED (red) will be flashing for a reminder. Global Power Action Menu On the Global Power Action Menu, you will... power on /off all ports of the virtual touch panel will appear to be executed nonetheless when (1) the host PC is shut down, or (2) the TK-RP08 Management Software is beyond the acceptable range of all banks. • Power off the specific device as you use the timer function to power on...
... go for a Power-On on all its last known status when ioPower is due. To set timer settings on the virtual front-panel of your TK-RP08 Management Software interface, and the alarm LED (red) will be flashing for a reminder. Global Power Action Menu On the Global Power Action Menu, you will... power on /off all ports of the virtual touch panel will appear to be executed nonetheless when (1) the host PC is shut down, or (2) the TK-RP08 Management Software is beyond the acceptable range of all banks. • Power off the specific device as you use the timer function to power on...

User's Guide
Page 9
...Output Front-panel control Host connection User interface Cascade level Cascade interface Max. the maximum allowable current loads of TK-RP08 --the numerical display of the daisy-chained TK-RP08 units. Circuit Breaker Open Due to Current Overloads If the total current loads exceed 15 AMP, the circuit...well as "OP". System Requirements Operation Mode • Used with a • Host PC • Requirements a Win-based Host PC (with TK-RP08 Management Software installed) Serial (RS-232) Cable for connection with it indicates that this port is Lit (Red) In normal condition, the Alarm ...
...Output Front-panel control Host connection User interface Cascade level Cascade interface Max. the maximum allowable current loads of TK-RP08 --the numerical display of the daisy-chained TK-RP08 units. Circuit Breaker Open Due to Current Overloads If the total current loads exceed 15 AMP, the circuit...well as "OP". System Requirements Operation Mode • Used with a • Host PC • Requirements a Win-based Host PC (with TK-RP08 Management Software installed) Serial (RS-232) Cable for connection with it indicates that this port is Lit (Red) In normal condition, the Alarm ...

User's Guide
Page 10
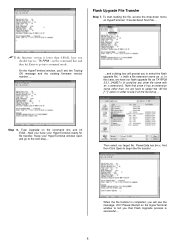
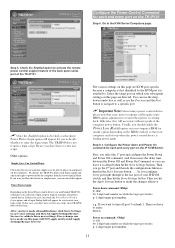
...Enter key twice to the last section, Flash Upgrade File Transfer. AND also..... Step 4. Connect your PC and the TK-RP08 Unit using Windows HyperTerminal for TK-RP08 flash upgrade, you have successfully established a serial connection, the settings will be connected to your ioPower Unit with a...its functionality and/or performance. Select COM 1 or COM 2 (depending on this User Guide. Step 3. Check the connection between the TK-RP08 Unit and PC Click OK. Power Control 01. Step 5. Flash Upgrade Procedure Click OK. Click Apply then click OK. Flash Upgrade ...
...Enter key twice to the last section, Flash Upgrade File Transfer. AND also..... Step 4. Connect your PC and the TK-RP08 Unit using Windows HyperTerminal for TK-RP08 flash upgrade, you have successfully established a serial connection, the settings will be connected to your ioPower Unit with a...its functionality and/or performance. Select COM 1 or COM 2 (depending on this User Guide. Step 3. Check the connection between the TK-RP08 Unit and PC Click OK. Power Control 01. Step 5. Flash Upgrade Procedure Click OK. Click Apply then click OK. Flash Upgrade ...
User's Guide
Page 11
...the existing firmware version number..... ....and a dialog box will see it has an extension name other file name with a file extension name as TK-RP08 3.0.1_040907.x (it could be any other than 040421, here you that Flash Upgrade process is completed, you will prompt you have our flash upgrade..., *.x (with an .x extension!). In this case, we have to select the "All file [*.*]" option in order to tell you should type in / TK-RP08 \ on the HyperTerminal window to see the message: OK!! Step 6. Flash Upgrade File Transfer Step 7. If the firmware version is lower than .txt, we...
...the existing firmware version number..... ....and a dialog box will see it has an extension name other file name with a file extension name as TK-RP08 3.0.1_040907.x (it could be any other than 040421, here you that Flash Upgrade process is completed, you will prompt you have our flash upgrade..., *.x (with an .x extension!). In this case, we have to select the "All file [*.*]" option in order to tell you should type in / TK-RP08 \ on the HyperTerminal window to see the message: OK!! Step 6. Flash Upgrade File Transfer Step 7. If the firmware version is lower than .txt, we...

User's Guide
Page 12
Wait for a few seconds and then complete the reset again. 9 If that is the case, please power off the TK-RP08 Unit and then power it indicates that the flash process had failed. Troubleshooting If the flash upgrade procedure seems never ending or you see the ... on the screen, it on restart the whole flash procedure again. You also press any button on the TK-RP08 Unit. After you have successfully upgraded the flash firmware and before you utilize the TK-RP08 Unit, you power on front panel about 3 seconds when you should perform a system reset by powering down the...
Wait for a few seconds and then complete the reset again. 9 If that is the case, please power off the TK-RP08 Unit and then power it indicates that the flash process had failed. Troubleshooting If the flash upgrade procedure seems never ending or you see the ... on the screen, it on restart the whole flash procedure again. You also press any button on the TK-RP08 Unit. After you have successfully upgraded the flash firmware and before you utilize the TK-RP08 Unit, you power on front panel about 3 seconds when you should perform a system reset by powering down the...

User's Guide
Page 13
.... Step 4. Step 1. Access the Web Management Interface of your TK-IP101. Connect TK-RP08 to TK-IP101 Before you connect the TK-RP08 to the TK-IP101, you might need to install them first into their own proper placements within the TKIP101 package) TK-RP08 Backpanel Trendnet KVM back panel Serial power control cable (can be effected via the viewer...
.... Step 4. Step 1. Access the Web Management Interface of your TK-IP101. Connect TK-RP08 to TK-IP101 Before you connect the TK-RP08 to the TK-IP101, you might need to install them first into their own proper placements within the TKIP101 package) TK-RP08 Backpanel Trendnet KVM back panel Serial power control cable (can be effected via the viewer...
User's Guide
Page 14
... use the Previous and the Next button to navigate to enter your settings and then hit Apply Settings/Restart Servers to enter any script, since TK-RP08 does not need a login script to turn off the computers. Configure the Power Control Command for each and every port on this page will.... In this page are directed. After you don't have to enter any script. Select the target port on which the target port resides. e.g. The TK-RP08 does not require a login script. Power down and Power On command for each and every port on the IP KVM Switch. Every change you hit...
... use the Previous and the Next button to navigate to enter your settings and then hit Apply Settings/Restart Servers to enter any script, since TK-RP08 does not need a login script to turn off the computers. Configure the Power Control Command for each and every port on this page will.... In this page are directed. After you don't have to enter any script. Select the target port on which the target port resides. e.g. The TK-RP08 does not require a login script. Power down and Power On command for each and every port on the IP KVM Switch. Every change you hit...

User's Guide
Page 15
...to perform power on bank 1. The command specified here will NOT apply until you need only to TK-IP101 User Guide, Section 4.10, KVM Server/Computers - On a client computer that has been installed with an TK-RP08. Now you can configure it according to turn on port 3 on / power off this page will... be sent automatically by TK-IP101 to the TK-RP08. Access the Viewer Quick Menu by clicking its manual instructions. By default this computer and then click Power On/Power Off in the Select Computer...
...to perform power on bank 1. The command specified here will NOT apply until you need only to TK-IP101 User Guide, Section 4.10, KVM Server/Computers - On a client computer that has been installed with an TK-RP08. Now you can configure it according to turn on port 3 on / power off this page will... be sent automatically by TK-IP101 to the TK-RP08. Access the Viewer Quick Menu by clicking its manual instructions. By default this computer and then click Power On/Power Off in the Select Computer...

User's Guide
Page 16
That means you from entering commands. When using a RS-232 cable for TK-RP08 control, you have to enter the serial command mode again. 13 ScrollLock is ON, hit ScrollLock key again to the following parameters for HyperTerminal connection: ... within the HyperTerminal window according to relieve it. QUIT - Use the following command usages Command usage notes: 1. If ScrollLock is OFF by default in between TK-RP08 and the host PC, using the HyperTerminal, note that ScrollLock should not be viewed on status bar at the bottom of bank number or port...
That means you from entering commands. When using a RS-232 cable for TK-RP08 control, you have to enter the serial command mode again. 13 ScrollLock is ON, hit ScrollLock key again to the following parameters for HyperTerminal connection: ... within the HyperTerminal window according to relieve it. QUIT - Use the following command usages Command usage notes: 1. If ScrollLock is OFF by default in between TK-RP08 and the host PC, using the HyperTerminal, note that ScrollLock should not be viewed on status bar at the bottom of bank number or port...
User's Guide
Page 17
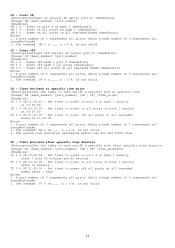
Power on all ports on all cascaded banks. 2. while a bank number of 0 represents all ports on all cascaded banks at 01:22:50. Timer Activate at specific time point [Description]Set the timer to power on bank 1 immediately ON 0 0 - Set timer to turn on all ports; while a bank number of 0 represents all cascaded banks immediately Notes: 1. Timer Activate after specific time duration [Description]Set the timer to power on /off a specific port at 00:10:00 TA 0 0 OF 01:00:00 - ON - Power on all cascaded banks after 10 minutes TF 0 0 OF 01:00:00 - Power off...
Power on all ports on all cascaded banks. 2. while a bank number of 0 represents all ports on all cascaded banks at 01:22:50. Timer Activate at specific time point [Description]Set the timer to power on bank 1 immediately ON 0 0 - Set timer to turn on all ports; while a bank number of 0 represents all cascaded banks immediately Notes: 1. Timer Activate after specific time duration [Description]Set the timer to power on /off a specific port at 00:10:00 TA 0 0 OF 01:00:00 - ON - Power on all cascaded banks after 10 minutes TF 0 0 OF 01:00:00 - Power off...
User's Guide
Page 18
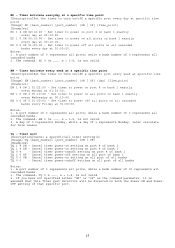
A port number of bank 1 TQ 0 0 ON - Set timer to power off all ports on bank 1 exactly every Monday at specific time point [Usage] EW [bank_number] [port_number] [ON | OF] [day] [Time_point] [Examples] EW 1 4 ON 1 01:22:50 - Set timer to power on port 4 on all ports; A day of bank 1 TQ 1 4 ON - Cancel timer power-on setting on all port of 0 represents all cascaded banks every Friday at 00:10:00. The command: TQ 0 x ........., x = 1~9, is assumed that this reason. ED 1 0 ON 00:10:00 - EW - Timer Activate every week at a specific time point [Description]Set ...
A port number of bank 1 TQ 0 0 ON - Set timer to power off all ports on bank 1 exactly every Monday at specific time point [Usage] EW [bank_number] [port_number] [ON | OF] [day] [Time_point] [Examples] EW 1 4 ON 1 01:22:50 - Set timer to power on port 4 on all ports; A day of bank 1 TQ 1 4 ON - Cancel timer power-on setting on all port of 0 represents all cascaded banks every Friday at 00:10:00. The command: TQ 0 x ........., x = 1~9, is assumed that this reason. ED 1 0 ON 00:10:00 - EW - Timer Activate every week at a specific time point [Description]Set ...

User's Guide
Page 19
Show the firmware version of all bank 16 ST - Show the system status of bank 16 VER 00 - Set Up System Date and Time [Description]Set up the system Date and time to ioPower Flash Operation Guide for details. SETTIME - Set up the system date and time [Usage] SETTIME [20yy/mm/dd] [hh:mm:ss] [Example] SETTIME 2004/09/27 18:10:00 - Show the firmware version of bank 1 ST 16 - Show the system status of bank 1 VER 16 - Firmware Version [Description]Show the firmware version of a specific bank, such as current loads, on/off status and timer settings [Usage] ST [bank_number] [...
Show the firmware version of all bank 16 ST - Show the system status of bank 16 VER 00 - Set Up System Date and Time [Description]Set up the system Date and time to ioPower Flash Operation Guide for details. SETTIME - Set up the system date and time [Usage] SETTIME [20yy/mm/dd] [hh:mm:ss] [Example] SETTIME 2004/09/27 18:10:00 - Show the firmware version of bank 1 ST 16 - Show the system status of bank 1 VER 16 - Firmware Version [Description]Show the firmware version of a specific bank, such as current loads, on/off status and timer settings [Usage] ST [bank_number] [...

Quick Installation Guide
Page 2
TTaabblleeoof Cf oCnotennttesnts English ...1 1. Before You Start 1 2. How to Install 2 3. Operation and Configuration 5 Troubleshooting 7 Version 04.10.2008
TTaabblleeoof Cf oCnotennttesnts English ...1 1. Before You Start 1 2. How to Install 2 3. Operation and Configuration 5 Troubleshooting 7 Version 04.10.2008
Quick Installation Guide
Page 3
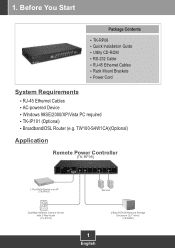
... I/II Network Storage Enclosure (3.5" drive) (TS-S402) 1 English Utility CD-ROM ? RJ-45 Ethernet Cables ? AC-powered Device ? Rack Mount Brackets ? TK-RP08 ? RS-232 Cable· ? Power Cord System Requirements ? RJ-45 Ethernet Cables ? Broadband/DSL Router (e.g. TK-IP101 (Optional) ? Before You Start Package Contents ? Windows 98SE/2000/XP/Vista PC required ? 1.
... I/II Network Storage Enclosure (3.5" drive) (TS-S402) 1 English Utility CD-ROM ? RJ-45 Ethernet Cables ? AC-powered Device ? Rack Mount Brackets ? TK-RP08 ? RS-232 Cable· ? Power Cord System Requirements ? RJ-45 Ethernet Cables ? Broadband/DSL Router (e.g. TK-IP101 (Optional) ? Before You Start Package Contents ? Windows 98SE/2000/XP/Vista PC required ? 1.