Users Guide
Page 5
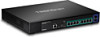
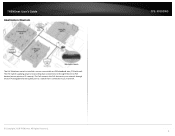
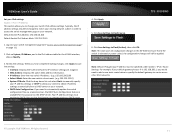
...monitoring, making this a powerful solution for increased throughput over existing Cat5e or better cabling. The TPE-30102WS is equipped with an 80Gbps switching capacity. All Rights Reserved. 1 TPE-30102WS Features TRENDnet's 10-Port 2.5G Web Smart PoE+ Switch with eight 2.5GBASE-T PoE+ ports and two... 10G SFP+ slots, model TPE-30102WS, delivers advanced management features with 2.5GBASE-T PoE+ ports that ...
...monitoring, making this a powerful solution for increased throughput over existing Cat5e or better cabling. The TPE-30102WS is equipped with an 80Gbps switching capacity. All Rights Reserved. 1 TPE-30102WS Features TRENDnet's 10-Port 2.5G Web Smart PoE+ Switch with eight 2.5GBASE-T PoE+ ports and two... 10G SFP+ slots, model TPE-30102WS, delivers advanced management features with 2.5GBASE-T PoE+ ports that ...
Users Guide
Page 6
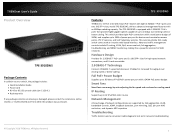
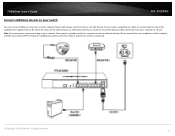
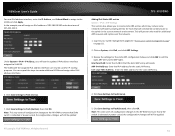
...Connect the included RJ-45 to the connector and the other side into a power outlet. (Input: 100~240VAC, 50/60Hz) Front View TPE-30102WS Reset Button - If using the hardware reset button to reset to factory default, the system LED will flash rapidly (orange) and...address. Reset Button - The smart fans are hot swappable. © Copyright 2018 TRENDnet. Connect network devices at 2.5G/1G/100M speeds. SFP+ slots (9-10) - All Rights Reserved. 2 TRENDnet User's Guide Product Hardware Features Rear View Smart Fans AC Power Connector AC Power Connector...
...Connect the included RJ-45 to the connector and the other side into a power outlet. (Input: 100~240VAC, 50/60Hz) Front View TPE-30102WS Reset Button - If using the hardware reset button to reset to factory default, the system LED will flash rapidly (orange) and...address. Reset Button - The smart fans are hot swappable. © Copyright 2018 TRENDnet. Connect network devices at 2.5G/1G/100M speeds. SFP+ slots (9-10) - All Rights Reserved. 2 TRENDnet User's Guide Product Hardware Features Rear View Smart Fans AC Power Connector AC Power Connector...
Users Guide
Page 7
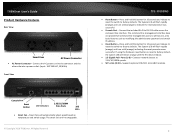
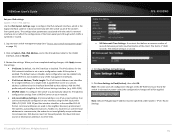
... device to the connected device. SFP+ Slots (9-10) On (Green) : Solid - Blinking - Data transmission/activity at 1G/100Mbps speed. TPE-30102WS 2.5G/1G/100M PoE+ Ports (1-8) Link/Activity: The upper left or when about 50% of the PoE power (Green) budget.... 50% This LED indicator is not System LED On (Green) : Solid - Data transmission/activity at 10G speed. Off No link 3 TRENDnet User's Guide Diagnostic LED Indicators Power LED On : When the power. Power LED lights on solid (orange) after first reboot. ...
... device to the connected device. SFP+ Slots (9-10) On (Green) : Solid - Blinking - Data transmission/activity at 1G/100Mbps speed. TPE-30102WS 2.5G/1G/100M PoE+ Ports (1-8) Link/Activity: The upper left or when about 50% of the PoE power (Green) budget.... 50% This LED indicator is not System LED On (Green) : Solid - Data transmission/activity at 10G speed. Off No link 3 TRENDnet User's Guide Diagnostic LED Indicators Power LED On : When the power. Power LED lights on solid (orange) after first reboot. ...
Users Guide
Page 8
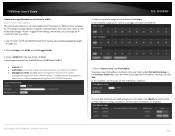
TPE-30102WS 4 All Rights Reserved. The PoE connects the PoE devices to PoE devices (access point and IP camera). TRENDnet User's Guide Application Diagram The PoE WebSmart switch is installed a server room within an EIA standard-size, 19-inch rack The PoE switch supplying power and providing data connectivity to through the non-PoE Gigabit Ethernet uplink port to a switch that is connected to your network through Ethernet to your network. © Copyright 2018 TRENDnet.
TPE-30102WS 4 All Rights Reserved. The PoE connects the PoE devices to PoE devices (access point and IP camera). TRENDnet User's Guide Application Diagram The PoE WebSmart switch is installed a server room within an EIA standard-size, 19-inch rack The PoE switch supplying power and providing data connectivity to through the non-PoE Gigabit Ethernet uplink port to a switch that is connected to your network through Ethernet to your network. © Copyright 2018 TRENDnet.
Users Guide
Page 9
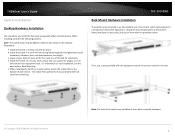
...that can be placed in a wiring closet with other equipment. Note: The look of each switch in the rack. © Copyright 2018 TRENDnet. TPE-30102WS Rack Mount Hardware Installation The switch can be different than what is actually displayed. 5 When installing, consider the following pointers: Note: The switch... model may be mounted in an EIA standard-size, 19-inch rack, which can support its performance. TRENDnet User's Guide Switch Installation Desktop Hardware Installation The site where you install the hub stack may greatly affect its weight, or in an...
...that can be placed in a wiring closet with other equipment. Note: The look of each switch in the rack. © Copyright 2018 TRENDnet. TPE-30102WS Rack Mount Hardware Installation The switch can be different than what is actually displayed. 5 When installing, consider the following pointers: Note: The switch... model may be mounted in an EIA standard-size, 19-inch rack, which can support its performance. TRENDnet User's Guide Switch Installation Desktop Hardware Installation The site where you install the hub stack may greatly affect its weight, or in an...

Users Guide
Page 10
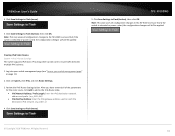
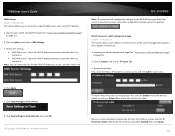
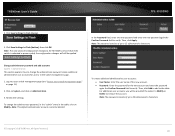
...: User Name: admin Password: admin Note: User name and password are saved, you can connect the switch to your network. © Copyright 2018 TRENDnet. Click Save Settings to Flash (button), then click OK. All Rights Reserved. 6 The default IP address is 192.168.10.200. 7. Enter ... Enter. Configure the switch IP address settings to IP address settings within your subnet in the first entry, click Modify. 3. TRENDnet User's Guide Basic Installation TPE-30102WS 6. Note: You may need to modify the static IP address settings of your computer's network adapter to be within your network...
...: User Name: admin Password: admin Note: User name and password are saved, you can connect the switch to your network. © Copyright 2018 TRENDnet. Click Save Settings to Flash (button), then click OK. All Rights Reserved. 6 The default IP address is 192.168.10.200. 7. Enter ... Enter. Configure the switch IP address settings to IP address settings within your subnet in the first entry, click Modify. 3. TRENDnet User's Guide Basic Installation TPE-30102WS 6. Note: You may need to modify the static IP address settings of your computer's network adapter to be within your network...
Users Guide
Page 11
TRENDnet User's Guide TPE-30102WS Connect additional devices to your switch You can connect additional computers or other network devices PoE (Power over Ethernet) or non-PoE devices to your ... be a problem with your switch using Ethernet cables to connect them to ensure the physical cable connection from your switch is connected. © Copyright 2018 TRENDnet. Please ensure that your computer or device network settings (also called TCP/IP settings) are configured properly within the network subnet your computer or device...
TRENDnet User's Guide TPE-30102WS Connect additional devices to your switch You can connect additional computers or other network devices PoE (Power over Ethernet) or non-PoE devices to your ... be a problem with your switch using Ethernet cables to connect them to ensure the physical cable connection from your switch is connected. © Copyright 2018 TRENDnet. Please ensure that your computer or device network settings (also called TCP/IP settings) are configured properly within the network subnet your computer or device...

Users Guide
Page 12
By default: User Name: admin Password: admin Note: User Name and Password are case sensitive. All Rights Reserved. 8 TPE-30102WS Switch Info View your switch status information Switch Info You may want to the IP address http://192.168.10.200. Hardware Information &#...®, Chrome™, Safari®, Opera™) and will prompt you for a user name and password. 2. System Information System Up For - TRENDnet User's Guide Configure your switch Access your switch management page Note: Your switch default management IP address http://192.168.10.200 is running . Enter...
By default: User Name: admin Password: admin Note: User Name and Password are case sensitive. All Rights Reserved. 8 TPE-30102WS Switch Info View your switch status information Switch Info You may want to the IP address http://192.168.10.200. Hardware Information &#...®, Chrome™, Safari®, Opera™) and will prompt you for a user name and password. 2. System Information System Up For - TRENDnet User's Guide Configure your switch Access your switch management page Note: Your switch default management IP address http://192.168.10.200 is running . Enter...
Users Guide
Page 13
... modified under the System section. System Location - System MAC Address, IPv4 Information MAC Address: Displays the switch system MAC address. © Copyright 2018 TRENDnet. TPE-30102WS 9 This information can be modified under the System section. All Rights Reserved. Displays the identifying system name of your switch...
... modified under the System section. System Location - System MAC Address, IPv4 Information MAC Address: Displays the switch system MAC address. © Copyright 2018 TRENDnet. TPE-30102WS 9 This information can be modified under the System section. All Rights Reserved. Displays the identifying system name of your switch...

Users Guide
Page 14
Specifies the Switch model. TPE-30102WS 4. Click Apply. 5. Entering this step, rebooting or power cycling the switch will lose all configuration changes to the NV-RAM to save the settings. ... Save Settings to Flash (menu). 6. You cannot change this parameter. System Object ID - Specifies the location of your current configuration changes. © Copyright 2018 TRENDnet. When you do not complete this information is optional and may contain up to 15 characters. System Location - If you have completed making changes...
Specifies the Switch model. TPE-30102WS 4. Click Apply. 5. Entering this step, rebooting or power cycling the switch will lose all configuration changes to the NV-RAM to save the settings. ... Save Settings to Flash (menu). 6. You cannot change this parameter. System Object ID - Specifies the location of your current configuration changes. © Copyright 2018 TRENDnet. When you do not complete this information is optional and may contain up to 15 characters. System Location - If you have completed making changes...
Users Guide
Page 15
...be applied. Click on System, IP Address, and in order to access the switch management page on your switch management page" on Modify. 3. TPE-30102WS 6. Typically, the IP address settings should be specified under System > IPv4 > Route Settings. Log into your switch management page (see "Access ....168.200.1, you would need to automatically update the switch configuration files via the DHCP server. For example: If your DHCP server. 4. TRENDnet User's Guide Set your IPv4 settings System > IPv4 > IP Address This section allows you to change your network. DHCP Auto ...
...be applied. Click on System, IP Address, and in order to access the switch management page on your switch management page" on Modify. 3. TPE-30102WS 6. Typically, the IP address settings should be specified under System > IPv4 > Route Settings. Log into your switch management page (see "Access ....168.200.1, you would need to automatically update the switch configuration files via the DHCP server. For example: If your DHCP server. 4. TRENDnet User's Guide Set your IPv4 settings System > IPv4 > IP Address This section allows you to change your network. DHCP Auto ...

Users Guide
Page 16
... address settings. In this VLAN/IP interface. Log into your switch management page (see "Access your switch management page" on page 11). 2. TPE-30102WS 4. Select the ports to assign to the switch management page from this example, assign ports 3 and 4 as untagged members of the VLAN, ex...VLAN and click Apply. First, you can assign an IP interface to a specific VLAN interfaces. Disabled denies management access to VLAN 50. TRENDnet User's Guide Create and assign IPv4 address interfaces to VLANs System > IPv4 > IP Address This section also allows you to create additional...
... address settings. In this VLAN/IP interface. Log into your switch management page (see "Access your switch management page" on page 11). 2. TPE-30102WS 4. Select the ports to assign to the switch management page from this example, assign ports 3 and 4 as untagged members of the VLAN, ex...VLAN and click Apply. First, you can assign an IP interface to a specific VLAN interfaces. Disabled denies management access to VLAN 50. TRENDnet User's Guide Create and assign IPv4 address interfaces to VLANs System > IPv4 > IP Address This section also allows you to create additional...
Users Guide
Page 17
... Save Settings to Flash (menu). 5. Click Save Settings to Flash (menu). 7. TPE-30102WS Adding IPv4 Static ARP entries System > IPv4 > ARP Settings This section also allows you will still be applied. © Copyright 2018 TRENDnet. Note: This step saves all configuration changes to the NV-RAM to ensure that will... ARP entry. Note: This step saves all configuration changes to the NV-RAM to the VLAN and click Apply. All Rights Reserved. 4. TRENDnet User's Guide For new IPv4 address interface, enter the IP Address, and Subnet Mask to assign to ensure that the static ARP entry will...
... Save Settings to Flash (menu). 5. Click Save Settings to Flash (menu). 7. TPE-30102WS Adding IPv4 Static ARP entries System > IPv4 > ARP Settings This section also allows you will still be applied. © Copyright 2018 TRENDnet. Note: This step saves all configuration changes to the NV-RAM to ensure that will... ARP entry. Note: This step saves all configuration changes to the NV-RAM to the VLAN and click Apply. All Rights Reserved. 4. TRENDnet User's Guide For new IPv4 address interface, enter the IP Address, and Subnet Mask to assign to ensure that the static ARP entry will...

Users Guide
Page 18
...Click on page 11). 2. After you have entered all configuration changes to the NV-RAM to route traffic between multiple IP subnets. 1. TPE-30102WS 14 Log into your switch management page (see "Access your switch management page" on System, click IPv4, and click Route Settings. 3. ...Click Save Settings to Flash (button), then click OK. Click Save Settings to Flash (menu). 5. All Rights Reserved. TRENDnet User's Guide Creating IPv4 Static Routes System > IPv4 > Route Settings The switch supports IPv4 static IP routing which can be applied. © ...
...Click on page 11). 2. After you have entered all configuration changes to the NV-RAM to route traffic between multiple IP subnets. 1. TPE-30102WS 14 Log into your switch management page (see "Access your switch management page" on System, click IPv4, and click Route Settings. 3. ...Click Save Settings to Flash (button), then click OK. Click Save Settings to Flash (menu). 5. All Rights Reserved. TRENDnet User's Guide Creating IPv4 Static Routes System > IPv4 > Route Settings The switch supports IPv4 static IP routing which can be applied. © ...
Users Guide
Page 19
... auto configuration mode if this option is the logical interface used in the neighbor discovery protocol and the stateless autoconfiguration process. TPE-30102WS NS Retransmit Time Settings: A constant that defines a nonzero number of seconds between periodic reauthentication of the switch's...This step saves all of the client. Auto configuration can be specified under System > IPv6 > Route Settings. © Copyright 2018 TRENDnet. All Rights Reserved. 15 fc00::2/64) DHCPv6 Client: To configure the switch to other links. Log into your switch management...
... auto configuration mode if this option is the logical interface used in the neighbor discovery protocol and the stateless autoconfiguration process. TPE-30102WS NS Retransmit Time Settings: A constant that defines a nonzero number of seconds between periodic reauthentication of the switch's...This step saves all of the client. Auto configuration can be specified under System > IPv6 > Route Settings. © Copyright 2018 TRENDnet. All Rights Reserved. 15 fc00::2/64) DHCPv6 Client: To configure the switch to other links. Log into your switch management...
Users Guide
Page 20
TPE-30102WS 4. In this VLAN and click Apply. Enter a VLAN ID for IP routing and assign them ... VLAN will assign an IPv4 interface to VLAN 50. By default, all IPv6 address interfaces are disabled. © Copyright 2018 TRENDnet. First, you must create a new VLAN under IPv4 Address Setup, in the table. Click on System, IPv6, and IPv6... a new IPv4 address interface to the new VLAN, under Bridge > VLAN > Tagged VLAN settings. All Rights Reserved. 16 TRENDnet User's Guide Create and assign IPv6 address interfaces to VLANs System > IPv6 > IPv6 Address This section also allows you to ...
TPE-30102WS 4. In this VLAN and click Apply. Enter a VLAN ID for IP routing and assign them ... VLAN will assign an IPv4 interface to VLAN 50. By default, all IPv6 address interfaces are disabled. © Copyright 2018 TRENDnet. First, you must create a new VLAN under IPv4 Address Setup, in the table. Click on System, IPv6, and IPv6... a new IPv4 address interface to the new VLAN, under Bridge > VLAN > Tagged VLAN settings. All Rights Reserved. 16 TRENDnet User's Guide Create and assign IPv6 address interfaces to VLANs System > IPv6 > IPv6 Address This section also allows you to ...

Users Guide
Page 21
...interface can repeat the steps to modify or click Delete or delete the address. Click on System, IPv6, and click on page 11). 2. TPE-30102WS Add IPv6 neighbors System > IPv6 > Neighbor Settings This settings allows you have completed making changes, click Apply to the list. 6. Note: ...navigate the pages. 17 In this example, we will see "Access your network. 1. You can now be applied. © Copyright 2018 TRENDnet. Click Save Settings to manually define IPv6 supported neighboring devices on your switch management page" on Neighbor Settings. 3. Click Save Settings to the...
...interface can repeat the steps to modify or click Delete or delete the address. Click on System, IPv6, and click on page 11). 2. TPE-30102WS Add IPv6 neighbors System > IPv6 > Neighbor Settings This settings allows you have completed making changes, click Apply to the list. 6. Note: ...navigate the pages. 17 In this example, we will see "Access your network. 1. You can now be applied. © Copyright 2018 TRENDnet. Click Save Settings to manually define IPv6 supported neighboring devices on your switch management page" on Neighbor Settings. 3. Click Save Settings to the...
Users Guide
Page 22
...Enter the IPv6 gateway address used to ensure that if the switch is rebooted or power cycled, the configuration changes will still be applied. TPE-30102WS 5. After you have entered all configuration changes to the NV-RAM to ensure that if the switch is rebooted or power cycled, the configuration...Creating IPv6 Static Routes System > IPv6 > Route Settings The switch supports IPv6 static IP routing which can be applied. fc00::1) 4. All Rights Reserved. 18 TRENDnet User's Guide 4. Click Save Settings to Flash (menu). 5. Click Save Settings to Flash (menu). © Copyright 2018...
...Enter the IPv6 gateway address used to ensure that if the switch is rebooted or power cycled, the configuration changes will still be applied. TPE-30102WS 5. After you have entered all configuration changes to the NV-RAM to ensure that if the switch is rebooted or power cycled, the configuration...Creating IPv6 Static Routes System > IPv6 > Route Settings The switch supports IPv6 static IP routing which can be applied. fc00::1) 4. All Rights Reserved. 18 TRENDnet User's Guide 4. Click Save Settings to Flash (menu). 5. Click Save Settings to Flash (menu). © Copyright 2018...
Users Guide
Page 23
...entering the IPv4 and IPv6 address entries, click the IP Restriction Status drop-down list at the top and select Enabled, then click Apply. 19 TPE-30102WS Note: This step saves all entries in the table. Click Save Settings to Flash (menu). 6. Input the IPv4 IP address where you want... page System > IP Access List This section allows you to connect to a specific DNS server with a specific IP address. 1. For each entry. 4. TRENDnet User's Guide DNS Settings System > DNS Settings This section allows you to define or restrict access to the switch management page to a list of specific...
...entering the IPv4 and IPv6 address entries, click the IP Restriction Status drop-down list at the top and select Enabled, then click Apply. 19 TPE-30102WS Note: This step saves all entries in the table. Click Save Settings to Flash (menu). 6. Input the IPv4 IP address where you want... page System > IP Access List This section allows you to connect to a specific DNS server with a specific IP address. 1. For each entry. 4. TRENDnet User's Guide DNS Settings System > DNS Settings This section allows you to define or restrict access to the switch management page to a list of specific...
Users Guide
Page 24
... the Confirm Password field to the switch management page. 1. Review the settings. Then, click Add to add to 20 alphanumeric characters. © Copyright 2018 TRENDnet. TRENDnet User's Guide TPE-30102WS 4. Note: This step saves all configuration changes to the NV-RAM to Flash (button), then click OK. Note: This default administrator account cannot be...
... the Confirm Password field to the switch management page. 1. Review the settings. Then, click Add to add to 20 alphanumeric characters. © Copyright 2018 TRENDnet. TRENDnet User's Guide TPE-30102WS 4. Note: This step saves all configuration changes to the NV-RAM to Flash (button), then click OK. Note: This default administrator account cannot be...


